Devices for automatically washing dirty dishes are gradually becoming a common attribute of many modern kitchens. Manufacturers of household appliances, meeting the wishes of housewives, produce washing units of various capacities and sizes.
Considering that a significant number of families are faced with a shortage of usable space in the kitchen, many companies have begun to produce dishwashing machines that can be hidden inside cabinet furniture or placed between the cabinets of a kitchen unit under the countertop.
Installing a built-in dishwasher involves a whole range of activities. This is the choice of location, connection to water supply, electricity and sewerage. You will learn how to do this yourself by reading this article.
Choosing a location for installing a built-in dishwasher
From the very beginning, it is important to determine the place where the dishwasher will be located. It is necessary to take into account the distance of the machine from communications, the method of installation and the dangerous proximity to other equipment.
Installing an Electrolux dishwasher from A to Z. Step-by-step instructions.
Distance from communications
The place where the built-in dishwasher will be located must comply with the conditions for safe operation of the unit . The machine body should not come into contact with electrical wiring, water and sewer pipes. To effectively ventilate a confined space, the back panel of the machine must be at least 50 mm away from the wall.
The socket for connection can be installed in a convenient place by extending the wiring. Wires should not be located behind or under the dishwasher. The distance from the sink should be minimal.
The closer the siphon is under the sink, the more efficient it will be to drain waste water into the drain from the dishwasher.
Embedding method
There are two solutions to this problem. The machine is hidden in one of the existing kitchen cabinets or built into a pre-prepared opening between the floor cabinets. Installing a dishwasher in the second option is directly related to the façade, which will be discussed in this article.
Dangerous neighborhood
To ensure long and trouble-free operation of the dishwasher, you need to pay attention to the advice of experts on the correct placement of the washing machine in relation to other household appliances in the kitchen. Here are 4 tips on this matter.
- Dishwashers should not be installed close to heat sources, such as radiators, ovens, gas or electric stoves. Violation of this rule leads to frequent overheating of the unit, which leads to failure of operation. For example, the distance between the machine and the oven must be at least 40 cm. If, due to cramped kitchen space, this condition cannot be met, then a slab of foil-clad polypropylene or foam plastic is laid between the appliances.
- Do not allow the washing machine to be adjacent to the washing machine. The washing machine may vibrate strongly during the spin cycle. The vibration will be transmitted to all “neighbors”, which will soon negatively affect the technical condition of the unit. Simultaneous operation of two appliances can lead to damage to the dishes inside the washing chamber.
- Proximity to a microwave oven may affect the operation of the dishwasher's electronic components. It is best if the microwave oven is located at a distance of 0.7 - 1 m from the machine. Experts recommend hanging the microwave oven on brackets rather than leaving it on the table.
- Close proximity to a refrigerator and freezer is allowed. The slight heat generation and weak vibration of these devices does not pose any threat to the dishwasher.
Connection to water supply and sewerage
Connecting the dishwasher to the water supply can be done in two ways.
The first is when you are at the stage of construction or major renovation, and you can afford to lay separate pipes, trench walls, etc.
The second is when your entire kitchen has already been installed and all finishing work has been completed. At the same time, you bought a dishwasher and you need to connect it all somewhere, to the existing water supply and sewerage system with minimal alterations and hassle.
Required tools and materials
Before you begin installing the dishwasher, you need to prepare tools and consumables.
Dishwasher Installation
Tools
To install the built-in device, you will need the following tools:
- Phillips screwdriver for adjusting the height of the legs, hanging the facade, attaching clamps, etc.;
- laser level to control the horizontal and vertical of the washing cabinet;
- pliers for fixing parts;
- wrenches for connecting the inlet hose, installing a tee and supplying water supply;
- a hammer drill with a crown for concrete and brickwork for installing sockets and hidden wiring;
- screwdriver;
- tape measure, square, marker.
Consumables
Additionally, you will need the following materials if they are not included with the machine:
- fum tape, plumbing tape, gaskets, ties;
- flexible hose with fasteners (cap nuts);
- corrugated hose with a sealing collar and a union nut with a gasket;
- siphon with a pipe for draining water from the dishwasher.
- socket with socket box.
- two-wire wire.
- RCD circuit breaker for the electric meter panel.
How to integrate a dishwasher into the kitchen: integration into the cabinet
The cabinet located next to the sink must have a width greater than 45 cm. In such a situation, there is no need to come up with complex installation diagrams; you just need to install it into the adjacent module. When purchasing products from some brands, you should be aware that they require the installation of a special siphon when connecting (for example, Electrolux devices). Videos of installing a dishwasher of this type can be easily found on the Internet.
To prepare the lower cabinet for installation, you will need to do several manipulations. First of all, you need to remove the transverse partitions (shelves) from the cabinet, and also dismantle the back wall. The bottom panel is removed only if necessary, for example, if the height of the module itself is not enough to accommodate the dishwasher. To fix the case, it will need to be positioned strictly in a vertical plane. For this, adjustable legs and a building level are used.
If you wish, you can call a specialist who will do the job professionally. However, this will come with additional costs. The cost of installing a dishwasher depends on many factors: model, location, technical difficulties, etc.
Don’t forget about the front panel, which performs a decorative function and contributes to the harmonious integration of the dishwasher into the kitchen set. The facade is usually made from a cabinet door. However, it can also be purchased separately (to order). Devices that are part of the partially integrated group do not require a decorative front panel.
To prepare the lower cabinet for installation, you will need to remove the transverse partitions and dismantle the back wall
Installing a dishwasher in a separate module
Sometimes there are situations when it is not possible to allocate free space for installing new kitchen appliances. In this case, you can place an order for a separate module that will complement the existing kitchen ensemble. However, the rules regarding its location are the same. It must be located in close proximity to water supply and sewerage.
Related article:
Built-in dishwasher: modern appliances for a comfortable life
Varieties of models according to installation method and dimensions. Functionality of compact devices. Manufacturers and prices.
Thus, it is possible to transfer equipment that was previously located near the sink into the new module, and integrate a dishwashing unit into the old one. In this case, everything will depend on the features of the installation. Built-in dishwashers must be leveled and secured. This is required to ensure that the device does not produce vibrations during operation. If you ignore the fixation of the PMM, then it will make a lot of noise and move the cabinet.
Helpful information! The hoses located behind, in the space between the rear wall of the dishwasher body and the wall, must run parallel to the surfaces. Access to them must be free so that problems do not arise if it is necessary to replace a failed element.
When connecting certain models, you must carefully read the instructions. Bosch dishwashers, as well as other devices from popular brands, are sometimes quite difficult to integrate into an old set. To avoid having to change furniture, you need to study the issue of “compatibility” at the stage of choosing a PMM.
Access to hoses supplying and removing water in a separate module must be free
If the unit is located under a common kitchen countertop, maintenance becomes more complicated. A communication problem that arises in such a situation will require dismantling the dishwasher unit.
Installation diagram
Built-in dishwashers come in full-size, narrow and mini units. Their installation diagram is shown in the lower figure.
- The dimensions of full-size machines are defined as the width, depth and height of the device body. Standard dimensions W/D/H - 598/545/818-868 mm. Such dishwashing devices are built between the floor cabinets of kitchen furniture under the countertop;
- Narrow dishwashers are compact. W/D/H - 448/570/805-870 mm. They are also inserted between the cabinets under the tabletop;
- Mini cars are conditionally classified as built-in appliances. Small devices (550/500/550 mm) are installed both inside kitchen cabinets and placed on the table.
In each specific case, the dimensions of the washing units must be clarified. Manufacturers strive to unify the dimensions of appliance housings as much as possible, based on the standard dimensions of mass-produced kitchen units.
The opening between the floor cabinets, 60 cm wide, allows you to build in a full-size model with its standard height of 87 cm. Before purchasing a dishwasher, you need to consider all of the above.
What do experts advise?
- The cabinet parameters should be measured before purchasing a PMM.
- It is better to check the adjustment of the legs with a level.
- The machine should be placed near the sink - this makes it more convenient to switch between drain and fill.
- A metal plate can be used as a vapor barrier.
- The height of the dishwasher should be equal to the height of the countertop.
- The optimal length of the drain hose for normal load on the pump is up to 2.5 m.
- Grounding will prevent electric shock.
- Equipment cannot be connected via extension cords.
It’s good when the kitchen design provides space for appliances. But most often we have to install appliances in an already equipped kitchen set. Where can I find space for a large dishwasher? After all, in addition to placement, it needs to be connected to communications. In this article we will reveal the secrets of how to install a dishwasher under the countertop with your own hands.
Embedding methods
Several installation methods can be noted - this is the installation of dishwashers:
- into furniture;
- into the body;
- into the tabletop.
To furniture
This applies to free-standing models. Dishwashers with their own lid and front panel are placed between the floor cabinets of the kitchen set.
The disadvantage of this method is the violation of the integrity of the table and the color background of the floor cabinets, which does not always have a favorable effect on the attractiveness of the kitchen interior.
Into the body
As mentioned above, mini dishwashers are installed inside cabinet furniture. They are hidden behind the doors of the floor cabinets. They can be moved to any other places in the kitchen.
Dishwasher BOSCH spv58m50ru. Installation and adjustment of water hardness.
Into the tabletop
A dishwasher placed between the cabinets under the countertop and hidden under the facade of the furniture set will not disturb the harmony of the kitchen interior with its appearance.
This method of integrating a dishwasher is considered the most effective solution for placing dishwashing units in kitchen units.
Built into furniture
So, the communications necessary to connect the dishwasher are prepared. Next, adjust the height of the unit using the legs, and to ensure that their height is the same, use a level.
Try to carry out a test wash before the product is installed, in case it turns out to be broken
Before the machine is built into the kitchen unit, you should run a test wash with detergent. This will help you figure out shortcomings in the connection, possible leaks at the joints and eliminate these minor troubles in a timely manner.
Install in the case
Provided that you purchased the equipment separately from the furniture and the dishwasher is not integrated into the set, and its installation is not the responsibility of the company that assembles and installs the furniture, then you should install the equipment yourself after assembling the kitchen cabinets.
It is better, of course, that the initial kitchen design includes a niche for a dishwasher
If the kitchen design included a niche for installing built-in appliances, this will make your task easier. And if the set has long been firmly established in your kitchen and you do not intend to change it, but you bought the dishwasher much later, you will only have to disassemble one of the cabinets.
Kitchen furniture usually has standard sizes of base cabinets, which in most cases coincide with the sizes of built-in household appliances. Therefore, in order to install the machine in a cabinet, it is necessary to dismantle the facades, remove the hinges, the back wall so that it does not interfere with the installation of hoses, and the bottom shelf. If the cabinet had drawers, then remove the drawers and unscrew the guides on which they were installed. As a result, only the side walls and the tabletop should remain.
Installation involves ordering an additional facade from a furniture company that will produce a kitchen set for you
Keep in mind that for built-in appliances you will have to order an additional façade according to the size of the unit from the furniture manufacturer.
Next, the inside of the furniture body must be covered with a vapor barrier material, since most modern furniture is made from chipboard (chipboard), which can swell and lose its shape - it does not tolerate steam and moisture entering the surface.
Another important point is the surface on which the machine will be installed. If you place it not on the floor, but on the kitchen plinth, make sure that it is level and strong enough.
It is better to install appliances at the stage of assembling the kitchen
Next, carefully and carefully, trying not to damage the cable and hoses, we push the dishwasher into its place. It is important to leave a gap for ventilation between the wall and the back of the machine of at least 5 cm.
The next step is to secure the machine so that it does not vibrate or move during operation. To do this, use the fasteners that are sold complete with the unit. Open the door of the machine and you will see plugs on the sides, remove them and, through the holes that appear, pull the machine with self-tapping screws to the adjacent sides of the cabinet, then return the plugs to their place.
Following the instructions, fix the machine inside the niche intended for it.
Insulating the tabletop
The machine is installed, now you need to hang the façade and take care of the countertop. The fact is that countertops are made from different materials, but most often from:
- stone;
- MDF;
- Chipboard.
It all depends on the wishes and financial capabilities of the customer. If the top covering of kitchen cabinets is made of natural or artificial stone, then the steam from the dishwasher will not harm it in any way.
A tabletop made of MDF - a medium-density fiberboard covered with laminated film or acrylic - is also not afraid of steam, since the material is moisture resistant.
The countertop must be insulated after installing the dishwasher.
But in the most budget-friendly kitchen options, the countertops are all made of the same chipboard of different thicknesses, and this material should be protected from steam in order to extend the life of the product. The dishwasher must come with a special metal plate designed specifically to protect the protruding edge of the countertop from moisture and steam.
We fix the facade
All that remains is to decorate the dishwasher with the facade panel. It is hung directly on the unit door and the manufacturers provide holes for self-tapping screws for installation work.
Lastly, the façade is strengthened
It is best to order the façade itself from the same manufacturer from whom the kitchen set was purchased. Or you can make it from the doors of the cabinet in which the typewriter was built.
A template on which the fastening points are marked will greatly facilitate the work of installing the façade. By the way, it should also be included with the documents for the equipment.
The facade must be hung carefully, otherwise it will fail over time.
To hang the façade correctly and neatly, use a few tips:
- The first step is to attach a handle to the facade; use the handles of neighboring cabinets as a guide;
- use a tape measure, check the positions of the door and the template to ultimately get a symmetrical, even look for your set;
- when using the template, it should be securely fastened so that it does not move;
- select the screws for fastening of the required length - they should not go out from the front side, but at the same time fit deeply and firmly into the panel.
The façade panel is fastened exclusively using self-tapping screws.
Keep in mind that the façade part is attached only to self-tapping screws. It would be a big mistake to place this decorative element on double-sided tape or glue. There are two scenarios here: either the glue will very quickly lose its adhesive properties due to the constant temperature difference, or, on the contrary, it will glue the facade very tightly, which will also not be practical, especially if you want to change the kitchen furniture sooner or later, and with it a decorative element of the sink facade.
Upon completion of the installation of the facade, close the machine door, check for gaps, if necessary, tighten all the fasteners again and you can consider the installation of the built-in dishwasher complete.
A dishwasher is an indispensable unit in any kitchen.
First start
The first start is made empty without loading dishes. This is necessary to wash off various deposits remaining after factory assembly on the surfaces inside the washing chamber. Perform the following actions:
- At the bottom of the chamber, unscrew the compartment lid;
- regenerating salt is poured into the neck to the very top;
- screw the lid back on;
- on the inner surface of the door, pour gel or place a tablet into containers, pour in rinse aid;
- on the control panel, by pressing the corresponding keys, set the degree of water hardness, select the washing mode (at the first start, set the economical program);
- press the “Start” button and close the door.
- After finishing work, the dishwasher can be loaded with dirty dishes.
Nuances of installing PMM
If you already have furniture in your kitchen, the optimal place to place the dishwasher is under the countertop. For these purposes, it is better not to choose large free-standing machines. The width of their body is from 60 cm; Large enough to fit compactly into the designated space.
The ideal option is built-in dishwashers. The width of the models does not exceed 45 cm. Most built-in PMMs are equipped with wheeled legs that are height adjustable and conveniently slide into a niche.
, Siemens, Electrolux produce not only narrow models, but also compact ones. The equipment can be installed under the sink, countertop or on the table.
Important point! You must consider the location of communications. It is recommended to place the dishwasher to the right or left of the sink.
You have decided on the choice of location. If there is a cabinet in the niche, then you just need to dismantle it, making room for equipment:
- remove the cabinet door from its hinges and set it aside;
- remove all shelves and back wall, leaving free space;
- remove the bottom panel.
If it is not possible to remove the back wall, you can make holes in the side panels to route the hoses. Many furniture manufacturers provide niches for dishwashers in advance, so they are slightly larger in size than the appliance itself.
Built-in machines are equipped with special fasteners. Therefore, there will be no difficulties with how to secure the equipment in a niche.
Installation tips and tricks
When installing a dishwasher, experts recommend following several tips:
- Before starting work, carefully study the instructions and follow all of its steps step by step;
- Use hardware (screws, washers and nuts) only from stainless steel;
- Avoid dangerous proximity to large household appliances;
- Pre-fit the machine to the niche under the tabletop;
- All connections to communications must be checked for strength and tightness before starting the dishwasher for the first time;
- If the electrical network suffers from sudden voltage changes, you need to connect a stabilizer.
Preliminary work before installation of PMM
There are two options for installing a dishwasher: yourself and with the help of specialists. In the first case, you risk connecting the car incorrectly; in the second, you will have to part with part of the family budget.
Sometimes the skills of one craftsman are not enough; you have to call a team of specialists: a furniture assembler, a plumber and an electrician.
Installation services for built-in equipment are offered by companies that sell them. For a certain fee, a universal master comes at the appointed time, carries out all the connection work and checks the serviceability of the machine.
However, if you carefully study the installation instructions, think about connecting hoses, find or install an additional outlet, you can save money and acquire new skills by doing everything yourself.
Choosing a location based on size
An important step is choosing a location for installation . For the built-in model, furniture modules of the first level are suitable, that is, cabinets standing on the floor.
But if you like a compact mini-dishwasher, then its installation is a little easier - such equipment can be inserted at waist or chest level (for ease of maintenance).
There are several conditions for choosing a good location. If they are not followed, you may later encounter problems with water supply/discharge or PMM maintenance.
Image gallery
Photo from
Built-in dishwasher next to the sink
Separate grounded socket for dishwasher
Suitable cabinet for dishwasher dimensions
Dishwasher Maintenance
Many installation difficulties arise when a dishwasher is integrated into an already installed kitchen set. You have to adjust cabinets to fit, and sometimes dismantle and remodel some of the furniture.
We recommend that you take care of the installation location before purchasing furniture. This also applies to other household appliances that require integration. Usually, the models you like are first selected, and when drawing up a sketch of the headset, their location and exact dimensions are taken into account. We have provided recommendations for choosing a built-in dishwasher in this material.
Preparation of tools and materials
Manufacturers of built-in PMMs sometimes list in the instructions what tools may be useful during the installation process. However, they expect that preliminary work has already been done.
If measures are required to lay a power line or tap into a pipe, the list of necessary items will increase.
To be on the safe side and save time, you should stock up on the following tools:
- hammer drill or powerful drill;
- adjustable wrench;
- hammer;
- a set of screwdrivers, including flat and Phillips;
- chisel;
- pliers;
- laser level;
- tape measure, square, pencil;
- screwdriver
In addition to tools, you will need connection parts. It is not recommended to use used elements - this will reduce their service life.
To install a socket, you need to buy the electrical installation product itself, a socket box for it, a three-core copper cable, and an additional automatic protective device.
There are special requirements for the socket: it must be of a “European” type, with grounding, preferably protected from moisture, fully operational, without damage
To connect water, you will need a metal tee for inserting into the water supply system, fum tape, a tap for shutting off water, rubber gaskets, clamps or ties for fastenings.
If the siphon is not provided for connecting another drain hose, then it will also have to be changed.
If the voltage in the network often fails, we recommend purchasing a stabilizer. It can be installed on several devices at once.
Installation by a wizard
Not everyone can handle installing a dishwasher with their own hands. Therefore, it is better to call a specialist with experience working with built-in household appliances.
Masters will professionally perform the following work:
- They will securely secure the household appliance in a cabinet niche or install it in the right place,
- Extend plumbing pipes
- They will lay hidden wiring from the electric meter to the car,
- Install a circuit breaker (RCD),
- They will install a separate outlet,
- They will check the car in test mode.
The final cost of installing a built-in dishwasher is determined after a specialist inspects the installation site of the unit. Based on information collected on the Internet, average prices can be presented in the following table.
| Type of work | Cost, rub. |
| Standard dishwasher installation | 2000 |
| Finishing of plumbing communications | 1000 |
| Built-in under the countertop | 2000 |
| Electrical connection | 2000 |
| Facade canopy | 800 |
| Test run with refilling detergents | 1200 |
| Call the master | 300 |
How to install a dishwasher: checking the contents and unpacking
Preparing for installation of a dishwasher includes two more stages, in addition to choosing a location: unpacking and checking the contents. It is recommended that unpacking be carried out in the presence of employees of the company from which the unit was purchased. This is necessary in order to check the presence of all parts necessary for installation. If there is a problem with the packaging, then you must inform the company’s employees about it.
Note! You also need to check the availability of instructions (necessarily in Russian). Without it, it is much more difficult to independently understand the design features of a particular model.
If necessary, you can try looking for installation instructions on the company's website. Many well-known brands add them to the product description (for example, Bosch). Dishwasher instructions are very important, so don't ignore this point.
When checking the package, you need to pay attention to the presence of instructions in Russian
In addition to the dishwasher itself, the kit often includes parts that are necessary for the correct installation of decorative trims. It is also necessary to check the presence of retaining elements, a rubber apron used for protection, and gaskets with hoses. The latter are needed when connecting the device.
Basic parameters for choosing a built-in dishwasher
The main parameters of a built-in dishwasher include the following:
- kinds;
- dimensions;
- capacity;
- power;
- Class;
- energy efficiency.
Kinds
Dishwashers vary in how they are installed. They can be divided into two types - free-standing and built-in models. The first ones have their own façade and countertop. The latter come in fully built-in and partially built-in dishwashers.
Dimensions
These are the width, depth and height of the machines (W/D/H). The dimensions of full-size models are in the range of 598/545/818-868 mm, narrow units - 448/570/805-870 mm, compact mini machines - 550/500/550 mm.
Capacity
The load is determined by the number of sets of kitchen utensils and cutlery. Dishwashers are divided into 4 groups based on performance, processing the number of sets of dishes in 1 washing session:
1 – from 3 to 8.
2 – from 8 to 12.
3 - from 12 to 15.
4 – from 15 to 18.
Power
Based on power, washing machines are divided into 3 classes of energy consumption per dishwashing session:
- A class – from 0.8 to 1.04 kWh;
- In class - from 1.05 to 1.1 kWh;
- C class – from 1.1 to 1.5 kWh.
Energy efficiency and labeling
Electricity consumption is an important parameter and is determined by such an indicator as energy efficiency. The manufacturer notes the energy efficiency class on a sticker that is affixed to the front panel of the machine.
Classes are marked with Latin letters A, B, C, D, E, F, G. Since 2010, “+” signs have been added to the letters. The more there are, the more economical the model is in terms of electricity and water consumption.
These are followed by less significant parameters - drying class and methods, noise level, weight, washing modes, control methods. They, as a rule, have an insignificant influence on the choice of model.
Part 12. Installation, installation of a built-in BOSCH dishwasher. #kitchenofmydream
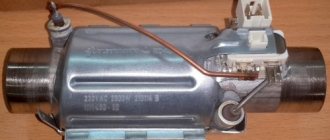
Stages of connecting communications
When connecting the dishwasher, it is necessary to prepare an electrical line suitable for the power characteristics.
And also provide a connection point for the hose with the cold water pipe (or mixer outlet), and a hole for the drain hose - it is better not directly into the pipe, but into the siphon, which is located under the sink.
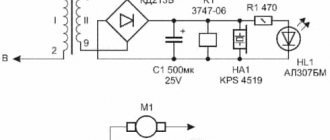
Stage #1 - electrical wiring
To ensure that a dishwasher or other household appliance does not experience interruptions or emergency problems with the power supply, it is necessary to take care of the stability and safety of the entire line, which begins in the electrical panel and ends with the outlet.
The following construction and installation activities may be required:
- Grooving walls for internal electrical wiring. “Rough” work of this type is carried out using a wall chaser or hammer drill even before installing the kitchen unit.
- Installation of a circuit breaker in an electrical panel with a rating of 16A, class “C”. For each powerful unit - boiler, washing machine, dishwasher - it is better to install a separate protective device.
- Laying a three-core copper wire from the electrical panel to the location of the outlet. One of the options is VVGng 3*2.5. This is a non-flammable wire that can withstand loads of up to 3.5 kW.
- Installation of a socket box into the wall and output of wires.
- Installing a socket , connecting a cable.
After connecting, be sure to test - turn on the machine, and then use any household appliance to test.
You can do the work of cutting and laying the cable, as well as installing the socket yourself, but to install the machine in the panel you will have to invite an electrician from the management company or another service organization
Instead of one socket, it is allowed to install a block of 2-4 sockets, but so that the total load of all electrical appliances connected to the line corresponds to two important indicators: the cross-section of the VVGng copper cable and the rating of the machine.
Stage #2 - insertion into the water supply system
Connecting the cold water supply is a little more complicated than connecting the drain hose.
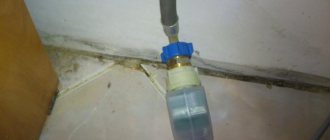
A tee should be installed at the outlet of the pipe or at the connection point of the mixer so that water flows simultaneously in two directions - to the dishwasher and the sink faucet.
There is no point in installing two separate parts - a tee and a tap, when there are tees specially designed for dishwashers or washing machines with the ability to cut off water.
If you only need to connect the dishwasher inlet hose, the procedure is as follows:
- We turn off the water and relieve excess pressure by opening any water-folding mixer.
- Unscrew the flexible faucet connection from the water pipe or adapter.
- To make the connection tight, screw fum tape or flax with Unipak paste onto the thread.
- We mount the tee so that the tap is in a comfortable position.
- Attach the flexible mixer hose. If the old gasket is worn out, replace it immediately.
- We check the operation of the tap: turn it off and open the water supply to the kitchen. If a leak appears, tighten the threaded connections or replace the defective product.
- Attach the drain hose by tightening the union nuts. Before doing this, check that the o-rings are in place.
It is important that the water supply hose is not twisted or kinked, otherwise the dishwashing process will be difficult.
Dishwasher hoses are equipped with Aquastop devices with solenoid valves that prevent leaks. These are large devices, so before connecting you must ensure there is free space to accommodate them
If preparations for connection are made in advance, and you plan to install several household appliances that require water, then it is better to use a collector rather than a tee.
The distributing device (collector) has from 3 to 5 outputs. This is enough to ensure water intake for the PMM, washing machine, water heating boiler and filters.
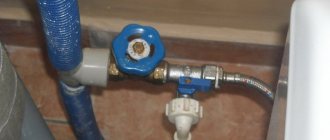
Stage #3 - drain device
There are several options for integrating a drain hose into a sewer system.
The most successful is to connect the outlet end to the siphon pipe, which is installed under the sink.
An economical and easy way to drain. The hose is connected to the outlet pipe of the sink siphon using a plastic corner adapter and a metal clamp
Not all siphon models are suitable for additional PMM connection. If the water seal is not intended for this, it may be possible to expand it with a separate element with a pipe.
However, the cost of the products is low, so it is better to buy a new device, initially designed for the additional connection of a washing machine or dishwasher.
Plastic siphons have a simple collapsible design and are equipped with clear instructions, so installing the product and connecting the hose from the PMM will not be difficult
Due to the fact that the water first flows into the siphon, sewer odors from biological waste drains will not spread throughout the entire apartment.
For this reason, it is not recommended to discharge the drain directly, without a water seal or at least a loop, into a sewer pipe.
How to remove and disassemble the door: list of works
If the door still does not lock, and the adjustment does not produce results, then repair is required. There is nothing complicated in the work:
- open the door all the way, hold it by pressing it with your knee;
- Unscrew the screws located around the perimeter of the end or on the inside;
- disassemble the door - it is designed like a sandwich, it has two halves, between which there is a closing mechanism; by removing the inside, you will see it;
- loosen the spring so that the machine does not slam shut;
- remove the cover from the cable;
- dismantle the standard locking device and install a new original part.
After installing a new blocker, do not rush to assemble the equipment. Holding the cable and spring, check how well the hopper closes and opens, and whether the flap is held in the open position. Only after making sure that everything is functioning correctly can you put the case back together.