Electrical circuit diagram of the Vyatka washing machine motor
Low prices.
Since we cooperate only with PRIVATE contractors, the contractors carry out repairs on the day of the order, since they live in your area
In 90% of cases, the Contractor announces the final cost of his work over the phone
The price will not be inflated, because we will select 3 performers for you for free and you will choose the most suitable one
- Call a technician and diagnose for free (in case of repair)
- We serve all areas!
- Repair warranty up to 2 years!
- Same day repairs!
- home
- Services
- Repair of washing machines
- Washing machine repair Vyatka
Blog about electronics
My washing machine died here. Vyatka Automatic 16, if anyone still remembers this coffin. It worked great for about 16 years, but then it jammed. Judging by the symptoms, the command apparatus was covered.
If anyone doesn’t know, the command apparatus is the great-great-grandfather of microcontrollers. A small motor turns a shaft with protrusions through a gearbox, and it closes or opens the contacts. Electromechanical barrel organ.
The system is reliable, solid, but not eternal - the contact groups in the barrel organ died, the washing melody was interrupted. I googled and dug up a cyclogram of the washing program for Vyatka-16, where it was literally written second by second when and which contact was closed. Well, where did ours go?
Vyatka automatic engine connection diagram
Washing machines, over time, fail or become obsolete. As a rule, the basis of any washing machine is its electric motor, which can be used even after disassembling the washing machine for spare parts.
The power of such engines, as a rule, is not less than 200 W, and sometimes much more; the shaft speed can reach up to 11,000 rpm, which may well be suitable for using such an engine for household or small industrial needs.
Here are just a few ideas for the successful use of an electric motor from a washing machine:
- A sharpening (“emery”) machine for sharpening knives and small household and garden tools. The engine is installed on a solid base, and a whetstone or emery wheel is attached to the shaft.
- Vibrating table for the production of decorative tiles, paving slabs or other concrete products where it is necessary to compact the solution and remove air bubbles from it. Or perhaps you are engaged in the production of silicone molds, for this you also need a vibrating table.
- Vibrator for concrete shrinkage. Homemade designs, which are abundant on the Internet, can easily be implemented using a small motor from a washing machine.
- Concrete mixer. Such an engine is quite suitable for a small concrete mixer. After a little modification, you can use a standard tank from a washing machine.
- Hand construction mixer. Using this mixer you can mix plaster mixtures, tile adhesive, and concrete.
- Lawnmower. An excellent option in terms of power and size for a lawn mower on wheels. Any ready-made platform on 4 wheels with a motor mounted in the center with direct drive to the “knives” that will be located below will do. The height of the lawn can be adjusted by planting, for example by raising or lowering the wheels on hinges in relation to the main platform.
- Mill for grinding grass and hay or grain. This is especially true for farmers and people raising poultry and other livestock. You can also prepare feed for the winter.
There can be many options for using an electric motor; the essence of the process lies in the ability to rotate various mechanisms and devices at high speeds. But no matter what mechanism you are going to design, you still need to correctly connect the motor from the washing machine.
Types of engines
Washing machines of different generations and countries of production may have different types of electric motors. Typically this is one of three options:
Asynchronous
.
Basically, these are all three-phase motors, they can also be two-phase, but this is very rare. Such engines are simple in their design and maintenance; basically it all comes down to lubrication of the bearings. The disadvantage is the large weight and dimensions with low efficiency. Such motors are found in older, low-power and inexpensive models of washing machines. Collector.
Motors that replaced large and heavy asynchronous devices. Such a motor can operate on either AC or DC power; in practice, it will even rotate from a 12-volt car battery. The motor can rotate in the direction we need; to do this, we just need to change the polarity of connecting the brushes to the stator windings. High rotation speed, smooth change in speed by changing the applied voltage, small size and large starting torque are just a small part of the advantages of this type of motor. Disadvantages include wear of the collector drum and brushes and increased heating during short-term operation. More frequent maintenance is also necessary, such as commutator cleaning and brush replacement.
Inverter (brushless)
An innovative type of motor with direct drive and small dimensions with fairly low power and high efficiency. The engine design still contains a stator and a rotor, but the number of connecting elements is reduced to a minimum. The absence of elements subject to rapid wear, as well as low noise levels. Such motors are found in the latest models of washing machines and their production requires relatively more costs and effort, which of course affects the price.
Connection diagrams
Motor type with starting winding (old/cheap washing machines)
First you need a tester or multimeter. You need to find two pairs of pins corresponding to each other. Using the tester's probes, in continuity or resistance mode, you need to find two wires that are connected to each other, the remaining two wires will automatically be a pair of the second winding.
Next we need to figure out where we have the starting winding and where the working winding is. You need to measure their resistance: a higher resistance will indicate the starting winding (PO)
, which creates the initial torque. A lower resistance will indicate to us the field winding (OB) or, in other words, the working winding that creates a magnetic field of rotation.
Instead of the “SB” contactor, there can be a low-capacity non-polar capacitor (about 2-4 µF) This is how it is arranged in the washing machine itself for convenience.
If the engine starts without a load, that is, does not wake up a pulley with a load on its shaft at the moment of starting, then such an engine can start itself, without a capacitor and short-term “powering” of the starting winding.
If the engine overheats greatly
or it heats up even without load for a short time, then there may be several reasons. Perhaps the bearings are worn out or the gap between the stator and rotor has decreased, causing them to touch each other. But most often the cause may be a high capacitance of the capacitor; it’s easy to check - let the engine run with the starting capacitor disconnected and everything will immediately become clear. If necessary, it is better to reduce the capacitance of the capacitor to the minimum at which it copes with starting the electric motor.
In the button, the “SB” contact must strictly not be fixed; you can simply use the doorbell button, otherwise the starting winding may burn out.
At the moment of startup, the “SB” button is pressed until the shaft spins up completely (1-2 seconds), then the button is released and voltage is not supplied to the starting winding. If reverse is necessary, you need to change the winding contacts.
Sometimes such a motor may have not four, but three wires at the output, in which case two windings are already connected at the midpoint to each other, as shown in the diagram. In any case, when disassembling the old washing machine, you can take a closer look at how its motor was connected to it.
When there is a need to implement reverse
or change the direction of rotation of the motor with the starting winding, you can connect according to the following diagram:
MANUAL
GENERAL INSTRUCTIONS
1.1.
Automatic household washing machine type SMA-4FB model “Vyatka-automatic-16”, hereinafter referred to as “machine”, designed for washing, rinsing and spinning laundry from all types of fabrics using low-foaming synthetic detergents. 1.2. The machine performs bluing, starching, bleaching, aromatization and antistatic treatment of linen, hereinafter referred to as “special treatments”, by introducing the appropriate agents into the dispenser.
1.3. The machine operates from a hot and cold water supply network, hereinafter referred to as “mixed water supply”, or only from a cold water supply network with full or partial heating of the washing solution.
1.4. The machine is intended for operation only during the daytime (from 7 a.m. to 11 p.m.).
1.5. The main advantage of the machine is the complete automation of washing modes, including preliminary and main washes, rinsing, special treatment and spinning.
1.6. To save water, electricity and detergent consumption, economical and energy-saving washing modes are provided.
1.7. The machine must be connected to a 220V electrical network using a two-pole plug with a grounding contact.
1.8. Machine models differ in design.
Symbol of the machine.
To reduce the consumption of electricity, water and detergents in the machine, an “economical tank” in Fig. Figure 2 shows the levels of water filled in a regular tank and an “economical” one. When using an “economical” tank in a machine, the indicators “WASHABILITY, RINSEABILITY, LOSS OF STRENGTH” comply with the requirements of the State standard.
An example of the designation of a machine of the “Vyatka-automatic-16” model, operating from a hot and cold water supply network, having a drum rotation speed during spinning of 500 rpm and an enameled tank: “Vyatka-automatic-16” BA160500
1.9. The general view of the machine is shown in Fig. 1
Machine with conventional pump filter
Machine with front bottom panel
Rice. 1
General view of the car.
Rice. 2
Water filling level in tanks of various designs
TECHNICAL DATA
Attention to buyers!
The washing machine “VYATKA-AUTOMAT-16” has a certificate of compliance with safety requirements in accordance with GOST 27570.4-87, GOST 8051-83, TU1-01-0867-89 No. GOST R. RU .0035.1.2.0019 dated 03.31.94.
- modern design
- new tank design provides savings: - water by 30% - electricity by 15%
- operates from a single-phase alternating current network with a voltage of 220V
- a permanent connection to the water supply network is provided
- fully automatic laundry washing process
- program switch for any type of laundry
- spin off mode
- energy-saving washing mode (limiting the heating of the washing solution to 60C)
- economical washing mode
- visual indication of machine operating mode and heater operation
- removable pump filter
To ensure electrical safety, the machine must be grounded!
Refinement of the electrical and water supply networks, if necessary, should be carried out by a specialized organization, the address of which you can find out in the store.
All movements and transportation should be carried out with the tank secured (Appendix 2). In case of non-compliance with the requirements for fastening and packaging of the machine, claims regarding the operation of the machine will NOT be accepted by the manufacturer.
If the machine is brought from the street into a heated room in winter, then before turning it on, it must be allowed to warm up to room temperature for 2 hours.
The design of the machine is constantly being improved, so there may be some discrepancies between the design of the machine and the operating instructions, which do not affect the technical data.
CONTENTS OF DELIVERY.
Note.
The data in parentheses is for machine models operating only from a cold water supply network.
SAFETY REQUIREMENTS.
Safety during operation of the machine is ensured by the design of the machine, correct connection to the electrical network and proper grounding, as well as your correct actions.
Monitoring the correct connection of the machine to the electrical network and proper grounding is carried out by specialized organizations, the address of which you can find in the store.
PROHIBITED:
- carry out any maintenance work with the machine turned on;
- operate the machine with the top and rear covers removed;
- operate the machine with a damaged power cord or in case of a grounding fault;
- turn on the machine in an inclined position;
- wash laundry soaked in substances capable of releasing flammable, explosive or toxic vapors;
- carry out adjustment and adjustment of components, installation and repair of machines and electrical equipment by persons who have not undergone special training.
IT IS STRICTLY PROHIBITED:
- install sockets in toilets, bathrooms and combined bathrooms;
- ground the machine body through heating, water supply and sewerage equipment.
PREPARATION FOR WORK.
5.1. Installation work.
5.1.1. The machine is connected to the electrical network using a two-pole plug with a grounding contact (Fig. 4). If your apartment does not have a two-pole socket with a grounding contact, it must be installed. The socket is included with the machine.
If the electrical wiring in the apartment where the machine is installed has an aluminum wire cross-section of 2.5 sq. mm (copper 1.5 sq. mm), then when installing an outlet it is allowed to use this wiring with a grounding wire of the same cross-section.
5.1.2. If necessary, in addition to modifying the electrical wiring (laying a grounding wire), install a new protective device and an apartment electric meter for a current of at least 15 A on the floor panel.
5.1.3. The machine is connected to the water supply network permanently (Fig. 4) with the installation of separate valves or taps for cold and hot water, with the ability to connect inlet hoses to them, using a connecting nut with a G ¾ -B thread (3/4 pipe).
5.1.4. Refinement of the intra-apartment electrical and water supply network at the request of citizens who bought cars should be carried out by specialized organizations in accordance with the recommendations of this manual and in accordance with the “Temporary rules for the installation and connection of electrical household machines and appliances with a power of 1.3 to 4 kW in public housing and housing cooperative buildings."
You can obtain the address of a specialized organization for machine maintenance and repair in the store.
5.2. Machine installation.
ATTENTION!
Due to the fact that the machine is a complex product, improper installation of the ACS may result in an accident or accident. Installation and testing of the operation of the machine is carried out only by specialists from companies that provide warranty service for household appliances.
5.2.1. Remove packaging.
5.2.2. Open the hatch by moving the stopper with the sign on the hatch handle to the left, i.e. to the center of the hatch, and pull the lever towards you (Fig. 1).
Remove components and documentation from the machine tank. Close the hatch smoothly (until it clicks).
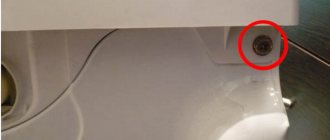
5.2.3. Remove the parts securing the tank when transporting the machine. In this case, it is recommended to follow the following sequence (Fig. 3): unscrew the screws 7 securing the rear panel 8, remove the panel, unscrew the nuts 11, remove the bushings 14 located on the screws 15 between the housing wall and the tank and screws 15.
Unscrew the screws 5 and remove the rod 3 together with the bracket 4, install the rear panel 8 in its original position, securing it with screws 7.
Rice. 3
Dismantling transport parts.
WE REPAIR “VYATKA-AUTOMAT”
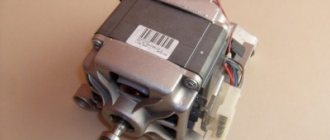
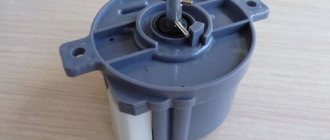
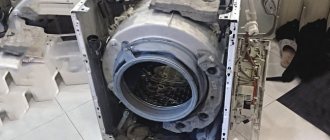
One of the most common reasons leading to the failure of the Vyatka-automatic washing machine is the failure of the electric motor winding (EM) in the control device drive. In repair shops, such a malfunction is usually eliminated by replacement. Moreover, they prefer to deal not with updating a burnt-out cheap winding or even with a “moody” electric motor, but with an expensive command apparatus (CA), in which all this is located as a “monolith” that cannot be disassembled.
A complex unit is replaced entirely, and no one cares about the client’s financial expenses. It is not surprising that the owner of a damaged washing machine strives to repair it on his own, regardless of time or lack of experience.
But L1, which only needs to be rewound, is nothing more than a coil (Fig. 1a) of a multi-pole electromagnet mounted on an axis and which is the rotor of an electric motor. You should also take into account other factors that complicate repairs. In particular, the fact that there is a gear at the end of the rotor. Of course, the ED also has a stator - a unique, stamped one. The electric motor is attached to the command device (Fig. 1b) with three pins that fit into holes in the spacecraft body and are slightly flared on the back side.
Rice. 1. The coil (a) burns out, but the workshop does not repair it, but prefers to replace the entire complex and expensive “monolith” (b) with a new command device with an electric motor included in it:
1 - coil frame; 2 - winding; 3 — output (2 pcs.); 4 - electric motor; 5 — command apparatus body; 6 — axis of the program selection knob; dimensions d, D and H - in accordance with the specific model of the washing machine
When disassembling this unit, it is necessary to ensure that the current-carrying conductors are not disconnected from the terminals. This precaution is dictated not only and not so much by the troublesomeness of restoring accidentally opened contacts, but by the difficulty of finding the disconnected terminals themselves.
Before removing the ED housing, it is advisable to apply control marks on it and on the spacecraft body, which will subsequently allow the entire structure to be correctly assembled with a new L1 wound independently. By inserting a screwdriver into the gap between the disconnected units and lightly pressing it, you can separate the motor from the control device and remove the burnt out winding. But this must be done carefully so as not to lose the overrunning clutch - a small plastic part located between the ED housing and the armature.
How to change the fin punch?
We have already said that the rib punch is a part in the SMA necessary for shaking and distributing the laundry. They are made of plastic. Replacement procedure:
- Arm yourself with a wire or spring. Choose harder.
- Bend the end of the wire to create a hook.
- Insert the wire into one of the holes in the rib punch, press and pull towards you. The rib punch, secured with a latch, will be removed.
- Take the purchased spare part and put it on - this is done without tools. First, the part is brought up a little, and then put on the hooks.
- The hooks are tightened. This is done with an awl threaded through the holes.
Main components of a washing machine
This information will be useful before using the machine. Let's list the external elements of our washing machine with which users will always be in contact, and briefly describe them.
Hatch door
The purpose of the door is to isolate the water in the drum so that it does not spill out of it. When you close the door, check the hatch seal; the door may not close. When opening the hatch door, be careful with the handle - it is not very strong and may break if handled carelessly. The hatch door is closed using a locking mechanism.
Powder tray
Or another name - powder receiver. This is a special retractable compartment in the body of the machine into which powder or detergent is poured. In addition to the powder receptacle, detergent can also be poured into the drum.
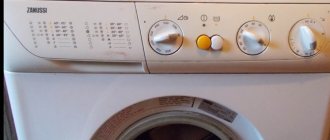
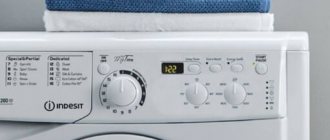
Control Panel
Many users find it difficult to understand the control panel of the washing machine. There is nothing difficult about this, just try a few times. The control panel elements are buttons and knobs.
Program selection knob
On the right side of the panel there is a knob that selects the washing mode. Here you can select the program you need from the list provided by simply turning the knob to the desired value.
Temperature control knob
You can adjust the water heating using the appropriate knob.
Buttons
After the handles there are 4 buttons, each of which performs different functions.
- To turn off the spin press the first button.
- Using the second button you can turn on the half load mode.
- Want to stop washing? Pause it using the third button.
- The fourth is needed to turn the washing machine on and off.
Indicator lights
There are only two of them. One light will notify us that the machine is turned on, and the second will indicate that heating is in progress.
Classification
During the Soviet era, almost every family had small washing machines, but now they have “moved” to dachas - here it is convenient to use simple and lightweight devices, especially if there is no centralized water supply. Repairing such equipment is irrational and expensive. This is if you contact a specialist, but trying to fix it yourself is a worthwhile task.
There are two types of activator SMs: with a vertical and horizontal arrangement of the ribbed disk. The first include the Samara and Desna washing machines. The second category includes such models as “Mini-Vyatka”, “Fairy”, “Baby”. In semi-automatic machines with a spin tank, the circle is placed in a horizontal plane. Disassembling each option has certain nuances.
How much does the repair cost?
The final cost of repair depends on the type of damage. It will become known after diagnosis by a specialist. Now you can roughly estimate the upcoming costs using the price list below. For your convenience, prices are presented in two ways - in the form of names of work and depending on the symptoms of the breakdown.
| Symptoms of a problem | Repair time | Price ** |
| Expert visit and diagnostics* | 5-10 minutes | 0 rub.* |
| Doesn't drain | from 20 minutes | from 1000 rub. |
| Doesn't heat up | 30-60 minutes | from 1800 rub. |
| The lights are on | from 20 minutes | from 1300 rub. |
| Won't start washing | from 20 minutes | from 1400 rub |
| The drum does not rotate | from 40 minutes | from 1100 rub. |
| No water fill | from 30 minutes | from 1200 rub |
| It rattles and creaks | from 40 minutes | from 1500 rub. |
| Vibrates strongly | from 40 minutes | from 1600 rub. |
| Knocks out plugs when washing or turning on | 30-60 minutes | from 1800 rub. |
| Water flows | from 30 minutes | from 1200 rub. |
| No spin | from 40 minutes | from 1100 rub. |
| Doesn't open after washing | from 30 minutes | from 1700 rub. |
| The hatch door does not close | from 30 minutes | from 1700 rub. |
| Doesn't rinse clothes | from 30 minutes | from 1900 rub. |
| Name of works | Repair time | Price ** |
| Specialist visit and diagnostics* | 5-10 minutes | 0 rub.* |
| Replacing a button on the control panel | 30 - 50 minutes | from 1400 rub. |
| Hatch handle - replacement | 30 - 50 minutes | from 1600 rub. |
| Replacing the water level sensor | 30 - 60 minutes | from 1700 rub. |
| Pressostat repair | 15 – 40 minutes | from 1100 rub. |
| Replacing the water supply valve | 30 - 50 minutes | from 1600 rub. |
| Drive belt - replacement | 15 – 40 minutes | from 1100 rub. |
| Replacing the drain hose | 30 - 50 minutes | from 1400 rub. |
| Replacing the pump | 40 – 70 minutes | from 1900 rub. |
| Replacing the heating element | 30 - 60 minutes | from 1800 rub. |
| Removing foreign objects from the tank | 30 – 80 minutes | from 1500 rub. |
| Replacing the hatch locking device | 30 - 60 minutes | from 1700 rub. |
| Replacing motor brushes | 30 – 80 minutes | from 1400 rub. |
| Replacing the cuff | 40 – 80 minutes | from 1900 rub. |
| Bearing replacement | 60 – 180 minutes | from 3000 rub. |
| Replacing the control board | 30 – 70 minutes | from 2200 rub. |
| Control module repair | 40 – 80 minutes | from 2300 rub. |
| Electric motor replacement | 40 – 80 minutes | from 2300 rub. |
| Replacing shock absorbers | 40 – 80 minutes | from 1600 rub. |
| Tank replacement | 60 – 180 minutes | from 3700 rub. |
| Replacing the temperature sensor | 30 - 60 minutes | from 1200 rub. |
* In case of refusal of repair, you must pay 400 rubles. for a technician’s visit and diagnostics
** The price includes ONLY WORK on repair or replacement of parts, spare parts are paid separately
How to replace the activator with your own hands?
The procedure for disassembling and replacing depends on the type of design of the washing machine. We will learn how to repair and disassemble washing machines with broken parts. Let's consider different options.
How to disassemble SM-1?
The SM-1 category includes washing machines of the Malyutka, Samara, and Otrada brands. There are few elements, they consist of a tank, a housing, a cover, an electric motor, a thermal relay, a capacitor, and an activator. Unlike SMA, the activator versions do not have a drum.
The activator is replaced after disassembling the machine. To implement the plan, you will need a key to unscrew the circle. You'll have to make it yourself. Suppose you need to disassemble the “Malyutka”. You will need a piece of ordinary metal pipe used for plumbing. Its length should be 15 cm greater than the diameter of the element being unscrewed. Procedure:
- The pipe is drilled. Drill diameter - 6 mm. Drill two holes. Interval - 9.5 cm. Location - equidistant from the middle of the pipe. After inserting the bolts into the holes, tighten them using suitable nuts. The bolts should protrude about a centimeter.
Main components of a washing machine
This information will be useful before using the machine. Let's list the external elements of our washing machine with which users will always be in contact, and briefly describe them.
Hatch door
The purpose of the door is to isolate the water in the drum so that it does not spill out of it. When you close the door, check the hatch seal; the door may not close. When opening the hatch door, be careful with the handle - it is not very strong and may break if handled carelessly. The hatch door is closed using a locking mechanism.
Powder tray
Or another name - powder receiver. This is a special retractable compartment in the body of the machine into which powder or detergent is poured. In addition to the powder receptacle, detergent can also be poured into the drum.
Control Panel
Many users find it difficult to understand the control panel of the washing machine. There is nothing difficult about this, just try a few times. The control panel elements are buttons and knobs.
Program selection knob
On the right side of the panel there is a knob that selects the washing mode. Here you can select the program you need from the list provided by simply turning the knob to the desired value.
Temperature control knob
You can adjust the water heating using the appropriate knob.
Buttons
After the handles there are 4 buttons, each of which performs different functions.
- To turn off the spin press the first button.
- Using the second button you can turn on the half load mode.
- Want to stop washing? Pause it using the third button.
- The fourth is needed to turn the washing machine on and off.
Possible connection problems and their elimination
If all the wires are connected correctly, but the washing machine motor turns off after a few minutes of starting, overheating may be the cause. To identify a heating part, you need to run the engine for one minute. During this time, only the problem area will have time to heat up. This way you can understand that the bearing assembly, stator or other part has failed. In this case, it is not necessary to change the bearings; perhaps they are simply clogged, or there is not enough lubrication. If the cause of the motor shutdown is the capacitor, then it should be replaced with a device with a lower capacity.
When all parts have been replaced, you need to run the engine for 5 minutes and check its heating. Then the procedure should be repeated two more times, and only after this can you be sure that the electric motor is working.
Important! Sometimes an induction motor can run too slowly. One of the reasons is a short or break in the winding. In any case, such a motor is not suitable for further use.
Having understood the intricacies of connecting the motor from an old washing machine, you can make your life easier and save your budget by making several universal tools. If all faults in the engine are corrected in a timely manner, it will last for several more years. The main thing is to follow safety precautions when working with electricity.
Making the installation
The final stage of making emery is to secure it on a flat surface, such as a workbench or carpenter's table. You can screw the sandpaper to an old, stable stool. On the motor housing of the washing machine there are fasteners with holes. Just before screwing it onto the surface of a table or stool, they place a metal sheet, which also needs to be secured.
For safety reasons, you can attach a metal arc over the sanding disc, which will protect against particles flying during work. In addition, be sure to wear safety glasses when working with sandpaper.
Thus, it is not difficult to make emery from a washing machine motor with your own hands, be patient, read the tips carefully, and watch the video. In addition to emery, you can use the engine and other parts of the machine to make a homemade wind generator, concrete mixer and other useful household items. This is described in the article What to make from an old washing machine.
The device of the emery and its purpose
Emery is a useful thing in the household. They are very convenient for sharpening metal knives, scissors, drills, shovels and other tools. You can buy a similar device in stores; there is a wide selection. However, the price may force you to refuse such an acquisition. Therefore, you can try to make emery with your own hands from the engine of an old washing machine.
To carry out such work, you need to have a good understanding of how emery works and what parts it consists of. The simplest version of emery has:
- engine;
- bushing;
- flange;
- starting device;
- emery wheel;
- protective casing;
- electrical cable and plug;
- support.
Of all the parts listed, you will need to purchase a high-quality sanding wheel. All other details can be made with your own hands, this will be discussed further.
Electric motor for wood splitter
The basis of the design, as in a lathe, is the bed. It is made of a metal profile or square. The resulting site will consist of two zones - power and working. The power side is intended for installation of an electric motor. It must be securely fastened, since the main load falls on it.
The engine control unit is located in the same area. A dielectric plate is provided to accommodate the electrical components, and they themselves should, if possible, be placed in a plastic housing. The work area is made in the form of a table. The material used is steel sheet, 2-3 mm thick. At the boundary that conventionally separates both zones, a pedestal is mounted on which the shaft of the splitting cone is fixed. This part must not be mounted directly on the motor shaft.
The cone shaft is equipped with its own bearing support. In order to compensate for jerks and create torque, it is recommended to install a flywheel on the shaft.