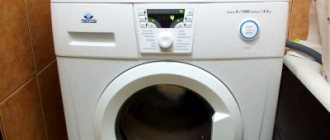
Electrolux washing machines are distinguished by their stylish design, functionality, and high build quality.
The device incorporates the latest achievements of developers in terms of electronics, allowing you to control the washing process from the moment you load the laundry until the end of the working cycle.
You can appreciate all the advantages of Electrolux washing machines only if you use the household appliance correctly.
We will tell you further about how to properly use an Electrolux washing machine.
What other functions are there?
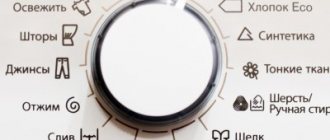
Different Electrolux models may be equipped with additional icons that are not present in other models - developers are constantly improving the devices, adding something, removing something. So, for example, you can see the following signs on some branded cars:
- Iron is an option - easy ironing. Of course, there is nothing like an iron there, it’s just that the drum, rotating in a special way, prevents creasing.
- A square with sound waves and the words “very quiet” - this icon indicates that the machine is unusually silent.
- A square with a weight with a number drawn inside it notifies the user about the maximum load of the drum.
- A square with a circle inscribed in it - imbalance control.
- A square with water and soap bubbles indicates foam control.
Errors (on screen) and what to do about them?
The self-diagnosis system, which is equipped with most models of Electrolux washing machines, helps to quickly determine the cause of the problem and restore the normal functioning of household appliances. The error code displayed on the information display on the control panel will tell you what exactly caused the malfunction:
Error E01 (EA1), E02 (EA2), E04 (EA4), EA5 . Problem: The washing machine does not spin the drum. What to do: check the drive belt, test the drum self-positioning device.- Error E03 . Problem: The washing machine does not heat the water. What to do: test the heating element relay and heating element with a multimeter (replace if necessary).
- Error EA6 (typical for top-loading washing machines). Problem: The drum does not rotate. What to do: check the drive belt, restart the wash.
- Error E10 (in some models E11) . Problem: lack of water supply to the tank. What to do: check the water pressure in the tap, inspect the hose for breaks and kinks, test the fill valve.
- Error E13 . Problem: leaks in the system. What to do: disconnect the washing machine from the power supply, call a specialist for detailed diagnostics and repairs.
- Error E20, E21 (C2), E23, E24 . Problem: no water drainage. What to do: check the drain hose and the drain pump impeller for blockages, test the drain pump.
- Error E31, E32, E33, E34, E35, E38 . Problem: the tank is not completely filled with water or the water level exceeds the permissible limit. What to do: test (replace if necessary) the pressure switch, clean clogged areas of the sensor.
- Error E40, E41, E42, E43, E44, E45 . Problem: The machine does not start the washing process. What to do: check the tightness of the hatch closure, the integrity of the rubber cuff, test the functionality of the UBL, restart the wash.
- Error E50, E51, E53, E54, E55 . Problem: The washing machine does not spin the drum. What to do: restart the washing machine, check the functionality of the triac, motor (brushes), tachometer, Hall sensor.
- Error E52, E56, E59 . Problem: the tachometer is malfunctioning. What to do: restart the washing machine, ring the controller circuit, test the tachometer (replace if necessary).
- Error E57, E58 . Problem: the washing machine does not emit any rotation signals, the washing process is blocked. What to do: check the voltage in the network (most often this problem is associated with very high voltage in the network), test the control module.
- Error E61, E62, E66, E68, E69, E3A, E71, E74 . Problem: the machine does not heat the water or the temperature of the heated water exceeds the value set by the program. What to do: check the contacts of the heating element and temperature sensor (replace faulty elements).
- Error E90, E91, E93, E94, E95, E96, E97 . Problem: The washing machine does not respond to specified commands from the control panel. What to do: test the control unit elements, clean or replace the electronic boards if necessary.
- Error EH2 . Problem: The mains voltage is too high. What to do: check the power supply.
- Error EH3 . Problem: The mains voltage is too low. What to do: check the power supply. If necessary, install a voltage stabilizer.
If troubleshooting the error yourself does not lead to the desired result, it is better to entrust the repair of the washing machine to the service center specialists.
Inclusion rules
For the first launch, the manufacturer LG has a number of requirements that must be followed.
One of the rules is that the start must be idle - without loading things into the drum. Procedure:
- Plug the plug into the socket.
- Close the hatch door until it clicks.
- Pour powder or gel into the detergent cuvette.
- Turn on the machine with the button.
- Using the settings, select the “Cotton” mode and set 60°C.
- Click the “Start” button.
When operating an LG washing machine that is started for the first time, you should pay attention to all the nuances of the operation of the device:
- correct rotation of the drum;
- no leaks;
- absence of sounds uncharacteristic for washing;
- no error messages on the display.
If the device is faulty, its operation must be stopped.
Connection and first launch of the LG washing machine - in the video:
Adviсe
By installing the washing machine on a rubber mat, you can significantly reduce the noise and vibration of the body during the washing process.
At the end of the full washing cycle, the household appliance must be unplugged from the outlet (sudden surges in the network voltage can lead to serious repairs to the control module).
Do not pack the washing machine drum tightly. Otherwise, overloaded household appliances will break down very quickly.
Clothing with rivets and other metal fittings must be turned inside out before loading into the drum. This will help protect the inside of the tank from scratches and dents, and your clothes from being snagged or torn.
A special measuring spoon will help you accurately measure the required amount of dry (or liquid) washing powder. If a situation arises that requires adjustment of the specified parameters (for example, it is necessary to change the water temperature), the “Start/Pause” button is pressed again. The green indicator starts flashing and the running process is suspended.
Having the following meaning
Page 2
- Image
- Text
For the user
Before installing and starting to use the machine, carefully study our recommendations. Compliance with them ensures reliable operation of the machine. All machine users must know the rules
operation. Please keep these instructions in case you need to transport the machine.
new place or sell. The one after you
will use it, must have
opportunity to get acquainted with the machine and its
functions, as well as instructions for its safe use.
About damage and malfunctions, as well as
If any details are missing, please report
to the car seller.
A
CD
Some sections of this manual are marked with symbols
having the following meaning:
Here you will find important information on operating your washing machine. Non-compliance
These requirements may result in damage to persons and property.
Indicates information for correct operation of the machine and for achieving better results.
Indicates important conservation information.
Our commitment to the environment: We use only recycled paper.
23
Call the master
You can call a technician to connect the washing machine. You can find the right contact on the Internet. A technician from a washing machine repair company will carry out the work efficiently and quickly enough.
The cost of the service may vary between companies. If additional work is required along the way, the price will increase. Also, the cost of connection does not include parts that may be needed, for example, a lost inlet hose.
On average in the capital, connection will cost from 1,000 rubles with disconnected communications and 1,500 – 3,500 rubles with preparatory work. If the equipment is built-in, then the cost of the work is higher - from 1,700 to 4,000 rubles.
When calling the technician, you must name the model of the device and indicate whether there is a supply of all communications for installation.
How to connect equipment correctly, on your own or call a specialist
All manufacturers of household appliances, with the exception of some Chinese companies, provide rules for installing and connecting a dishwasher in the operating instructions for the device. Moreover, dealers and representatives of well-known European brands often require that the connection of washing machines and dishwashers be carried out only by authorized specialists, otherwise the warranty may be denied.
Although there is a free connection service for certain types of very expensive equipment. For example, most retail centers for household appliances offer a technician to connect and diagnose an Electrolux dishwasher completely free of charge. For simpler dishwashers, such promotions are rare.
In such a situation, you can do the following:
- Agree and pay for the specialist’s work, giving him all questions related to connecting the equipment. At the same time, the responsibilities of the master do not include laying pipes and wiring, or preparing the space in the kitchen. You will have to do all this yourself; the service representative will only connect the wiring, drain hoses and note in the report that the work was completed in accordance with the requirements and connection diagram of the dishwasher;
- Connect the dishwasher yourself. With proper preparation, this will take a maximum of one day, saving money and nerves, especially since 99% of the connection work will still have to be done by hand;
- Buy a six-year warranty service for the purchased dishwasher in the same salon. As a rule, this is very little money, and the problem of installing and connecting a dishwasher does not interest them at all.
In this way, you can get a real guarantee and simplify the problems of self-installation. Of course, if the equipment is delivered to your home or place of residence at the expense of the selling company, before acceptance it is advisable to check with the utmost rigor that the delivery is complete and that there are no signs of opening the case.
For your information! This approach is justified not only in the situation with a dishwasher. If a batch of equipment is produced with defects, then the faulty unit will “shoot” and break much earlier than six months have passed.
On the other hand, service companies are very reluctant to provide free replacement or service; most often you have to pay for quick and high-quality repairs, regardless of who and how the dishwasher was connected.
Welcome to the world of Electrolux You have chosen a first-class…
Page 3
- Image
- Text
electrolux 3
Welcome to the world of Electrolux
You have chosen a first-class product from Electrolux that we hope will bring you much joy in the future. Electrolux strives to offer the widest possible range of quality products that can make your life even more convenient. You can see several copies on the cover of this manual. Please read this manual carefully to use your new device correctly and enjoy its benefits. We guarantee that it will make your life much easier thanks to its ease of use. Good luck!
135499240_RU.qxd 05/14/2007 16.05 Pagina 3
Starting a household appliance
The process of preparing for washing is completed, the desired mode has been selected, there are a few more steps left to perform before starting the washing machine:
- Select the required temperature mode (varies from 30°C to 95°C). So light, delicate items are washed at a temperature no higher than 30C, cotton items -40°C-60°C. A temperature maximum of 95°C is used for very soiled bed linen or bath items.
- Set the required number of spin revolutions. As a rule, when selecting a washing mode, the program automatically sets the desired spin parameter, but if necessary, it can be changed using the corresponding button on the control panel.
- Pour washing powder into the detergent dispenser compartment.
Where to put the powder: on the left side of the powder receptacle there is a compartment for the main wash, on the right side - for pre-wash, in the center - a compartment for conditioner and rinse aid.
Information about the amount of washing powder required for one wash can be found on the packaging of the detergent. You should not exceed the recommended standards . Otherwise, saving powder will reduce the quality of washing, and increasing the rate will lead to excessive foam formation, which can damage the Electrolux washing machine.
After all the preparatory measures have been completed, you can start washing. To do this, press the “Start/Pause” button. The indicator on the control panel will stop flashing, and the machine will start the initial stage of washing - drawing water into the tank.
Preparing for washing
Preparation for the washing process proceeds according to the following scheme:
- The household appliance is connected to the power supply (separately installed, grounded outlet). The Start/Pause or Power button indicator on the control panel should light up.
- Sort dirty laundry. Everything that requires washing is divided into groups: according to degree of contamination, color and material of manufacture. It is unacceptable to wash colored and white items together (the result is damaged, faded clothes). Hand-embroidered items and hand-knitted items are washed separately.
- Load the drum of the washing machine. The maximum amount of dirty laundry (weight) that can be loaded into the drum depends on the model of the washing machine (the necessary information can be found in the data sheet of the household appliance).
For synthetic items, the maximum loading level does not exceed a third of the drum volume, for knitted woolen items - a maximum of half the tank. With a maximum load of products made from natural, dense fabrics, there should be enough free space in the drum to fit the palm of your hand.
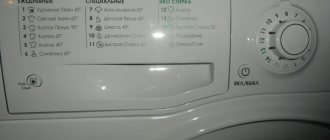
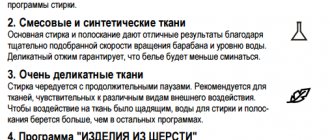
Mode selection
There are many symbols on the control panel - encrypted meanings of the main washing modes and additional functions of the Electrolux washing machine.
Main modes:
Auxiliary programs (selected depending on the type of laundry):
Additionally, the display of the control panel of the washing machine displays information about how much time is left until the end of the wash, the number of spin revolutions, and the water temperature in the tank set by the selected program.
Video review of the modes of the Electrolux washing machine:
How to care for equipment?
Regular, proper care will help extend the trouble-free operation of your Electrolux washing machine.
So the drum and powder compartment are wiped at least once a week with a soft sponge using baking soda paste (the dry powder is diluted with warm water until it becomes a thick paste). Such actions help clean surfaces from limescale and other impurities from hard tap water.
Don't forget about the rubber cuff around the hatch. It is in its folds that the largest amount of dirt collects, which can be cleaned with a soft toothbrush and baking soda paste.
The rubber seal cannot be cleaned with chlorine-containing compounds (for example, Belize). Otherwise, the cuff will very quickly lose its elasticity and become covered with cracks.
The drain filter and water inlet filter require special attention. To avoid problems with draining waste fluid, it is necessary to clean the drain filter once every ten days. You can find it in the lower part of the hull behind a small hatch.
The drain filter is unscrewed (counterclockwise movements), cleaned of hair, threads and other debris, and then installed in its original place.
Covered with a layer of impurity particles from tap water, the water inlet filter blocks the process of water entering the washing machine. How to clean it? To do this, on the back panel of the washing machine body, unscrew the fastening nut of the inlet hose, from which, using a flat screwdriver, carefully remove a small metal mesh - the inlet filter. The mesh is cleaned under water pressure with a toothbrush , and then installed in its original place.
Once a week, wipe the body of the washing machine with a soft cloth or sponge moistened with soapy water.
What to do after?
Once the washing is finished, you must:
unload washed laundry from the drum of the washing machine;- Wipe the rubber cuff from moisture with a clean cloth (additionally check the seal for stuck small items of clothing);
- slightly open the detergent dispenser (if there is any undissolved powder left in the tray, it must be removed);
- open the hatch door slightly for ventilation (ventilation of the inner surface of the drum prevents the formation of an unpleasant musty odor).
Do not try to open the hatch door immediately after the sound signal for the end of the wash. The UBL keeps the door closed for another 2-3 minutes. Sudden movements or tugging can break the lock.
Features for other detergent compositions
The variety of laundry detergents makes you think about how to properly load them into the washing machine.
Gels
Concentrated gel-like liquid products cannot be poured into the main wash compartment (everything that gets into the tray will simply flow down the walls into the tank without having time to mix with water).
Gels or liquid powder are poured directly into the drum of the washing machine using special measuring balls with holes.
Air conditioner
Do not pour conditioner into the main wash compartment. Otherwise, the product will be washed out at the very beginning of the process and you can forget about the effect of soft tissue.
For the conditioner there is a special compartment of the dispenser (powder receptacle) marked with the symbol “*” or a flower.
Bleach
Products intended for removing stains from clothes (bleaches, stain removers) are poured together with washing powder into the pre-wash compartment.
There is no need to experiment by pouring bleach directly into the washing machine drum. Aggressive chemicals, not diluted with water, destroy fibers and change the color of the fabric.
Capsules
Gel capsules or tablets for washing are loaded directly into the drum (bottom) of the Indesit washing machine.
Reacting with water, the capsules quickly dissolve, ensuring complete removal of stains from clothing.
You should not put gel capsules or tablets into the powder receptacle. In a short time of supplying water to the tray, the capsules do not have time to completely dissolve, which significantly reduces the quality of the wash.
Algorithm of actions
For each type of Electrolux washing machine (depending on the loading method), a specific parsing algorithm is prescribed.
Horizontal loading household appliance
The body of a front-loading washing machine consists of two halves (back and front, connected by fasteners along the side line).
Taking into account this design feature, the Electrolux washing machine is disassembled as follows:
- We find two screws located on the back wall of the case and unscrew them. We slightly push the cover towards the back wall, lift it and remove it from the body.
- On the left and right side panels, unscrew the two screws that secure the rear panel.
- At the bottom of the rear panel, unscrew the two fasteners.
- On the sides, after opening the plugs, unscrew the fixing bolts.
- Unclench and lift the plastic holders that secure the panel in the upper part of the case.
- Remove the back panel.
- Inside the powder receptacle we find a plastic tab, press it, and carefully pull the dispenser out of the washing machine body.
- We unscrew the fastening bolts and remove the hatch door along with the hinge.
- Carefully prying up the clamp spring with a slotted screwdriver, pull the metal ring off the cuff. We put the rubber seal inside the drum.
- We unscrew the screws located on the left side of the control panel, carefully use a screwdriver to open the latches on the top and sides of the panel, without disconnecting the wiring, remove the control unit.
- We unscrew the screws located around the hatch lock, under the control panel and around the drain filter, and remove the front panel from the body.
- Hold the pulley with one hand and remove the drive belt with the other.
- We unscrew the fasteners holding the motor, disconnect the terminals of the power wires, move the motor slightly toward itself, and remove the mechanism from the housing.
- Disconnect the wires from the drain pump, unscrew the fasteners, carefully turning clockwise, and remove the pump from the housing.
- We disconnect the wiring from the heating element, unscrew the central bolt (located between the contacts) and, using gentle rocking movements, remove the heating element from its seat.
- Having unscrewed the central bolts, we dismantle the counterweights.
- Using pliers, pull out the pin holding the shock absorbers and remove the paired elements from the bottom of the tank and the body of the washing machine.
- In the upper part of the housing, we disconnect the powder receiver pipes, the wiring of the filling valve, the springs, after first disconnecting the tube, we dismantle the pressure switch.
- Carefully lifting it, remove the tank from the springs and remove it from the housing.
At this stage, the analysis of the Electrolux front-loading washing machine is completed.
From vertical
Algorithm of actions:
- Carefully prying the latches on the right and left sides, lift the control panel, disconnect the wiring from the board connectors, and remove the panel from the case. Before you disconnect any wires, you need to take a photo of their connection diagram.
- Disconnect the wires, unscrew the fasteners, and remove the electronic board.
- Having previously disconnected the pipes and wiring, we dismantle the fill valve.
- Having unscrewed the fixing elements located on the rear panel and one at the bottom of the front panel, we dismantle the side walls of the case.
- From the opened space we pull out the engine, drain pump and water level sensor (all elements are located under the tank). To do this, unscrew the fasteners, remove the wiring, and pull the mechanisms out of the housing.
- We block the pulley wheel with a wooden block. Carefully remove the drive belt.
- Raise the top panel (cover), take out the powder receptacle (fixed with latches).
- Unscrew the bolts holding the cover.
- We pull back the rubber cuff, under which we have access to the screws that secure the plastic strip. They also need to be unscrewed. Remove the top panel.
- We unscrew the hardware holding the shaft, close the tank doors, and remove the tank from the housing.
At this stage, the disassembly of a top-loading washing machine can be considered complete.