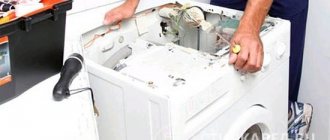
Any equipment fails sooner or later. Washing machines in the budget category, for example, Indesit brand models such as WISL 82, WISL 83, WISL 102, WISL 103, WISL 105, IWSC 5105 (especially those that have been in use for a long time), often require repairs. Failures can be very different, and in order to correctly determine the cause of the malfunction and eliminate it, as a rule, the machine needs to be disassembled.
To determine the cause of the malfunction and eliminate it, it is usually necessary to disassemble the washing machine
Sometimes it is enough to simply remove one of the housing covers, but there are times when you need to get to a bearing located in the drum or to another hard-to-reach part. Then the owners of the equipment are faced with a serious task, the solution of which must be approached with full responsibility.
If you want to save money, try performing repairs without contacting a service center. In our article we will tell you how to disassemble an Indesit washing machine with your own hands so that you can easily reassemble it later.
Price issue
One of the most common malfunctions encountered by employees of washing machine repair service centers is wear of bearing units. This set of parts, which ensures rotation of the drum, experiences the greatest load due to high centrifugal speeds, so it wears out faster than other parts of the apparatus.
The bearing assembly is located just in the washing machine tank, on the drum cover. To replace bearings, in the vast majority of cases, almost complete disassembly of the device is required.
It should be noted that not every Indesit machine model has a collapsible tank; very often it is made fused with the drum.
In such cases, specialized centers do not even undertake disassembly, but offer a complete replacement of the old tank with a new one, which can result in an amount equal to 2/3 of the price of a new car.
Meanwhile, there are unofficial appliance repair centers that can offer you sawing and gluing of a plastic washing machine tub. Of course, such repairs will be much cheaper than replacing the drum, but the technicians will immediately warn you that they do not provide any guarantees for the proper operation of the machine after repair. What to do in this case is up to you to decide. You can try to carry out such “handicraft” repairs yourself and absolutely free. In this article we will look in detail at how to disassemble different models of Indesit washing machine tanks, and what tools will be required for this.
Repair of SMA "Indesit": preparatory work
Before changing the drum bearing or performing other work related to disassembling the tank, you will have to completely disassemble the machine. Therefore, make room in advance for such a large-scale work. It is best to do this in a garage or other non-residential premises. As a last resort, the kitchen will do, just keep in mind that the equipment needs to be moved to the center of the room so that it is convenient to get to any panel.
You will also need the following tools:
- a set of slotted and Phillips screwdrivers;
- socket wrenches;
- hammer;
- pliers;
- hexagon;
- drill;
- hacksaw for metal.
Additionally, prepare glue-sealant, rags and water containers. Although the washing machine is disconnected from the water supply, water remains in the hoses and pipes. Do not rush to buy replacement parts in advance; it is better to take out the old elements and go to the store with them. So you definitely won’t go wrong with your choice.
Proceed to the next step.
Set of tools
Surely you have a universal tool kit at home, which contains various types of screwdrivers with slotted and Phillips bits, screwdrivers, hexagon sets and pliers. You will also most likely need a hammer.
As for new parts that need to be replaced, you should not buy them in advance unless you know their exact markings. It would be much wiser to first remove them, and then select an appropriate replacement for them.
Preparing for disassembly
First of all, we choose the place where the car will be disassembled. There must be enough space to carry out the work and to allow the dismantled parts of the machine to be neatly laid out. After all, we still need to put it back together.
It would be best to write down all the steps involved in disassembling the car. Then the reverse process will be easier and without errors.
We will need:
- Set of different screwdrivers. A pair of crosses of different lengths. Flathead screwdriver. It will be needed in order to pry off various clamps and fasteners. Screwdriver with a set of bits - hexagons and stars.
- Hammer. Will be needed if bearings need to be replaced.
- Pliers.
- A set of keys.
- A block of wood.
Instructions for disassembling the washing machine
- Do not begin to disassemble the appliance while it is plugged in to avoid electric shock, so first disconnect the power from the machine.
- It is also necessary to close the valve on the water supply pipe and disconnect the device from the drain.
- Place the machine so that it is convenient to approach it from all sides, since you will need to remove both the top and back covers of the device.
- Remove the bolts at the back that hold the top cover in place. Remove it; to do this, you can pry off its edge with a screwdriver.
- Start unscrewing the bolts on the back cover of the device in a circle. Remove and set it aside.
- In front of you was the outer part of the drum along with the drive mechanism in the form of a pulley with a belt and a motor. The belt can be removed immediately. Stains of rusty liquid coming from the central point of the tank indicate obvious failure of the bearings and seal.
- Begin to disconnect the tank from all the wires that are connected to it: from the grounding of the bearings, from the temperature sensors. Don’t forget to also unscrew the bolts that secure the device’s engine.
- Looking at the machine with the top cover removed, you can see a rather large part located on top of the drum. This is a counterweight that puts pressure on the tank and gives balance. To remove it, start unscrewing its fasteners using screwdrivers and hexagons of a suitable diameter.
- Next, pay attention to the elements of the mechanism that may interfere with the removal of the drum. This could be a housing for loading washing powder, or transport stops. Remove them using suitable tools.
- The drum along with the plastic case can be removed either from the top or from the rear hole, depending on how convenient one or the other method is.
Having taken the tank out of the body, you can inspect it and determine what kind of device it has: one-piece or collapsible. If you notice any mounting screws holding the two halves together, they will need to be removed. You can separate the components using a screwdriver, splitting them along the edges. Once you manage to disconnect the drum from the cover, you can begin to replace worn parts by first removing them from their sockets and reading their markings.
It's another matter if the tank is cast from solid plastic. In this case, you will have to cut it.
Sawing time and result
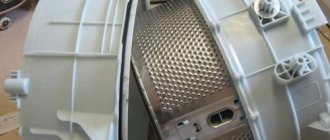
A modified jigsaw will help you spend a minimum of time cutting. Before moving on to the main work, it is necessary to cut off all the “ears” from the surface of the tank, that is, the protrusions present on the welding seam that will interfere with sawing. Next, the blade is placed on the seam, after which you can start the jigsaw.
It is important to monitor the location of the file; it should run almost parallel to the tank so as not to damage the elements.
Also, if you are doing work in this way for the first time, then it is still better to go through difficult areas of the tank (for example, the place shown in the figure above) manually. This will help cut the tank as neatly as possible.
A master who has already become skilled will be able to cut a tank using a jigsaw in literally 45-50 minutes. If you are spending more time dividing the tank for the first time, remember that the work will go faster each time. The cutting method using a jigsaw is very effective and does not require much effort from the “sawing” person.
How to disassemble a soldered tank
Why do manufacturers still use one-piece plastic drum shells? The answer is simple: this technology simplifies and reduces the cost of production. In addition, it is beneficial for them to use this type of tank due to the fact that if the bearing assembly wears out, the consumer will most likely purchase a new washing machine rather than choose to pay for repairs that cost almost the same as a new device.
Therefore, this trick is often used: the body is sawed, the necessary replacements are made, and it is glued back together with special glue. Here's how to describe this process.
- In front of you is a plastic tank of a machine with a drum inside. Inspect it to determine the location of the weld. To mark the sawing site, make small indentations around the entire circumference. Use a drill with a thin drill bit for this.
- Armed with a hacksaw for cutting metal, begin to carefully cut the tank along the prepared marks. Separate the cut section from the drum.
- When you turn the drum over, you can see the wheel that connects the parts together. Remove it and you will finally be able to free the drum from the body.
- After the new parts are installed, the two halves of the disassembled tank can be glued together with silicone sealant, and additional screws can be installed.
Subsequent assembly and installation of all removed systems can be done in the reverse order.
Thus, now you have the opportunity to carry out repair work yourself and save on service costs.
How to remove main parts
The washing machine consists of many parts, most of which are hidden inside the body.
Here is a schematic representation of the main parts of the washing machine
We begin to disassemble the case from the top panel , which is secured with two bolts located on the back side of the machine; they need to be unscrewed first. Then, standing at the front of the unit, pull the panel towards you and lift it slightly.
Next we move on to the rear panel , which is held on by six self-tapping screws. You can unscrew them using a screwdriver. Directly behind the cover you will see the drive belt; it is better to immediately remove it too, carefully turning the pulley wheel clockwise.
The diagram shows in which direction you need to rotate the pulley to remove the belt from it
To dismantle the dashboard , unscrew several screws located in the niche of the detergent tray. Then we disconnect the wires and the pipe, remove the panel from the latches and put it aside.
During the disassembly process, the location of the parts and the connection diagram of the contacts can be photographed so that after the repair you can quickly and correctly reassemble in the reverse order.
At the top of the washing machine there are: a counterweight (stone), a pipe connecting the powder compartment to the tank, a water intake valve and its contacts, as well as a pressure switch, its tube and contacts. We remove all these details.
Before removing the front panel , remove the hatch door and rubber seal. We begin dismantling with the cuff - bend it with a screwdriver and carefully remove it. We dismantle the door by unscrewing several bolts that hold the hinge. Then we remove the screws that hold the front panel in place and move it to the side.
Remove the rubber cuff by carefully bending it using a screwdriver
In the lower part of the unit, it is necessary to dismantle the electric motor, tubular electric heater (TEH), lower counterweight, drain pipe and shock absorbers on which the tank is supported.
The heating element is easy to find by the end, which is visible under the tank. Remove all wiring from the heater contacts. Unscrew the nut located in the center between the contacts. Having loosened the element, remove it from the groove. We remove the power supply and ground wire from the engine, and then unscrew the bolts securing it.
The heating element is located under the tank, to remove it you need to disconnect the contacts and unscrew the nut located in the center
To remove the shock absorbers and drain pipe, you need to place the washing machine on its side. Using pliers, remove the clamp and disconnect the drain pipe from the pump. Then unscrew the shock absorbers.
To dismantle the drain pipe, you need to loosen and remove the clamps holding it
After dismantling all the parts, remove the tank. But what if this is not enough? How to disassemble the drum of an Indesit washing machine located inside a non-separable tank?
Preparatory activities
First of all, you need to carefully prepare for such repairs. To do this, you need to prepare all the basic tools that will be needed for replacement. There is nothing unusual in the list that would not be found in the standard set of tools that every man keeps at home. Prepare the following for work:
- hammer;
- screwdrivers with different attachments;
- screwdriver;
- pliers;
- side cutters;
- hexagons.
We will also need to buy a new tank-drum assembly, but do not purchase it in advance, as you may choose the wrong marking, so first remove the old tank, and only then look for a replacement.
Having prepared or purchased all the tools for repairs, start preparing the washing machine itself. The replacement will most likely take you the whole day, so it would be logical to pre-arrange a comfortable workspace so that nothing distracts or interferes with your work. A garage or a large living room with enough free space is best suited for this purpose.
If it is not possible to move the device to a non-residential premises, then it is worth emptying the whole or at least part of the room in the house, and also covering the floor with thick fabric so as not to damage the floor covering during all manipulations. Only now is it worth starting to restore the home assistant.
How to cut?
- The element intended for cutting is placed on the floor. The surface must be flat.
- Place marks under the screws.
- Drill holes in the plastic - 3 mm in diameter. Only 15–20 pieces.
- Place the product on its side. Using a metal file, they start cutting from the top.
- The maximum depth is 5 cm. A large cutting depth can damage the drum.
- As sawing proceeds, the seam is sprayed from time to time to make sawing easier and prevent the plastic from heating up.
- Having cut the product into two halves, pull out the drum. For this purpose, unscrew the fastening bolt and disassemble the shaft - the drum is attached to it. Remove the pulley and remove the drum. Now you can change the bearings and seals. After replacing the parts, gluing begins.
Requirements for glued joints
When new bearings are installed, the question arises - how to repair a plastic tank that has been sawed in half. How to seal the drum to prevent leaks? What to choose - glue or sealant? It is better to use glue, since no sealant can provide the necessary strength characteristics of a glued structure.
Reliable connection of parts requires two operations:
- The halves are connected using bolts and nuts. To do this, holes are made in the plastic - evenly along the entire seam.
- The gap between the parts to be joined is filled with glue or sealant.
Not every composition will work. It is important to know what sealant to glue the halves together with. In this case, the operating features of the unit are taken into account:
- Strong vibrations - the connection must withstand severe mechanical loads.
- Extreme temperature conditions - the unit either heats up or cools down.
- Contact with aquatic environment. Including water supplied under pressure.
If the purchased composition fails you, leaks are possible. Then you will again disassemble the machine and fix the problem.
How to glue the halves?
There is nothing complicated here. The main thing is to properly prepare the parts for gluing. Before sawing, you need to make 30–40 small diameter holes across the seam. They are then precisely aligned when gluing, and the halves fit together flawlessly.
The joint of the halves is smeared with the selected composition, and then the bolts are screwed on. Moreover, they tighten the bolted connections without waiting for the glue/sealant to dry. The seam will dry completely in about two hours.