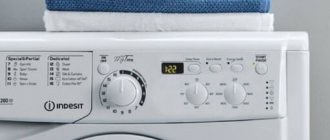
The programmer is a knob on the control panel of most washing machines.
It looks simple, but in reality it is a complex mechanism that controls turning on and off different washing programs, adding and draining water. This is a whole control unit consisting of many parts. Looks like a protruding knob on a control panel. Its role is undoubtedly important, since the final result depends on its performance. This mechanism is located near the handles, displays, and buttons. Some people call it a command device or a timer programmer for a washing machine.
How to fix the door in a washing machine?
How to fix a washing machine door?
The door in a washing machine can break when:
- A mechanical failure has occurred. There is no usual sound when you close the machine.
- Electronics failure. There is a click, but there is no blocking.
Fix the washing machine door if the problem is mechanical:
- Skewed hinges. It can be seen that the tongue goes past the groove. If the device is really not level, adjust the height.
- The tongue is not level. The tongue does not fit into the lock. Perhaps the rod fell out. Disassemble the door, return the rod to the correct position, or have the washing machine handle repaired by a service center.
- The guide is broken. Sometimes you don't know how to open the door and think that the washing machine is broken because of the plastic guide. When it breaks, the door closes without the familiar sound. The solution is to change the guide from a specialist.
Repair the washing machine door when there are problems with the electronic system:
- Lock failure. The plates can become deformed, and then the unit no longer works; it needs to be replaced by a service center.
- Blockage. Money or debris may become stuck in the locking mechanism. Just remove the blockage.
- Module failure. There is no closing signal from the control system. The problem is in the software. It is better to carry out diagnostics and repairs at a service center.
Installation Features
Any of the above Vyatka Katyusha models comes with detailed operating instructions. It is written in an accessible form and is accompanied by a number of visual diagrams. In order for the equipment to function correctly, it must be freed from its industrial packaging and fixing bolts.
Vyatka automatic
The Vyatka Katyusha automatic washing machine is picky about its location. It must meet the following characteristics:
Along the perimeter, be sure to maintain a distance of 1.5 cm from the appliance to the walls. From below, it is important to adjust the legs so that the gap between the washing machine and the floor is at least 1 cm. It is important to level the appliance, ensuring a minimum angle of inclination. Ideally, the Vyatka Katyusha machine should stand strictly horizontally, which will help avoid frequent repairs of worn parts. Nearby it is necessary to have communications from where the device draws water, a sewer outlet for draining waste liquid and a grounded socket
If the residential premises have old wiring, for such household appliances it is recommended to change it or make another branch from modern materials.
The manufacturer recommends placing the washing machine on a bare floor or an anti-vibration mat. The use of pile carpets is strictly prohibited.
Disassembly and repair of the programmer
To repair it, you must first properly remove the washing machine programmer and disassemble it.
It depends on the model of the washing machine. There are some features that need to be taken into account when disassembling. If, for example, we talk about the Ariston machine, then:
The removed programmer must be thoroughly inspected. On the side you will see the latches that secure the cover. They snap off with a screwdriver. Under the cover there are many springs that try to scatter in different directions when removed.
Removing the cover, you will see the board from the wrong side. You need to take it out and put it aside.
Next, the gear is taken out and the gears are carefully examined
If there is debris, clean it up. Let's turn our attention to the board. If damage, burnt parts or tracks are noticeable, they need to be soldered again.
If there is no damage, then use a multimeter to check the resistance on the contacts. Next, all the gears and the motor core of the part are taken out. The winding on the engine is checked in order to eliminate burnt areas
If found, replacement will be required.
The integrity of all elements and contacts is checked.
The programmer is assembled in the reverse order.
Repair of programmers for German washing machines
Do-it-yourself repair of a washing machine programmer in German models cannot be done without knowledge and experience in electronics, which may affect the performance of related parts.
The device of the washing machine programmer is very complex in design.
And if we talk about Gorenie, then they generally have a soldered-in control board and it is recommended to replace the programmer in the washing machine.
Even many professionals do not undertake to repair it. You can repair it yourself, if it is due to a malfunction of the buttons and switches or the programmer handle of the washing machine, you can solve the problem yourself. For this:
- use a screwdriver to unfasten the fasteners;
- The powder receptacle extends;
- By unscrewing the mounting bolts, the control panel is removed.
You can replace the program switch without disassembling the machine; to do this, just remove the top cover.
TOP stores of washing machines and household appliances:
- mvideo.ru/- household appliances store, large catalog of washing machinesholodilnik.ru – Inexpensive household appliances store.
- techport.ru – profitable modern online store of household appliances
- citilink.ru is a modern online store of household appliances and electronics, cheaper than offline stores!
- ru.aliexpress.com - spare parts for washing machines
Design and principle of operation: description
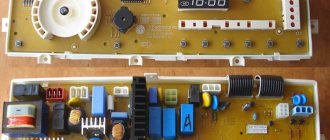
The washing machine control unit is one of the most important and expensive parts in the system. In most cases, it is universal for all types of devices and is a set of printed circuit boards with electronic components. The first microcircuit is responsible for sending commands to the executive units of the machine, and the second controls the washing modes.
Main functionality:
- water pressure control;
- starting pumps;
- door lock;
- water temperature control;
- regulation of electric motor operation;
- regulation of washing programs.
Relays, triacs and thyristors, using signals from auxiliary sensors, switch the electrical impulse depending on the washing program that you select using buttons and levers on the front panel. All switches are located on the display board and are connected to the controller via wires. Thanks to the control unit, you can select washing modes, perform specific operations (for example, spin only or drain water) and monitor the progress of the process.
If the drain doesn't work
First of all, check to see if the filter is clogged and if the washing machine is leaking from below.
Unfortunately, not all housewives follow the important rule - carefully check and empty the contents of your pockets before loading the machine. As a result, coins, paper clips, buttons and other objects end up in the filter compartment.
As a result, coins, paper clips, buttons and other objects end up in the filter compartment.
The filter is traditionally located under the front panel, on the right side.
On some models, to get to it, you need to remove the entire bottom panel. This is easy to do by prying it off from the side with a screwdriver.
But more often, the filter is hidden behind a small hatch, which can also be removed using a screwdriver or coin.
Lower the drain hose to floor level to drain any remaining water.
But even after this, some of it will remain in the system.
Before opening the filter, it is advisable to tilt the machine slightly back and place a rag or container.
Next, unscrew the filter head counterclockwise and remove it.
The excess is removed from the compartment, the filter itself must be thoroughly rinsed.
Then we inspect the impeller, which is located in the depths of the compartment. Sometimes threads, rags or stray lint from clothes get wrapped around it. All this needs to be carefully removed.
The filter is installed in place and the drain can be checked. Sometimes this is enough, but what if it doesn’t work?
Check if the pump itself is working. To do this, unscrew the fastening screws and remove the back cover. The engine, after the electronics and all relays, is supplied with 220 volts alternating current.
Its functionality can be easily checked by disconnecting all connectors coming from the machine and connecting it using wires to a household electrical outlet.
If the impeller does not spin, the problem has been found. Remove the pump for a sample and go to the hardware store for a new one. What to do if the pump is working, but there is still no drain? Disconnect the hoses and pipes and check for foreign objects.
Sometimes amazing things come out of there. And, since the part has been removed, do a little preventive maintenance.
Disconnect the motor and impeller and thoroughly clean the sealing gasket. Or replace it with a new one.
If the electric motor is of an open type and it is completely disassembled, lubricate both bushings with graphite grease.
Dismantling the command apparatus
Dismantling requires preliminary preparation. As in any other case, when you work on a washing machine, before repairing it, you need to disconnect it from the water supply and power supply. Then move the device away from the wall so that it can be easily approached from any side.
Make sure that there is no water in the drum, remove and clean the debris filter, and remove the powder receptacle from the groove. Now unscrew the screws that secure the top panel of the washer and remove it. For most old-style cars, you will also have to remove the plastic control panel from the front wall. After this, you can begin to dismantle the command apparatus itself.
- Inspect the washer from above. Locate the wires that direct the flow of water to the different compartments of the dispenser. One end of it is fixed to the panel on top of the powder receiver with two clamps. Unclench them and remove one end of the wire.
Important! The correct position of the mode switching knob determines whether the machine will correctly understand your choice of program, so before removing it, remember exactly what position it was in.
The door does not open
| Cause | What to do |
| Locking enabled | Most often, the lock is turned off within 2 minutes after the wash is completed. |
| The switch that locks the door is broken | When the machine is de-energized, the door lock will turn off and you can remove the laundry. Some machines have a cord that provides emergency door unlocking. When it is missing or you cannot pull it, you will have to partially disassemble the device by removing and repairing the door. |
| There is water left in the tank | Make sure that the water is drained and that you have set the washing program correctly. In addition, check whether the pump is working properly and whether the pipes are clogged. |
If you need to replace shock absorbers, restore them yourself using the video from the Maxs K channel. The whole process is shown on the shock absorbers of a Samsung washing machine.
Selection rules
Available Vyatka Katyusha automatic options depend on the model. All devices have the same number of functions - 22. However, their spin speeds are different. Those who are satisfied with almost damp laundry can purchase model 522P. If you want to take semi-dry clothes out of the washing machine, you should opt for 1022P. Housewives often do not use the maximum number of revolutions in order not to spoil things and ensure smooth operation of the equipment, so the most successful option is with average indicators - 722P.
Vyatka-Alenka model 772P
The models have several other significant differences:
- Washing machines Vyatka Katyusha 522Р and 722Р have an enameled tank, while in 1022Р it is made of stainless steel.
- Leakage protection is provided only on the latest version with the maximum number of revolutions for this series.
Otherwise, the instructions for the Vyatka washing machine indicate the following characteristics, which are the same for all three models:
- The maximum drum load does not exceed 3 kg.
- The door is located vertically at the front.
- Overall dimensions 60x42x85 cm.
- The body color is white, as shown in the photo.
- Economy wash mode available.
- It is possible to select the required water temperature.
Despite some design imperfections, the equipment performs well in use, being a worthy representative of the budget category of household goods.
Vyatka-Maria
Samsung washing machines
This South Korean brand is very popular, has a good rating and positive customer reviews. But nothing lasts forever, and mistakes happen to her.
Repairing a Samsung washing machine with your own hands will not be an insurmountable difficulty knowing its main weaknesses
First of all, pay attention to sensitivity to voltage changes. It is precisely such a minor problem that can one day harm the device.
Inconvenience may also arise with an unexpected stop in the rotation of the tank, or a pause in the washing process - often the reason for this option may be insufficient water supply pressure.
Solving this oversight is very simple - just unplug the plug from the socket and reboot the process.
Brushed motor
Connecting a commutator motor from an automatic washing machine is much easier. First of all, most of these devices have a standard block. There are 4 (including the wires from the sensor - 6) wires connected to it.
The first pair, most often white or beige, are the terminals of the speed control sensor. They are not involved. The second pair (red and brown wires) is the stator winding. The remaining two (gray and green) go to the commutator brushes. In some cases, the color scheme may not match, then you just need to visually determine which conductors are connected to the brushes; the remaining pair will be the stator winding.
The simplest connection diagram for such a device to 220 volts will look like this. Voltage is supplied to one of the terminals of the stator winding and one of the brushes. The remaining two terminals are connected to each other. If voltage is applied to this circuit, the rotor will begin to rotate. Changing the direction of rotation is simple; just swap the brush leads.
Causes of failure and do-it-yourself repair of the washing machine programmer
The programmer is one of the main components in the washing machine, which is responsible for selecting the desired washing mode. This part is also called a command device or timer; it is used in most automatic washing machines and looks like a round knob pushed forward on the control panel that switches programs.
A breakdown of the command device can occur due to the following reasons:
- One element of the control unit, including the programmer, has failed.
- During operation, the program gets confused, the time is not what was chosen.
- In some washing machine models, an external indicator of a breakdown may be the blinking of all indicators on the control panel.
The command device, despite its reliability, can also fail after 10 years of operation. The main reason cited by professionals is incorrect maintenance and poor handling of household appliances. So, for example, if during the washing period the baby turns the handle, then because of this the command device may break. Also, the part may break due to power surges.
Well, a defect in the creation of an element cannot be ruled out. Repairs should begin with proper disassembly of the part. The problem is that each model has its own nuances. Let's look at the features of disassembling the command apparatus using the Ariston washing machine as an example. It is necessary to remove and disassemble the programmer. When the cover is removed, you can see the board underneath; it needs to be removed. Then you need to check the gears and, if there is debris, remove it. If there are burnt elements or tracks on the board, they will need to be soldered again. If there are no burnt places, then you need to take a multimeter and measure the resistance on the board contacts, you will find something. Next, you need to remove the gears and take out the motor core. Then you should check if all the elements are intact, wipe the device with alcohol and reassemble in reverse order.
Professionals do not recommend repairing Miele or Siemens machine programmers on your own. And Gorenie washing machines have command devices with a soldered-in control board. In this case, the repair must be done by a master.
What is a programmer
Programmers are reliable and less sensitive to voltage changes than mostly premium machines with electronic control panels, which undoubtedly have their advantages.
Machines with the fuzzy logic function can handle washing processes without a programmer. There are two types of programmers : hybrid (mechanical) and electronic.
Electronic ones have a more advanced mechanism with a wider range of functions.
Their disadvantage is that, like all electronic devices, they are sensitive to network surges.
Hybrid ones are more modest, but they are distinguished by long-term performance and reliability, and, if necessary, quick and cheap repair of the washing machine programmer. The service life of the programmer is not short - from 10 years.
And if we consider the frequency of component failures in washing equipment, then it will be in last place.
However, exposure to external factors can accelerate the process of wear and tear. If there are children in the house, they often speed up the process of breaking down the programmer without any malicious intent.
This part does not like interference during operation, otherwise the cycle is disrupted and the control unit itself is damaged.
What to do if water is leaking from the machine?
If water leaks out in small quantities, the clamp may simply be loose. Be sure to check for small puddles near it. Water will leak out if there are cracks in the hose. In such a situation, it must be replaced.
If the door seal is slightly loose, water will leak out of the tank. To eliminate the leak, you will need to replace the sealing gasket.
It is much worse when water flows out of the tank or hoses in large quantities. After all, if you don’t detect a breakdown in time, you can flood your neighbors. The most common reasons for a water leak are as follows: the outlet hose has jumped out of the riser, either the hose or the sewer is clogged.
Flaws
- A significant disadvantage that will play a role when choosing such a washing machine is the spin function
, which is not present in all models. Due to its presence, the price of the model also increases. - The small size of the machine will not allow you to load a large amount of laundry into it. Most units have a tank with a capacity of only 2-4 kg. This characteristic feature will not allow you to wash a blanket, blanket or a complete set of bed linen in it.
- Many owners note that Malyutka is
quite
noisy
. For some, such a drawback will seem significant and will be a reason to refuse to purchase.
List of required tools
To correctly disassemble the washing machine, a home craftsman will need the following tools:
- wrenches (size 8, 9, 19);
- service hook;
- screwdrivers (classic flat and Phillips);
- pliers and wire cutters used for self-clamping clamps;
- ordinary wire cutters;
- pliers with an insulated rubberized handle;
- bent long pliers.
Almost all of these items will definitely be found in your home arsenal, and the missing items will simply need to be purchased at a hardware store or borrowed from friends or neighbors.
If the machine runs for a long time, some screws may “stick” to the cells. Unscrewing them will be problematic, so it makes sense to use WD-40. A few drops will soften the joints and facilitate correct unscrewing of the connecting parts.
In addition to all the items listed above, it is worth stocking up on a medium-sized basin, where it is convenient to drain the remaining water in the hoses, and several microfiber cloths. They can be used to wet your hands, wipe the internal parts and collect the remaining working fluid that has spilled from the tubes from the floor.
Controller firmware
If after repair the problems remain, then the problem may be in the software part. Therefore, it is worth trying to update the controller firmware.
To flash the controller firmware, you will need an adapter - a programmer that provides software access to the module via a PC. Professional solutions are quite often found in specialized stores and cost around 2-4 thousand rubles. You can also purchase a simpler version of the programmer for 500 rubles, but then you need to take into account the brand of equipment. For example, for washing machines of the Electrolux, Indesit, Ariston and Whirlpool brands they use the Arcadia adapter (USBDM MemoryDump).
USBDM programmer
Additionally, you will need drivers and proprietary software. Both can be found on the official resources of equipment manufacturers in the “Software” section. Let's look at the software installation procedure using the Arcadia adapter as an example.
Firmware via USBDM MemoryDump:
- connect the adapter to the controller and to the computer;
- install the programmer driver;
- go to the OS control panel and find “Device Manager”;
- click on the USBDM line;
- go to the Target section and select DetectChip;
- the system must detect the module if it is working and connected correctly;
- click on LoadHexFiles and determine the firmware;
- Click ProgramFlash and wait for the procedure to complete.
Advantages and disadvantages
Equipment manufacturers take into account the demand for certain capabilities and characteristics of devices. The following models are especially popular on the Russian market:
- with a frontal method of loading things;
- having shallow depth and compact dimensions;
- economical modifications in terms of water and electricity consumption.
It is worth noting that, unlike Europeans, domestic users prefer versions with front-loading laundry. Therefore, among Russian-made washing machines, only the representative office produces units with vertical filling of the working compartment.
Among the non-standard modifications, the following features can be noted:
- reduced depth from 500 to 550 millimeters;
- narrow versions with volume from 390 to 470 mm;
- full-size options in European dimensions;
- super-narrow models with a depth of 330 to 360 mm.
The machine stopped while washing
| Cause | What to do |
| Incorrect machine operating program selected | Inspect the panel to make sure the switch is not paused. |
| No power supply | Using a tester, check the supply voltage in the socket, and also whether the circuit breaker in the panel is turned off and whether the plugs are in good condition. |
| Hoses clogged | Check the condition of the inlet and outlet hoses, and after detecting a blockage, flush the hoses. |
| The pump is broken or clogged | After removing the pump, inspect the impeller and, if necessary, replace the faulty pump. |
| The inlet valve is dirty or broken | First of all, it is necessary to clean the valve, and if there is a malfunction, replace this part with a new one. |
| Draining water through the outlet hose (water entering the machine due to siphoning immediately flows out of the device) | Check how well the outlet hose is connected to the riser. |
| The thermostat is broken | You need to check whether this part works and, if necessary, replace it with a working thermal relay. |
| The heating element is broken | After checking the electrical circuit, replace the element if necessary. |
| The programmer timer does not function | If this part does not work, you will have to replace it with a new timer. |
| The electric motor is broken | Remove the drive belt, then turn on the spin cycle and, after turning on the machine, check whether the motor has started to rotate. The faulty engine must be disassembled and then the operation of its elements must be checked. |
You can replace the pump yourself. Vladimir Khotuntsev will tell you about replacing the pump in a Bosch top-loading washing machine in the next video.
Causes and prevention of failure
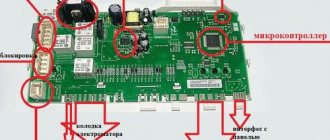
The following factors can cause module failure:
- A manufacturing defect.
- Water gets on the board.
- Unstable voltage in the network.
- Violation of the integrity of the wires.
- Improper operation of household appliances, for example, constant overloading of the machine.
To prevent parts from breaking, you must follow simple rules:
- Maintain a normal level of humidity in the bathroom.
- Do not allow moisture to accumulate inside the device, for which purpose the hatch should be left ajar after washing and the cuff should be wiped with a dry cloth.
- Use voltage stabilizers.
- Follow the rules for operating and transporting household appliances.
Modern models of Bosch washing machines can be controlled using a smartphone. To prevent software failures, you should only use official applications from the developer.
Problems with the washing machine
If you cannot turn on a semi-automatic or top-loading machine, it does not draw or heat water, or otherwise does not perform its basic functions, then you first need to look at the instruction manual - perhaps these problems are caused by improper handling of the device.
If the machine does not turn on, first make sure that you have selected the correct wash cycle, closed the door tightly and plugged in the machine.
Video:
You may notice when connecting that the plug of the machine is faulty and that is why the machine does not work.
You also need to make sure that the taps through which water flows into the semi-automatic machine or other model are open, because This is also a common reason why the washing machine may not turn on.
If you find that the problem is in the electrical wiring, then you need to remove the plug from the network, remove the outer panel from the machine and clean it if you see oxidation processes.
The machine may not start due to a faulty timer.
To find out how it works, you need to switch programs until the reel starts. If the problem is with the timer, then you need to buy a new one.
For other possible malfunctions that prevent a semi-automatic machine from starting, and ways to solve them, see the video.
Video:
https://youtube.com/watch?v=xZn7-uTPoYQ
If water does not flow into the device, then the first thing you need to do is check whether the valves for water supply are open, and also assess whether the inlet hose is in order.
If it is flattened or deformed, it needs to be washed and returned to its previous position.
Perhaps the filter in the car is clogged, to repair it yourself, close the tap and separate the hose, then remove the filter with round pliers and rinse it under water, then put it back in place and connect all communications. Watch the video on how to do this.
The inlet valve may be damaged. In this case, you will have to purchase another valve.
It is located in the same place as the inlet pipes; the instruction manual will give you more information on the structure of your machine.
However, you should not tighten it too much, because... In this case, wear of the bearings, plates, belt or motor may occur prematurely.
To avoid damaging the quality of bearings, boards and other parts, check the belt tension: if the displacement is 12 mm when pressed, then it is tensioned correctly.
If the car is semi-automatic and there is no belt tension, then you will need to buy another one.
The machine drum will not be able to function if the machine door lock is damaged. The latch may be stuck or broken. To find out, press the machine handle several times.
It didn't work, which means the latch is damaged. Finally, the problem could be a faulty motor.
Most likely, it will not be possible to fix it even with the help of a video, and in this case it is better to turn to professionals.
Video:
If a semi-automatic or top-loading machine stops during operation, then the first thing you need to do is check whether you have paused it.
It may also be that the reason is an interruption in power transmission, which is why the machine turned off. Often the problem is a faulty pump, which can become clogged or break.
To do this, you need to remove it and check for problems, and replace it if necessary. How to remove the pump from a washing machine, watch the video.
Washing machine disassembly diagram
Devices from any manufacturer such as Ariston, Indesit or other machines have a similar structure and disassembly principle. There may be only slight differences in details, which we will discuss later.
The basic schemes are predetermined mainly by the type of laundry loading.
Horizontal loading
First, you should turn off the power to your device, remove the drain hose from it and turn off the water supply to it.
If you know the diagram of the internal structure of all the elements of your washing machine, then you can roughly guess in which part of the machine the breakdown occurred and, without wasting time disassembling the entire washing machine, start doing this from the place of the supposed breakdown.
This way you will save your time and effort.
For example:
- A decrease in the quality of washing, an increased noise level during spinning and poorly wrung clothes indicate a problem in the pump, or it is simply a clogged hose. To eliminate this type of breakdown, disassemble the machine from below, or simply remove the front panel.
- If you notice that the water does not heat up, then this is most likely a breakdown of the heating element. You can find out the location of this part by reading the instructions. As a rule, you need to remove the back panel, but in some models of washing devices this part may be located on the front.
- If the drain takes longer than usual, then the problem is in the pressure switch or pump. Based on the structural structure of the washing machine, the part can be located either behind the side panel or in the upper part.
- If there is a problem with the drum or bearings, then you will have to completely disassemble the machine.
Step-by-step instructions for disassembling a washing machine
- Top hatch.
It is held in position by several screws (you can use a Phillips screwdriver to remove them) at the top of the back panel. When you have unscrewed them, you should press on the cover from the front side, and then lift it up.
- Tray for detergents.
To remove this element, you need to feel a special plastic button, which, as a rule, is located in the center of the tray, and after you press it, pull the element towards you and the dispenser for gels and powders will come out.
- Removing the control panel of the washing machine.
This part is secured with a pair of screws. One of them is located under the powder tray, and the second is located in the opposite part of the panel. Do not forget that you should handle it with extreme caution, and it will be better if you place it on the top of the machine or put it on a hook.
- Removing the service panel.
It is needed for servicing and removing small items that accidentally got into the tank during washing, so it couldn’t be easier to remove - press two latches on the sides and the third one, which is located in the middle.
- Front wall.
First you need to remove the rubber clamp located on the loading hatch. It is held in place by a small spring that needs to be tucked in.
Next, you need to tighten the cuff in a circle (pliers and screwdrivers will help you). If the cover is in the way, you can remove it by unscrewing just a few bolts, but if it doesn’t bother you at all, you can leave it alone.
Next, find all the latches that hold the front panel in place.
In addition to them, there are also hooks on the panel and in order to remove them, the part should be lifted a little.
The power connector is removed from the hatch locking devices, and the panel is now completely at your disposal.
- Back panel.
Everything is much simpler here, because to remove this wall you only need to unscrew the fixing bolts around the entire perimeter (of which there can be quite a lot).
Vertical loading
The unit should be disconnected from the drain, electricity and water supply.
- Control Panel. Using a screwdriver, carefully pry up the top control panel from all sides. Pull it up, then towards the back wall, and then tilt it at an angle convenient for you so that you can easily work with the wires.
Be sure to take photographs of the wire locations in the “BEFORE” disassembled state. Then everything is twisted and dismantled. The printed circuit board contains all the elements that can be unscrewed to further detach the mounting module. - Side walls. To remove the side panels, tighten all the screws, the bottom edge leans towards you, and pull it down.
- Front wall. You can remove its fastenings only after dismantling the side panels.
How to disassemble washing machines of different brands
How to disassemble a Samsung washing machine
In Samsung washing machines, the tray for loading detergents is attached to two self-tapping screws.
The heating element in Samsung machines is located under the front cover of the washing machine, below the loading tank.
How to disassemble an Ariston washing machine
The biggest problem that can befall washing machines manufactured by Ariston is the failure of oil seals and bearings. The manufacturer tried his best to make these parts impossible to repair, although if you have golden hands, then this is not an obstacle.
The tanks of Ariston machines are solid, so to replace the seals you will have to completely flare the tank, or, simply put, cut it.
How to disassemble an Atlant washing machine
It is very convenient to get the drum in the Atlant machine through the top hatch, not forgetting to remove the counterweight and dismantle the top control panel in advance. The drum in this model is disassembled into two halves, which are bolted together in working order. This model is very practical in terms of tank repair.
How to disassemble an Electrolux washing machine
The front wall in the Electrolux can be removed, and it will also provide access to all the main components.
“To replace (repair) bearings and seals, you do not need to dismantle the entire tank, since these parts are located on removable supports.”
How to disassemble an LG washing machine
To remove the front wall of the washing machine in LG, you will need to unscrew the hatch cover and then remove the cuff. It is held in place by a clamp that will become a screw in one place.
This screw can be found if you lift the edge of the clamp with a screwdriver and inspect everything, moving in a circle.
To make it easier to remove the drum, first remove the top weighting from it.
How to disassemble an Indesit washing machine
The back panel of the Indesit washing machine is a small oval wall, which is attached with six bolts. The top cover is inserted into the grooves, and to remove it you will need to unscrew two bolts, and then lift the part towards yourself, without lifting it.
The heating element is located under the tank, and access to it is freely accessible through the back of the device.
The weighting weight in machines from this company is located below and above the tank.
How to disassemble a Bosch washing machine
As standard, the Bosch washing machine comes with a special wrench, which is located in the bottom panel. Behind it you will find a drain pump, which will be located a little to the left.
Harbingers of breakdowns
While the washing machine is operating, you may find that the equipment behaves strangely: either the drum does not spin properly, or it makes too much noise, or vibrates with great force, and water flows out of it. Such signs may reflect either existing problems, or they may only indicate that the device will soon have to be repaired.
For example, a strange noise as the drum rotates may indicate that you forgot to remove metal items from your clothes. It’s good if they remain in the drum, but if metal things end up inside the tank, then the equipment will have to be repaired or completely replaced.
A common cause of noise is a broken drum bearing. This is a very important part of the machine, which breaks down and requires replacement quite often. In this case, it is more difficult to repair the equipment, because you will have to disassemble it completely, but you can replace the bearing yourself. To do this, you will have to remove the top panel, the front panel, dismantle the tank, remove all fasteners and tubes and, finally, get to the bearing. It's a small detail, but a bad bearing can really contribute to serious appliance problems. If the machine vibrates when washing, this may indicate that it is extremely busy.
Vibration may also indicate that the ballasts are loose. Each model has small concrete weights inside for stabilization. If the fastening of such loads is loose, it needs to be tightened. The weights themselves may burst, and then they will have to be replaced.
Dismantling the command apparatus
Dismantling requires preliminary preparation. As in any other case, when you work on a washing machine, before repairing it, you need to disconnect it from the water supply and power supply. Then move the device away from the wall so that it can be easily approached from any side.
Make sure that there is no water in the drum, remove and clean the debris filter, and remove the powder receptacle from the groove. Now unscrew the screws that secure the top panel of the washer and remove it. For most old-style cars, you will also have to remove the plastic control panel from the front wall. After this, you can begin to dismantle the command apparatus itself.
- Inspect the washer from above. Locate the wires that direct the flow of water to the different compartments of the dispenser. One end of it is fixed to the panel on top of the powder receiver with two clamps. Unclench them and remove one end of the wire.
- Now move to the left wall of the washing machine (if you are facing the front panel, it will be on the right for you) to the mode regulator, to which the second end of the wire is attached to a hook, remove it.
- Remove the plastic cylinder indicating the washing programs.
- Under it, in a small niche, you will see a self-tapping screw. Unscrew it with a screwdriver.
- Remove the plastic element it holds, under which you will find two more large bolts that are responsible for fastening the command device itself.
- After removing these screws, the command device will only be held in place by a multitude of wires. To remove it, you will have to remove the wiring, first marking somewhere which wire corresponds to which hole, so that you can then correctly mount the element back.
Important! The correct position of the mode switching knob determines whether the machine will correctly understand your choice of program, so before removing it, remember exactly what position it was in.
How to avoid malfunctions
Repairing an LG washing machine or any other model can be quite difficult, so it is best to take care of the equipment and try to avoid breakdowns and damage.
To do this, you must follow the following rules:
- Don't overload the drum.
- For washing you need to use high-quality gels and powders.
- The inlet and outlet filters must be cleaned regularly.
- After washing, the door should be left open and the seal should be wiped dry with a rag.
To carry out minor repairs, it is also important to study the design principle of your household appliances and take into account the model of the unit. If you are not confident in your abilities, it is best to contact a specialist or a service center for repairing household appliances.
Call the master
It is not always possible to repair the board on your own. Sometimes difficulties arise even at the stage of disassembling household appliances. If you don’t have the necessary knowledge and equipment, you should call a specialist.
Specialists advertise their services on the Internet and in the print press . Sometimes word of mouth comes to the rescue. The cost of repairing the board of a Bosch washing machine starts from 2,600 rubles. The module will have to be purchased separately.
To avoid dealing with scammers, it is better to contact large service centers that provide a guarantee for all types of work.
Water does not fill the tank and the system does not drain
If water is not being filled into the tank of the Electrolux machine, there is no need to panic and call the technician right away. You need to try to find the cause and repair it yourself. First you need to understand whether the water supply is working properly. It happens that water flows intermittently due to low pressure.
There are times when a person forgot to open the tap that supplies liquid to the Electrolux washing machine. If no fault was found in the water supply, then the reason may be in the Electrolux washing machine. If low-quality water comes in, this happens due to a clogged inlet valve. It can also burn out if there are power outages. If the failure is in the heating element, then the wash does not start.
If the reason is that the water is not draining, it may be a clogged drain filter or drain. You can do this type of repair yourself. To eliminate this, you will have to completely clean these elements. Such methods are preventive measures and are most often carried out by the owner of the equipment. If no blockage is detected, then you need to inspect the drain pump or pump. If a problem is found, the devices are replaced. It happens that the pressure switch stops working. This is a sensor that is responsible for the water level.
Common washing machine problems
There is a list of the most common faults that most often cause a washing machine to fail.
- The water does not heat up. To determine whether the water is heating up, during washing you need to touch the door of the washing machine; it should heat up from the hot water. If the door is cold, then the heating element, thermostat or electronic programmer has failed;
- Tapping and vibration. This may indicate improper installation, broken bearings, shock absorbers, or foreign objects between the drum and the tank. Replacing bearings in a washing machine can be done by yourself;
- Water leakage is also one of the common reasons. This means that it is time to replace the gaskets, the hatch cuff has ruptured or the pipe has broken;
- The wash does not start and water does not flow. It is possible that the water supply hose is clogged, the inlet valve is broken, or a program failure has occurred.
- The washing machine does not turn on. This may indicate that the power supply has burned out, the power supply has broken, or the firmware has crashed.
Electric motor for a grinder or emery
Purchasing a ready-made sharpening machine is not always possible, primarily due to the high price, and in this case an electric motor from a washing machine or other equipment literally becomes indispensable.
A lot of effort requires the correct layout of the future unit, as well as solving such a technical problem as attaching a grindstone to the motor shaft. In many cases, there is no thread on it, and the diameters of the shaft and the hole in the stone do not match. The usual way out is to use a special part, which must be ordered separately from a turner's workshop. This part may be called a flange, adapter, hub, etc.
The flange to be machined must be fitted onto the shaft and secured with a bolt. In addition, you will need a washer and a nut with threads directed in the direction opposite to the rotation of the motor shaft. Due to this, spontaneous tightening of the nut will occur during operation. Otherwise, the nut will quickly unwind and the stone will fly off.
If necessary, you can change the direction of rotation of the rotor. Asynchronous motors are installed in washing machines, therefore, it is enough to switch the corresponding windings, and the direction of rotation will change. To start the engine you will need a starter coil. If it is missing, then there is nothing to worry about: when you push the stone in the right direction, the device will work on its own.
To make a sharpening machine, it is not at all necessary to use high-power engines. 400 W is quite enough, and even 100-200 W. You should pay attention to the number of revolutions per minute, which should not exceed 3000. Otherwise, a motor with too high a rotation speed may lead to destruction of the grindstone. The best option is an electric motor with 1000 rpm.
Operating a homemade sharpening machine requires strict adherence to safety regulations. First of all, it is necessary to provide a protective casing to protect the worker from abrasive dust and small debris. For this purpose, metal 2.0-2.5 mm thick in the form of a strip folded into a half ring is suitable. In addition, it will be necessary to make a tool rest to ensure the support of the workpieces.
Surface care
One of the maintenance stages is cleaning the external surface of the machine from dirt. Before starting the procedure, the washing machine (for example, Samsung, Ariston or any other) must be disconnected from the network. If this is not done, water may get inside during the washing process and cause damage to the machine.
For washing, it is recommended to use a non-aggressive cleaning agent. During this procedure, you cannot use a composition that includes hard particles, since as a result, the outer part of the washer may be damaged.
Do not use alcohol or solvents containing chlorine for cleaning during maintenance. These compounds can damage the paint on metal parts and plastic parts.
After finishing washing, you need to wipe the washer with a dry towel and allow time to dry. To carry out washing, it is necessary that there is no water left not only on the external surfaces, but also inside the machine, where it could get accidentally.