The Chaika sewing machine is perhaps the most popular model of home sewing machine, despite the abundance of imported household sewing machines in stores. At one time I had to buy it for a lot of money, and it seemed like it had sewn well recently, but something began to loop. It really is almost impossible for her to break. The body is made of aluminum, the parts are all metal, the components are strong and reliable - everything is in the style of Soviet technology. But, unfortunately, it loops almost “from birth” and knocks when sewing, like a machine gun.
The plant provided many other “delights” along with instructions for design and use, where almost 5 pages describe how the pedal works, an electrical diagram of the engine is given, but not a word about how to set up and repair the Chaika sewing machine .
Model range of sewing machines Chaika
The Chaika sewing machine has many models, practically not much different from each other: Chaika 2; 3; 142m; 132; 134; 143 and others. Sewing machines of the Podolsk plant: Podolsk 142, Podolsk 125-1 others, as well as the Malva sewing machine, have approximately the same device as the Chaika. Therefore, the instructions for one of these machines are quite suitable for any model of a full zigzag sewing machine, such as the Seagull.
Setting up, adjusting and repairing Chaika sewing machines is almost the same for all the models listed above, with the exception of repairing the copier (depending on the machine model) and setting some shuttle parameters. But since our task is to learn how to configure only a stitch, we will omit the repair of many components in this article. In addition, such repairs cannot be done with your own hands without professional knowledge and experience, especially at home.
An incorrectly selected needle number leads to thread breakage
Correct selection of a needle is one of the conditions for good operation of a sewing machine. Unfortunately, this is what is least paid attention to. A needle that is too thin “fractures” the thread and it breaks; a needle that is too thick destroys the fibers of thin fabrics and leads to seams “unraveling” after washing. For knitted fabrics, elastic fabrics (stretch), denim fabrics, especially for leather, it is advisable to use special needles with a specific blade and point shape. For more information, see Sewing machine needles.
Any instruction contains recommendations for selecting a needle, depending on the type and thickness of the fabric and the selected threads. Here is a list of recommendations for the Chaika, Podolskaya sewing machine: Silk, cambric - No. 70; chintz, satin, cambric, linen fabrics - No. 80; cotton fabrics, calico, flannel, thin woolen fabrics - No. 90; woolen, suiting fabrics - No. 100; thick woolen fabrics, cloth - No. 110.
The needle must be set up all the way and tightened well with the screw so that it does not jump out during operation. The flat (sawed-off) side of the bulb on the needle should be facing away from you. And do not install industrial-style needles with a round flask. Such needles lead to skips and even serious damage, in particular the breakage of a sewing machine needle.
Lubricating the Chaika sewing machine
Before you begin repairing and setting up the Chaika sewing machine with your own hands, it is advisable to do a routine inspection, cleaning, and lubrication. To do this, disconnect the electric motor from the mains and remove the top cover (it is secured with two screws from the top). Disconnect the presser foot, remove the needle and needle plate, and the hook mechanism cover. Remove the machine from the wooden stand or table. Disassemble the shuttle device: bobbin case, locking ring, shuttle. Now remove from the machine (especially in the shuttle compartment) dust, dirt, fuzz and lubricate all rubbing, accessible places well with machine oil. You can look at the places that need to be lubricated in the instructions for the machine or lubricate all accessible rubbing metal parts and assemblies.
For lubrication, it is very convenient to use a medical disposable syringe; just select a size so that it fits into the neck of the container with oil. The needle must be removed when “filling” with oil.
Internal organization
“Chaika-2” is equipped with a shuttle device, a stitch type determiner, a zigzag width regulator, a spool pin, a winder and a flywheel. One lever is responsible for moving the needle, and another is responsible for attracting the threads. A plate for needles is provided. Other parts include:
- platform;
- clamp detail;
- a pair of covers;
- lever that raises the foot;
- thread tension controller;
- needle bar;
- tension washers;
- needle shift lever;
- return feed lever;
- zigzag handle, stitch controller, comb raising, copier body shutdown;
- pattern design.
Seagull sewing machine repair
The main malfunction of “Chaika” type machines that perform zigzag stitching and several types of finishing stitches based on it are skipping, looping of the lower and upper threads, as well as thread breaks at the top and bottom. It is these faults and ways to eliminate them that we will consider in this article.
Thread breakage most often occurs with Chaika-type sewing machines. The first reason leading to thread breakage is the bent point of a blunt needle, which breaks the thread while it is moving. Using a magnifying glass, you can clearly see the condition of the needle tip. Use serviceable needles designed for Chaika sewing machines in accordance with the instructions.
A thread break can be the result of many malfunctions, for example, if the needle touches it when entering the needle hole, the thread will periodically break. When performing a straight stitch, the needle should be located in the center of the needle plate hole, evenly spaced from its sides, and when performing a zigzag operation, the position of the needle L should be the same as R.
The longitudinal installation of the needle in the center of the needle slot is carried out by shifting the needle bar frame, fixed with two screws on the rocker arm, in the upper part of the machine (scroll the flywheel on the zigzag stitch and you will see this fastening). Loosen these screws and set (on a straight stitch) the needle exactly in the center (offsetting the needle bar frame). After this, check the position of the needle when injecting it left and right. I hope that the needle entry (at the maximum zigzag width), on the right and left, will be evenly spaced from the center. If it touches the edge of the hole at the maximum zigzag width, contact a specialist; this case is for him.
User manual
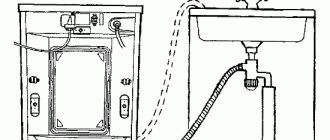
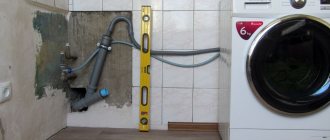
To prepare a semi-automatic washing machine for operation, you should open its lids and check the emptyness of the tanks. Next, the drain hose is connected to the outlet of the fitting, and the bent end is hung in a special place. After this, pour 1 liter of water into the washing tank. And test the operation of the equipment idle. Plug the power cord into the outlet, first checking that all relay handles are turned off.
The washing solution is prepared in a fairly simple way. To do this, water is poured into the washing tank, the temperature of which is from +30 to +80 degrees Celsius, up to the specified mark. After this, powder is poured into the water or finely chopped soap is added.
Washing one load of laundry takes approximately 3-5 minutes. Rinsing can be done either in the washing tank or in a separate container.
Thoroughly rinsed items must be sent to the second spin tank. This procedure usually takes 3 minutes.
In order for the Chaika electrical circuit to serve for many years, you need to adhere to the following recommendations:
- always fill water to the indicated level;
- Do not pour a lot of washing powder at once, it is better to add it as needed;
- at the end of the washing procedure, you should wash the tank from the inside each time, and turn on the idle spin mode;
- Tanks must be wiped dry;
- do not forget about washing the hoses and pump;
- store removable parts from the machine in a special container.
Next, watch a video on how to operate the Chaika-3 washing machine.
Adjusting the vertical position of the needle
The transverse position of the needle is regulated by a rod mounted on a plate with two screws and a plate pressing the needle bar frame to the bracket rod. Adjusting this unit is quite complicated and requires experience, but, unfortunately, it is this mechanism that can spontaneously go astray during operation, especially with the Chaika electric sewing machine. Therefore, if you decide to repair your sewing machine yourself, you should learn how to adjust the position of the needle, since moving the needle forward is the cause of its breakdown, and moving it away from the seamstress is the cause of skipping.
Adjusting the needle position requires professional knowledge and experience. If you are not sure that you can do it yourself, contact a specialist, since it may cause failure of other components, the repair of which cannot be learned from a boring book stuffed with technical terms and diagrams.
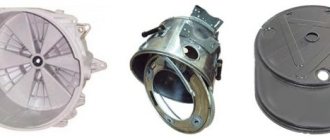
It can be added that when using a crooked needle, notches may form on the nose of the shuttle, which “fluff” the thread and break it. The nose of the shuttle should be perfectly smooth and sharp, without roughness. Its condition can be determined by running your fingernail along the edge of the nose or using a magnifying glass. The clamping plate tightening screw should not be jagged, the latch handle should be clearly fixed and its surface should be clean and smooth. The shuttle itself must also be perfectly clean, without nicks or rust stains.
Adjusting the shuttle stroke of the Chaika sewing machine
Incorrect position of the hook of Chaika sewing machines leads to thread breakage and the appearance of other stitching defects, including gaps. Skips usually appear due to the incorrect position of the shuttle at the moment of meeting the needle - the nose of the shuttle does not capture the formed loop, it passes by and a skip is formed. Many other factors may also be the cause.
In order to correctly set the meeting position of the shuttle nose and the needle, it is necessary to adjust the position of the shuttle stroke. You can loosen the two bolts that secure it and carefully, using a powerful screwdriver, move or move away the stroke together with the shuttle in relation to the needle. The shuttle rotates on an axis rather than moving back and forth. This is a very important point. There is no need to pull it out with a nail puller or hammer it in, it easily turns on its axis. It is difficult for an inexperienced person to immediately understand what is being said, but it is also very difficult to explain in more detail. Anything else that can be added, look carefully before twisting anything, much less unscrewing it. There should be no remaining parts after the repair.
Shuttle and needle adjustment parameters (Seagull)
At the moment of the meeting between the nose of the shuttle and the blade of the needle, the following parameters must be observed: the gap between the nose and the blade is approximately 0.15 mm; when the needle comes out from the lower position to a height of 1.8 - 2.0 mm, the nose should approach it above the eye of the needle by 1 mm, at least, but not more than 3 mm. By the way, a very important point is raising the needle from the lower position (1.8 - 2.0 mm). This parameter affects the formation of the needle loop and should be paid special attention to. In order for the spout to grab the thread from the needle, it is necessary for a loop to form, where it passes, hooking it. That is why the needle must first go down and then, having risen a little, meet the tip of the looper.
The position of the needle is also regulated by the needle bar; for this purpose there is a screw for fastening it to the sleeve under the front cover (see above).
If you set these parameters for adjusting the shuttle stroke, the “Chaika” sewing machine will work relatively normally. But, unfortunately, the repair is not finished yet. There are also many other shuttle settings that are quite complex and necessary for the Chaika sewing machine. It is there that the reasons for thread looping and such a rare phenomenon for sewing machines are hidden - the bottom thread breaks. The difficulty of presenting this material is that for almost any model of the Chaika sewing machine, engineers have provided their own specific settings for setting up this unit and, moreover, requiring a lot of experience from the performer. For which we thank them, at least from the sewing machine repairmen. They will not be left without work as long as there are Chaika sewing machines.
Main components and mechanisms
Remove the top cover (two screws on top of the cover) and lubricate the main components of the front compartment with a few drops of oil. Screw 1 is designed to adjust the needle bar into which the needle is inserted. Screw 2 clamps the upper thread tensioner. This fastening quite often needs to be tightened, because the plastic body of the tensioner falls through the screw and the tensioner begins to wobble in the seat.
If the fabric is not moving well, most often you just need to lift the teeth of the rack by setting the switch to position (H) - normal, B - embroidery.
When removing the flywheel, be sure to pay attention to the position of the friction washer petals (L). To completely remove the friction screw holding the flywheel, loosen the screw (K). Adjustment of the tension of the electric drive belt is carried out after loosening the screw (B).
The device for winding the thread onto the bobbin also needs to be lubricated and sometimes adjusted.
Flywheel friction washer
Sometimes you have to remove the flywheel from the machine. There are only three parts in this assembly, but many people cannot assemble it correctly. This is due to the fact that it would be more logical to insert the petals of the friction washer inside the slot of the shaft, so they do so. As a result, the machine begins to idle. The petals should not be facing towards the machine body (shaft), but towards you. Moreover, they can be supplied in “two options”; choose the one in which the limit screw will not interfere with tightening the flywheel fastening.
Characteristic
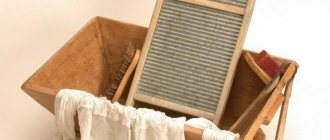
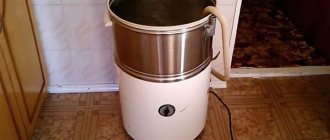
The Chaika washing machine began to be produced back in the days of the Soviet Union. This type of technology quickly became popular among the population, as it freed housewives from hand washing. They are still used today; sometimes such units are found in country houses or rented apartments. This is not surprising, since the service life of this washing machine is about 20 years.
"Chaika" consists of two tanks:
- the first one washes clothes;
- the second is wrung out followed by drying.
During the working process, soiled items are placed in the first tank, and after washing is completed, they are moved to the second, where they are wrung out.
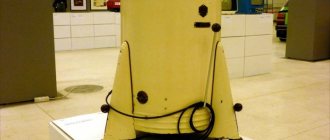
This washing machine is not programmable, so before loading, it is worth inspecting the laundry for stains, as well as separating colored and white items.