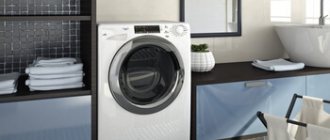
The Italian brand of household appliances Ardo has long become very popular and popular among a wide range of consumers. Automatic washing machines are considered a unique calling card of this brand. The model range is represented by machines of various sizes - from compact to full-size. And Ardo top-loading machines are considered one of the most convenient for rooms with limited size.
The only pity is that, like any complex equipment, Ardo washing machines cannot be fully insured against malfunctions. Some problems are quite easy to fix on your own without interfering with the internal world of the machine, while others may require some repairs to fix. Many types of repair work are also quite accessible to carry out on your own.
What breaks most often according to statistics:
- 30% - clogged drainage path, wear and breakdown of the pump:
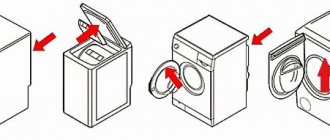
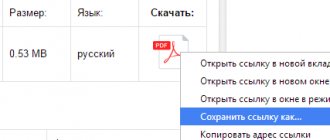
Open the loading hatch and identify the machine model on the sticker.
Unscrew the drain filter from the front bottom and clean it.
We change the pump, which is located at the bottom right on the back side.
Loosen the clamp on the drain pump pipe.
We check the pump, clean it, and if it malfunctions, replace it.
Over time, mechanical wear appears on the shaft. The impeller dangles and does not pump out water well.
- 20% malfunction of the electronic control board:
MINISEL board:
Ardo models FL1000,FL1202,FLS81S,A800XEL, AE810, AE800X, SE810, FLS81S, AED1000X,TL1000EX, TL1010E ANNA610, ANNA 600X, A410, A610, A500, A1000.
We look at the power source and the level of constant voltages (5 and 12 V) at its outputs. If there is no voltage at the output of the IP, check the corresponding elements - power switch, power filter, power transformer T1, rectifier (D11-D14), microcircuit U1.
module :
Models A800, A804, A810, A814, WD800X, S1000X, T80, T800, TL800X, TL804, etc.
Malfunctions in the DMPU module
By power module:
break in resistance R51 (A, B); stabilizer U3; Zener diode D24 (short circuit); varistor VDR5 is broken.
For engine control:
relay K1, K2; rsimistor TR2. Diodes D1-D6, D9-10, D15, D23.
Legacy DMPA module:
They are used in machines that include an asynchronous drive motor and a mechanical command device.
Models A1000PL, A1000XCZ, A1000XPL, WD1000PL, TL1000X, etc.
The wear of the heating element increases with “hard” water.
Overgrown with scale (scabs), it transfers heat poorly and burns out.
You need to pull out the elastic band and not the heating element. Since when pulling out the heating element you can wedge the elastic band.?
This is important to avoid further leakage under the seal.
- 10% wear on the commutator motor brushes, loose contacts, broken drive belt
Remove the belt, unscrew the screws and remove the engine. There are two brushes on the engine, each secured with two screws. Unscrew the screws and remove the brushes.
Inspect the motor power supply terminal from the board and the ground wire.
Very often the contacts oxidize due to humidity and the machine gives an error because of this.
Each brush is installed in a brush holder. It can be disassembled into two halves. Pay attention to how much the brush protrudes.
This size should be at least 1 cm. The optimal option is 1.5 cm. After that, we assemble everything and install it in place.
- 10% - extraneous noise (bearings, shock absorbers, foreign objects)
Having jammed the pulley, unscrew the upper shaft clamping nut counterclockwise.
If the oil seal is not filled with specialized lubricant and the crosspiece bushing is not lubricated with it during assembly, the oil seal will wear out very quickly, regardless of its quality, this has been proven in practice.
There is no need to save money and improvise with lithol, grease and other lubricants; it is better to purchase specialized lubricants that are used to lubricate oil seals.
Standard sizes of bearings and seals Ardo:
This applies to modern technology - starting from 2000 (models AE800X, AED1000X, TL1ОООEX).
Thanks to it, you can perform diagnostics (DMPU control module):
Close the hatch (without laundry). Set the program selection to 30°C until it clicks. Temperature regulator to 0°C. Turn it on. The drum rotates at 250 rpm. To check the buttons for half load, extra rinse and others, press them. The spin speed increases from 250 to the maximum provided for in this model. If there are no additional functions, press the spin button.
When faults are detected, the indicators will flash.
Ardo Error Codes
- E00 |
E01 – Drain.
Clean the drain filter and drain pipes. E02
– Water flows or drains incorrectly.
The drain hose may not be positioned correctly. E03
– Water does not drain from the tank, and the drain time has exceeded 3 minutes.
F2
– Temperature sensor.
F4
– Displayed on the display if there is no water drain.
A possible cause is the drain pump. F5
– The water is drained and immediately refilled.
The problem is usually in the water supply filter. F6 |
F9 | F12 – Electronic module.
F8
– The water in the tank has exceeded the available level.
Suspicion of the aquastop valve. F13 |
F14 – Critical.
Breakdowns are a fairly rare occurrence, usually associated with improper operation. Italian technology is distinguished by its high technology and versatility.
How to carry out a service test equipped with a MINI-SEL board:
The control panels have different appearances. The steps to switch to the test mode are shown in the figures - move the program selector knob to the “6 o’clock” position - press button 4 - POWERFUL WASH and, holding it, press the POWER button. After this, the SM should go into test mode.
With temperature control knob:
— turn the program selector knob to the “6 o’clock” position — move the temperature selection knob to the “9 o’clock” position — press and hold the ENERGY button (for at least 6 s), at the same time turn on the power supply to the CM with the NETWORK button.
After this, the SM should go into test mode.
By turning the selection knob we check the devices:
Knob in position 1 (autotest) - NTC temperature sensor (sensor circuit for open or short circuit), pressure switch, display (if equipped), door lock and main function buttons on the control panel
2. First, the cold water inlet valve opens until a signal is issued from the water pressure sensor. Water is poured through the PRELIMINARY dispenser compartment.
3. First, the heating element is turned on and the water in the tank is heated to 60°C. Then the CM drum begins to rotate in cyclic mode at a speed of 45 rpm (as in washing mode).
4. The drain pump (pump) turns on. At the same time, the drum begins to rotate as if spinning.
5. Within 10 s, the hot water inlet valve turns on (if this SM model has one). At the same time, the CM drum begins to rotate.
6.The fan and heating element for drying are turned on (for models with drying)
The test mode is exited by turning off the power using the NETWORK button.
Ardo washing machine DIY repair
Share on social media networks:
Even the best quality household appliances tend to break down over time. If you have an “Ardo” washing machine, repairing it yourself will not be difficult. The ease of repair is due to the fact that the world-famous Italian manufacturer has taken care of the availability of all required components in any country and ease of maintenance. In this article, we will share with you recommendations regarding situations when an Ardo washing machine requires DIY repair, and how to carry it out.
Review of the best models
Ardo produces many high-quality and multifunctional washing machines. Each model has its own individual characteristics and features. Let's take a closer look at some of the top Italian-made devices and learn all about their functionality.
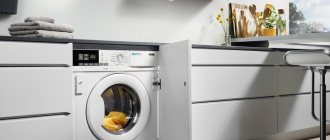
33FL105LW. Popular narrow front-loading model. The automatic machine has an attractive design and has a loading capacity of 5 kg. The device belongs to the sought-after energy consumption class A+++, has partial protection against leaks and a display that displays information about the selected mode and washing time. Drying is not provided here, but there is automatic balancing, a program for washing delicate items, an enlarged hatch and the ability to reload laundry.
Types of breakdowns
Service center specialists identify two main types of faults that can occur in Ardo washing machines:
- Typical - failures that occur in all washing machines, regardless of the manufacturer, for example, water does not drain, the drum does not spin, the door is stuck, etc.
- Rare - malfunctions that are inherent in products from a particular manufacturer and are associated primarily with the manufacturing technology of the unit. Examples of such breakdowns may be excessive flooding of the drum with water, insufficient or no heating of the liquid, etc.
Basic rules for DIY repairs
If you have experience working with household appliances and are confident in your own abilities, then you can repair the Ardo washing machine yourself, rather than waiting for the technicians from the technical service to arrive. The main task in this situation is to correctly diagnose the malfunction.
The easiest way to do this is if your washing machine model has carried out diagnostics and displayed the cause of the existing malfunction on the display. In this case, purchase the necessary components from the company store or service center in order to immediately replace the failed parts of the Ardo washing machine.
When you begin repairing your appliances, make sure you have access to the back of your washing machine. In any case, you will need to disassemble the unit. To remove the back cover, you just need to unscrew the easily visible screws.
Important! After removing the back cover, be sure to disconnect the power cable that goes to the pump motor. Only after these steps can you begin to unscrew the connecting bolts. Be sure to select the appropriate parts, since incorrect replacement can lead to serious consequences that you cannot eliminate on your own.
If your washing machine needs to replace bearings, then you can handle this task yourself. To do this, it is enough to understand at least a little the basics of technology and arm yourself with the instructions that come with Ardo washing machines.
However, if the breakdown is more serious, for example, a heating element or capacitor burned out, which are connected to the equipment using a variety of wires, then it is best to seek help from highly qualified service center specialists. The slightest mistake in DIY repair of the Ardo washing machine in such a situation can lead to more serious and disastrous consequences for the equipment.
Important! When starting to repair equipment, be sure to look at the warranty repair conditions. You should remember that repairing equipment yourself may result in the service center denying you warranty service for your washing machine.
Let's prepare for disassembly
Before you begin disassembling washing equipment with your own hands, you must be prepared for the work. First of all, you need to disconnect the unit from the power supply. Next, you need to turn off the tap responsible for supplying water to the system, remove the inlet hose and drain hose. After the washing machine is disconnected from communications, you should move the device to a place convenient for disassembly. To disassemble the washing machine you need to prepare the following tools:
- two types of screwdrivers (flat and Phillips);
- small hammer;
- wrenches of different sizes;
- pliers and pliers;
- puller (if bearings are to be removed);
- screwdriver;
- heads for loosening nuts and unscrewing bolts.
Article on the topic: How to disassemble the Ariston avsd 109 washing machine
Having all the listed tools in your arsenal, you can begin work. The process is not quick, so we advise you to stock up not only with patience, but also with free time.
The most common Ardo breakdowns and how to fix them
If the Ardo top-loading washing machine does not turn on or its operation does not meet the usual standards, then most likely you have encountered one of the following typical malfunctions.
The water in the drum does not heat up
This problem occurs quite often - both in units with vertical and in models with a horizontal loading principle. If you study user reviews and statistical studies, then in 95% of cases this is due to a malfunction of the heating element. Also, a malfunction of this kind can occur in the event of damage to the electrical heating circuit, which most often occurs due to the failure of one of the terminals.
Important! The most rational solution in such a situation would be to completely replace the heating element of an automatic washing machine. It is quite difficult to solve such a problem on your own, and the slightest inaccuracy can lead to more serious damage. Therefore, in such situations, it is recommended to seek help from service center specialists.
The drum does not fill with water after switching on
This kind of breakdown most often occurs in top-loading washing machines. There is a problem with the shut-off of the water tap leading to the equipment. The reason for this blockage is often a malfunction of the washing equipment valve. Two factors can provoke such trouble:
- control unit malfunction;
- filter contamination.
Important! If the power supply malfunctions, you cannot do without the help of specialists, because the valve mechanism itself will need to be replaced. If you encounter a dirty filter, cleaning it yourself will not be difficult.
Washing machine fills with too much water
If your washing machine pours an excessive amount of water into the drum, then there are two most likely causes of failure:
- Self-draining, as a result of which water is thrown by the system into the drum space, almost immediately after filling. Most often, this behavior of equipment is observed in the case of improper connection of the system to the water pipes.
- A program failure, which may indicate electronics problems or breakdowns of any parts.
Important! If the machine is correctly connected to the water supply, and accordingly a software malfunction in its operation is diagnosed, do not try to fix the problem yourself. Only a highly qualified maintenance technician can correctly identify and eliminate electronic faults.
Changing the lock on the vertical Whirlpool
Depending on the model of the top-loading washing machine, the UBL may be located in different places. On Whirlpool machines, the lock is not under the top cover, as on Ardo, but on the side, on the right side. To dismantle an element, you must:
- disconnect the machine from the network;
- turn off the tap responsible for the water supply;
- disconnect the drain and inlet hoses;
- move the “vertical” so that you have free access to all sides of the case;
- Unscrew the bolts holding the right wall of the case and remove the panel;
- find the UBL, it is located on top, in the corner, closer to the front wall of the machine;
- pull the blocker out of the housing with a sharp movement;
- take a photo of the wiring diagram;
- disconnect the wires from the blocker.
In the case of Whirlpool machines, everything is even simpler - you don’t have to remove the instrument console and touch the top cover. It is enough to remove only one side wall of the machine. Even a beginner will spend no more than 15 minutes replacing the blocker.
The price of UBL for top-loading Whirlpool washing machines is low, within a thousand rubles. Installing a new lock is performed in the reverse order:
- connect the wires to the contacts of the blocker according to the diagram;
- insert the device into the “socket” where it stood;
- fix the side wall of the case with self-tapping screws.
After this, a test wash is started. If the cover is blocked, the replacement can be considered successful. If the electronic lock does not work, you will have to check whether the contacts are connected correctly.
Share your opinion - leave a comment
Ardo washing machine does not turn on - washing does not start
Sometimes situations arise when an Ardo washing machine does not turn on. It is not at all necessary to immediately run to the phone to call repairmen. It is likely that the problem can be solved with your own hands, and the main thing in this situation is not to panic. This article will discuss the causes of the malfunction, as well as ways to eliminate possible breakdowns.
It will not be possible to immediately determine why the washing machine stopped turning on. This requires an inspection of the equipment. In this case, attention should be paid to both the external elements of the device and the internal ones. For example, the main reasons for lack of performance are:
- Electrical problems. This includes malfunctions of machines, sockets, extension cords.
- The power cord or plug is deformed.
- Overheating of the FPS - network capacitor.
- Door lock malfunction.
- Overheating of the start button contacts.
- Also, the cause of the breakdown may be a failure of the control module.
The following three reasons will require a thorough inspection and immediate repair. For example, as a result of a door malfunction, the indicators may not light up; they can be replaced fairly quickly.
And finally, the last reason is the most multifaceted and serious. It is worth considering each of the cases separately.
Minor damage
In a situation where Ardo refuses to turn on, it is necessary to inspect the equipment for possible damage or malfunctions. You need to start with the simplest reasons, which are located under points 1 and 2 above.
The washing machine remains in place during the inspection. First of all, if the Ardo machine refuses to turn on, you will need to perform the following steps.
- Check the outlet. To do this, you need to remove the plug from the socket and connect another electrical device to it. The verification method is quite simple. The socket is considered broken if the connected device refuses to turn on.
- If the outlet works, you need to check the extension cord where the cord of the Ardo machine goes. The verification method is the same as above.
- The next element of inspection will be the network cable. If damage to the insulating layer is detected, and traces of melting are also noticed, the cord must be replaced. Its further operation is impossible. Otherwise, this may cause the Ardo machine to stop turning on and working.
- Finally, if you cannot see any damage, you can check the wire using a multimeter. To do this, you must first set the device to the minimum resistance value, and then touch the probe to one of the teeth (usually the right one) of the fork. The standard resistance value for an Ardo machine is 2 ohms. Any deviation indicates that the plug needs to be replaced.
Removal in three movements
In fact, “opening” a washing machine is very simple. In the process of removing the “top” you only need a screwdriver or a regular screwdriver. Before disassembling the housing, be sure to turn off the power to the equipment and turn off the water supply valve. Next you need to move the equipment away from the wall, so it will be more convenient to work. Now nothing interferes with dismantling the top cover of the Ardo washing machine. The algorithm of actions is as follows:
- go around the washer;
- Unscrew the two screws that hold the “top” of the housing. The bolts are located under a small protrusion, in the right and left corners;
- Grab the top panel and pull it towards you. The lid should move just a couple of centimeters;
- remove the cover and set it aside.
This will complete the process of removing the top panel. You can begin diagnosing the Ardo washing machine and making the necessary repairs.
When the “top” does not budge, the panel is likely jammed. You will have to “stir” it by pressing on the lid from different sides. You can lightly tap it with a mallet.
It is important not to overdo it and damage the case. This is how you can remove the top cover on Ardo washing machines
Using this algorithm, it is easy to open many modern models of other brands - the principle of dismantling remains unchanged.
Mains capacitor fault
Sometimes the washing machine may not turn on due to problems with the FPS. This abbreviation stands for interference filter or network capacitor.
The element is a semiconductor structure that is installed inside the washing machine to absorb minor interference. It is no secret that the operation of almost all electrical networks occurs with periodic interruptions. They are caused by the same interference, the effect of which on the washing machine is eliminated by the FPS. This ensures reliable operation of the equipment and all elements.
You can find the FPS at the end of the power cord if you look inside the Ardo washing machine. If the filter breaks, it will need to be replaced. This action can only be performed after the top cover of the machine has been removed.
To remove it, you will need to unscrew two bolts and pull the part towards you. Under the cover you will find a wire, as well as a capacitor. It is recommended to disconnect all connected wires from the capacitor and take the structure outside.
The filter's performance is also checked using a multimeter at minimum resistance values. The serviceability of the element can be indicated if the device shows a rapid increase in the indicator to one. If during the test the numbers 1 or 0 appear immediately, the capacitor must be replaced.
To replace, you will need to buy a new filter and install it in place of the old one. All the necessary wires are connected to the new capacitor, and then the cover is screwed back on.
Replacing the pump
When the cause of the malfunction is known, you should decide whether to call a technician or try to fix the malfunction yourself. For example, you can remove the blockage yourself. As a rule, debris collects in the drain filter itself.
To clear the blockage, do the following:
- Open the small door in the bottom corner of the washer on the front side. Or remove the bottom panel.
- Next, you need to lay a rag on the floor that absorbs water, since water may leak out of the filter.
- Unscrew the valve. You need to turn it counterclockwise.
- Pull the drain filter towards you.
- Next, you need to rinse the filter thoroughly with water. Then clean it of debris.
- Reinstall the filter.
However, debris can accumulate anywhere. Debris can form in the pipes, the hose through which water is drained. Even the drain pump itself can contain debris. These parts are hard to find and not easy to reach. You will have to disassemble the body of the washing equipment.
There may be a small foreign object stuck in the drum. Then you will need to completely disassemble the machine. This repair is complex and will cost the owner quite a lot.
You can replace or clean the pump yourself. All you need are simple tools, skills to work with them and free time.
In an Ardo machine, the pump is reached through the bottom. On this side there is a plastic strip that can be easily removed, or there is no bottom at all.
To clean the drain hose, you must first completely disconnect it. The first end must be pulled out of the sewer, and the second must be disconnected from the pipe that comes from the pump. After disconnecting, the hose is cleaned with a flexible cable with a small brush at the end. Upon completion of cleaning, the drain hose should be rinsed with water, wiped and replaced in its original place.
Damage to the device power button
Another option why the Ardo washing machine does not turn on is a malfunction of the power button. Often the problem arises because the equipment is already old. Also among the most popular reasons are:
- Contact wear. In this case, the breakdown occurs gradually. At first, the indicators light up periodically, and then completely stop responding to any action.
- Water ingress. Liquid can penetrate inside the button, causing overheating of the electrical circuit responsible for the operation of this element.
- Oxidation of contacts. The problem occurs as a result of excess moisture. Therefore, it is worth paying special attention to such a moment.
In order to repair the button, you must first remove the control panel of the washing machine. To do this you will need:
- Remove the top cover by unscrewing all nuts and bolts.
- Inspect the button contacts and check their functionality using a multimeter. The check is carried out in exactly the same way as described earlier. In this case, you should also pay attention to the appearance of the numbers 1 or 0.
- Remove the button if any defect is found. Most cases require the use of a soldering iron.
- Install a new button in the same place.
- Put the lid back on.
- Plug in the washing machine.
Is the program switch knob working?
A non-functioning programmer can prevent the cycle from starting. When selecting and switching modes, the selector must be locked in the desired position. If the handle is faulty, this does not happen and the user cannot set the necessary washing parameters. Therefore, the machine does not start working. The programmer in many models is an integral part of the timer. However, this does not prevent you from checking the selector with a multimeter. What to do in this situation:
- turn off the power to the automatic machine;
- remove the “top” of the case by unscrewing a couple of bolts holding the cover;
- inspect the electrical circuit of the device;
- find the selector contacts;
- use a tester to ring the contacts.
Some modern Ardo machines have a digital selector. In this case, the device is not tied to the timer, but is built into the control board circuit. Here the programmer is more difficult to check - you need to apply the multimeter probes by activating the “Start” key.
Hard case
Finally, if during all previous checks it turned out that all the inspected elements are intact, it is worth concluding that the problem lies in the control module.
This type of malfunction is considered the most serious in the case of the Ardo washing machine. And it is not recommended to replace this element yourself. The work must be performed by an experienced specialist who can not only determine the extent of the damage, but also replace the part or element.
It is worth noting that one of the options for repairing the control module is replacing the microcircuit. And you can perform this action yourself only if you have experience working with such electronics. And even in this situation, the probability of success is much less than in the case of a professional.
The operation of any equipment requires a responsible and careful attitude, and the Ardo machine is no exception. If the device stops turning on or malfunctions, you should carefully inspect it for possible damage to various systems.
Some useful tips
Try to prevent the occurrence of malfunctions rather than bring the matter to repair work. To do this, it is proposed to follow some simple rules:
- before loading laundry into the drum, check the contents of its pockets for foreign objects;
- install the washing machine and connect it in accordance with the operating instructions;
- Wash linen with decor in special bags;
- load things in accordance with the established norm. Otherwise, the washing machine will be subject to rapid wear and tear and perform poor washing;
- use a voltage stabilizer to protect household appliances from sudden breakdowns;
- Clean the drain filter and washing powder tray regularly;
- Leave the hatch door open after washing to prevent the appearance of mold and mildew.
Types of breakdowns and reasons for their occurrence
A washing machine is a rather complex piece of equipment, so malfunctions of the unit can be caused by many reasons. But some of them are much more common than others. Here is a sample list of them:
User forgot to remove shipping bolts
If this is not done, then after shaking on a long journey, the unit will end up in a warehouse or shopping center in very poor condition.
Before the first start, these bolts must be removed, which some buyers do not do due to forgetfulness. Of course, in this state of affairs, the unit will not be able to work properly.
The machine was installed askew
All washing machines must be installed in a strictly horizontal position. The correct installation is controlled by the building level. If there is a misalignment, the rotation of the drum, especially in the spin mode, is accompanied by excessive vibrations and noise.
Poor water quality
The scourge of all washing machines, like boilers, is scale - a hard, porous deposit of calcium and magnesium salts (hardness salts), which forms especially actively in hot water. The heating element becomes covered with deposits, as a result of which it initially loses its ability to quickly heat water, and then completely fails.
Violations of operating rules
Many users themselves create problematic situations by ignoring the instructions given in the instructions.
For example, overloading the machine with laundry or, conversely, starting an almost empty unit leads to undesirable consequences.
Also, do not overfill the distribution container for detergents - powder and other chemicals must be poured in the quantities specified in the instructions.
Problems often arise because powder left in a container for a long time cakes, making it difficult for the machine to absorb it.
Some models react painfully to switching a washing program before the current one has completed.
And another emergency situation - the user started the machine, forgetting to close the drum.
Water getting into “where it shouldn’t”
Incompatible things - water and electricity - have to be combined willy-nilly in a washing machine. No matter how hard manufacturers try to seal electrical contacts, water often manages to short-circuit them. Moisture shows particular insidiousness in the form of ubiquitous steam, which easily penetrates into the most inaccessible places and immediately cools down and turns into condensate.
About additional details
Front-type counterweights are present only on some models. This is necessary to compensate for the imbalance. The shape, material, and weight of such inserts may vary.
The counterweights themselves are blocks with a fairly large weight. They can be plastic or concrete. The latter have a serious drawback - the ability to deteriorate and crumble over time. But most often serious problems arise due to mounting on counterweights. Because of them, the seat of the bolts is destroyed.
To transfer torque from the electric motor to the drum, you need a special belt. Most often, rubber is used to make such parts. But some manufacturers put belts made of polyurethane, neoprene and nylon inside their cars.
Drive belts are available in several varieties:
- groups Z – almost every device from Russia is supplied with them;
- H – found in small cars;
- J is a diagram for devices with large dimensions;
- 3 L – found in foreign analogues. LG, for example.
A wheel is fixed to the drum shaft, which is called the driven drum pulley. It also participates in transmitting the movement of the drive belt. The diameter of this structure determines what the maximum number of revolutions in the machine will be during operation. Aluminum alloys are very fragile materials, from which this pulley is almost always cast. This also applies to Ardo models.
DIY repair basics
Here are general instructions regarding repairs:
Tool
Most operations are performed using the most common tools - wrenches, screwdrivers, pliers, wire cutters, knives, etc.
To check the condition of the electrical part, you may need a multimeter and a phase indicator screwdriver.
In addition to the standard tool, sometimes it is necessary to use a magnet on a nylon thread or a nylon cord (helps to remove screws or some metal debris that have fallen into it from the machine), as well as a flexible metal ruler 70 cm or more long. The ruler is indispensable if you need to turn the drum into its normal position after it has been put into operation with the loading hatch open.
Ardo washing machine does not drain water
The solution to the problem must be sought in the following sequence:
- It is necessary to check for kinks or twists in the drain hose.
- If the drain hose is connected directly to a sewer pipe (fixed connection), you must ensure that it is not clogged. The easiest way is to disconnect the hose and see if water flows out of it. If not, check the hose for blockages.
- If everything is in order with the sewer and drain hose, you should check the condition of the drain filter. It is made in the form of a threaded plug and is located at the bottom of the unit on the front side - behind the door or decorative panel. Before unscrewing the filter, place a container under the machine to collect water. It is necessary to clean not only the filter itself from debris, but also the place where it is installed. After this, you can screw the part into place and check the results of the work.
- The next suspect (if all else fails) is the drain pump. Most often, this unit breaks due to small objects getting inside - coins, buttons, etc. The pump is installed at the bottom and is easiest to reach by tilting the car on its side. Some models of Ardo washing machines are not closed at the bottom; others have an easily removable protective cover in this place. First, use a multimeter to check the presence of voltage at the pump contacts. If everything is in order with the electrical circuit, turn off the power to the machine and disconnect the pump.
The clamps holding the drain hose and pipe from the machine tank do not need to be completely removed - just loosen them slightly. Then the wires are disconnected and the pump itself is unscrewed. After removing foreign objects, the assembly is assembled in the reverse order.
Washing machine drain pump
If the pump turns out to be serviceable, we move on to the last link in the chain - the level sensor, also called a pressure switch. It is he who sends a signal to the controller about the need to start the drain pump. To get to this element, just remove the top cover of the machine by unscrewing the screws and slightly pushing it back. Next, you need to check the condition of the connections of the wires to the sensor contacts. If there are no complaints about them, the pressure switch should be dismantled and the tube connected to it from below should be inspected for blockages.
Next, you need to blow into the tube - this way the functionality of the device is checked. If it is in working order, you should hear a click. If you cannot hear any clicks, you need to purchase and install a new level sensor.
There is no reason to complain about the quality of Zanussi washing machines, but no one is immune from unpleasant surprises. Zanussi washing machine - do-it-yourself repair of the mechanical component of the unit.
You will learn how to fix some types of failures of Indesit washing machines here.
It doesn’t always make sense to contact specialists if your washing machine breaks down. Some problems can be fixed on your own. If you are the owner of a Kandi washing machine, the following article https://aquacomm.ru/cancliz/mnogokvartirnyie-doma/santehnika/kandi-stiralnaya-mashina-remont-svoimi-rukami.html will help you deal with its repair.
Photo of ARDO repair with disassembly to the ground.
On this page we have selected a photo of the dismantling of Ardo right down to the frame . The case of disassembling Ardo down to its elemental base became a clear example of what happens to equipment during intensive use. So let's look at the photos of the renovation.
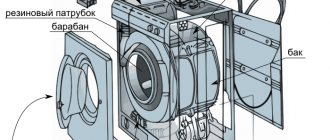
We remove the back cover - in the photo there are elements of the electrical circuit, part of the pipe and the stainless metal of the drum. The wiring is done quite neatly. The insulated conductors are collected into bundles and neatly plugged into the terminals.
In the next photo, the yellow-green ground wires and the metal outline of the stainless steel turned out especially well. The electronic module and terminal strip turned out a little blurry.
Side view of the back of the washer.
A wheel that transmits torque to a rotating drum; The crosspiece of the tank, which gives it rigidity, is a high-quality casting. The heating element is located inside, connected by black and white conductors. Power cord and drain hose in frame.
All the ins and outs of ARDO: Antonio MERLONI SPA; Via Vittorio Veneto, 116; 60044 FABRIANO (AN) ITALY; Model WD1000X 20014624179 05 Made in Italy; 230V 50Hz, IPX4 0.05-1Mpa; 5kg 2.5kg 10A 2200W; type ME03 PCT – Russian certification of goods.
The front panel of ARDO is a reflection of Italian design: round and rounded handles, oval buttons and indicators, apotheosis - Made in Italy
. So, let's take a closer look: BIANCHI CON(SENZA) PRELAVAGIO, COLORATI RESISTENTI DELICATI. Further inscriptions: RISCIACQUI (AMMORBIDENTE) E CENTRIFUGA, SINTETICI CON PRELAVAGGIO. RPM 1000/500, scales, water fill, centrifuge cancel, on/off. Temperature regulator 30 to 90 degrees Celsius, washing time, program selection. SINTETICI SENZA, TESSUTI MISTI DELICATI, SCARICO, LANA. The inscription on the hatch is 20014624179 014105018 01 05. Green light bulb 220 Volt, drum made of perforated stainless steel.
Article on the topic: Which washing machine is better: Samsung or LG
Ardo does not heat water
In this situation, you need to act like this:
- Remove the back panel by unscrewing the fasteners that hold it in place.
- Using a multimeter, check the presence of voltage at the contacts of the heating element, the shank of which protrudes from the tank in its lower zone (the machine should be operating in heating mode).
- If there is no power, you need to check the temperature sensor. Measure its resistance at room temperature and after heating with hot water. If it remains constant, the sensor needs to be replaced.
Heating element (bent heating element) for ARDO washing machine (Ardo)
At the same time, make sure that the contacts of the heating element relay (located near the control module) are not jammed.
If power is supplied, the heater is burnt out and needs to be replaced. Having disconnected the wires, unscrew the fasteners in the middle of the shank and carefully remove the heater, rocking it in different directions.
Having cleared the installation site of dirt, screw on the new heating element and connect the wires to it.
Drive belt breaks or stretches – from RUB 1,300*
The drive belt is responsible for transmitting rotation from the motor shaft through the pulley to the SMA drum. If it breaks, the drum stops rotating; if it is stretched, the machine can operate normally during the wash cycle, but does not pick up speed during the spin cycle.
SIGNS
The machine does not spin or the drum does not rotate at all. In the latter case, water is drawn in and drained, there is heating, clicks of program switching are heard, but the drum stands rooted to the spot.
HOW TO FIX
The belt needs to be replaced with a new one. The technician also inspects the bearings of the washing machine, since their wear leads to play in the drum, which, in turn, can cause the belt to break or stretch.
If your Ardo SMA has stopped working as expected, it’s time to call a professional. Call:
Or submit an online application.
The washing machine rattles when washing
- The unit is installed skewed (checked using a building level).
- The laundry load was too small, causing the weight to be distributed unevenly in the drum.
- Drum bearings are damaged.
To replace these parts, the machine must be completely disassembled and the drum removed from the tank.
In the absence of a puller, the axle shaft can be knocked out of the bearing with careful blows of a hammer, but you need to hit not on the axle shaft itself (this can damage the threads), but on a placed board. The bearing itself can be knocked out of the cover using a blunt chisel and hammer. The blows must be applied evenly so that the bearing does not warp.
New bearings must be lubricated with lithol before pressing. Let us note once again that if you have no experience in metalworking, you should not take on this almost jewelry task.
Other problems and their solutions
Another commonly observed symptom is the slow flow of water into the machine or its complete absence. To resolve the problem, do the following:
- First you need to open the cold water tap on any of the mixers and make sure that there is sufficient pressure in the pipeline.
- If there is water, you need to inspect the filling hose. It may be twisted or severely bent.
- At the next stage, you need to turn off the water supply to the machine, disconnect the filling hose from it, place its end over the bathtub or some other container and open the tap again. If the water barely drips, the hose is clogged and needs to be cleaned. Some washing machine models have hoses equipped with a safety valve that automatically closes in the event of a leak. It is disposable, so after operation you will have to install a new hose.
- If the hose is still coping with its duties, you need to inspect the mechanical cleaning filter on the rear wall of the unit. You need to remove it with pliers and clean it.
- If water does not flow after this, you need to check the operation of the fill valve by removing the top cover from the machine. The valve is attached behind the filter. First of all, inspect the wires and their connections to the valve contacts. If everything is in order here, the valve must be dismantled and the voltage indicated on the body must be applied to its terminals. If it does not open, the unit has failed.
If the sensors, valves, heater and other elements are in good condition, but the unit does not work properly, then the control module, which “conducts” this entire system, has failed. To repair electronics or replace them, you must contact a service center.
Many owners of washing machines try to repair them themselves in order to save money. Do-it-yourself Bosch washing machine repair - typical breakdowns, their elimination and prevention.
How to choose the optimal model of a pumping station for a summer residence, we will consider in this material.
Let's start the process
Disassembling the Ardo machine begins by disconnecting the top cover. The platform is attached to the body with two self-tapping screws. They unscrew, after which the lid moves back a little and rises up without much effort. Next, the process of disassembling the unit is performed as follows:
- remove the counterweight of the washing machine; to do this, unscrew the 3 bolts holding the load;
- remove the detergent tray;
- remove the control panel of the machine, to do this, unscrew all the screws holding the part, and also unclip the plastic fasteners located around the perimeter;
- disconnect the terminals and filling pipe from the dispenser, remove the dispenser box from the body;
- remove the metal clamp holding the sealing collar. To do this, pry the ring with a screwdriver, unclip the lock and pull out the wire;
- tuck the cuff inside the drum.
Now you can proceed to disassembling the rear part of the unit. The algorithm of actions is extremely simple.
- We remove the back wall of the case; to do this, unscrew all the fastening screws.
- Remove the drive belt.
- We disconnect the contacts leading to the heating element, the electric motor of the washing machine.
- We unscrew the bolts holding the motor and remove the motor from the unit (to do this, you may need to tilt the washing machine).
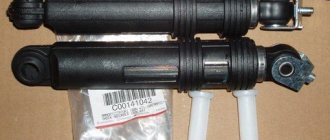
- We put the washing machine on its side and begin to remove the shock absorbers.
- We detach the pipe from the drain pump and all the wiring leading to the pump.
- We install the machine vertically and remove the tank with the drum from the body.
Article on the topic: How to remove the pump from a Samsung washing machine
By following these steps, you will almost completely disassemble the Ardo washing machine. If replacement of bearings or oil seal is required, you will have to additionally remove the pulley from the drum and disassemble the tank. Only after this will you gain access to the mounting location of the bearings and oil seal.
As you understand, doing the work yourself is not difficult. You can replace the main parts and components of the SMA yourself, without the help of professional repairmen.