If you have begun to notice that recently your device has begun to work much worse, then most likely the problem arose due to a clogged washing machine filter , which is designed to protect the structure from unnecessary parts getting inside.
Now it’s time to find out how to clean the washing filter on an indesit machine, and whether it is possible to do it yourself without the help of service center employees.
Indesit washing machine drain filter: description
The cleaner is an important design element of Indesit equipment. For different models, for example, 622TP and 12UK, it may have some differences. At the same time, the principle of operation of the device, its dismantling, cleaning and installation for different types of equipment are almost the same.
Design features and location
In most Indesit models, the dirt and debris catcher is a hollow oblong plastic object with two rounded vertical planes. One of them is the filter cover, the second is the bottom of the device, they are connected by two strips located parallel to each other.
In the Indesit washing machine, the cleaner is located in the lower right corner of the body, both in top-loading and front-loading models. It is covered either by a narrow protective panel or a small round hatch.
Principle of operation
The filter device traps debris, foreign objects, and dirt in the waste water, preventing them from entering the pump. This ensures uninterrupted operation of the pump. Gradually, mineral salts settle on the filter parts, fabric fibers and hair envelop them, coins and other items forgotten in pockets accumulate inside.
A contaminated cleaner stops performing its functions. This is evidenced by the appearance of unusual noise at the location of the drain pump, poor pumping of water from the tank, and an unpleasant odor from the car. A clogged filter must be removed from its slot, cleaned, rinsed and replaced.
Where is?
The exact location of the drain filter part in front-loading and top-loading machines is determined by the model of the household appliance.
In the Indesit top-loading washing machine
There is a technical hatch door on the device body . The exact location depends on the specific model. The filter is always located at the bottom of the housing. The shape of the lid is a recognizable “washer”, similar to the part on machines with horizontal loading.
From horizontal
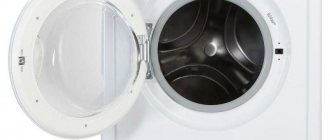
In a front-loading Indesit washing machine, the filter is located behind the panel, which is located on the body on the front side at the bottom right. Once the cover panel is removed, the part is very easy to find.
How often should the filter be washed?
The manufacturer recommends cleaning the filter device at least once every 4 months. But with excessive loads (frequent washing, loading fabric with long thick pile, down products), the part should be cleaned and washed more often.
Preventive measures significantly extend the life of the washing machine.
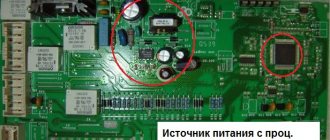
A heating element
Too hard water with a high content of metals and mineral salts leads to scale appearing on the elements of the washing machine. TEN is no exception. Hard deposits also form on the heater, which can lead to failure of the element.
Timely cleaning of the heating element will help prevent the part from breaking. The easiest way to produce it is using citric acid. The amount of “lemon” added to the washer directly depends on the degree to which the heater is “covered” with scale. In most cases, five packets of product are enough: the contents of four are poured into the powder receptacle, and one into the drum. Next, you need to start a mode that involves heating the water to 90-95°C.
The scale will completely disappear; the user’s main task is to ensure that it does not clog the drain system. It is recommended to do cleaning this way once every two to three weeks.
Along with lemon juice, vinegar does an excellent job of removing stains. It is more aggressive, but it will also remove scale much faster. Acetic acid (50 ml) is also poured into the detergent tray, after which the high-temperature wash program is started.
Cleaning products
The filter device is cleaned mechanically, washed under running water, and citric acid is used to remove the most persistent contaminants. Cleaning sequence:
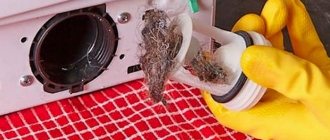
- First of all, you should remove threads, hairs, lumps of cotton wool, felt, and fluff that have become entangled in the filter. Sometimes small socks and scarves get wrapped around the device, and buttons, coins and other hard objects can get stuck inside.
- If there is plaque on the surface of the part, you can try to remove it with a toothbrush.
- Then cleaning is carried out with warm water (temperature no more than 60ºC, so that the plastic does not deform).
- Citric acid helps clean mineral deposits well. Prepare a solution by stirring 1/2 tablespoon of the product in 1 liter of water. Leave the filter in it for several hours. This method helps not only to remove limescale, but also to destroy putrefactive bacteria that quickly multiply in damp places, leading to an unpleasant odor.
What happens if you don't clean it?
The drain filter is essentially a catcher for small debris. If you never clean it at all, you can expect the following troubles:
- Bad drain. The blockage will interfere with the normal flow of waste water.
- Unpleasant odor from the washing machine drum and from already washed clothes. This is due to stagnation of water and active development of microbes.
- Pump malfunctions. This situation can occur when a foreign object from the filter gets into the pump. In this case, the pump may become jammed, and the impeller blades may even become deformed and break. As a result, repairs and replacement of parts will be required.
You will find maximum useful information about Indesit washing machines in this section.
How to remove and clean the filter in the washing machine
To avoid the risk of electric shock, disconnect the machine from the electrical outlet before starting work.
When unscrewing the part, residual water will flow out of the drain system. You should prepare for this by laying rags on the floor and placing a low basin. Removing the cleaner in machines with different types of laundry loading has its own characteristics.
Horizontal loading
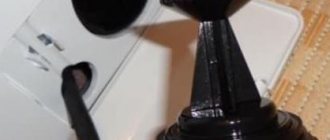
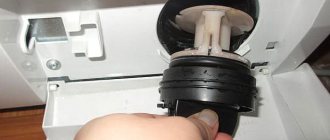
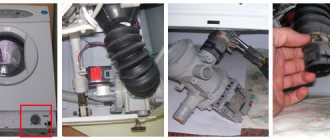
In order to remove the cleaner from the machine, you must first remove the protective panel. It is attached to the body with latches. According to the user manual, you need to insert a flathead screwdriver into the hole between the panel and the case. Gently press on the edge of the bar and remove it by pulling it towards you. Directly behind it is the filter cover. It must be unscrewed by turning the handle counterclockwise.
Then remove the cleaner from the machine, clean and rinse thoroughly to remove accumulated dirt. If necessary, soak in an aqueous solution of citric acid. Screw the cleaned filter into its original place, having first cleared the threads of possible debris deposits with a moistened rag.
Check the assembled drain system for leaks at the junction of the cleaner and the pump. If a leak appears when you turn on the machine in washing mode, you should check that the filter is installed correctly (the part must be screwed in evenly, without distortion). If the rubber seal loses its elasticity, it must be replaced with a new one.
Front loading
In Indesit washing machines of this type, the filter is located in the same place as in equipment with horizontal loading of laundry. But it is closed not by a panel, but by a round hatch. It can be opened by slightly prying with a flathead screwdriver.
The further cleaning sequence is the same as in the previous type of machines:
- you need to unscrew and remove the cleaner from the socket;
- remove dirt from the threads, check if there is any debris stuck in the place where the device fits;
- clean the filter according to the scheme described above;
- install the device in place.
Then cover with a protective hatch. Check how the washing machine works and whether there are leaks in the drainage system area. If you notice that drops of water are released in this place, you should remove the filter from its seat again and check the integrity of the threads and the absence of deformation of the sealing gasket. Correct the identified errors and screw the part into the socket until it stops without distortion.
Step-by-step instruction
After the car has been prepared, they begin to remove the filter.
How to remove the part?
You must act in the following sequence:
- Remove the cover panel.
- Grasp the tab on the lid.
- Do not turn it sharply counterclockwise. At this point, water will begin to flow out.
- Pull the tab towards you.
- Once the part has been turned, you can remove the filter.
Usually the part can be removed without difficulty. But if the process is difficult, then jamming may be caused by:
- a foreign object, for example, a bra wire;
- dirt and scale deposited on the threads.
How to unscrew and remove the filter? The following steps will help you unscrew the lid:
- lightly tap the body with a plastic hammer or the wooden handle of a regular hammer;
- using pliers, twist the “stubborn” cover by the protrusion;
- It is possible to get to the filter by partially disassembling the device, through the pump.
Cleaning process
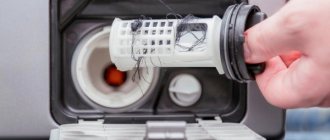
The removed filter element must be washed in clean water . The cavity in which it was placed must be cleaned, removing any debris that has accumulated there.
All surfaces - both the holes and the filter itself - must be thoroughly cleaned. Since the processing area is small and has inconvenient access, small tools should be used for these purposes. An old toothbrush, for example, will do. The most convenient way to remove the slimy mass from the cavity is with a soft cloth.
The removed filter itself
is washed in the following sequence:
- Removing small and larger debris from the surface of elements.
- The nozzle must be washed. This can be done in a bucket, but better - in running water.
- Let the parts dry.
- Make sure there is no dirt.
In advanced cases, when cleaning has not been carried out for a long time, simple washing may not be enough. In order to bring the filter into working condition, it should be soaked in a solution of citric acid. This will remove lime deposits from it and remove the unpleasant odor.
For processing, prepare a solution based on 0.5 liters of water - 1-2 tbsp. citric acid . The part is soaked for a couple of hours, after which the cleaning is repeated with a toothbrush. It is not recommended to use very hot water for soaking so that the part does not deform and the seal remains elastic.
Resetting
After cleaning the filter and cavity, it is necessary to reinstall the removed part. To do this, the part is placed in the hole and secured by turning it clockwise. The removed plastic panel is installed on top.
The video will show you how to clean the filter of an Indesit washing machine:
Possible difficulties
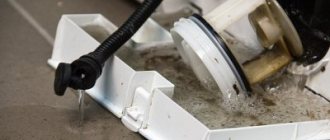
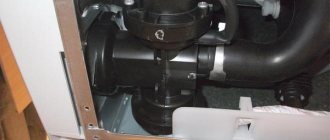
The drain filter is not always easy to unscrew from its seat. This problem occurs when the device is cleaned too rarely. The limescale layer accumulated at the junction of the part with the thread does not allow them to be separated. In such a situation, you have to remove the filter along with the pump. You can get the device by placing the washing machine on the floor with its side wall in such a way as to provide access to its bottom.
The bottom of the pump can be covered with a lid. It should be unscrewed, the pump separated from the pipes (by removing the clamps) and disconnecting the wires from the terminals. Unscrew the bolts used to secure the device to the drain system. Apply WD-40, which is good at removing rust and deposits, to the connection between the pump and the filter. Disconnect the parts. If this method does not help, carefully break off the filter element without damaging the pump threads. Now the old filter needs to be replaced with a new one.
Possible problems after
Cleaning the filter is a fairly simple procedure, but sometimes problems with water leakage at the work site may subsequently arise.
This state of affairs indicates that the installation was not carried out efficiently or there is a defect in the part. To restore the tightness, the unit will have to be disassembled and reassembled.
When re-disassembling the unit, it is necessary to very carefully inspect the work area, since physical wear of the parts is possible. If this assumption is confirmed, it is necessary to replace the filter element. In cases where the gasket is worn out, it is only possible to replace it.
In the event that you cannot independently determine the cause of the leak, it is recommended to call a specialist.
Tips for proper use of the machine
Proper use of equipment extends its service life and reduces the frequency of problems and the need to call a technician to fix them. Please note the following tips for using and caring for your washing machine:
- Clean the drain system filter after each wash of long-pile fabrics and downy items. In this way, excessive contamination can be prevented.
- Before storing dirty laundry, make sure there are no foreign objects in the pockets. Remove pins, brooches and other accessories from clothing that could damage the walls of the machine drum or get into the drain system when the fastener is opened under the pressure of water pressure.
- Wash bras and lace items in special bags. Buttons and metal rivets on items must be fastened.
- To remove scale from the walls of the machine and parts of the drain system, use a surface treatment with a product specially designed for this purpose, for example, Whirpool. Citric acid will also cope well with this task. It is enough to pour 80 grams of detergent into the compartment for detergent. products and turn on the device in the “Without laundry” operating mode. This treatment is carried out once every 3 months.
Citric acid will also help eliminate unpleasant odors from your machine or drain system that may result from stagnant water or mold formation. You can prevent its occurrence by leaving a small hole between the hatch cover and the body of the machine at the end of the wash.
When should you clean?
The drain filter should be cleaned periodically and, if necessary, if the washing machine malfunctions during the draining stage. The frequency with which preventive treatment is necessary depends on the following factors:
- quality of water supplied to the washing machine;
- intensity of use of the device;
- the possibility of foreign objects entering the drum due to distraction.
This situation may be due to the following circumstances:
- work freezes when the washing machine switches to rinsing;
- refusal to work at the “spin” stage;
- lack of drainage or slowdown;
- displaying a message indicating a problem with draining water.
The main reasons for clogged drain filters are the ingress of small debris, threads, hairs and foreign objects from clothing. Even if you handle the equipment very carefully, you should not avoid cleaning the part.
The secret of the drain device
If the panel is being removed for the first time, special care should be taken. Many washing machines are equipped with latches that open by sliding the panel to the sides
There may be other latches that secure the panel with rotating hooks, so removing the machine panel can only be done after carefully inspecting it.
Before removing the plastic panel, you will need to place a low tray-type container under it to drain any remaining water, and you can also use a thick, large rag to absorb moisture. Some machine models are equipped with thin hoses through which the remaining water is drained; in this case, a plug is installed on them.
If there is a drain hose, you need to free it from the plug, get rid of any remaining water, you can drain it into a container and close the hose with a stopper. If there is no drain hose, then you need to spread a rag under the pump filter to absorb moisture. The plug should be unscrewed counterclockwise. If the plug is secured with a bolt, it must first be unscrewed. When the water has drained out, you can remove the panel.
The plug on which the filter is attached must be pulled out. Use a flashlight to illuminate the space inside the pipe and remove any dirt from there. Insert the drain filter into the slot and screw it down so that it does not loosen. The decorative panel, after cleaning, is put back in place and the hatch is closed.
Timely cleaning of the filter is a mandatory procedure for a clogged washing unit. If you periodically, at least twice a year, clean the filter from debris, as written in the instructions, then the washing machine will work for a long time without problems.
Preparatory activities
Before cleaning the filter, you should thoroughly prepare for the upcoming actions. Its dismantling is most often accompanied by the release of dirty water, which can flood expensive floor coverings.
To prevent possible troubles, you need to do the following:
- pull out the built-in unit from the kitchen cabinet, first disconnecting it from the communications system;
- cover the floor covering at the work site with unnecessary rags or oilcloth;
- Place a large container directly under the filter cover.
If before disassembling the washing machine has completed a full operating cycle with rinsing, you will need to pause for draining. If this is not done, then when disassembling the filter, the volume of spilled water will increase noticeably.
Dismantling
Upon completion of the preparatory operations, they proceed to removing the filter from the machine and then cleaning it.
Utility materials and cleaning products will require a piece of flannel fabric, rubber gloves and citric acid.
The procedure for dismantling the filter trap is as follows:
First, you should grab it by the protrusion on the cover and, turning it counterclockwise, pull it towards you.- If this cannot be done due to accumulated dirt and scale, you need to use a plastic hammer and lightly tap it on the body.
- After unscrewing the filter base completely, you will then need to remove it and get ready to clean it.
If, when unscrewing, the housing does not move even after tapping on it, this means that it is additionally secured with a bolt. When carrying out these procedures, not only the filter dirt catcher needs to be cleaned, but also the cavity in which it is attached.
To do this, wear rubber gloves and remove all foreign objects (buttons, coins, etc.) from it. After this, use a toothbrush to sweep away small particles of dirt and remove accumulated mucus from the walls with a flannel.
Finally, all that remains is to thoroughly wipe the walls of the cavity with a damp cloth or rags and leave it to dry for a while.
Cleaning procedure
To clean, you will need to do the following:
- Manually remove dirt and hair deposits adhering to the parts.
- Rinse the filter attachment under running water while cleaning it with a toothbrush or soft brush.
- Let it dry and inspect for contamination.
- Upon completion of cleaning, the filter device is installed in place.
- To do this, insert it into the cavity and, rotating the body clockwise, fix it in it.
The filter is soaked in cold water, since at low temperatures citric acid dissolves better and the plastic body of the device does not deform. In addition, hot water causes the seal to lose its elasticity, which will disrupt the tightness of the joint.
System health check
Upon completion of cleaning, you need to check the Indesit machine for functionality by turning it on in the accelerated wash mode with mandatory rinsing.
After waiting for the end of the cycle, you need to carefully monitor the process of draining the water and make sure there are no failures . If you find that the signs of clogging have not disappeared, you will have to disassemble the filter again and consult with specialists about its condition.
Problems after
Sometimes, when draining after cleaning, waste water begins to seep out from under the technical hatch door. This means that during assembly the filter housing is not installed tightly enough. You will have to remove it again and re-install it.