When should cleaning be done?
Manufacturers of Bosch machines have tried to minimize the risk of clogging of internal components, as well as to develop a special indication system with which you can easily receive a signal about the need for cleaning.
Main indicators of clogging:
- water drainage is difficult;
- unstable work;
- reduction in spin quality;
- an error message appears on the display.
When washing items made from down, it is best to immediately clean the filter, since this material tends to accumulate and complicate the operation of the entire machine.
All of the above points indicate that it is necessary to carry out a special cleaning procedure, after which the functionality of the device should be fully restored.
The service life of the machine until the next cleaning is influenced by many factors .
The intensity of use, frequency of washing, materials processed and much more are important here. When washing once a week, there is no need to clean the filter more than once every three months. Active use may require monthly cleaning.
Why doesn't Bosch SMA drain the water?
It’s worth starting the check with typical problems that could lead to the drain stopping. Look at the control panel. Make sure the No Drain program is selected. Next, perform the check in the following sequence:
- Inspect the drain hose. It should be positioned evenly, without kinks.
- Disconnect the hose from the body and lower it into the sink.
- Start any mode.
- If water flows out of the hose, then the cause is a clog in the sewer system.
You can clean the drain using special means or by calling a plumber.
If the modes and communications of the Bosch Max 5 (Maxx 5) or another model are in order, then there may be a serious breakdown. Typically, an electronically controlled machine displays an error code on the display. Having learned its meaning, you can come to a conclusion about the location of the malfunction. But if there is no code, then you will have to check in order:
- drain filter and pipe for blockages;
- pump at the time of breakdowns;
- water level sensor for malfunction;
- electronic module for burns and damage.
To find and fix the problem, start by diagnosing the internal parts of the washer.
Location of the element in the Bosch washing machine
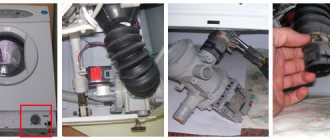
On traditional horizontal-loading machines, the cleaning elements are in most cases located on the front panel. Older models do not provide any plugs, so the component protrudes slightly. For new devices, such a cover has already become commonplace.
Lid opening options:
On the bottom of the front panel there is a special strip that occupies the entire edge. This cover is secured with latches, the opening of which will allow the user to gain direct access to the washing machine filter.- On the right there is a small rectangular lid that can be opened with a knife or screwdriver.
- The round hatch closes the element or opens it with a light touch.
Horizontal loading washing machines are also equipped with filters. Most often, it is located in the front part of the case behind a small rectangular or round cover. At the same time, the removal of the component and subsequent cleaning is not much different from a similar process on machines with horizontal loading.
Models of washing machines produced before 2005 did not have drain filters. So it will be useless to look for any cover.
On such devices, the volute could sometimes become clogged , which cannot be cleaned without separating the pan and disconnecting the pipes.
Replacing and maintaining the filter of Bosch Maxx series washing machines
Replacing and maintaining the filter of Bosch Maxx series washing machines is a procedure that extends the life of your washing machine
The pump filter of the Bosch Maxx 4 and Bosch Maxx 5 series washing machines needs maintenance more often than other parts of the washing machine, because it serves as a barrier that constantly filters dirty water from large particles, such as hair, fabric fibers, and large particles of dirt. If you do not clean the drain filter on time and constantly, the pump itself may fail.
When running diagnostics on Bosch Maxx 4 series washing machines, a drain problem may also mean that the filter is clogged and needs to be cleaned. The sensor displays the following picture:
Problem with water drainage
As a result of diagnosing Bosch Maxx 5 washing machines, the following error codes will appear on the display: F02, F18 (drain filter), F17, F29 (inlet filters), F60 (fill valve filter).
You can clean the drain filter yourself, but it is better to contact the service department to avoid further problems that may arise when dismantling the control panel yourself.
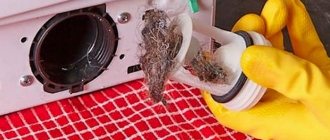
First you need to open the filter hatch (located in the basement area of the washing machine, bottom right) and try to unscrew the filter counterclockwise. The filter will not unscrew if heavy lime deposits have formed in the pump chamber or the filter has not been cleaned for a long time. If you managed to get the filter, then after you take it out, you will need to clean it from visible contaminants, and at the same time check the pump chamber for the presence of foreign objects.
If you can’t unscrew the filter, you shouldn’t pull it with all your might - you can break the thin plastic handle, and you’ll only need to get it out from the inside, through the pump chamber. As mentioned above, in this case, you should not risk the entire washing machine to clean the drain filter; it is better to contact a service specialist for qualified help in cleaning the drain filter.
Maintenance procedures for the filter of Bosch Maxx 4 and Bosch Maxx 5 washing machines include:
- timely diagnosis of the degree of filter clogging and its preventive cleaning;
- use of washing agents that soften water and prevent the formation of limescale;
- checking items before washing for the presence of small parts (for example, poorly sewn buttons) that could fall into the drain and clog the filter;
- Compliance with the washing parameters recommended by the manufacturers for all items.
Take care of your washing machine and contact the service center in time not only to troubleshoot problems, but also to prevent them in a timely manner.
Preparatory activities
Once the user has been able to detect the filter on the body of the washing machine, it is recommended to take a number of additional measures aimed at ensuring the safety and convenience of the cleaning procedure.
First of all, you must immediately turn off the power supply and shut off the water supply . After this, you need to tilt the car back a little and place a basin under the lower part of the body, and also stock up on rags to remove water.
Even if the machine is idle for a long time, a certain amount of water still remains inside the machine, which can easily flow out through the hole.
Cleaning
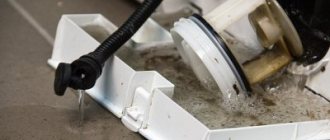
Well, the garbage filter has been safely found, you can start cleaning. First, we tilt the washing machine a little back so that under the body in front we can place a flat container for the sewage that will flow out of the filter snail.
- We substitute a small basin.
- Open the lid that hides the filter.
- On the right we see the filter itself, on the left there is a short hose for draining water. We pull out the hose a few centimeters and, having pulled out the plug from it, drain the dirty water into a basin.
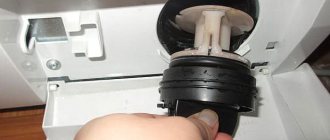
- Now you can remove the filter. We need to unscrew the plug by turning it counterclockwise a few turns.
- The remaining water will pour into the basin through the hole formed, and you should inspect the internal surfaces of the niche and the filter itself for dirt and foreign small things that accidentally got there.
- Wipe the filter and seat with a cloth.
- We insert the filter back into the niche and screw it fully clockwise.
- Close the hatch, take out the basin and place the machine in a stable position.
Step-by-step instruction
Once all preliminary operations have been completed, you can proceed directly to cleaning.
Tools
To carry out all the activities to clean the filter and return the machine to the necessary functionality, you will need a certain set of additional tools:
- a basin and rags to collect leaking water;
- knife, screwdriver or anything suitable for prying off the lid;
- cloths for wiping.
Preparing for cleaning
After ensuring safety and turning off the power, you should finally start preparing the filter. This process involves opening the cap on the washing machine body, draining the water from the hose, and removing the component itself.
To remove the element, you need to unscrew the retaining plug counterclockwise. It is worth remembering that there is water not only in the hose, but also in the seat.
So when removed from the hole, water will flow, which must be quickly collected using rags and a basin.
Process
The cleaning process includes a visual inspection of the filter and drain hole for the presence of various types of contaminants.
Any extraneous items are also removed. Cleaning is completed by wiping the elements with a specially prepared cloth .
Now you need to insert the element back and screw it clockwise until it stops. Then the plug is closed, and all additional containers and rags are removed.
If the housing was raised before cleaning, it must be returned to the desired position.
Instructions
Cleaning a Bosch filter is a simple task that can be done on your own, even without special skills. You just need to prepare for the procedure.
Selecting Tools
No special tools are required for cleaning . To access the unit in a Bosch top-loading washing machine, you will need a pencil or screwdriver.
To clean the drain filter in a horizontal-loading washing machine, you need to prepare rags and a low bowl in advance to collect the remaining water from the washing machine.
In rare cases, when the filter has not been cleaned for a long time and is literally welded, you may need pliers or another tool to more conveniently grip the not very protruding handle.
Preparation
Before you begin cleaning work, you must:
- Free the drum from laundry and foreign objects.
- Disconnect the device from the power supply.
- Shut off the water supply.
It is necessary to provide convenient access to the filter (for front-loading washing machines - from the front, for vertical washing machines - from the top).
Process
Depending on the type of load of the Bosch washing machine, the cleaning process differs. But in all cases it is not complicated.
Vertical loading
For Bosch top-loading washing machines, the cleaning process does not result in water spilling onto the floor, unlike front-loading washing machines. But at the same time, removing the filter has its own nuances.
To access the node you need:
- open the drum doors;
- At the bottom of the drum you need to find a protruding part that serves to grab the laundry as it rotates and distribute things evenly.
Using a screwdriver or pencil, remove the laundry grabber using the following algorithm:
- A pin-shaped object (screwdriver, pencil) is inserted into the hole.
- Tilt the inserted object down and at the same time push it to the right until the part moves out of the lock.
- Remove the laundry grabber.
Further actions:
- turn the washing machine drum forward;
- take out the filter;
- clean the removed part under running water;
- return the removed element to its original place;
- Reinstall the removed laundry grip - to do this, slide it into place until it clicks.
Horizontal loading
It is convenient to clean the Bosch filter by tilting the washing machine slightly towards the rear wall. But you can leave it in its original position.
Procedure:
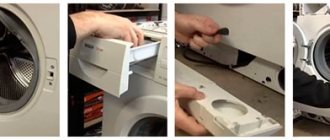
- Remove the panel that covers the drain filter at the bottom of the front of the washing machine.
- If the model has a hose for emergency drainage, it is advisable to use it by removing the plug and directing the free end into a container prepared in advance.
- After the water has been drained, carefully turn the handle counterclockwise. You need to act carefully.
- In models that do not have a hose for emergency drainage, you need to immediately start unscrewing the handle, and water will flow straight from under it.
- Pull out the filter.
- Inspect the removed part itself and the seat in which it was located. If foreign objects are found, they must be removed and the dirt must be wiped off.
- Clean the filter and rinse it under the tap or in a basin.
- If the removed element is very dirty, it can be cleaned additionally with a brush and rinsed in a solution of citric acid.
- Wipe the part with a cloth.
- After cleaning, the filter must be installed in its original place, carefully screwing it into the thread.
- Reinstall the decorative panel.
Video instructions for cleaning the filter:
Possible problems and solutions
Cleaning the filter involves partial disassembly of a rather complex unit. It is quite natural that in some cases, after carrying out the described procedures, various kinds of problems may arise. In most cases, they are associated with water seepage or leakage.
Main causes of problems:
Uneven or insufficiently tight placement of the part in the drain compartment.
When placing the element, it is important to avoid shifts and also monitor the tightening force. But you shouldn’t use too much force, as the plastic threads can easily break off, which will lead to constant leaks.- Gasket failure. It is the gasket that creates the necessary conditions for isolating the system from the external environment. But under the influence of time, this component can wear out and lose its properties. As a result, leaks occur. You can get rid of this kind of defect by replacing the gasket.
- Filter failure. Excessive cleaning and screwing force may result in component failure. In this case, the contact between the walls becomes less dense, which creates the necessary conditions for the passage of water. This problem can be solved by replacing the cleaning unit.
What to do if it is impossible to unscrew the filter
Usually, when cleaning, problems with detaching the element do not arise. However, occasionally situations arise when this part seems to be tightly attached and remains motionless despite the efforts made.
Using maximum effort can damage the structure. In this case, partial disassembly is recommended. First you will need to remove the front wall of the machine. After this, access will be gained to the following components of the mechanism: both pipes, pump, volute and the base of the drain hose.
In this case, you need to pay special attention to the snail, inside of which there is a filter that needs to be removed.
Before starting this procedure, you must disconnect the machine from the electrical outlet. Now you need to loosen the clamps on the pipes, remove them and gain access to the volute. It is removed along with the filter and pump.
Now you need to do the following manipulations:
- The snail needs to be turned so that the fitting faces upward.
- The pump is moved in a clockwise direction until the end.
- You need to squeeze out the locking tab.
- The pump must be turned clockwise to remove it.
Access to the internal cavity of the cochlea is now open. It needs to be cleaned carefully. After this, the block is put back together and put in place.
You can carry out additional processing of the snail so that the filter can be twisted freely in the future. To do this, it is soaked in lubricant. You can, for example, use WD-40. The thread of the device will oxidize and in the future the process of unscrewing will occur without difficulty.
