If the washing machine takes in water but does not wash, then the owner needs to disconnect the equipment from the electrical network and check the components. Some machine breakdowns can be fixed on your own, but to correct some defects you will have to contact a service center.
Damage
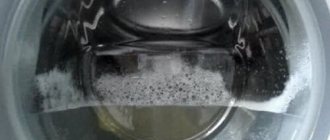
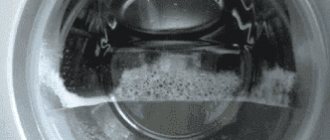
During normal operation of the equipment, liquid is collected and drained 3-4 times during the washing process. If the operating cycle is disrupted, the owner needs to find out why the washing machine takes in water and immediately pumps it into the sewer. Increased water exchange leads to an increase in washing time, while things remain dirty or not cleaned of traces of detergents. A pump that continuously draws in or pumps out water makes noise. The shutdown occurs for 10-20 seconds, or the electric drive operates continuously.
If the machine begins to continuously pump and drain water, then a check is necessary:
- connecting sleeves;
- seals;
- drum and tank.
Hoses
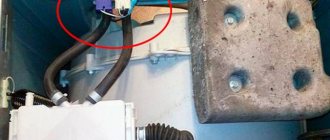
If the hoses are broken or damaged, further operation of the equipment is prohibited, since liquid will flood the room and may cause a short circuit in the electrical wiring. Repair work is carried out on household appliances disconnected from the power circuit. After removing the decorative top cover and back wall, you can determine the entire path of the flowing water. It is not recommended to seal the pipes, since the glue does not provide a tight seal and after a while begins to leak liquid.
If the drainage system does not operate correctly, a vacuum forms in the pipes (for example, when neighbors drain liquid). The water from the machine itself is drawn into the low pressure zone, and the pump begins to replenish the level. When the liquid is subsequently drained by neighbors, the cycle repeats. You can quickly restore the operation of the machine by lowering the drain hose into the bathtub, but then you need to carry out preventative maintenance on the sewer pipes and monitor the condition of the drain.
Cuff
The design of the machine includes rubber seals that prevent liquid from leaking out of the working cavity.
In case of ruptures or loss of elasticity, water flows through the cracks, which is detected by a level sensor.
The pump pumps liquid into the tank, which again flows into the sewer hose or accumulates in the pan. Repair consists of disassembling the equipment and visually inspecting the rubber parts. Damaged or torn cuffs are removed and replaced with elements that are supplied as spare parts.
Drum
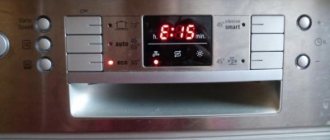
If the washing machine constantly fills with water, then it is necessary to inspect the tray installed below. The metal drum may break due to foreign objects left in clothing pockets. The equipment constantly drains the collected water into the tray; if the design has an overflow sensor, the washing process stops and an error code is displayed on the display or using LEDs.
To fix the problem, you will need to remove the tank with the drum, seal the hole with epoxy resin, or install a patch with a rubber gasket on the rivets. If after some time water begins to seep through the crack again, the tank or washing machine will need to be replaced. Liquid can also escape through a damaged drum seal; in this case, the O-ring and ball bearings are replaced, which are destroyed when exposed to moisture.
The washing machine draws water, but does not wash: self-diagnosis
If water build-up and problems with drum rotation are detected, self-repair is not recommended. The user can only perform diagnostics.
Emergency water drain
After disconnecting the equipment from the network:
- Unclench the fasteners on the back of the housing and disconnect the pipe from the sewer drain;
- Place the hose in a bucket to drain the water;
- Place a container under the hatch and unscrew the plug.
Emergency drain diagram
Important! Modern automatic machines have a special valve for emergency draining.
Tank and Drum Inspection
The device is disconnected from the network, after which:
- The side panels are removed;
- The drum is checked - it needs to be turned a little;
- Debris or foreign objects between the tank and drum are removed.
If there is no blockage and the drum does not spin, contact a technician.
Seized bearings
The part is just being replaced. Without skills and equipment, self-repair is contraindicated.
Cleaning filters
The machine needs to be turned off. Further actions:
- Removing the front hatch, under which the filter is located;
- Rinsing the clogged element with running water.
The filter needs to be cleaned regularly
Advice! When unscrewing the filter, water will flow from the hose, so place a basin under it.
Checking the drive belt
The part must remain in place. If it is not on the pulley, install it with the calculation of 1 clove per 1 pulley. The torn belt is replaced by a technician.
Removing blockages from the pipe
To check the drain hose:
- Unscrew the fasteners on the drain;
- Remove and inspect the hose, feel it with your fingers;
- Carefully remove debris with a long wire or knitting needle.
After cleaning, the hose is reinstalled.
Incorrect connection
If the machine constantly takes in water and then drains, the reason for the incorrect operation is the incorrect installation of the connecting hose. The flexible hose for pumping out liquid should not touch the floor; the farthest bending point is located at a height of 500-600 mm from the floor covering. To hold the hose, standard plastic clamps are used on the back wall of the case; if the bracket is broken, then it is necessary to install a loop (for example, from a plastic clamp for electrical wiring).
To check the correct operation of the drain you need to:
- Start the work cycle without loading laundry.
- Wait until the tank is filled with water.
- Activate liquid drain mode.
- Stop pumping water by pausing.
- Visually check the change in fluid level through the glass hatch. If water continues to flow out, then additional adjustments to the position of the drain hose are necessary. If the liquid level does not drop, then you should continue to search for the reason for the constant operation of the pump. The technique is not used on top-loading machines due to the lack of a glass hatch.
Changing the drive belt
If the washing machine has a direct drive, then we eliminate this malfunction immediately, since such a machine does not have a drive belt. Otherwise, it is best to start diagnosing the washing machine with the belt. This is one of the most common reasons why the machine fills with water, but the wash does not start.
What can happen to the belt? It may fly off due to improper transportation or installation, or wear out from long-term use, which requires its replacement. In all washing machines with a belt drive and front loading of laundry, the belt is located behind the rear cover of the housing . On top-loading machines, the belt is located behind the side cover. There shouldn't be any problems removing the cover; you just need to unscrew all the bolts holding the cover in place.
If the belt has come off, it must be pulled out of the housing and carefully inspected for any defects; if any are found, it must be replaced with a new one. To put on a working belt, you need:
- first put it on the engine.
- With your left hand, pull the belt up, and with your right hand begin to put it on the pulley;
- then carefully turning the pulley counterclockwise, we put on the belt completely.
After replacing the faulty belt, run a test wash cycle and make sure that the machine performs the wash cycle as expected.
Checking the heating element and the engine of the machine
The second reason why a washing machine may stop washing is a malfunction in the electric motor, or rather wear of the brushes inside it. But the motor in a washing machine can be asynchronous, that is, without brushes. In this case, the starting capacitor fails.
For your information! The engine may not start if it overheats, for example, after 2-3 hour-and-a-half washes in a row. In this case, you just need to leave the car for a while and let the engine cool.
To replace the brushes in the motor, the motor must be removed. It is usually secured with a couple of bolts. In addition, you need to remove the existing sensors and belt from the engine. Now we take the motor and use a screwdriver to remove the terminal from the brush.
Now we insert a small plate into the slot, bend it and pull it out. The second brush is removed in the same way.
Next, insert a new brush into the brush holder, compress the brush spring and secure this spring with a plate. We put a terminal on the plate. We install the second brush in the same way. We assemble the washing machine.
In some models of washing machines, after the machine fills with water, the wash may not start due to a broken heating element. In this case, there is no heating of the water, and the temperature sensor does not send a signal to continue the washing process. But at the same time, an error code regarding the breakdown of the heating element must appear on the display. You will need to check the performance of the heating element and, if necessary, replace it with a new one.
Control board problem
If checking the engine, heating element, and drive belt does not reveal the reason that the machine draws water and does not start washing, then there is a high probability of failure of the electrics or control module. Electrical testing is a painstaking job involving inspection of all terminals and wires. Perhaps some wire has burned out or a terminal has oxidized; by cleaning it, you can restore the operation of the machine.
It's a completely different matter if there is a fault in the electronic board. It is through it that the washing stages are switched, in particular, when the machine takes in water and the water reaches a certain level, a signal is sent to the module from the pressure switch, then a signal should go from the module to the engine, but due to a malfunction this does not happen.
If the control board is broken, it is better to contact a professional who can determine whether the board can be repaired or replaced completely. If you are good with electronics, you can try to test the board yourself. But we would not recommend taking risks - why? Because this could lead to even bigger problems.
Some users note that if the machine fills with water but does not start washing, the reason may be a clogged drain filter or hose. And after cleaning the drain system, the machine begins to work as expected. In our opinion, users in this case do not explain all the “symptoms” of the washing machine, or describe them incorrectly, meaning by the phrase “does not erase” the symptom “does not drain”, “the program freezes”, etc.
It is very important for an accurate “diagnosis” to correctly describe the symptoms when a washing machine breaks down.
So, we note that the washing machine may not start washing after filling with water for several reasons. Most of these reasons are fairly easy to determine on your own and then fix the problem. There would be desire and patience, and everything else would follow. Happy renovation!
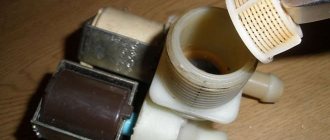
Faulty valve
In the fluid supply line to the equipment there is a valve with a spring-loaded membrane, which is controlled by an electromagnet. If the washing machine draws water when it is turned off, then it is necessary to check the condition of the unit. It is necessary to dismantle the valve block and inspect the channels, removing dirt deposits. If it is not possible to restore the functionality of the structure, the valve will need to be replaced. It should be taken into account that damage to the electromagnet coil disrupts the normal operation of the valve, and it is impossible to visually determine the defect.
There have been cases when the valve spring lost its elasticity, and the machine began to bleed water during washing or stopped due to erroneous signals from electronic sensors. To access the valve block, you will need to turn off the power to the equipment and remove the supply and drain hoses. The inlet valve is located at the connection point of the water main; to access the part, you will need to remove the top or back wall of the housing (depending on the design features of the equipment).
The valve body is disconnected from the water supply hoses, and the power cables of the electromagnetic coil are de-energized. The tubes are fixed to the valve using spring clamps, which are removed with pliers or a special tool. The new valve is installed in the same position as the old unit. After repair, it is necessary to test the machine.
Filter clogged
The machine does not always malfunction due to a serious breakdown. It is quite possible that it does not start washing, although it is drawing water, because the drain system is clogged. Especially if the equipment has not been properly maintained.
You can clean the filter yourself. To do this, you need to remove the drain hose - unscrew it from the siphon or sewer hole, then take any container for dirty water and lower the free end of the hose into it. Most of the water collected by the machine should drain into it.
Now you need to find a filter. It is usually located on the front bottom of the case and can be hidden by a removable panel.
The filter plug must be carefully unscrewed and pulled out completely. All dirt accumulated during washing should be removed from it. Then fasten it back and cover it with a panel.
After this operation, the machine should work. If this does not happen, then the problem is somewhere else.
This is interesting: Why does the refrigerator freeze food: the main causes of malfunction
Breakdown of the pressure switch
Inside the tank of the machine there is a special sensor (pressostat), which determines the water level and controls the operation of the electric pump. If the sensing element is damaged or does not work correctly, the sensor issues incorrect commands. Errors are recorded by the machine's control unit, the washing process stops with an error code displayed. To check the sensor, you will need to remove the back cover; cracks are not allowed on the surface of the element. The sensor cannot be repaired; the faulty unit is replaced with an original part (selected from the catalog).
The sensors are designed with a rubber tube, which is necessary to determine the liquid level. Under the influence of powders and temperature changes, the rubber delaminates, blocking the internal section of the hose. The liquid does not penetrate into the internal cavity, causing incorrect operation of the sensor and electric pump. When servicing the sensor, it is necessary to remove and clean the tube; if a new sensor is installed, it is recommended to install a new hose.
The heating element is broken
When you add water to the washing machine, the heating element starts working - thus, the water heats up. When the water heats up to the required temperature, the sensor that drives the motor is activated. If the water is not heated, the sensor will not start working. In this case, an error should appear on the screen indicating problems with the heating element. To check the heater, you need to open the back cover of the washing machine. Sometimes this element may be located at the front, in which case it is necessary to open the front panel.
The heating element is mainly installed in the lower section of the tank, to which various wires are connected; they need to be disconnected. To remove the heating element, you need to unscrew the central nut. The protruding bolt must be pushed inside. After this, use a flat screwdriver to pry off the housing of the heating element and, using loosening, pull it out of the tank.
Initially, you will need to clean the heater from accumulated scale. If during the inspection of the heating element there are dark spots on it, then there is a high probability that there is a breakdown. In this case, the heater must be replaced with a new one. If there are no stains, then you can check it with a tester. For this purpose, you need to switch the device for measuring resistance. If the heating element is working properly, then the resistance will be 20–40 Ohms, and sometimes 60 Ohms. If the resistance is less than 20 ohms, this indicates a malfunction of the heater.
Problems in the control unit
If all of the above actions did not restore functionality, then it is necessary to inspect the controller. Damage to electronic components or wiring leads to the fact that the washing machine takes in water and does not wash the loaded laundry. The causes of failure may be voltage surges or water entering the contact pads. Repair of the control unit is carried out at a service center; if it is impossible to restore the printed circuit board, then you will need to purchase a new controller (or a used one, removed from disassembled equipment).
Possible faults
Numerous washing machine repairs have helped us compile a rating of popular breakdowns when the washing machine fills with water but does not wash.
| Signs | Breaking | Repair or replacement | Cost* (work only) |
| The washing machine fills with water, the motor makes noise, the program runs (heating and draining work), but the drum does not rotate. | Drive belt. It has torn or fallen off, so the motor works, but the drum does not spin during washing, rinsing, or spinning. | It is necessary to put on the fallen belt or replace it with a new one. | from 900 rub. |
| Water enters the machine, the motor hums, but the drum does not rotate. If you turn off the light, you may notice that the washing machine is sparking. | Motor brushes (in models with commutator motor). The brushes are worn out, almost do not touch the commutator and therefore do not ensure rotation of the motor. | The brushes need to be replaced. | from 1400 rub. |
| The washing machine fills with water, but the drum does not rotate and the machine does not wash. In cars with a screen, the tachometer error may be on. | Tacho sensor. Measures the number of revolutions of the washing machine engine. If it fails, the washing machine “does not understand” at what speed to rotate the drum and does not wash. | The tachometer needs to be replaced. | from 2100 rub. |
| The SMA fills with water, but does not spin the drum. You can't hear the usual engine noise. After typing, the machine drains the water and stops or hangs with water in the drum. On models with a display, the engine error may be illuminated or flashing. | Motor. The commutator motor has burned out, so the drum does not rotate and the machine does not wash. In asynchronous motors, the starting capacitor usually fails. | The motor needs repair or replacement. | from 2000 rub. |
| The washing machine fills with water and turns off. | Control unit (electronic controller). Elements, tracks or contacts in the motor circuit on the board have burned out. | The technician identifies faulty elements of the microcircuit and replaces them with new ones. The tracks and contacts are soldered. In difficult cases, the board is changed entirely. | from 2000 rub. |
| The washing machine took in water, immediately drained it and does not wash. Models with a display may display a pressure switch error. | Water level sensor (pressostat). The pressure tube has fallen off, become clogged or damaged, the pressure sampling chamber has become clogged, or the sensor itself has failed. The washing machine cannot detect the amount of water in the machine, so it drains the water and stops. | The master blows out the pressure switch tube | from 1600 rub. |
| The washing machine does not wash: immediately after loading it drains the water and stops or does not heat the water and hangs on the wash. A heating error may be flashing on the display. | heating element (heating element). It's burned out, so the water doesn't heat up and the machine doesn't wash. | The heater needs to be replaced. | from 1400 rub. |
| Temperature sensor. It is out of order, so the machine cannot detect the water temperature and does not wash. | The temperature sensor needs to be replaced. | from 1300 rub. |
*Spare parts costs are not included in the price and are paid additionally.
Does the machine refuse to wash after filling with water? "RemBytTech" will come to the rescue. We come to your home within 24 hours, repair equipment at home, and provide a guarantee of up to 2 years. Call from 8 a.m. to 10 p.m.:
+7 (495) 215 – 14 – 41
+7 (903) 722 – 17 – 03
or submit an electronic application at any time.
On-site service "RemBytTech" - urgent repair of washing machines at home with an official guarantee.
conclusions
If, after taking the measures, the switched off washing machine takes in water or frequently drains liquid, then it is recommended to contact a service center. Equipment diagnostics are carried out using special instruments that allow you to find small cracks in lines or damaged electronic components. After replacing parts, the owner can continue to operate the equipment. It should be borne in mind that restoring equipment may not be economically viable; in this case, you will have to buy a new washing machine.
Repair
First, disassemble the washing machine.
- Disconnect the SMA from the power supply.
- Turn off the water supply at the supply valve. Temporarily remove the inlet and drain hoses.
- Remove the back wall of the case.
The suction valve is located at the top of the rear wall.
- Unscrew the existing bolts. Use a screwdriver to pry out the latches (if any).
- Slide and remove the faulty valve.
- Check the valve coils using a tester set to ohmmeter mode. The norm is no less than 20 and no more than 200 Ohms. Low resistance indicates a short circuit, too high - a break in the enamel wire that is wrapped around each of the coils. The coils are completely identical.
- If the valve is OK, install it in reverse order. A faulty valve is almost beyond repair.
You can change one of the coils if you have a spare one, or rewind it with the same wire. The compartment itself, in which the coil is located, can be partially collapsible. In other cases, the valve is changed. You will not be able to change the flaps and return springs yourself; they are not sold separately. Ring the drain valve in the same way.
The washing machine tank is checked for integrity by the trace of a water stream or by drops seeping into the hole formed. It is easy to notice - it is the largest structure, up to several times larger than the motor. A small hole can be soldered (or welded using a spot welder). In case of significant and multiple damage, the tank is definitely replaced.
There are permanent tanks welded to the internal frame holding it.
If you are not a mechanic, it is better not to remove such a tank yourself, but to contact a specialist.
The cuff, unlike the vast majority of other parts and assemblies, is changed without completely disassembling the MCA. Open the hatch of the washing compartment, unload the laundry (if there is any).
- Unscrew the screws and remove the plastic frame holding the cuff.
- Remove the wire or plastic loop that runs along the perimeter of the hatch - it holds the cuff, gives it shape, and prevents it from falling out when opening/closing the hatch.
- Pry the latches inside (if there are any) and pull out the worn cuff.
- Fix exactly the same new one in its place.
- Put the hatch back together. Check that water is not leaking out by running a new wash cycle.
Some washing machine models require removal of the hatch door and/or the front (front) part of the machine body, including the detergent tray. If the cuff is not the problem, the door lock may be worn out: it does not latch or does not keep the hatch tightly closed. The lock will need to be disassembled and the latch replaced.
Prevention
Do not wash things too often at 95-100 degrees. Do not add excessive amounts of powder and descaling agent. High temperatures and concentrated chemicals age the cuff rubber and contribute to faster wear of the tank, drum and boiler.
If you have a pumping station on a well in your country house or country house (or a pressure switch with a powerful pump), do not create a pressure in the water supply of more than 1.5 atmospheres. A pressure of 3 or more atmospheres squeezes out the membranes (or flaps) in the suction valve, contributing to its accelerated wear.
Make sure that the intake and suction pipes are not kinked or crushed and that water flows through them freely.
If you have excessively contaminated water, use mechanical and magnetic filters at the same time, they will protect the SMA from unnecessary damage. Check the strainer in the suction valve device from time to time.
Do not overload the machine with excess laundry. If it can withstand up to 7 kg (according to the instructions), use 5-6. An overloaded drum moves jerkily and swings to the sides, which leads to its breakdown.
Do not load carpets and rugs, heavy capes, or blankets into the SMA. They are more suitable for hand washing.
Don't turn your washing machine into a dry cleaning station. Some solvents, such as 646, which liquefy plastic, can damage hoses, cuffs, flaps and valve connections.
The machine can only be serviced when it is switched off.
The following video will help you understand the causes of the breakdown.
Recommendations:
- When installing the device, do not forget about the laws of physics - if the height of the drain hose is less than 0.5 m, water will accumulate and drain immediately.
- For hard water, use special softeners or install a magnetic converter.
- To prevent the device from being damaged by voltage surges, install a protective relay.
- After the wash cycle, do not use the appliance immediately, let it rest and cool down.
- To avoid damage, clean the device filter once every two months.
- Once every six months you can carry out preventive descaling. To do this, you should use only certified products suitable for your machine model.
- Use detergents designed for automatic washing.
What can you fix yourself?
Many faults can be repaired with your own hands if you have some knowledge about the structure of an automatic washing machine.
Drum lock
First of all, check the drum for mechanical blocking. Rotation may be interfered with by foreign objects stuck between the tank and the drum. After removing this item, the operation of the machine will be restored.
Stopping due to belt problem
Direct drive machines do not have a belt. Therefore, for such units the first point of troubleshooting is not relevant. For other machines, it is better to start searching for the reason why the drum does not rotate by checking the belt. If you have a machine with a vertical type of loading of laundry, the belt is located behind the side wall of the unit. In front-loading automatic washing machines (AWMs), it is located behind the rear wall of the housing.
Removing the wall should not be difficult, you just need to unscrew all the mounting screws holding this panel in place.
A belt that has fallen off must be carefully inspected. If there are abrasions or small tears on it, they could cause it to jump off. The defective element must be replaced with a new one. In order to put a working belt back on, first put it on the motor pulley. After this, put one side on the large drum pulley, and begin to rotate it counterclockwise until the rubber element is completely seated.
Checking and replacing the heating element
When water fills in the washing machine, the heating elements are turned on for heating. When a certain water temperature is reached, a sensor is triggered and starts the engine. If the water did not heat up, the sensor did not start rotation. To get to the heating element, you will need to open the back panel of the AFM. On some models, the heater may be located at the front, so you need to remove the front panel.
The heating element is installed in the lower section of the tank. There are wires coming to it that need to be disconnected. In order not to confuse the position during assembly, they can be photographed.
To remove the heating element, unscrew the nut located in the center. Then you will need to deepen the protruding bolt inward by lightly tapping it. Taking a flat screwdriver, pry the heater body with it and, loosening it, pull it out of the tank.
First, the heater should be cleaned of scale. If, when examining the heating element, you see black spots on it, there is a high probability that a breakdown has occurred. This heater needs to be replaced with a new one. If there are no stains, it is advisable to “ring” it with a tester. To do this, switch the device to measuring resistance, and measure it between the two contacts of the heater.
With a working heating element, the resistance can be from 20 to 40 Ohms, and in some models 60 Ohms. If this indicator is less than 20 ohms, then the element is faulty.
The principle of sealing between the tank and the heater is as follows: on the body of the heating element there is a sealing rubber gasket with a bolt in the center. When you screw the nut onto this bolt, the rubber seal expands, and due to this, it is tightly fixed in the tank.
Try to carefully insert it into its place, into the hole in the tank. If you position the element a little higher, the heater will catch on the rotating drum (after installation, rotate the drum to prevent contact).
Replacing motor brushes
A malfunction of the electric motor can also cause things to not be washed. Common engine malfunctions include:
- wear of the brushes inside the electric. motor;
- The starting capacitor in the asynchronous electric motor does not work (asynchronous electric motors do not have brushes).
Note - the engine may not turn on due to overheating, which may be caused by long-term washing (several loads in a row for 1.5 hours).
To replace the brushes, do the following:
- Remove the engine by unscrewing a few bolts. Disconnect all sensors and belt.
- Using a screwdriver, disconnect the terminal from the brush.
- Next, you need to remove the carbon electrode from the engine by unscrewing the bolts or releasing the spring. If it is shorter than 1.5 cm, a replacement is needed. When removing the brush, pay attention to the coal, in which direction its end is ground. If you insert it backwards, the motor will spark.
- We take out the second brush and remember where the coal is ground (you can take a photo).
Note - the brushes must be suitable for this electric motor model. The engine model can be found out by reading the markings on its body. Coals should only be changed in pairs. You cannot replace one brush and leave the other half worn out.
Now the collector needs to be cleaned from coal dust and scratches. Take the finest sandpaper, preferably “zero”, apply it to the commutator and rotate the shaft. Continue rotating until the commutator surface is free of dirt and scratches. Place the carbon elements in place at the correct angle, and secure them with screws.
To complete the repair, install the engine in the SMA housing, connect all sensors and the belt. Close the back cover of the washing unit.