Disassembling an Atlant washing machine into its component parts (in order to repair or replace a faulty element) without knowledge of the internal structure is a difficult task.
Proper preparation and strict adherence to a certain algorithm of actions will help to simplify the dismantling process as much as possible.
We will tell you more about how to disassemble the Atlant washing machine with your own hands in the article.
Preparing for disassembly
In order for the work on disassembling the Atlant washing machine to proceed as quickly as possible, it is important to prepare properly.
First of all, collect the necessary set of tools:
- screwdrivers (phillips and flathead);
- pliers;
- wrenches and spanners;
- hammer;
- auxiliary elements (rags, basin or bucket).
A screwdriver and WD-40 liquid will maximally speed up the process of unscrewing fasteners covered with a layer of scale or rust.
The second very important point is the preparation of the household appliance. The Atlant washing machine is pulled away from the wall and placed on a stable, flat surface. The device is unplugged from the outlet, the filler valve is closed, and the water supply and drainage hoses are disconnected.
Recommendations for using the washing machine
To increase the service life of the machine, it is enough to follow several important rules:
- Do not overload the washing machine drum beyond the norm established by the manufacturer. The fact is that few people read the instructions included with the product in full. They describe how much and what kind of laundry can be washed at a time. And there is no need to strain the machine with full permissible loads; three quarters of the nominal weight will have a beneficial effect not only on the technical condition of your assistant, but will improve the quality of washing things. There is no need to be afraid of excessive consumption of electricity; for a long wash at 60 degrees, the device consumes from 0.5 to 1 kW of electricity;
- Use high-quality water and detergents when washing. This will improve washing results and limit the formation of scale deposits on the inside of the washing machine. If necessary, you need to install additional filters to soften the water. It is also necessary to carry out preventive measures against scale and other unwanted deposits at certain intervals. The formation of these deposits spoils machine parts and imbues washable items with unpleasant odors. The approximate level of contamination of the machine can be seen under the hatch cuff at the point where it connects to the device tank. To do this, you just need to open the hatch and lift the edge of the elastic band;
- After using the device, unplug it from the outlet and turn off the water supply tap to it. It is also necessary to correctly connect the washing machine when installing it for the first time. An important step is connecting the device to the sewer; it should not provoke spontaneous outflow of water during washing and its entry from the sewer system.
- How to wash red wine from white clothes
- How to remove blood from clothes
SMA device diagram
The internal structure is a set of parts and mechanisms, the coordinated operation of which ensures high-quality washing and uninterrupted operation of the Atlant washing machine. Main elements and mechanisms:
Motor and drive belt
Ensure drum movement during washing and spinning . By pressing the “Start” button, the control module transmits a signal to start the rotation of the engine, which, through a pulley and drive belt, causes the drum to rotate.
The Atlant washing machine is equipped with commutator-type motors that are sensitive to sudden voltage changes. To ensure uninterrupted operation, it is better to connect the household appliance to the electrical network through a voltage stabilizer.
The speed (rpm) is controlled by a small sensor - a tachogenerator.
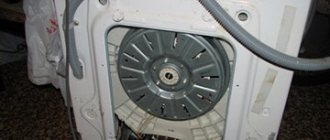
Tank
The largest element of the internal structure . The Atlant washing machine can be equipped with tanks made of both high-quality plastic and stainless steel. Two halves of the tank (most often a collapsible element) hide a metal (made of stainless steel) perforated drum.
The ribs on the surface of the drum help distribute the laundry evenly and improve the quality of washing.
Drain pump
A unit that ensures timely pumping of water from the drum at the end of washing . The Atlant washing machine is equipped with a rotary asynchronous drain pump.
When the corresponding signal is sent from the control module, the movement of the impeller blades is started, which are responsible for pumping the waste liquid from the drum into the sewer pipe.
Moving through the drain pipes, the water passes through a barrier in the form of a drain filter, which protects the drain pump from small objects and debris accumulated after washing.
Shock absorbers (dampers, springs)
They are necessary so that at high speeds of washing or spinning the tank does not swing , damaging the adjacent elements of the internal structure of the washing machine.
Control module
Coordinator, element that controls all processes occurring in the washing machine. It is the control module that receives signals from all elements of the internal device of the washing machine. Analyzing the information received, the control module starts or stops washing and sets the action algorithm for a specific program.
The Atlant washing machine is equipped with a self-diagnosis system. If a failure occurs in the washing program, the control module receives a corresponding signal , which appears on the control panel in the form of an error code or blinking indicators. By reading such signals, you can quickly find the cause of the malfunction and eliminate it.
Heating element (heating element)
Responsible for heating the water in the drum to the temperature specified by the washing program. You can find the heating element under the drum on the back side of the housing. Unfortunately, due to the poor quality of tap water, the heating elements in the Atlant washing machine must be replaced frequently (the tubes become covered with a layer of scale, which sharply reduces the rate of heating of the water).
Pressostat
Drum water control sensor . It is this small controller that measures the amount of water collected and if the volume exceeds the parameters specified by the program, the sensor transmits a signal to the control module to block the liquid collection process (thereby preventing a dangerous flood situation).
All the main elements are securely hidden under a metal case covered with enamel, which protects the metal from corrosion and rotting.
Disassembling a household appliance
By strictly following a certain sequence of actions, disassembling the Atlant washing machine will not be difficult.
Front loading
Unwinding a horizontal (front) loading washing machine begins by removing the top panel . To do this, unscrew the fasteners (two self-tapping screws). Then, slightly lifting it and moving it to the side, remove the cover from the body.
The second step is dismantling the back wall. To do this, you need to unscrew the fasteners and remove the panel from the body. The third step is dismantling the front panel. Here you will have to tinker a little. First, take out the powder receptacle, unscrew the control panel fasteners, and remove it from the body (before disconnecting the wires, you need to photograph their connection diagram).
At the bottom of the front panel, a small hatch is opened, behind the door of which the drain filter is hidden (it must be unscrewed).
There is a loading hatch in the central part of the front panel . It is necessary to open it and, by unscrewing the fasteners, remove the hatch locking device (located on the right side). Additionally, the clamp (a thin metal ring connecting the washer drum to the front panel) is dismantled. This is easy to do: carefully pry the ring off with a flat screwdriver and then pull it off the washing machine body.
As soon as all the auxiliary elements are removed from the front panel, the fasteners are unscrewed around the perimeter and the panel is removed from the body. The last step is to remove the side panels.
After the washing machine body is disassembled, access to all elements of the internal structure is available. They are removed in a certain sequence:
- After unscrewing the long mounting bolts, remove the heavy counterweight blocks (you will need the help of a friend for this work).
- Remove the heating element (located at the bottom of the washer under the tank). To do this, unscrew the central nut, carefully push the fixing pin, then carefully pry it off with a flat screwdriver and remove the heating element from the mounting socket. When disconnecting the wiring, do not forget to mark their location with colored markers.
- Remove the tank. To do this, disconnect the shock absorbers (springs), and then remove the drive belt. After unscrewing the fasteners and disconnecting the wiring, dismantle the washing machine motor. Only after the tank has been freed from all components and mechanisms can it be easily removed from the body and washed.
The final touch is to remove the pressure switch (the sensor is easy to find on the back panel of the washing machine body). Before removing the sensor, you need to photograph the wiring diagram, and then unscrew the fasteners and remove it from the panel.
The video will show you how to disassemble the Atlant washing machine:
From vertical
The disassembly of the Atlant top-loading washing machine proceeds according to the following algorithm:
- Using a Phillips screwdriver, unscrew the fasteners located on the sides of the case.
- Using a flat-head screwdriver, pry up the control panel and carefully disconnect it. Before removing the panel from the case, you need to tilt it slightly to the side and photograph the wiring diagram.
- Lifting the lid, unscrew the screws holding it. Additionally, we unscrew the bolts hidden behind the sealing collar. After all fasteners have been removed, the washer cover can be removed from the body.
- Loosen the clamp and disconnect the rubber pipes.
- After unscrewing the screws, remove the side panels.
- After unscrewing the bolts, remove the front panel.
In the Atlant washing machine, the tank cannot be removed from the body. By disassembling the body of the household appliance, access only opens to:
- drive belt (if necessary, remove it from the pulley wheel),
- electric motor (by unscrewing the fasteners and disconnecting the wiring, it can be easily removed from under the tank),
- drain pump (before dismantling it would be a good idea to photograph the wiring diagram and hose location).
How to put it back?
The assembly process of the Atlant washing machine is carried out strictly in the reverse order of the disassembly process.
First of all, install the washing machine tank in its original place , after which the electric motor, drain pump and heating element are connected. A pressure switch, drain and fill pipes, and counterweights are mounted above the tank.
After all the elements of the internal structure are in place, the body of the washing machine is assembled. First of all, the front panel is mounted (along with it, the loading hatch clamp and the hatch locking device are returned to their original place), and the drain filter is screwed in. The back panel and lid of the washing machine are returned to their original place. The powder receptacle is inserted.
After the reassembly process is completed, the washing machine is connected to the communications, after which a test wash (without clothes) must be started. “Idle run” will help identify connection errors and troubleshoot all problems in a timely manner.
Where to buy, how much does it cost?
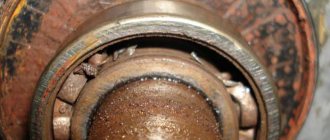
Different models of Atlant washing machines have original bearings installed.
To select the appropriate part, you need to know the serial number of the device. Not only the bearing must be replaced, but also the seal. You can purchase a repair kit in online markets and in specialized stores. Its average price is 1000 rubles .
To buy a bearing that will be 100% compatible with your washing machine, you need to find the serial number on it. The new part must have similar values stamped on it.
What difficulties might arise and what should be done in this case?
In the process of independently disassembling and assembling the Atlant washing machine, you may encounter some difficulties.
First of all, difficulties are associated with unscrewing fasteners. To facilitate and speed up the process, lubricant must be applied to the thread or joint between the fastener and the part.
The second point is that it is impossible to remove the tank from the housing . As a rule, this problem can be solved very simply. It is enough to carefully check that all fasteners are disconnected, paying special attention to the shock absorbers under the tank.
The third point is that upon completion of reassembly, the inlet and drain hoses begin to leak. To fix the problem, you need to tighten the compression rings and coat the threads of the connection with sealant.
And one more, very unpleasant situation - there are not enough parts during reassembly . Most often, the problem can be prevented if, during the disassembly process, you carefully lay out all the dismantled parts on a flat surface, labeling and numbering each element. All small parts, as well as fasteners, are placed in separate small containers (boxes).
Call the master
If you are not sure that you will be able to cope with bearing repairs yourself, it is better to entrust this work to specialists. You can find a master by looking at advertisements posted on bulletin boards on the Internet and in newspapers. In addition to private repairmen, service centers offer their services.
The cost of work differs depending on the city and the organization providing the service . To replace bearings at a service center you will have to pay about 3,200 rubles. The price does not include the price of the part. It is paid separately.
The master must provide receipts and a report with a list of work performed. If the machine is under warranty, then malfunctions that are not the fault of the user must be corrected by the manufacturer.