Operating instructionsAutomatic washing machineW…
Miele washing machines
- Image
- Text
- Content
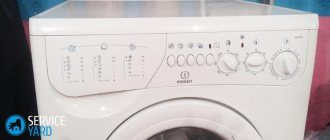
Operating instructions Automatic washing machine W 2839i WPM
Before installing, connecting and preparing the machine for operation, be sure to
Please read these operating instructions. You will protect yourself and prevent damage to the machine.
Ru
M.-Nr. 06 844 980
- Contents Your contribution to environmental protection 2 Disposal of transport packaging 2
- Disposal of used device 2
- Control panel 10
- Electricity and water consumption 15
- Brief instructions 16
- Short 22
- Final spin speed 23 Spin with rinse 23
- Adding or removing laundry 34
- Choosing the right detergents 35
- Water softener 36
- Cleaning the washing machine 38 Cleaning the detergent and laundry care additive dispenser 38
- What to do, if . . . 40
- Repair work 49
- Front view 50
- Unscrewing and fixing the leg with a lock nut 55
- Adjustment 57
- Front panel size 58
- Preparing the front panel 59
- Comparison test instruction: 66
- Entering the “Settings” menu 69
Instructions for Miele washing machines
On our website you can always download operating manuals for Miele washing machines. The need for user instructions for the required model often arises. To download the instructions, point to the link for the desired model and save it to your computer or open it in a browser.
- Miele PW 5064 Professional washing machine instructions
- Miele PW 5065 Professional washing machine instructions
- Miele PW 5082 Professional washing machine instructions
- Miele PW 5084 Mopp Professional washing machine instructions
- Miele PW 5104 Mopp Professional washing machine instructions
- Miele PW 5105 Vario Professional washing machine instructions
- Miele PW 5134 Professional washing machine instructions
- Miele PW 6065 Vario Professional washing machine instructions
- Instructions for washing machine Miele PW 6080 Vario AV Professional
- Miele PW 6107 Professional washing machine instructions
- Miele PW 6137 Professional washing machine instructions
- Miele PW 6163 Professional washing machine instructions
- Miele PW 6167 Professional washing machine instructions
- Miele PW 6207 Professional washing machine instructions
- Miele PW 6241 Professional washing machine instructions
- Miele PW 6243 Professional washing machine instructions
- Miele PW 6321 Professional washing machine instructions
- Miele PW 6323 Professional washing machine instructions
- Miele W 149 Novotronic washing machine instructions
- Miele W 1513 Novotronic washing machine instructions
- Miele W 1514 Novotronic washing machine instructions
- Instructions for washing machine Miele W 155 WPM Novotronic
- Miele W 155 WPS Novotronic washing machine instructions
- Miele W 1613 washing machine instructions
- Miele W 1614 Novotronic washing machine instructions
- Miele W 162 Softtronic washing machine instructions
- Miele W 1714 WCS washing machine instructions
- Miele W 1730 washing machine instructions
- Instructions for washing machine Miele W 1734 WPS Softtronic
- Instructions for washing machine Miele W 1740 Active care
- Miele W 1744 WPS washing machine instructions
- Miele W 180 WPM Softtronic washing machine instructions
- Miele W 1914 WPS washing machine instructions
- Miele W 1944 WPS washing machine instructions
- Miele W 204 Softtronic washing machine instructions
- Miele W 2102 Softtronic washing machine instructions
- Miele W 2104 Softtronic washing machine instructions
- Miele W 2105 Softtronic washing machine instructions
- Miele W 2127 Softtronic washing machine instructions
- Miele W 2242 Softtronic washing machine instructions
- Miele W 237 WPM Softtronic washing machine instructions
- Miele W 2448 Softtronic washing machine instructions
- Miele W 247 WPM Softtronic washing machine instructions
- Instructions for washing machine Miele W 2523 WPS Softtronic
- Miele W 254 Softtronic washing machine instructions
- Instructions for washing machine Miele W 2597 WPS Softtronic
- Miele W 262 WPM Softtronic washing machine instructions
- Miele W 2809i Softtronic washing machine instructions
- Miele W 2839i WPM washing machine instructions
- Instructions for washing machine Miele W 2859 iR WPM Supertronic
- Instructions for washing machine Miele W 2888 WPS Navitronic
- Miele W 297 WPM Softtronic washing machine instructions
- Instructions for washing machine Miele W 3000 Gala Grande Softtronic
- Washing machine instructions Miele W 3164 WSS Edition 111
- Miele W 317 Novotronic washing machine instructions
- Miele W 323 Novotronic washing machine instructions
- Miele W 3240 Softtronic washing machine instructions
- Miele W 3241 washing machine instructions
- Miele W 3266 Softtronic washing machine instructions
- Miele W 337 Novotronic washing machine instructions
- Washing machine instructions Miele W 3370 Edition 111
- Instructions for washing machine Miele W 3444 WPS Softtronic
- Miele W 3523 Softtronic washing machine instructions
- Instructions for washing machine Miele W 3627 WPS Softtronic
- Instructions for washing machine Miele W 3724 Limited Edition Softtronic
- Miele W 3741 Softtronic washing machine instructions
- Miele W 3748 Softtronic washing machine instructions
- Instructions for washing machine Miele W 377 WPS Novotronic
- Miele W 3780 Softtronic washing machine instructions
- Instructions for washing machine Miele W 3821 WPS Softtronic
- Instructions for washing machine Miele W 3835 WPS Softtronic
- Instructions for washing machine Miele W 3845 WPS medicwash Softtronic
- Instructions for washing machine Miele W 3903 WPS Softtronic
- Instructions for washing machine Miele W 3923 WPS Softtronic
- Miele W 3985 WPS washing machine instructions
- Instructions for washing machine Miele W 4000 Gala Grande Softtronic
- Miele W 402 Plus Softtronic washing machine instructions
- Miele W 405 Softtronic washing machine instructions
- Miele W 409 Softtronic washing machine instructions
- Instructions for washing machine Miele W 4144 WPS Softtronic
- Instructions for washing machine Miele W 4146 WPS Softtronic
- Instructions for washing machine Miele W 433-E Softtronic
- Miele W 437 Softtronic washing machine instructions
- Instructions for washing machine Miele W 439-E WPS Softtronic
- Instructions for washing machine Miele W 4466 WPS Softtronic
- Instructions for washing machine Miele W 4469 WPS LiquidWash Softtronic
- Miele W 452 WPS Softtronic washing machine instructions
- Instructions for washing machine Miele W 452-E WPS Softtronic
- Miele W 459 WPS Softtronic washing machine instructions
- Miele W 463 WPS Softtronic washing machine instructions
- Instructions for washing machine Miele W 477 WPS Softtronic
- Instructions for washing machine Miele W 487 WPS Softtronic
- Instructions for washing machine Miele W 5000 WPS Supertronic
- Miele W 526 Novotronic washing machine instructions
- Miele W 544 Novotronic washing machine instructions
- Miele W 564 Novotronic washing machine instructions
- Miele W 5780 washing machine instructions
- Miele W 5820 WPS washing machine instructions
- Miele W 5824 WPS washing machine instructions
- Miele W 5834 WPS washing machine instructions
- Miele W 584 Novotronic washing machine instructions
- Washing machine instructions Miele W 5872 Edition 111
- Instructions for washing machine Miele W 5880 WPS Super Silence
- Miele W 5963 WPS washing machine instructions
- Miele W 5965 WPS washing machine instructions
- Miele W 5967 WPS washing machine instructions
- Instructions for washing machine Miele W 6000 Gala Grande XL
- Miele W 604 Softtronic washing machine instructions
- Miele W 6073 Professional washing machine instructions
- Miele W 614 washing machine instructions
- Instructions for washing machine Miele W 627 WPM Softtronic
- Miele W 647 WPM washing machine instructions
- Miele W 6564 WPS washing machine instructions
- Miele W 664 washing machine instructions
- Miele W 667 washing machine instructions
- Miele W 6746 WPS washing machine instructions
- Miele W 687 F WPM washing machine instructions
- Instructions for washing machine Miele W 690 F WPM
- Miele W 851 Novotronic washing machine instructions
- Miele W 866 Novotronic washing machine instructions
- Miele W 961 Novotronic washing machine instructions
- Instructions for washing machine Miele W 979 AllWater Novotronic
- Miele W 985 WPS Novotronic washing machine instructions
- Miele W 989i WPS Novotronic washing machine instructions
- Miele WDA 100 washing machine instructions
- Miele WDA 101 washing machine instructions
- Miele WDA 200 WPM washing machine instructions
- Miele WDA 211 WPM washing machine instructions
- Miele WDB 020 ECO washing machine instructions
- Miele WKB 120 WPS washing machine instructions
- Miele WKB 120 washing machine instructions
- Miele WKF 120 washing machine instructions
- Miele WKF 121 WPS washing machine instructions
- Miele WKG 120 WPS washing machine instructions
- Miele WKH 130 WPS washing machine instructions
- Miele WKR 570 WPS washing machine instructions
- Miele WKR 571 WPS washing machine instructions
- Miele WMB 120 WPS washing machine instructions
- Miele WMG 120 WPS washing machine instructions
- Miele WMH 120 WPS washing machine instructions
- Miele WMH 121 WPS washing machine instructions
- Miele WMH 122 WPS washing machine instructions
- Miele WMR 560 WPS washing machine instructions
- Miele WMR 561 WPS washing machine instructions
- Miele WMV 960 WPS washing machine instructions
- Miele WT 2670 WPM washing machine instructions
- Washing machine instructions Miele WT 2679 i WPM
- Instructions for washing machine Miele WT 2780 WPM Softtronic
- Instructions for washing machine Miele WT 2789 i WPM Softtronic
- Miele WT 2796 WPM washing machine instructions
- Miele WT 945 Novotronic washing machine instructions
- Instructions for washing machine Miele WT 945 S WPS Softtronic
- Instructions for washing machine Miele WT 946 I WPS Novotronic
- Instructions for washing machine Miele WT 946 S WPS Softtronic
- Miele WT 946 WPS Novotronic washing machine instructions
- Miele T 277 C Novotronic dryer instructions
- Instructions for dryer Miele T 8623 C SOFTTRONIC
Your contribution to environmental protection...
Page 3
- Image
- Text
Your contribution to environmental protection
. . . . . . . . . . . . . . . . . . . . . . . . . . . . 2 Disposal of transport packaging. . . . . . . . . . . . . . . . . . . . . . . . . . . . . . . . . . . . . . 2 Disposal of used devices. . . . . . . . . . . . . . . . . . . . . . . . . . . . . . . . . . . . . . . 2
Safety instructions and warnings
. . . . . . . . . . . . . . . . . . . . . . . 6
Washing machine control
. . . . . . . . . . . . . . . . . . . . . . . . . . . . . . . . . 10 Control panel. . . . . . . . . . . . . . . . . . . . . . . . . . . . . . . . . . . . . . . . . . . . . . . . . . . . 10 How the display works. . . . . . . . . . . . . . . . . . . . . . . . . . . . . . . . . . . . . . . . . . . . . . . eleven
First commissioning
. . . . . . . . . . . . . . . . . . . . . . . . . . . . . . . . . . . . . 13
Eco-friendly washing
. . . . . . . . . . . . . . . . . . . . . . . . . . . . . . . . . . . . . . . . . . . . . 15
Electricity and water consumption. . . . . . . . . . . . . . . . . . . . . . . . . . . . . . . . . . . . . . . 15 Detergent consumption. . . . . . . . . . . . . . . . . . . . . . . . . . . . . . . . . . . . . . . . . . . . . 15
Proper washing
. . . . . . . . . . . . . . . . . . . . . . . . . . . . . . . . . . . 16 Brief instructions. . . . . . . . . . . . . . . . . . . . . . . . . . . . . . . . . . . . . . . . . . . . . . . . . . . 16
Options
. . . . . . . . . . . . . . . . . . . . . . . . . . . . . . . . . . . . . . . . . . . . . . . . . . . . . . . . . . 22 Short. . . . . . . . . . . . . . . . . . . . . . . . . . . . . . . . . . . . . . . . . . . . . . . . . . . . . . . . . . . . . 22 More water. . . . . . . . . . . . . . . . . . . . . . . . . . . . . . . . . . . . . . . . . . . . . . . . . . . . . . . . . 22 Pre-wash. . . . . . . . . . . . . . . . . . . . . . . . . . . . . . . . . . . . . . . . . . . . . . . 22 Additional options. . . . . . . . . . . . . . . . . . . . . . . . . . . . . . . . . . . . . . . . . . . . . . . . 22
Soak. . . . . . . . . . . . . . . . . . . . . . . . . . . . . . . . . . . . . . . . . . . . . . . . . . . . . . . 22 No drain. . . . . . . . . . . . . . . . . . . . . . . . . . . . . . . . . . . . . . . . . . . . . . . . . . . . . . . . . . 22 Add. rinsing . . . . . . . . . . . . . . . . . . . . . . . . . . . . . . . . . . . . . . . . . . . . . . . . . . . 22
Spin
. . . . . . . . . . . . . . . . . . . . . . . . . . . . . . . . . . . . . . . . . . . . . . . . . . . . . . . . . . 23 Final spin speed. . . . . . . . . . . . . . . . . . . . . . . . . . . . . . . . . . . . . . . 23
Spin and rinse. . . . . . . . . . . . . . . . . . . . . . . . . . . . . . . . . . . . . . . . . . . . . . . 23 Refusal of the final spin (without draining). . . . . . . . . . . . . . . . . . . . . . . . . . 23 Refusal from spinning with rinsing and final spinning (without spinning). . 23
Delayed start
. . . . . . . . . . . . . . . . . . . . . . . . . . . . . . . . . . . . . . . . . . . . . . . . . 24
Program overview
. . . . . . . . . . . . . . . . . . . . . . . . . . . . . . . . . . . . . . . . . . . . . . . . . 26
Program Execution
. . . . . . . . . . . . . . . . . . . . . . . . . . . . . . . . . . . . . . . . . . 30
Care symbols
. . . . . . . . . . . . . . . . . . . . . . . . . . . . . . . . . . . . . . . . . . . . . . . 32
Changing the course of the program
. . . . . . . . . . . . . . . . . . . . . . . . . . . . . . . . . . . . . . . 33 Adding or removing laundry. . . . . . . . . . . . . . . . . . . . . . . . . . . . . . . . . . . . . . 34 Safety interlock. . . . . . . . . . . . . . . . . . . . . . . . . . . . . . . . . . . . . . . . . . . . . . . . . 34
Detergents
. . . . . . . . . . . . . . . . . . . . . . . . . . . . . . . . . . . . . . . . . . . . . . . 35 Choosing the right detergents. . . . . . . . . . . . . . . . . . . . . . . . . . . . . . . . . . . . . 35
Content
3
Detergents…
Page 4
- Image
- Text
Detergents
. . . . . . . . . . . . . . . . . . . . . . . . . . . . . . . . . . . . . . . . . . . . . . . 36 Water softener. . . . . . . . . . . . . . . . . . . . . . . . . . . . . . . . . . . . . . . . . . . . . . . . . . . . . . 36 Compound detergent. . . . . . . . . . . . . . . . . . . . . . . . . . . . . . . . . . . . . . . . . . . 36 Linen care products. . . . . . . . . . . . . . . . . . . . . . . . . . . . . . . . . . . . . . . . . . 37
Automatic use of additives. . . . . . . . . . . . . . . . . . . . . . . . . . . . . . 37 Separate rinsing with additives or starching. . . . . . . . . . . . . . 37
Discoloration/staining. . . . . . . . . . . . . . . . . . . . . . . . . . . . . . . . . . . . . . . . . 37
Cleaning and care
. . . . . . . . . . . . . . . . . . . . . . . . . . . . . . . . . . . . . . . . . . . . . . . . . . . 38 Cleaning the washing machine. . . . . . . . . . . . . . . . . . . . . . . . . . . . . . . . . . . . . . . . . . . . 38
Cleaning the dispenser for detergent and laundry care additives. . . . . 38
Cleaning the filter in the water supply system. . . . . . . . . . . . . . . . . . . . . . . . . . . . . . . . . . 39
Troubleshooting assistance
. . . . . . . . . . . . . . . . . . . . . . . . . . . . . . . . . . . . . 40 What to do if . . . . . . . . . . . . . . . . . . . . . . . . . . . . . . . . . . . . . . . . . . . . . . . . . . . . . . 40 No washing program starts. . . . . . . . . . . . . . . . . . . . . . . . . . . . . . . 40 The display shows a fault message. . . . . . . . . . . . . . . . . . . . . . . . . 41 Problems when determining the load or setting the zero point of the load sensor. . . . . . . . . . . . . . . . . . . . . . . . . . . . . . . . . . . . . . . . . . . . . . . . . . . . . . 42 Common problems with an automatic washing machine. . . . . . . . . . . . . . . . . . 43 Unsatisfactory washing result. . . . . . . . . . . . . . . . . . . . . . . . . . . . . . . . 44 The door does not open. . . . . . . . . . . . . . . . . . . . . . . . . . . . . . . . . . . . . . . . . . . . . . . . 45 Opening the hatch door when the drain is clogged and/or there is a power failure. . . . . . . . . . . . . . . . . . . . . . . . . . . . . . . . . . . . . . . . . . . . . . . . . . . . 46
Draining the cleaning solution. . . . . . . . . . . . . . . . . . . . . . . . . . . . . . . . . . . . . . . . . . . . . 46 Opening the hatch door. . . . . . . . . . . . . . . . . . . . . . . . . . . . . . . . . . . . . . . . . . . 47 Cleaning the drain filter. . . . . . . . . . . . . . . . . . . . . . . . . . . . . . . . . . . . . . . . . . . . 47
Customer Service
. . . . . . . . . . . . . . . . . . . . . . . . . . . . . . . . . . . . . . . . . . . . . . . 49
Repair work. . . . . . . . . . . . . . . . . . . . . . . . . . . . . . . . . . . . . . . . . . . . . . . . . 49 Program updates (modernization). . . . . . . . . . . . . . . . . . . . . . . . . . . . . . . . 49 Warranty conditions and warranty period. . . . . . . . . . . . . . . . . . . . . . . . . . . . . . . . . 49 Optional Accessories . . . . . . . . . . . . . . . . . . . . . . 49 Certificate. . . . . . . . . . . . . . . . . . . . . . . . . . . . . . . . . . . . . . . . . . . . . . . . . . . . . . . 49 Service life. . . . . . . . . . . . . . . . . . . . . . . . . . . . . . . . . . . . . . . . . . . . . . . . . . . . . . . 49
Installation and connection
. . . . . . . . . . . . . . . . . . . . . . . . . . . . . . . . . . . . . . . . 50 Front view. . . . . . . . . . . . . . . . . . . . . . . . . . . . . . . . . . . . . . . . . . . . . . . . . . . . . . . . . . 50 Rear view. . . . . . . . . . . . . . . . . . . . . . . . . . . . . . . . . . . . . . . . . . . . . . . . . . . . . . . . . . . . 51 Installation surface . . . . . . . . . . . . . . . . . . . . . . . . . . . . . . . . . . . . . . . . . . . . 52
Moving the washing machine to the installation site. . . . . . . . . . . . . . . . . 52
Removing the transport securing device. . . . . . . . . . . . . . . . . . . . . . . . . . . . . . . 52
Content
4
Installation surface...
Page 5
- Image
- Text
Installation surface. . . . . . . . . . . . . . . . . . . . . . . . . . . . . . . . . . . . . . . . . . . . 43
Moving the washing machine to the installation site. . . . . . . . . . . . . . . . . 43
Removing the transport securing device. . . . . . . . . . . . . . . . . . . . . . . . . . . . . . . 43 Installing the transport securing system. . . . . . . . . . . . . . . . . . . . . . . . . . . . . . 45 Leveling the machine. . . . . . . . . . . . . . . . . . . . . . . . . . . . . . . . . . . . . . . . . . . . . . . . 46
Turning and securing the legs. . . . . . . . . . . . . . . . . . . . . . . . . . . . . . . . . 46 Built-in under a worktop. . . . . . . . . . . . . . . . . . . . . . . . . . . . . . . . . . . . . . . . 47 Installing a washing machine and dryer in a column. . . . . . . . . . . . . . . . . . . 47
Miele water leakage protection system. . . . . . . . . . . . . . . . . . . . . . . . . . . . . . . . . 48 Water supply. . . . . . . . . . . . . . . . . . . . . . . . . . . . . . . . . . . . . . . . . . . . . . . . . . . . . . . . . . 49 Draining water. . . . . . . . . . . . . . . . . . . . . . . . . . . . . . . . . . . . . . . . . . . . . . . . . . . . . . . . . . . . 50 Electrical connection. . . . . . . . . . . . . . . . . . . . . . . . . . . . . . . . . . . . . . . . . . . . 51
Flow parameters
. . . . . . . . . . . . . . . . . . . . . . . . . . . . . . . . . . . . . . . . . . . . . . 52
Note for comparison tests: . . . . . . . . . . . . . . . . . . . . . . . . . . . . . 52
Technical data
. . . . . . . . . . . . . . . . . . . . . . . . . . . . . . . . . . . . . . . . . . . . . 53
Programmable Features
. . . . . . . . . . . . . . . . . . . . . . . . . . . . . . . . . . . . . . 55
Entering the “Programmable functions” menu. . . . . . . . . . . . . . . . . . . . . . . . . . . . 55 Selecting a programmable function. . . . . . . . . . . . . . . . . . . . . . . . . . . . . . . . . . . . 55 Setting up a programmable function. . . . . . . . . . . . . . . . . . . . . . . . . . . . . . . . 55 Exit the “Programmable functions” menu. . . . . . . . . . . . . . . . . . . . . . . . . . 55
Language
F. . . . . . . . . . . . . . . . . . . . . . . . . . . . . . . . . . . . . . . . . . . . . . . . . . . . . . . . . . . . . . 55
Aqua plus. . . . . . . . . . . . . . . . . . . . . . . . . . . . . . . . . . . . . . . . . . . . . . . . . . . . . . . . . . . . 56 Gentle mode. . . . . . . . . . . . . . . . . . . . . . . . . . . . . . . . . . . . . . . . . . . . . . . . . . . . . . 56 Cooling solution . . . . . . . . . . . . . . . . . . . . . . . . . . . . . . . . . . . . . . . . . . . . . . . . . . . . 56 Pin code. . . . . . . . . . . . . . . . . . . . . . . . . . . . . . . . . . . . . . . . . . . . . . . . . . . . . . . . . . . . . . 57
Controlling the washing machine with a pin code. . . . . . . . . . . . . . . . . . . . . . . . . 57
Unit pace. . . . . . . . . . . . . . . . . . . . . . . . . . . . . . . . . . . . . . . . . . . . . . . . . . . . . 58 Buzzer. . . . . . . . . . . . . . . . . . . . . . . . . . . . . . . . . . . . . . . . . . . . . . . . . . . . . . . . . . . . . . . 58 Confirm. signal . . . . . . . . . . . . . . . . . . . . . . . . . . . . . . . . . . . . . . . . . . . . . . . . . . . . 58 Brightness. . . . . . . . . . . . . . . . . . . . . . . . . . . . . . . . . . . . . . . . . . . . . . . . . . . . . . . . . . . . . . 58 Contrast. . . . . . . . . . . . . . . . . . . . . . . . . . . . . . . . . . . . . . . . . . . . . . . . . . . . . . . . 58 Display in dir. expect... . . . . . . . . . . . . . . . . . . . . . . . . . . . . . . . . . . . . . . . . . . . . . . . . . . 59 Memory. . . . . . . . . . . . . . . . . . . . . . . . . . . . . . . . . . . . . . . . . . . . . . . . . . . . . . . . . . . . . . . 59
Content
5
Installing the transport fastener...
Page 5
- Image
- Text
Installing the transport fastener. . . . . . . . . . . . . . . . . . . . . . . . . . . . . . 54 Leveling the washing machine. . . . . . . . . . . . . . . . . . . . . . . . . . . . . . . . . . . . . . 55
Unscrewing and fixing the leg with a lock nut. . . . . . . . . . . . . . . . . . . . . . . . . 55 Installing a washing machine and dryer in a column. . . . . . . . . . . . . . . . . . . 55
Built-in under the countertop. . . . . . . . . . . . . . . . . . . . . . . . . . . . . . . . . . . . . . . . . . . 56 Adjustment to the size of the drawer. . . . . . . . . . . . . . . . . . . . . . . . . . . . . . 57
Adjustment. . . . . . . . . . . . . . . . . . . . . . . . . . . . . . . . . . . . . . . . . . . . . . . . . . . . . . . 57 Removing the lining set. . . . . . . . . . . . . . . . . . . . . . . . . . . . . . . . . . . . . . . 57
Installation of the front panel. . . . . . . . . . . . . . . . . . . . . . . . . . . . . . . . . . . . . . . . . . . . . . . 58
Front panel size. . . . . . . . . . . . . . . . . . . . . . . . . . . . . . . . . . . . . . . . . . . . . 58 Installing the front panel. . . . . . . . . . . . . . . . . . . . . . . . . . . . . . . . . . . . . . . . . . 58
Front panel from other manufacturers. . . . . . . . . . . . . . . . . . . . . . . . . . . . . 59
Preparing the front panel. . . . . . . . . . . . . . . . . . . . . . . . . . . . . . . . . . . . . . . . . 59 Establishing attachment points. . . . . . . . . . . . . . . . . . . . . . . . . . . . . . . . . . . . . . 60
Attaching the plinth panel. . . . . . . . . . . . . . . . . . . . . . . . . . . . . . . . . . . . . . . . . . . 61 Miele water leakage protection system. . . . . . . . . . . . . . . . . . . . . . . . . . . . . . . . . 62 Water supply. . . . . . . . . . . . . . . . . . . . . . . . . . . . . . . . . . . . . . . . . . . . . . . . . . . . . . . . . . 63 Draining water. . . . . . . . . . . . . . . . . . . . . . . . . . . . . . . . . . . . . . . . . . . . . . . . . . . . . . . . . . . . 64 Electrical connection. . . . . . . . . . . . . . . . . . . . . . . . . . . . . . . . . . . . . . . . . . . . 65
Flow parameters
. . . . . . . . . . . . . . . . . . . . . . . . . . . . . . . . . . . . . . . . . . . . . . 66
Note for comparison tests: . . . . . . . . . . . . . . . . . . . . . . . . . . . . . 66
Specifications
. . . . . . . . . . . . . . . . . . . . . . . . . . . . . . . . . . . . . . 67
Settings Menu
. . . . . . . . . . . . . . . . . . . . . . . . . . . . . . . . . . . . . . . . . . . . . . . . . 69
Enter the “Settings” menu. . . . . . . . . . . . . . . . . . . . . . . . . . . . . . . . . . . . . . . . . . . . 69
Language
F. . . . . . . . . . . . . . . . . . . . . . . . . . . . . . . . . . . . . . . . . . . . . . . . . . . . . . . . . . . . . . 69
Current time. . . . . . . . . . . . . . . . . . . . . . . . . . . . . . . . . . . . . . . . . . . . . . . . . . . . . . . . 69 Gentle mode. . . . . . . . . . . . . . . . . . . . . . . . . . . . . . . . . . . . . . . . . . . . . . . . . . . . . . 70 Add. time prev wash . . . . . . . . . . . . . . . . . . . . . . . . . . . . . . . . . . . . . . . . . . . . . . . . . . 70 Cool. washing sol. . . . . . . . . . . . . . . . . . . . . . . . . . . . . . . . . . . . . . . . . . . . . . . . . . . . . . 70 Pin code. . . . . . . . . . . . . . . . . . . . . . . . . . . . . . . . . . . . . . . . . . . . . . . . . . . . . . . . . . . . . . 71 Unit of measure temp. . . . . . . . . . . . . . . . . . . . . . . . . . . . . . . . . . . . . . . . . . . . . . . . . . . 72 Buzzer. . . . . . . . . . . . . . . . . . . . . . . . . . . . . . . . . . . . . . . . . . . . . . . . . . . . . . . . . . . . . . . 72 Confirm. signal . . . . . . . . . . . . . . . . . . . . . . . . . . . . . . . . . . . . . . . . . . . . . . . . . . . . 72 Brightness. . . . . . . . . . . . . . . . . . . . . . . . . . . . . . . . . . . . . . . . . . . . . . . . . . . . . . . . . . . . . . 72 Contrast. . . . . . . . . . . . . . . . . . . . . . . . . . . . . . . . . . . . . . . . . . . . . . . . . . . . . . . . 72 Display in mode expected . . . . . . . . . . . . . . . . . . . . . . . . . . . . . . . . . . . . . . . . . . . . . . . . . . 73 Memory. . . . . . . . . . . . . . . . . . . . . . . . . . . . . . . . . . . . . . . . . . . . . . . . . . . . . . . . . . . . . . . 73
Content
5
Commissioning
Before installing the machine in place, you need to completely remove all advertising stickers, leaving only the service information, for example, a standard table.
The best surface for installation is a concrete floor, because it does not vibrate during spinning. If the flooring is wooden (parquet, laminate, board), then it is recommended to make a plywood base, which should be screwed not only to the flooring, but also to the supporting beams. By the way, stability is greatest in the corner of the room, so experts recommend placing the device there. When installing on a plinth, be sure to use the special floor mounting kit.
How to remove the transport fasteners?
- Pull the secured stopper plugs and use a screwdriver to loosen the upper and lower clamps.
- Take the wrench that comes with the kit and turn the left shipping rod 90° and then remove it. Do the same with the right rod.
- Close the holes with plugs and secure the rods to the back wall of the machine. Since washing machines cannot be transported without transport fastenings, they may still be useful to you. Please note that the top clamp must be located above the holder.
Level the device using the screw feet and check the level. All four locknuts securing the legs must be firmly tightened towards the body. Otherwise, the machine will move during the spin cycle. Improper installation can also result in wasted water.
Installation into a column and under a countertop is carried out by service center specialists, as it requires special skills. For installation you need to purchase a specialized installation kit.
- WTV kit regular
- WTV set with drawer.
How to connect the machine to water?
A ¾'' threaded water tap is required. If it is not there, then the connection to the water supply must be made by a plumber.
How to connect the water drain?
The drain hose must be laid without kinks; if necessary, it can be increased to 5 m.
- Water can be pumped into the sink, then the hose is attached to the edge of the sink or sink. It is important to ensure that the end of the tube does not slip off and that the water goes down the drain fairly quickly.
- Discharge into the sewer is much more convenient. You can connect the drain to the waste pipe using a rubber coupling or plastic nipple.
After the washing machine is installed in place and connected to the water supply and sewerage system, you can connect the plug to the outlet. Do not use extension cords or tees. A permanently grounded outlet is required.
Safety instructions and warnings
Page 8
- Image
- Text
Before a long absence (for example, on vacation), close the
water tap, especially if there is no drain in the floor near the washing machine.
Danger of flooding! Before hanging the drain
hose to the sink, make sure that the water drains quickly enough. Secure the drain hose to prevent it from slipping. The backlash of escaping water can push a loose hose out of the sink.
Make sure that there are no foreign objects in the machine when washing.
solids (for example, nails, needles, coins, paper clips). These foreign bodies can damage the structural elements of the device (for example, tank, drum). In turn, damaged structural elements can subsequently cause damage to the laundry during washing.
With the correct dosage of detergents, no cleaning is required.
Keep your washing machine free of limescale. If your machine has such a strong limescale deposit that it requires descaling, use special anti-corrosion products for this purpose. These products can be purchased from Miele retailers or Miele customer service. Strictly follow the recommendations for using descaling products.
Textiles treated with detergents containing co-
containing solvents, rinse thoroughly in clean water before washing.
Do not use cleaning agents in the washing machine.
products containing solvents (for example, gasoline). Otherwise, machine parts may be damaged and toxic fumes may be released. There is also a risk of fire and explosion!
Near and directly on the surface of the washing machine
Under no circumstances should cleaning agents containing solvents (eg benzine) be used. If plastic surfaces are wetted with such products, they may be damaged.
The use of special dyes for auto-
tical washing machines for domestic purposes only. Strictly follow the manufacturer's instructions for use.
Bleaching agents may contain sulfur compounds and,
hence causing corrosion. Therefore, the use of bleaching agents in automatic washing machines is not permitted.
Safety instructions and warnings
8
New features
TwinDos system - maximum effect from detergents
The new Miele washing machine will replace professional dry cleaning services. The unique detergent dispenser declares war on any stain - no stains in just one wash cycle. There are two containers for two cartridges with proprietary liquids UltraPhase 1 and UltraPhase 2, which are fed into the drum at the right time. Formula No. 1 is selected to effectively dissolve soil, chocolate, and grease stains. Composition No. 2 is an effective and at the same time gentle bleach that removes stubborn red wine or coffee stains.
With separate supply of detergents, washing efficiency increases significantly. The fact is that each of the detergent components works more actively at a certain water temperature. The effect is progressive: the fabric fibers are saturated with clean water, the first composition penetrates deeply into the fibers, dissolves ordinary stains and softens stubborn stains, the second removes remaining dirt.
If you forget to buy UltraPhase, you won’t have to put off washing - TwinDos
universal. You can pour regular washing liquid and conditioner into the dispenser sections, but special compounds are a priority: in addition to bioactive substances, they contain additives to protect against fading, gray deposits, and wear. After ten intensive washes, linens and clothes will look new.
A pleasant bonus to the impeccable quality of washing is significant savings in detergents. The supply of liquids is automatically adjusted to the type and degree of soiling of the fabric, the volume of laundry in the drum and the water temperature. Compared to manual dosing, when the entire contents of the container are sent into the drum, consumption is reduced by 20-30%
.
[email protected] : remote control via mobile application
The price of Miele washing machines is quite high, but with smart appliances, household chores become easier. With a machine from the W1 series, you will appreciate the benefits of remote access. Through the built-in Wi-Fi module, the machine will transmit current information to the mobile application on your tablet or smartphone. You can monitor the status of the running wash without being distracted from watching your favorite movie. You won’t suddenly run out of detergents—you’ll receive a notification to buy more UltraPhase in a timely manner.
Safety instructions and warnings
Page 9
- Image
- Text
If you have children
Do not leave children unattended when they are near the
ral machine. Never allow children to play with the washing machine.
Using accessories
The device can be installed or built-in additional
accessories, if specifically authorized by Miele. When installing and integrating other parts, the right to warranty service will be lost, and the guaranteed quality of operation of the device may also be lost.
Before disposing of a used device
Unplug the power plug from the socket. To prevent unauthorized use of the washing machine, remove the power cord and plug.
Safety instructions and warnings
9
Washing machine control 10, Control panel 10, Washing machine control
Control Panel
- Image
- Text
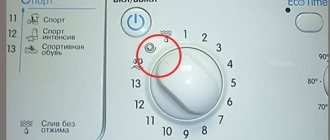
Control Panel
a Program selection buttons
with indie
kators Using these buttons, washing programs are selected.
b Option buttons
with indicators
Washing programs can be supplemented with various options.
c Optical PC interface
Serves as a place for the service technician to connect the computer during maintenance (including for updating programs).
d Button
m
to select the delay start function.
e Display with menu
See next page for details.
f Start/Stop button
Serves to start the selected washing program and interrupt the program in progress.
g I-On/0-Off button
To turn the washing machine on and off.
h Door button
opens the hatch door.
i Load/Dispense button
serves to indicate the load of laundry or the recommended dosage of detergents and set the zero point of the load sensor.
Washing machine control
10
Comments
Select → I found the instructions for my washing machine here! #manualza
- Click →
Why can’t you cook dumplings on a submerged submarine? Because in the cooking instructions, on the back of the package it is written: - Cook for 5-7 minutes after surfacing.
Manualza!manualza.ru