People are accustomed to treating the washing machine as an ordinary, routine part of the interior. But a couple of centuries ago, no one could even imagine such technically complex devices. Today they are found in almost every home, helping housewives with washing and drying clothes. The key to safe, efficient operation is careful study of the attached instructions. And knowledge of the internal structure of equipment can directly help with repairs. The electrical circuit of a washing machine is not as complicated as it seems at first glance. Our article will help you with this.
All modern washing machines have approximately the same set of functions and modes. There may be minor differences in the methods of loading laundry and additional spin programs. A general electrical diagram of the washing machine will help you understand the operating principle of this equipment; this will have a positive effect on its service life and the ability to independently correct a minor breakdown.
We will carefully choose a place
The first task on the list is to choose the optimal location for the washing machine. Ideally, the issue of placement is resolved before purchase, since this factor significantly influences the choice of dimensions and characteristics of the machine. So, if you want to build a machine into a cabinet, under a sink or into a kitchen unit, you should pay attention to narrow models with removable covers; in other cases, full-size units with a large load are suitable.
More often, the washing machine is placed in the bathtub: next to the toilet or under the sink. In rooms with a larger square footage, the machine is installed in a separate closet or niche. But here everything is individual: the owners adapt to their desires and free space. However, all options still have a significant drawback - high humidity, which reduces the life of the washing machine. There is also a “plus” - communications are nearby, and there will be no problems with their connection.
Often machines are “settled” in the kitchen. Most housewives “hide” the units in the unit, while others place the washing machine next to the cabinet. The advantages of placing it in the dining area are obvious: there are more free meters, there is ventilation, accessible communications and a lower percentage of humidity. There are also disadvantages, such as the need to store detergents and dirty laundry away from food, which complicates the washing process.
If there is no space in the kitchen and bathroom, then choose a hallway or pantry. There are no problems with odors and humidity, but the machine is troublesome to connect to the water supply and sewerage. The bedroom has similar pros and cons.
It doesn't really matter what the room is called. Any room can “shelter” a washing machine if it meets several requirements.
- Communications. Ideally, the distance between the selected location, pipes and outlet should not exceed 1-1.5 m. Otherwise, the costs of connecting equipment will increase.
- Flat floor. The manufacturer recommends installing the washing machine on a concrete, tiled floor or other hard surface. The machine must not be allowed to stand unsteadily.
- Sufficient square footage. Equipment should not be placed close to furniture or walls.
When choosing a place for Ariston, you need to focus on the relevant standards and requirements.
It is worth understanding that not all machines should be connected to centralized communications. It can be connected to water and sewerage through alternative options: install a fence from a tank or barrel, and drain into a sink or toilet. The main thing is to ensure full operation of the machine. If the optimal location has been chosen, we proceed to installation.
Evo 2 module diagram repair and service
We continue our review of the renovation. In this article we will touch on the malfunctions of the Ariston washing machine built on the EVO 2 electronic module.
AM Series – AMD 129, AML 105, AML 129 Hotpoint Series – AQSL 109, AVL 105, AVD 127, AVD 129, AVL 100, AVL 95, AVSD 107, AVSL 105, AVSL 109, AVSL 129, AVSL 88, AVXL 109
In addition, this module is installed in some models of Indesit washing machines.
EVO-II consists of power and control boards. Please note that the machine is in standby mode if it is plugged in. Even. If the general power button is turned off, voltage is still present on the power board. When making repairs, it is better to disconnect the power from the board!
The control panel can be with or without an indication screen. A program selection selector and control potentiometers are also connected to the board. Each selector position has its own resistance from 2.5 to 10 kM. The processor (DSP) converts it into a control code and transmits it to the power board. The spin and temperature controls are designed in the same way.
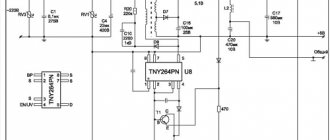
EVO-II with asynchronous 3-phase drive motor
1. The voltage converter is broken.
Symptom - no mains voltage is supplied to rectifier diode D2, there is no rectified voltage of 315 volts on capacitor C4. In one case, the U8 chip (TNY264P) must be replaced, as well as the inductor L1 and resistor R21.
They are connected in series and both of them can be replaced with one interrupting resistor 33. 100 Ohm 3 W.
Before turning it on (preferably first through a light bulb), be sure to make sure that capacitor C4 is working. For reliability, you can also replace capacitors C16, C17, C20.
When varistors RV1-RV3 burn out and in some other cases during a short circuit, the caps (jumpers between printed conductors on different sides of the board) burn out due to a large pulse current.
They need to be checked with a tester and restored - clean the enamel from the conductors on both sides of the board, make a thin hole, pass a single-core wire with a diameter of 0.3 mm through it and solder it on both sides.
To do this, you will need to temporarily remove the plastic chip from connector J4. If there is a break in pins 1 or 2, then the mains voltage will not be supplied to the converter. If piston 3 is torn (it is located under capacitor C26, if installed), then at the moment the lock is unlocked there will be an error F11.
2. Failure of the microcontroller.
Usually the reason is that the lock (Q9) and valve control triacs (Q10-Q13) explode due to actuators or other reasons. In this case, SMD resistors always burn out between the U6 terminals and the control electrodes of the triac (560 Ohm), sometimes also between them and the common wire (1 kOhm).
Preparing the machine
It is not enough to simply plug in the machine and connect it to the water supply and sewerage system. Each purchased washing machine requires a number of preparatory measures, without which the washing cannot be started. We are talking about the following mandatory steps:
- studying the factory instructions (it contains a description of the icons, a list of components, all requirements and connection nuances);
- unpacking the machine with the removal of all protective films, gaskets, ties, foam blocks;
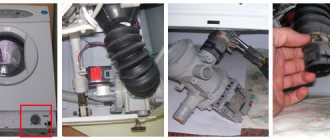
- removing the transportation bolts (this is done according to a specific scheme, which is given in a separate article);
It is contraindicated to operate the washing machine with the transport bolts not removed!
- inserting plastic plugs into the holes freed from the transport bolts (included in the package).
We begin to install the prepared machine. We carefully move the equipment to the designated place, leaving space at the back for subsequent connections. Afterwards we proceed to installing communications: first drainage, then water supply and electricity. Don't forget about body alignment - we'll tell you in more detail later.
Sewage disposal
There are several ways to organize drainage. The easiest and fastest way is to lower the end of the hose into the bathtub, sink or toilet. The waste liquid from the washing machine will be “sent” by the pump to the plumbing and removed through the already established sewer system. But it is better to practice such draining only at the initial stage: an extended hose looks sloppy, threatens to slip out, and dirty water leaves a specific coating on the ceramics.
It’s better not to be lazy, but to install a drain through a siphon. The instructions included with the washing machine will definitely contain a clause about connecting to the sewer system, which specifies all the requirements. In particular, you should not miss the recommended bending height, which varies between 50-70 cm. Each Ariston model has its own minimum, so we do not neglect this indicator. Having clarified the standards, we install the siphon, attach a hose to it and secure it with a clamp.
For owners of an Ariston equipped with a check valve, any bending height of the drain hose will suit them.
There is a third option - connect the washer's drain hose directly to the sewer pipe. To do this, you need to purchase a special rubber gasket and place it between the metal and the sleeve. Be sure to secure all joints with clamps and treat them with sealant.
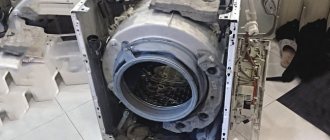
General scheme. Basic parts of the washing machine
Not every user can understand the electrical circuit of a washing machine, but it won’t hurt to learn about the basic systems. The pictures below show the following components, which are found in almost every washing machine:
- counterweight;
- water level relay (sensor);
- noise suppression filter;
- drain filter;
- pump (pump);
- drain hose;
- drum motor;
- tubular electric heater (TEH);
- start-up voltage relay;
- power block;
- thermostat;
- inlet hose;
- drum pulley;
- drum (tank);
- dispenser;
- detergent supply system;
- drum springs;
- solenoid valve.
Let's consider some basic parts, the failure of which is the reason for contacting the service center, the reason for purchasing a new washing machine.
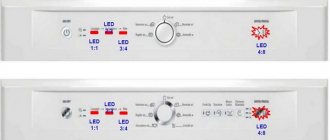
Control system
All modern automatic washing machines are equipped with some kind of computer that processes information from sensors, controls the supply and drainage of water, and switches cleaning programs. The number of programs that are installed in the control module varies depending on the model. The presence or absence of particularly convenient washing modes has a significant impact on the price of the unit.
The cause of the breakdown can be either a failure in the operating system or failure of electrical components and sensors. Broken electronics usually cannot be repaired. Here is a list of those relays whose failure will not allow you to start washing.
- Water level sensor (pressostat). Reports the amount of water in the drum.
- Thermostat. Built into the drum from the bottom, it regulates the temperature of the liquid.
- Drum rotation speed sensor.
Solenoid valve
This module is responsible for filling the drum with water. Works in conjunction with a pressure switch. When the valve receives a signal that there is enough liquid in the tank, it closes and water stops flowing.
Drum motor
It is a standard electric motor. Rotates the drum, transferring the energy of movement through a belt drive to a pulley. The speed and direction of rotation are set by the control system taking into account the indicators of the speed sensor.
If it breaks, you can replace it with any similar engine that is suitable in size and power. There are washing machines with direct drive: the drum rotates due to a magnetic field. Many models with this type of engine are found in Indesit and Zanussi.
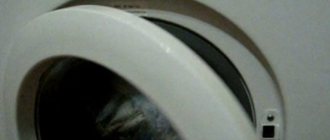
Loading hatch
The door located on the front panel. Before starting the wash, the control system locks it so that the user cannot accidentally open the hatch while there is water in the tank. The latest Ariston models have the function of loading items during washing through a special compartment. Through it, the clothes are loaded into the drum.
A heating element
Begins to heat the water in the tank upon command from the control system. At this time, the thermostat begins to measure the temperature. When it reaches the required value, the heating element turns off. The most common cause of failure of this part is the formation of a thick layer of salt deposits (scale) on it. This layer impairs heat transfer, which leads to systematic overheating of the metal tube.
Use cleaning products along with powder to prevent deposits from forming on the heating element. Samsung supplies its washing machines with heating elements that are extremely resistant to scale formation. This is achieved through a double ceramic coating.
Drain pump
Before starting the spin program, all water is drained from the tank. A pump is involved in this process. It consists of a filter and an electric motor with an impeller. The cause of pump failure may be failure of the electric motor or general contamination of the system. The filter is located at the bottom of the front of the housing in most washing machines.
Don't forget to take it out for cleaning every six months. LG and Bosch are developing the latest generation of filters that will have a self-cleaning function.
Water supply
Next in line is the plumbing. Here the connection diagram does not depend on the method of water supply, centralized or “home”. In any case, setup will occur according to the same algorithm:
- take an inlet hose (it comes complete with Ariston, differing from the drain hose in a smaller diameter, but sometimes you have to buy it separately);
- go around the machine and find the water supply pipe in the upper part;
- attach the curved end of the hose to the found tube;
- cut a proportionate hole in the water supply;
- insert a tee into the pipe with a separate line leading out to the washing machine;
- connect the hose to the tee;
- tighten all fasteners and tighten the clamps.
Plastic nuts are tightened only by hand, without the use of wrenches or pliers!
When establishing a water supply, a sealant is used. The joint must be treated with a water-repellent agent. After connecting, it is necessary to visually assess the tightness of the connection - if drops of water appear on the hose, then the fixation is unreliable.
Place the machine correctly
After connecting to the water supply and sewerage system, we place the washing machine in the chosen place: move it closer to the wall, lift it under the sink, into a niche or into a closet. But you cannot insert the plug into the socket and start the wash - first the machine equalizes. An unstable unit will “jump” during operation due to increased vibration, which will lead to damage to the equipment, including death.
Perfectly level floors are rare, so we take a building level and begin the procedure:
- place a level on top of the washing machine;
- monitoring the level indicators, we adjust the legs to the desired height;
- we check the stability (it is enough to push the machine lightly to the side; a stable machine will not move);
- fix the adjustment;
- We put anti-slip attachments on the racks;
It is prohibited to operate an unstable Ariston washing machine!
Ariston should not jump and clank when washing. A slight vibration is allowed, which increases during spinning.
Finishing touch"
The Ariston installation is completed by connecting to the electrical network. Everything is simple here: the power cord is plugged into an outlet. The main thing is not to rush, but to assess the readiness of the wiring for an increase in load.
The wiring is ready to turn on the washing machine if:
- there is grounding;
- an RCD is included in the circuit;
- The socket is protected from moisture by a special cover.
Having connected to electricity, we start a test wash. An “idle” cycle will wash away the factory lubricant and make it possible to evaluate the quality of installation.
Interesting:
- How to choose a cabinet for a washing machine in the kitchen
- Cabinet for washing machine in bathroom
- Is it possible to place a sink above a washing machine?
- How to install a washing machine in the kitchen and bathroom
- How to choose a cabinet and install a dishwasher in it
- Washing machine in the kitchen under the countertop
Reader comments
- Share your opinion - leave a comment
Examples of electrical circuits of washing machines
A circuit diagram can help you diagnose faults using a network tester. Understanding them on your own is an extremely difficult task. Without appropriate energy education and experience in handling microelectronic circuits, it will be extremely difficult to read these drawings.
To better understand what is depicted in these diagrams, some of the most commonly used symbols will be explained below them.
Ariston washing machine diagram
Ardo washing machine diagram
Electrolux washing machine diagram
Kandy Scheme
- AQS – solenoid valve;
- B – buzzer (device for supplying audio signals);
- BP – hatch door locking mechanism;
- ET – thermostat (off);
- EV – solenoid valve;
- I – inverter (switch);
- IP – fuse;
- L – line;
- M – main electric motor/grounding;
- MC – electric motor/spin winding;
- MI – asynchronous electric motor
- ML – electric motor/wash winding
- MO – box;
- MP – hatch door switch;
- MR – magnetic lock;
- N – neutral/block;
- NTC – temperature sensor;
- P – pressure sensor;
- PM – relay protection of the electric motor;
- PS – drain pump;
- R – heating element resistor;
- RR, RTF – heating element;
- T – drum rotation speed sensor;
- TH – temperature sensor.