A washing machine is an invariable attribute of comfort in the home. Without it, washing would turn into a whole set of physical exercises, taking both strength and time. Therefore, its repair in the event of a breakdown is an urgent matter, which, moreover, does not tolerate a superficial attitude at all. But here’s the problem: the services of a master are very expensive, and finding a smart professional is not so easy. So isn't it better to go ahead and do the repairs yourself? Moreover, if you are quite familiar with the structure of your washing machine and have all the necessary tools at hand.
- 2 What is needed to replace a bearing in a washing machine?
- 3 Removing the drum bearing in the ADRDO washing machine
- 4 Installing the drum bearing and reassembling the ARDO washing machine
- 5 Indesit washing machines: features of replacing the drum bearing
- 6 How to replace the drum bearing of an Ariston washing machine?
- 7 Replacing the drum bearing in an Indesit washing machine, video
- 8 Replacing the drum bearing of a Samsung washing machine, video
- 9 Replacing the drum bearing in an LG washing machine, video
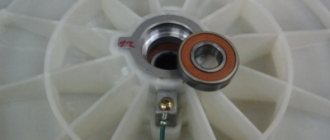
Drum bearing: the weak point of the washing machine
A washing machine is a rather complex household appliance and it operates under high loads. The most vulnerable point of this home worker is the drum bearing - the part thanks to which the washing process in the machine actually takes place. It is very easy to understand that the time has come to change it: if there is a faulty bearing, the unit begins to emit extraneous sounds during operation, which, if nothing is done, intensify over time.
Offers a large selection of high-quality bearing products - https://termopolis.com.ua/
But this is not the most unpleasant thing. If the bearing fails, the drum stops working normally. And this means that very soon the washing machine will completely break down, and you will have to pay quite a lot of money for its overhaul.
The average service life of a quality drum bearing is 6-8 years. However, due to improper operation of the machine, destruction of the oil seal, corrosion due to leakage, etc. it breaks much faster. That is why the unit should not be overloaded: in most cases, the causes of bearing failure are increased friction intensity and, as a consequence, excessive heating of the structural elements of the part.
If you decide to replace the drum bearing yourself, you will have to do this together with the oil seal. You can buy them in a store or on the market, carefully monitoring the quality of the parts and their compliance with the model of your washing machine.
Signs of bearing failure
Breakdowns depend on various factors, including the build quality of the equipment and its age.
Trouble can happen for the following reasons:
- due to a worn oil seal, the bearing assembly is destroyed by moisture;
- the rules for installing the washing machine were violated (instructions for proper installation are given here);
- regular tank overload.
Another possible problem is the initially poor quality of the bearings themselves.
It is often possible to find out about a breakdown even by hearing.
The signs that a bearing unit is malfunctioning are eloquently signaled by the following signs:
- the drum does not spin after turning on the washing program, although the motor is running (other reasons for such a breakdown are discussed in this article);
- the drum rotates, but makes an atypical grinding noise, and sometimes a rumble, the washing machine vibrates significantly;
- washed clothes are not spun (we talked more about noise and lack of spin in another article).
Having decided to deal with such an obstacle on your own, you need to clearly understand that this is a very labor-intensive process related to a major overhaul, in which virtually the entire washing machine must be disassembled.
You can make sure that there is a problem in the bearing by turning off the power to the washing machine and trying to rotate the drum in different directions by hand. The knocking and grinding sounds that appear in response will confirm suspicions
When the final decision is made to fix the breakdown yourself, in order not to aggravate the situation, you need to stop using the faulty mechanism and start preparing for repairs.
What is needed to replace a bearing in a washing machine?
The procedure for replacing a drum bearing involves almost complete disassembly. For this you will need:
- pliers;
- slotted and Phillips screwdrivers (preferably of different sizes);
- a set of open-end and ring wrenches;
- blunt chisel;
- hammer and rubber mallet;
waterproof sealant.
Repairing a washing machine is best done with two people: some parts of this household appliance are quite heavy. In this case, it is advisable to use a camera: by photographing the disassembly process, you will never make a mistake when reassembling it after replacing the bearing. As a last resort, you can check the procedure for installing structural elements and connecting electrical components on the Internet or from familiar specialists.
Before starting repairs, you need to disconnect all communications of the unit (electricity, water supply and drainage), and install it itself so that free access is provided from all sides. The procedure for disassembling a washing machine is determined by its design features. It is best to carry it out armed with detailed instructions from the manufacturer.
Tools required for repairs
It is at least unreasonable to begin work on dismantling and replacing bearings with your own hands without the appropriate set of tools. Therefore, you need to stock up in advance:
- open-end wrenches;
- hammer;
- special puller;
- pliers;
- a non-ferrous metal rod (no thinner than a pencil) or a blunt chisel;
- convenient screwdrivers (phillips and slotted) or a screwdriver with replaceable bits;
- a camera or smartphone to film the sequence of work.
In addition, the master will need consumables in the form of silicone sealant and waterproof lubricant, as well as spare parts - new bearings and oil seal.
Removing the drum bearing in an ADRDO washing machine
Let's take an ARDO washing machine about ten years old with an obviously old, creaking and knocking bearing. In order to replace it, you must perform the following steps:
- Remove the back cover. To do this, you need to unscrew the fastening bolts and remove the clips that hold the water hose.
- Remove the V-belt from the motor and drum pulleys.
- Disconnect the electrical terminals, be sure to remember, or better yet, photograph the order in which they are located.
- Disconnect the water temperature sensor. It is located in a rubber bushing, the edges of which need to be bent with a screwdriver. The sensor is removed from the socket and carefully moved to the side.
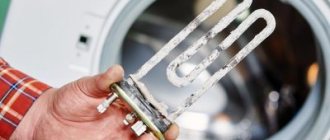
- Loosen the nut securing the heating element to facilitate the procedure for removing the tank cover.
- Unscrew the drum rim pinch bolt and remove the latter.
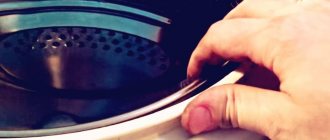
- Disconnect the cover from the drum and remove the rubber gasket.
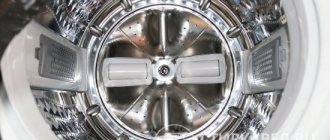
- Remove the cover with the drum from the body by pulling the tank down on the spring suspension.
- Unscrew the nut securing the pulley and remove it from the transmission shaft.
- Place the tank lid on the stand so that the drum is suspended. To prevent damage to the thread, place a plate on the shaft shank and carefully knock the drum axis out of the bearing with a hammer.
A rubber mallet is best for this job. The blows should be applied measuredly to prevent the bearing seat from flaring.
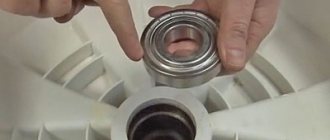
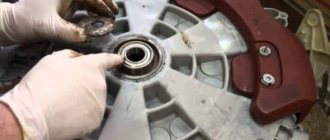
- Using a screwdriver, remove the oil seal and then the failed bearing. The latter is removed from the back of the cover using a blunt chisel and hammer. When lightly hitting the bearing housing, you need to make sure that it does not warp.
- In the same way, the second bearing from the tail side of the cover is removed.
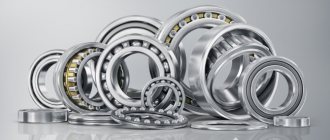
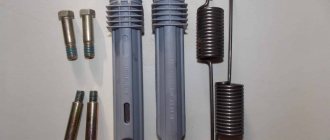
Let's look at the popular types of single row bearings
A unified classification standard is not limited to washing machines, which makes it easier to select replacement components. Household appliances use markings consisting of 4 numbers and letter combinations. For example, 6203Z (ZZ). The letter at the end of the abbreviation means that the bearing is completely metal, low noise. The numbers themselves have no relation to the physical size; the actual mounting diameters (internal and external), as well as the width of the cage, are determined from the table.
Important: The bearing width is the same for the inner and outer ring, so the table shows only 3 dimensions.
A similar classification is provided for double-row bearings. The marking of the unit for your machine can be found in the technical documentation, although not all manufacturers indicate this parameter, assuming that the repairs will be carried out in specialized workshops. If the information is not freely available, you will be able to see the markings after dismantling the tank and drum. You will still have to disassemble the machine to replace it.
Signs of bearing failure
External inspection for bearing burning (traces of tarnish on the metal), or lubricant leaks, is possible only after complete disassembly of the unit.
Installing the drum bearing and reassembling the ARDO washing machine
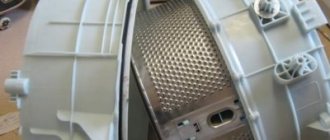
New bearings are lubricated with lithol and, together with the seals, pressed into their seats in the reverse order. After this, you need to put the tank cover on the drum shaft, put the pulley in place and install the cover with the drum on the body, not forgetting about the sealing gasket. Next, the lid is fixed on the tank and the clamping rim is put on.
Bearing seat lubrication
Pressing in a new bearing
Installing the oil seal
Tightening the rim tightening bolt is done by lightly tapping the rim around the perimeter in the direction of the lugs every 1.5-2 turns of the nut. This will ensure an even fit of this part.
Next, you should tighten the fastening of the heating element, not forgetting to put it in place. After this, the temperature sensor and electrical terminals are mounted, and the next step is to install the belt on the engine and drum pulleys. Next, you should begin installing the back cover of the washing machine, upon completion of which the latter can be considered ready for use.
The nuances of performing work on machines from different manufacturers
Let's look at some of the features of dismantling and replacing damaged bearings on automatic machines of popular brands in Russia.
Hotpoint Ariston
Hotpoint Ariston washing machines often have a non-separable tank. Therefore, when replacing bearings, you will either have to change the drum at the same time, or cut it into two halves. In the latter case, we proceed according to the following scheme:
- disassemble the washing machine and remove the tank from the body;
- We take a drill in our hands and make holes along the entire diameter of the weld near the tank in increments of about 5 centimeters;
- we cut the tank with a hacksaw or jigsaw along the seam line into two halves (distortions are simply unacceptable);
- change bearings;
- generously lubricate the sawn halves of the tank with silicone sealant, and then firmly connect them with bolts through the drilled holes.
Indesit washing machines: features of replacing the drum bearing
To replace the bearing in a washing machine of this brand, you must:
- Open the back and top covers.
- Remove the drive belt from the engine and drum pulley.
- Block the pulley.
To do this, you will need a wooden block, which allows you to carefully unscrew the screw that holds the pulley and remove the latter without damaging it.
- Remove the counterweight and spacer bar, which blocks access to the clamp and tank cover.
- Turn off the heating element.
- Remove the bearing assembly fasteners and the grounding strip, then loosen and remove the clamp.
- Open the tank lid without throwing out the seal.
The screws that secure the bearing assembly are often supplied by the manufacturer to be excessively long, so they are simply cut off. The tank cover should be removed so as not to damage the temperature sensor wire - no one needs extra work and costs due to its breakage.
- Remove the tank and bearing assembly. To remove the latter you need to remove the oil seal. The bearing is removed using a hammer and chisel.
The bearing assembly seat should be carefully inspected. If there are traces of rust or debris, they must be removed, and if leaks are detected, their sources must be eliminated. After this, you can begin reassembling the washing machine.
Conclusions and useful video on the topic
A detailed description of how to independently disassemble a Samsung washing machine with a front-loading type of laundry. Interesting design features of the model and curious nuances that arise during disassembly:
How to properly disassemble an LG washing machine at home. Detailed execution of all processes step by step:
Disassembling a washing machine is a meticulous process that requires attention. If the breakdown concerns only a separate part of the system, there is no need to completely disassemble the unit. If malfunctions are observed in the main components, efforts will have to be made to fix the problem.
Our step-by-step instructions will help with this, clearly describing the process. Having such a cheat sheet at hand, even a person with minimal experience can handle repairing a washing machine. If you still have questions, ask them in the comments and we will try to help you.
Tell us about how you disassembled the washing machine for repairs with your own hands. Share what difficulties you encountered and how you solved the problems. Please leave comments in the block form below, ask questions and post photos on the topic of the article.
How to replace the drum bearing of an Ariston washing machine?
Installation of a new bearing assembly in washing machines of this brand is carried out in the order already familiar to us. Of course, after disconnecting her from all communications. So:
- We unscrew the tension screw of the clamp holding the drain pipe and disconnect the latter from the tank.
- We open the contacts of the electric motor of the machine and remove the drive belt.
- We loosen the screws securing the engine, then carefully move it from the runners and hold it and remove it, having first unscrewed the screws.
- We disconnect the contacts from the heating element and the electrical wiring from the tank.
- Unscrew the screws securing the top cover and remove it from the body.
- We remove the dispenser and unscrew the screws that secure the control panel.
- We disconnect the second pair of fixing screws and remove the panel. You should start from the hopper side of the dispenser, and then remove the lower part.
- Remove the tension spring.
To do this, you need to find it by feeling the cuff around the perimeter. The spring needs to be pryed up with a screwdriver, carefully pulled on it and removed along with the pre-loosened clamp. After this, the cuff should be disconnected from the body and the hatch lock should be removed.
- We disconnect the base panel using a screwdriver. This allows access to the fastenings on the front wall of the washing machine. Its screws need to be unscrewed and it needs to be removed.
- We unscrew the front bolts of the lower counterweight and remove it, after which we proceed to remove the upper one.
- We remove the plastic clamp, and then move the dispenser hopper to the back wall of the machine.
- Remove the pressure switch relay tube from the tank.
- We disconnect the suspension system, which consists of shock absorbers and springs.
You should start with shock absorbers, which are attached with the upper end to the tank, and the lower end to the bottom of the body. You only need to remove the top one.
- We remove the tank and disassemble it, starting with the pulley.
- We remove the bearing block and replace them with new ones, while not forgetting about lubrication and uniform fit.
After pressing the bearing assembly, you can begin reassembling the Ariston washing machine. If everything was done correctly, you will not have any “extra” parts left, and the equipment itself will serve for a long time and properly.
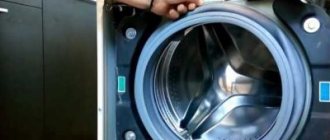
Stage two - remove the hatch cuff
The cuff is a special rubber gasket that connects the hatch opening and the laundry drum. It is attached very simply with a spring and a clamp. To release the cuff and gain access to removing the entire front panel, you need to find a clamp. It can be detected visually. To remove it, use a flat-head screwdriver to pry up the spring and pull out the clamp. Afterwards, carefully remove the cuff from the hatch hole and place it in the drum. Now the part we need is completely free, we can begin to dismantle it.