Disassembling the dishwasher
All dishwashers are designed quite simply.
In addition to the washing chamber, there are several control elements. They are located below. To access, you need to remove the side panels. And also the top cover. Unscrew the screws on the back of the PMM.
Backside
Remove the cover.
Front view
We take out the decorative plastic panel under the door. It is installed with latches.
Removing the bottom panel
Bottom panel and open door
Unscrew the screws hidden by the panel. They secure the side walls.
Front mounting screws
Remove the side panels.
Dishwasher without side panels
In principle, you can look at the side below and perform some actions. But it will be more convenient to remove the plastic bottom. Unscrew the screws and pull out the panel.
Bottom side view
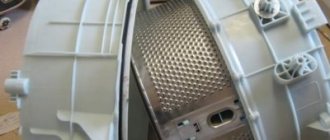
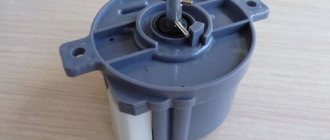
This Zanussi PMM model has a flow-through heater installed, and it is combined with a recirculation pump. In the photo below, the heating element is highlighted.
Heating element with recirculation pump assembly
Pump assembly and contacts of instantaneous water heater.
Heater contacts
Nicknamed a multimeter. The normal value is 30-50 Ohms. If there is no resistance, then the heater has burned out. It is not supplied separately from the pump. Therefore, either purchase the complete unit - as of 2017, this is 11,200 rubles, or repair.
To purchase, you need the product number of the dishwasher. It's on the door.
Product number on the door
Call a specialist
We will call you back within 15 minutes to arrange a convenient time for your visit.
Districts
- Altufyevo
- Babushkinskaya
- Baumanskaya
- Bibirevo
- Biryulyovo East
- Brateevo
- Bratislavskaya
- Rokossovsky Boulevard
- Central Administrative District
- Chertanovo
- Golyanovo
- Gorbushka
- Kolomenskaya
- Kozhukhovo
- Krasnopresnenskaya
- Kuntsevo
- Kuzminki
- Lyublino
- Medvedkovo
- Mitino
- Novogireevo
- Novokosino
- Novo-Peredelkino
- Otradnoe
- Pavshinskaya floodplain
- Printers
- Perovo
- Polezhaevskaya
- Preobrazhenskaya Square
- Peace Avenue
- River Station
- Ryazan Avenue
- SAO
- Northern Butovo
- Lilac Boulevard
- Sokolniki
- NEAD
- SZAO
- Teply Stan
- Tushino
- Southern Administrative District
- st. Academician Yangel
- st. Seleznevskaya
- SEAD
- South-Western Administrative District
- Varshavka
- Veshnyaki
- Voikovskaya
- Vykhino
- Company
- Zhulebino
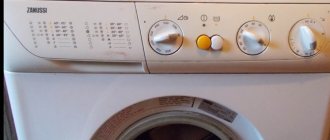
Analysis of the Zanussi front washing machine
Typically, the body of washing machines consists of a top cover, a front, a back and two side panels. Sometimes there is a bottom pan. Zanussi's technique is slightly different - instead of four panels, the body is divided into two halves, connecting at the sides of the washing machine.
To disassemble the equipment, you need to perform the following steps:
Unscrew the screws, move it back a little and lift the top cover. Under the cover in the middle there is a metal plate, along its edges there is a fastener that holds the front and back panels. You need to unscrew it. There are plastic plugs on the sides of the machine at the panel joints. They need to be pryed and pulled out. There are screws underneath that will need to be removed. On some models, two more screws are located on the bottom of the back of the washing machine. They also need to be removed. Now both halves are fixed only with a plastic holder
To remove it, you need to carefully press the latches. Sometimes it may consist of two halves connected by a screw
Unscrew the fasteners, press the latches, after which the holder rises up and moves to the side. Now you can move and remove the back half of the case.
Partial disassembly of the washing machine has been completed. Now the owner of the device has access to the motor, pump, heating element, belt and many other components for repair or replacement.
In some cases, for example, to replace a bearing, it is necessary to completely disassemble the Zanussi washing machine.
- First you need to disconnect the wiring from the heating element and motor, pressure switches and pump, and water inlet valve. It is recommended that the wires be marked or photographed before disconnecting. If errors in its connection are made during assembly, this can lead to serious consequences.
- Remove and pull out the temperature sensor.
- Unscrew the upper counterweight.
- Rotate the pulley and remove the drive belt.
- Unclench the clamps and disconnect the pipes.
- Unscrew the fasteners holding the motor.
- Lightly tap the pulley to move and remove the engine.
- Unscrew the nut between the contacts of the heating element, carefully so as not to break the contacts, and pull out the heating element.
- Unscrew the tank struts.
- Disconnect and remove the pressure switch, loosen the clamps, release the fill pipes and pull them out along with the water fill valve.
- Unscrew the drain pump, disconnect the hose from it and move it aside.
- Disconnect the pipe at the top of the tank.
- Open the hatch, pull the cuff back and pull it towards you. Use a screwdriver to pry up the clamp, find and release the latch, and remove the clamp.
- Pull the upper part of the cuff, find the watering pipe, loosen the clamps, then disconnect the part.
- Unscrew the interference filter.
- Unscrew the two screws, stick your hand inside the tank and pull out the hatch locking device.
- Close the hatch, unscrew the fasteners, remove the hatch.
- Pull out the detergent cuvette, unscrew the fasteners under it and on top that hold the control panel. Release the latches, disconnect the wires, remove and put it away.
- Remove the tank from the springs and pull it out of the housing.
- Disconnect the counterweight.
- Place the water tank with the hatch down, block the pulley, and unscrew the bolt. If it does not budge, lubricate it with WD-40, wait a while, and then try again.
- Grasp the pulley with both hands and, swinging it to the sides, separate it.
- If the tank is collapsible, unscrew all the screws and remove the top part.
- If it is non-separable, select the screws with which it will be connected during assembly and drill holes for them along the seam of the tank. Next, saw the tank along the seam.
- In place of the screw that held the pulley, screw in a similar old screw and knock out the shaft with hammer blows at a right angle.
- You can then remove the drum from the bottom of the tank.
Now you can disassemble the drum, replace the bearings, inspect and clean the shaft and cross, and perform other work. Complete disassembly of the washing machine has been completed.
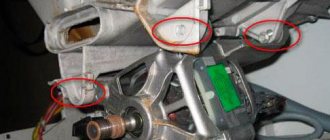
Changing units on the pulley side
In some models of Zanussi washing machines, the bearing assembly - the so-called caliper - is unscrewed.
After removing the drive belt, you need to remove the drum pulley (it is held in place by a screw). Next, you need to disconnect the grounding plate and unscrew the caliper, turning it to the right.
The caliper on the side opposite the pulley (in machines with vertical loading) is unscrewed in the opposite direction. The direction of rotation at each node is indicated by arrows labeled “Open” and “Close”. After installing the new caliper, the unit is assembled in the reverse order.
To ensure that the screw holding the pulley holds securely, the threads should be lubricated with Loctite glue before screwing in.
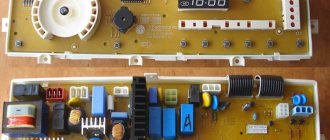
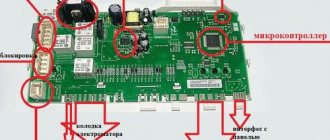
Control board
The user sets the desired washing parameters by pressing keys on the control panel. You can select the desired mode by rotating the selector knob, activate additional functions, adjust the temperature and the number of revolutions. The “tidy” is connected to the main electronic module.
Zanussi's main control board consists of semiconductor elements: microcontroller, triacs, capacitors, triggers, thyristors, resistors. Communication with the main parts and components of the machine is carried out via electrically conductive paths.
It is the control board that ensures the sequential execution of cleaning programs. All available washing algorithms and parameters are pre-recorded in the electronic module circuit. This gives the user the opportunity to launch the required mode without errors using the dashboard.
Some washing programs are carried out strictly according to the algorithm recorded in the “intelligence”. Individual modes can be adjusted - changing the water heating temperature and spin speed.
Rumble during spin cycle
Loud noise when the drum rotates at high speeds may be due to the following reasons:
- The position of the machine is not strictly horizontal.
- The drum is underloaded, as a result of which the center of gravity of the laundry has deviated from the center of rotation (strong vibrations will occur at high speeds).
- One of the bearings is broken.
Bearings in Zanussi cars can be replaced independently. This is done like this:
- Having completely disassembled the machine, you need to remove the tank with the drum.
- After removing the drum pulley and unscrewing several bolts around the perimeter of the tank, the latter needs to be disassembled into two parts.
- Using careful blows of a hammer through a wooden lining, you need to knock out the drum axle shaft from the bearing assembly in the rear half of the tank.
- Next, using a puller, remove the bearing itself along with the seal.
- The drum axle shaft and bearing seat must be thoroughly cleaned.
- A new one is installed in place of the old bearing, and its seal is filled with special lubricant.
Having lubricated the axle shaft and the inner ring of the bearing, the drum and the rear part of the tank are again assembled into a single unit, after which both halves of the tank are fastened together, coating the joint with sealant.
Hatch lock
Let's consider two situations:
The washing is completed, but the hatch still cannot be opened
The hatch won't close
The latches that hold the hatch in the closed position are made of fragile plastic, so they often break.
To make sure that this is the case, you need to disassemble the lock:
If the plastic parts of the mechanism are really broken, you need to purchase a new lock and install it in place.
To make the lock last longer, close the hatch as gently as possible.
Installation, connection and operation of the Zanussi washing machine
How to connect a Zanussi washing machine to an outlet
The main requirement of the manufacturer is a stable voltage in the electrical network of your household. In principle, there is nothing difficult in connecting the washing machine to an electric current, but it is advisable to fulfill some conditions. What needs to be done for this, read below
- Separate wiring → Let's compare a washing machine with a boiler, oddly enough, in almost any house or apartment there is a separate wiring to the boiler from the meter, and for the washing machine there is a carrying case in which an adapter is plugged in (from a Euro to a Soviet socket) and into this adapter The plug from the SM is turned on, guys, under no circumstances should you do this. Now let's see how much the boiler consumes - up to a maximum of 2 kW, and the washing machine consumes up to 3 kW. Now ask yourself if you need separate wiring for your washing machine.
- Separate outlet → If you have done separate wiring and installed a separate outlet, this does not mean that this outlet can be used by other household appliances or anything else. Understand that if you constantly pull the plug out of the socket and then insert it back in, the insides of the socket become loose, rendering it unusable. After several hundred such operations, you will not even see that the socket is broken, that is, when you connect the washing machine, the contacts spark or heat up. In general, the washing machine must have its own wiring
- Install machines → In the paragraph above, I said that every time you pull the plug out of the socket you render it unusable, to avoid this, it is advisable to install machines with a capacity of at least 16 amperes. Thanks to this, you can disconnect the washing machine from the network without removing the plug from the socket. The fact is that when you turn off the washing machine with the button, you do not turn it off completely, it will simply be in standby mode, and if your power supply goes to 380, and this very often happens in the vast post-Soviet space, then the control module may simply burn out. In short, it is advisable to do everything to protect your equipment from electrical surges
- Grounding → If you live in a private house, then grounding will practically not cause problems; as for an apartment, then everything is more difficult. Grounding is necessary so that your machine does not receive an electric shock; in addition, thanks to grounding, you can avoid such crap as electrolysis in the washing machine tank. Probably everyone has noticed that their washing machine shocks, at least a little, so it is advisable to carry out this step
In principle, these are all the requirements that the manufacturer makes. If the grounding point can be omitted and in some cases it is simply not feasible, then all other points are mandatory, and how long your washing machine will work will depend on this. Now I want you to read one example from life, or rather a question that is often heard on my channel
In order to avoid voltage surges and ensure that your equipment operates in normal mode, you need to install a current stabilizer with a power of at least 3.5 kilowatts. Understand that a washing machine consumes about 2.7 kW. You ask where this figure comes from, I will answer this way
- Heating element → that is, heating element, consumes from 2 to 2.5 kW, depending on the model of the washing machine
- Motor → that is, the engine consumes from 100 Watt to 500 Watt, and when starting to move, the consumption is even greater
- The rest of the periphery → this includes the brains of the washing machine, valves, drain pump (usually 40W) and other bells and whistles
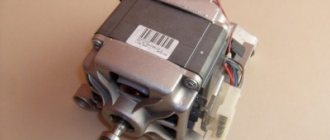
Motor and motor of the machine
The washing machine drum rotates thanks to an electric motor. The motor, through the drive belt, transmits “revolutions” to the pulley, and the wheel accelerates the “centrifuge” to the desired speed. This ensures high-quality washing and excellent spin. The “life” of an engine depends on several factors, the first of which is the type of engine.
Brushed motors are cheaper than inverter motors, but they are inferior to the latter in several characteristics. “Collectors” are less reliable, react sharply to power surges, and require periodic maintenance, in particular, replacement of brushes. However, if you connect the washing machine to the network through a stabilizer and promptly diagnose the motor, there will be no problems with the operation of Zanussi.
The engine is considered the “heart” of the washing machine. It starts working immediately after starting the washing program. Depending on the selected mode, the “brain” regulates the number of engine revolutions, sometimes slows down the speed, and when spinning, gives the command to accelerate as much as possible.
The weak point of commutator motors is the electric brushes. Over time, after about 4-5 years, the carbon rod wears off and the elements have to be replaced. It’s not difficult to install new brushes; you can do the repairs yourself without inviting a professional.
Zanussi washing machine does not heat water or washes with cold water
To understand whether the machine is heating water, you just need to place your palm on the glass on the washing machine door. If, after conducting this kind of test, you find that the water in the drum is cold, you should think about why this happened.
When you notice that your Zanussi washing machine is not heating the water
, do not be sure that the electric heater has burned out. Of course, there are exceptions, but when the heating element is in excellent condition and the water is cold, then the problem lies in the temperature sensor and the electronic control module. In any case, you cannot cope with this breakdown yourself; you must call a specialist. Using special equipment, he will quickly conduct a complete diagnosis of the washing machine and determine what the reason is. To correct such breakdowns, as a rule, transportation to a workshop is not required.
You can also check whether the equipment is connected correctly, because it often happens that, having decided to save on the quality of the connection, water randomly flows into the sewer and does not have time to heat up in the tank.
Features of model repair
Most Zanussi washing machines have a similar design, so you don’t have to rack your brains about finding certain elements. However, there are some features that, if taken into account, will save time.
Top loading
Top-loading washing machines are extremely common due to their compactness and functionality. There are also almost never any problems with their repair, since all the main elements are located under the back cover. These machines do not require any special lid sealing as there is very little chance of water leaking through the top.
Horizontal loading
Horizontal loading machines seem more familiar to many. However, this type of work requires some specific repair methods. Malfunctions of a horizontal-loading Zanussi washing machine are very often associated with a leak in the hatch. In this case, in addition to the main possible malfunctions, a leak may also occur at the seals.
Filters in such machines are often located at the front, hiding them under special decorative panels.
What to do if the dishwasher is still under warranty
For at least the first year after purchase, do not repair it yourself - by doing so, you will deprive yourself of warranty benefits. The warranty period and conditions must be clarified when purchasing household appliances.
During this period, you can work to remove blockages in the dishwasher filters. In addition, it is allowed to clean the holes in the sprinkler rocker arms from dirt and food debris if the PMM begins to wash dishes poorly.
Do not forget that many defects in work occur due to non-compliance with operating rules. The machine may not work only because there is no water in the water supply or someone has closed the inlet ball valve.
Therefore, you need to periodically check: the presence of electricity in the sockets, the water pressure in the water supply and the absence of blockages in the sewer. If you connect the dishwasher to the communications yourself, make sure you did everything correctly. An error may result in the PMM refusing to wash dishes.
Remember: you do not need to take the PMM yourself for repairs to a service center under warranty. This must be done by the store that sold you this equipment, because it weighs more than 5 kg. It is quite possible that technicians will volunteer to repair the device at home.
Water does not fill
We are looking for the cause of the malfunction:
- First you need to make sure that the water has not been turned off.
- Next, you need to check the capacity of the filling hose by disconnecting it from the machine and turning on the water supply.
- If water flows through the hose properly, install it in place and check the condition of the filter. Together with the filling valve, it is located in the place where the hose enters the unit body. After removing the top cover, the assembly (valve + filter) must be unscrewed, after which the filter can be disassembled and cleaned.
Cleaning filters, both inlet and outlet, must be done regularly, without waiting for problems to arise.
If the water supply has not resumed, you need to check the functionality of the filling valve. The resistance of its winding should be 3.75 kOhm, and when the voltage indicated on the case is applied to the contacts, the device should open. A malfunctioning valve must be replaced.
This problem may also indicate that the level sensor is broken or its tube is clogged.
In many cases, the owner of the washing machine can repair it himself. Repairing a Bosch washing machine yourself - an overview of the main types of breakdowns and methods for eliminating them.
What criteria should be taken into account when choosing a shower cabin, read in this topic.
Failure of the heating element, wear of the bearing, failure of the control unit - these types of faults in washing machines are the most common. Here https://aquacomm.ru/cancliz/mnogokvartirnyie-doma/santehnika/stiralnaya-mashina-indezit-neispravnosti-remont-svoimi-rukami.html you will learn how to fix Indesit machine breakdowns yourself.
DIY repair
As you can see, many different problems can arise while using a washing machine. Some require professional intervention, while others can be fixed on your own.
Replacing bearings
The condition of the bearings can be responsible for many problems that interfere with the operation of the washing machine. To replace these components, you must first disassemble the unit following basic disassembly principles. In this case, it is necessary to achieve free removal of the tank.
Immediately after disassembly, you need to pull out the tank and disassemble it into its components. To do this, you will need to unscrew the bolts around the perimeter of the structure. Now you need to remove the drum, the shaft of which is fixed in the bearing assembly. You can use a hammer to knock out the shaft.
Now it becomes possible to install a new bearing and seal. It is important to handle the process as carefully as possible so that no important components are damaged during assembly. Under no circumstances should you strike the holder or separator, as this may lead to permanent damage to the device. It is much wiser to use lubricants to facilitate the sliding of parts.
Replacing the heating element
Heating elements are most often located at the bottom of the tank, and access to them is gained when disassembling the machine. Before direct replacement, it is recommended to find out whether the heating element is mounted in front or behind in a particular model.
It is necessary to drain all the water from the tank, turn off the power to the machine and ensure the safety of the process. Then, using wrenches, loosen the nuts holding the heating element in place. You also need to disconnect all the wires that go to it from the heating element.
Sometimes seals can prevent the element from being removed, so you will need to gradually release the fasteners using a screwdriver.
The new heating element is inserted into the vacant space as smoothly as possible without any distortions. The component must fit into the guide bracket that holds it while the machine is operating. At the end of the repair, a nut is screwed onto the stud, and all the necessary wires are connected.
Cleaning the pump filter
One of the simplest and at the same time most common types of washing machine repairs is filter replacement. This is a fairly simple procedure that even an untrained person can understand. Before repairing, it is advisable to read the instructions for the specific device model, which should indicate the procedure for removing the filter from the installation socket.
Replacing the hatch cuff
To replace the hatch cuff, you must first find special rings under the hatch cover. By removing the first ring, the user gains direct access to the cuff, then it must be pryed with a screwdriver and pulled out.
It is recommended to carefully inspect the seal to determine the cause of failure. This will help adjust the operation of the machine in the future.
Now you need to install a new cuff. This process is somewhat more complicated and consists of the following steps:
Replacing drum supports
The drum supports or supports are changed as follows:
It is recommended to treat all main elements with lubricants, which can significantly extend the service life of products.
Control module repair
Repair of the control module can consist of either direct restoration or complete replacement. The second option is preferable for people who do not have much experience in working with such elements.
To replace, you need to disconnect the machine from the network and open the special cover inside the structure. Under the cover is the block itself, which can be removed after unscrewing several retaining screws. When disconnecting, it is important to remember which pin was connected to what. It is best to sketch a diagram or photograph the element.
After replacing the main board and connecting all the wires, you can put the component in place. If everything is done correctly, the repair will help restore the functionality of the machine. If you don’t want to spend too much money on a new unit, you can renovate it. However, such manipulations are best left to specialists in service centers.
Replacing brushes in the engine
Replacing brushes in the engine seems to be a rather labor-intensive procedure, consisting of the following steps:
Now you can assemble the car, connect all the wires and test.
Belt replacement
To replace the belt in most Zanussi models, you need to separate the rear wall. It is behind it that the problem area is hidden, in which the main work will be carried out.
Under the casing of the structure you can see two pulleys, each of which has a special belt. One pulley is connected to the drum, the second to the motor. The integrity of the belt or its jumping off prevents the drum from moving.
If the belt is in place, but the drum does not rotate, then the only option is to replace it. If it comes off, you can simply return the belt to its place, and performance should be restored.
Bosch washing machine care
To ensure a long service life of a Bosch washing machine, you need to use it correctly and not forget about maintenance. After each wash, the hatch and powder receptacle must be wiped with a dry cloth and left slightly open - this will protect the equipment from the appearance of mold and unpleasant odors. There is no need to use aggressive detergents to care for the drum - this will shorten the life of the washing machine.
We suggest you familiarize yourself with the smell in the shower from the drain, what to do
When putting things into the washing machine, you need to make sure that there are no small objects in the pockets that could get into the drum. To wash some items (bras, clothes with metal fittings), it is recommended to use special covers or bags to avoid breakage. You cannot put laundry in the machine that exceeds the permissible weight limit; this leads to overload and premature wear of the drum compartment and engine.
It is necessary to periodically clean the garbage filter and hoses, otherwise they become clogged and debris remains inside the machine, causing the laundry to have an unpleasant odor after washing.
Before carrying out any maintenance procedures, make sure that the machine is disconnected from the power supply.
What types of malfunctions are there?
There are many possible problems that can affect the performance of your washing machine. Let's look at popular problems with the Zanussi washing machine and how to fix them.
Drum doesn't move
The drum may jam during operation, which will naturally lead to disruption of the functionality of the equipment. The reason may be various mechanical inclusions that get inside with loaded items.
The hatch is blocked
Locking the hatch will not allow you to open the machine chamber and load clothes into it. In this case, the problem most often lies in the jamming of the lock, which will have to be removed manually.
Self drain is broken
Lack of water drainage may be due to clogged filters or drain system. Cleaning all key elements solves the problem.
Water does not fill
If water does not fill into the tank during operation, the problem may be low pressure, a faulty valve, or a broken control unit. The last option is quite rare in practice and can be solved by replacing the module.
Increased speed
Rapid operation of the motor indicates a malfunction of the tachometer, a malfunction of the control module, or poor tension of the drive belt. In this case, the drum begins to move too quickly, which threatens the reliability of the entire system.
No water heating
The heating element is responsible for heating the water in the washing machine. Its malfunction will naturally prevent the device from using heat during operation. Also, sometimes the water level sensor may not allow you to enable the option. You can solve such problems yourself by replacing components. If this does not help, it is better to contact a specialist.
Puddle formation
Puddles under the machine form when the pipe leaks, the cuff is damaged, or simply wear out the gaskets on the key components of the machine. This is one of the simplest problems that can be solved without major investments.
Rumble during spin cycle
Loose drum mounts, broken counterweight, or other similar factors may cause the unit to not operate smoothly. The result is constant shaking and rumble during washing, which is especially audible during the spin cycle.
First of all, in this case, it is important to check all bolts and fastenings for their tightness.
Self-draining device
The situation when, simultaneously with the collection of water, it is discharged through the drain hose (before the drum begins to rotate), may be due to the low location of this hose.
Its free end should be raised by 50 - 70 cm. Self-draining will also occur if the drain pipe is damaged, only in this case water will not flow out from the hose, but from under the machine.
More serious causes are failures in the control module or level sensor, which mistakenly turn on the drain pump.
Diagnostic modes for washing machines with different control panels
The Zanussi washing machine is considered a reliable unit, but, like any equipment, it needs preventive maintenance and proper care. If you neglect these procedures, you may encounter the device giving an error and refusing to work. You can check the functionality of the elements yourself using the instructions below. Options may vary depending on your device model. A horizontal machine or a top-loading machine may vary in scenario.
All manipulations are carried out in test mode. Entering the diagnostic mode is done by setting the selector to the “off” mode. and then pressing the “start” button and the buttons indicated in the figure.
EWM 1000
This line includes 7 methods for checking faults. You will need to wait a five-minute pause between switches for the diagnosis to be successful. Before proceeding, you should remove all clothing from the tank. Diagnostics of EWM 1000 is carried out as follows.
- The program selection selector is located in the first position. Here you can check the functionality of the buttons. When pressed, they should light up or produce a sound alert.
- When you turn the selector to the second position, you can check the water inlet valve into the wash dispenser. At this stage, the hatch will lock. The pressure switch controls the fluid level.
- The third mode controls the liquid fill valve during prewash. When you select it, the door lock will also work; the dial sensor is responsible for the water level.
- The fourth position will turn on two valves.
- The fifth mode is not used for this type of machine.
- The sixth position is to check the heating element along with the temperature sensor. If the liquid level does not reach the required level, the SM will add the required amount additionally.
- The seventh mode tests the operation of the motor. In this mode, the engine is cranked in both directions with further acceleration to 250 rpm.
- The eighth position is the control of the water pump and spin. At this stage, maximum engine speed is observed.
To exit test mode, you will need to turn the device on and off twice.
EWM 2000
Diagnostics of this line of washing machines is carried out as follows.
- The first position is diagnostics of water supply for the main wash.
- The second position is responsible for supplying water to the pre-wash compartment.
- The third position controls the water supply to the air conditioning compartment.
- The fourth mode is responsible for supplying liquid to the bleach compartment. Not every device has this feature.
- The fifth position is the diagnosis of heating with circulation. Also not present in every model.
- The sixth mode is needed to test the tightness. During this, water is poured into the drum, and the motor rotates at high speeds.
- The seventh position checks the drain, spin, and level sensors.
- The eighth mode is needed for models with a drying mode.
Each step tests the door lock and fluid level, along with the functionality of the pressure switch.
Common problems
One thing is certain: all problems in the operation of the machine are most often associated with the negligence of the owner. This may be an ignored instruction or incorrect installation. Housewives often overload or underload the drum, creating imbalances.
Even more cases of breakdowns are associated with improper operation and foreign objects entering the working paths of the device. There are also options when repairs are made due to wear and tear of system components.
Blockage
Clogging is a problem for all Zanussi cars without exception. This can be either a simple model or a fairly advanced device, for example, Aquacycle 800 or 900. All brand machines are very sensitive to the quality of tap water.
When installing the machine, it is recommended to install a separate fine filter at the inlet. It’s inexpensive and you won’t have to frequently remove the consequences of blockages.
If the machine is connected directly to the water supply, you need to clean the inlet filter mesh. Removing the blockage looks like this:
You can often repair a machine with your own hands in this way. The filter device includes a procedure for removing and cleaning the mesh.
Extraneous noise during operation
Extraneous noise is the most common problem. This phenomenon may be caused by the following reasons:
It is worth noting that malfunctions of a Zanussi horizontal-loading machine in the form of extraneous noise in any operating mode will most likely require the intervention of a qualified specialist. The cause is parts of mechanical components. This could also be a fairly harmless case when the shock absorber of the engine block is weakened or unbalanced. But the reason may lie in damaged bearings. In this case, the entire unit must be replaced.
Top-loading machines use a different type of drum mounting. In devices of this type, the unevenness of the load in the area of the bearing block is small, so extraneous noise, if it does not arise from loading laundry, but is present in all operating modes, necessarily indicates the complexity of the problem. Specialist intervention is required.