Is a dishwasher your long-time dream? Have you finally made up your mind and will this wonderful helper soon appear in your kitchen? With its purchase you will gain the much-desired freedom from the hated kitchen routine. Crystal clean dishes, saved water and electricity, soft skin on your hands and a perfect pristine manicure - these are the benefits it will give you. Disputes about who should wash the dishes will fade into oblivion. If the machine is purchased at the same time as the kitchen order, you can think about its placement at the furniture design stage. Then the design provides for a special module in which the equipment is located. If this is not your case and you need to install a dishwasher in a finished kitchen, you will have to do a lot of brainwork in order to choose the optimally suitable location. This directly depends on the type of car you have.
Types of Dishwashers
First of all, all dishwashers can be divided into household and industrial. The latter are used in public catering places and enterprises, so we will not touch on them.
Household dishwashers can be divided into the following types:
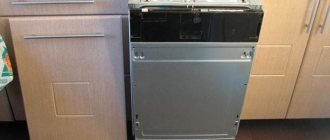
- fully built-in - the system is completely hidden behind the furniture facade. The control unit is located at the end of the front wall. Such models are often equipped with an indicator beam. It creates a light marker on the floor surface, which signals that the washing cycle is not completed;
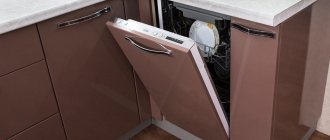
- partially built-in - the front wall is completely open or partially hidden behind the furniture front. The control panel in this case is located above the facade and is accessible even when the machine is turned on;
- free-standing - an independent unit in its own housing; The following classification affects the dimensional characteristics of dishwashers. The machines are distinguished:
- full-size - with a width of 60 cm. An excellent option for a large family. This “helper” can handle a whole mountain of dishes. In one cycle it can wash from 10 to 17 sets. It is easy to place pots and baking trays in it. The height of such machines ranges from 82-87 cm, depth 55-60 cm. They are presented in all categories - built-in, partially built-in, separate;
- narrow - their width can be from 45-49 cm. They can accommodate a maximum of 10 sets of dishes. More suitable for small families of 3-5 people. If the family is large, you will have to run it several times;
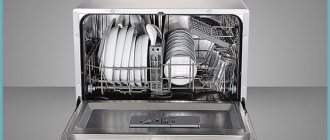
- compact - small devices similar in size to a microwave oven. They have a width of 35-45 cm, so they are easy to place in any, even the smallest kitchen. They can wash 4-6 sets of dishes per cycle. Available in built-in and free-standing design options.
Optimal dimensions of PMM
The dimensions of the purchased PMM are largely determined by the size of the kitchen and the features of the kitchen unit. The height of built-in models is usually the same; it corresponds to standard niches in furniture (820–870 mm). Width may vary. If you are purchasing a model for an existing niche, it is recommended that you measure this niche yourself in order to select a model that matches it when purchasing. If this has not been done in advance, such measurements will still have to be made before installing the dishwasher.
The situation is simpler with stand-alone machines. They are not tied to a niche; there may be several installation options. If the equipment is installed incorrectly, it can be rearranged. It is better, of course, to pre-determine the place where the PMM will be placed and, based on this, select a device of optimal dimensions. How to install it correctly is described below.
In some cases, the optimal dimensions of equipment are dictated not by any restrictions related to the size of the kitchen or furniture, but simply by its sufficiency for the family. In fact, why buy a full-size model, if even the narrow one has more than enough capacity.
Choosing a location: options for installing a dishwasher
The location of the equipment depends on its type. For a freestanding device, a small space on the floor or work surface is sufficient. If the appliances are built-in, you need to allocate space for it in one of the kitchen cabinets, and if there is no cabinet of a suitable size, purchase a separate module. A compact dishwasher can be built into a niche, hidden in one of the modules, or simply placed on the countertop. To ensure that the connection does not cause problems, it is necessary to take into account the proximity of water outlets, sewerage and electrical outlets.
Into the cupboard
If you decide to integrate the appliances into the kitchen unit, you need to measure the cabinets and determine which of them is most optimal for installing a dishwasher of a particular size. The exact parameters of the device can be found in the instructions. If the width of the module located next to the sink is more than 45 cm, it is ideal for installing the machine. When connecting, there is no need to install separate outlets for water supply and drainage. Hoses can be integrated into a system installed under the sink using adapter fittings.
To install the machine in a cabinet, you need to follow these steps:
- pull out the shelves from the cabinet, unscrew the bottom panel, remove the baseboard and doors;
- install the case strictly vertically using adjustable legs;
- fix the device using fasteners to the tabletop and side walls. If the width of the machine is smaller than the width of the body, the remaining space can be used to organize detergents;
- connect the device to water supply, sewerage and power supply systems;
- install the facade - for this it is better to order an additional decorative panel in the same design as the doors of the lower drawers. The facade can also be made from a former door, if it is the right size.
In a separate module
If there is no suitable cabinet in the set, and the kitchen space allows, you can order a separate cabinet for the car. It is necessary to place it as close to communications as possible. If there is a gap between the module and the built-in kitchen, it will not be possible to hide the hoses. Therefore, it is better that the body is moved close to the cabinet with the sink. For maintenance, the dishwasher built into the mobile module does not have to be dismantled. It will be enough just to move it away from the wall.
A separate box is not attached to the overall structure, so the likelihood of vibration increases. It is necessary to adjust the dishwasher unit as best as possible and secure it. Otherwise, he will move the cabinet while working.
To a niche
The compact built-in dishwasher can be installed in a niche provided for an oven or microwave. If the niche is located far from the water supply system and sewerage system, long hoses will be required for connection. To prevent the dishwasher from spoiling the overall aesthetics of the space and not being conspicuous, the front wall is covered with a decorative strip made in the same style as the facade.
If embedding is not suitable
What to do if there is no suitable space in the kitchen even for a compact built-in dishwasher? Don't give up! Consider freestanding and tabletop units. You can always allocate a piece of the floor or a small space on the countertop to accommodate your much-needed “kitchen helper.”
Reasoning 2
The world has been equipped with new technologies for many years. Technology has become an integral part of our lives; it makes our work much easier and our time more entertaining. Progress does not stand still, and many of us can no longer do without a mobile phone and other gadgets. Now this is no longer an expensive toy, but an essential item. Almost every home uses modern computers, laptops, and tablets.
Progress improves living standards. With its help, the human brain develops and science improves.
Our modern age is unthinkable without high technology and efficient production.
In our country, the standard of living is maintained at a fairly high level, and this is thanks to good modern conditions and medicine, which is capable of treating various complex diseases.
It is difficult for today's citizens to imagine their life without technology. New inventions are constantly appearing. Yes, for some gadgets are useful and necessary assistants, but others believe that they have a negative impact on people.
Modern technology does a lot of work for us, for example, washing clothes, which allows us to spend more time with loved ones or just relax. Kitchen appliances such as an oven, microwave, and multicooker make life much easier for women, and men too. Scientific technology is advancing our development, and the work we do is much easier than it was decades ago.
The emergence of modern technologies has both advantages and disadvantages. Many people believe that current inventions have a negative impact on humans. He becomes lazy and inactive, because he knows that technology will do a lot for him. Scientists are of the opinion that gadgets have a negative impact on health, as they contain harmful radiation, and this can lead to a number of complex diseases.
Undoubtedly, modern technology has a lot of advantages. It allows us to save time while enjoying life. But, unfortunately, technological progress has also brought losses. People now choose electronic devices rather than reading books; they exchange communication with acquaintances in reality for gadgets and spending time in the virtual world.
It is now very difficult to do without all these devices. But it is within our power to ensure that technological progress does not have a negative impact on people and nature.
`
Preparing to connect
The first thing you need to do when the car is delivered to you is to unpack it and check the completeness of the package in the presence of employees of the selling company. The standard kit should contain hoses for connecting to the water supply and for draining dirty water, gaskets, templates for correct installation of the facade panel, tools for fastening and adjustment, and a rubber apron. Some manufacturers include plates to protect the tabletop. If any items are missing, the company is obliged to provide additional delivery.
Before installing the machine, be sure to read the manufacturer's recommendations. As a rule, the installation algorithm is described in sufficient detail.
To operate the dishwasher, you must ensure that it is connected to the electrical network, water supply and sewerage. To do this, you will need additional plumbing and electrical equipment, as well as the necessary tools for the job.
You can't do without:
- three-core copper cable with a wire cross-section of at least 2 mm;
- moisture-resistant “European socket”;
- 16A automatic machine;
- siphon with at least one fitting. If you subsequently plan to connect a washing machine, it is better to immediately purchase a part with two fittings;
- tee for connecting the hose to the water supply. The fittings can be metal-plastic, brass or bronze;
- shut-off ball valve to shut off the water;
- a coarse filter that will remove large suspended matter, sand, and silt from the water;
- additional hoses for extension if the machine is not located next to the sink;
- fum tapes for sealing joints of fittings;
- screwdriver;
- pliers;
- screwdrivers;
- hammer.
Water pipes
Despite the fact that in some dishwashers manufacturers have provided the ability to connect to hot water, experts do not recommend using this option in Russian conditions. Energy savings are insignificant, and the consequences may be irreversible. The fact is that the hot water in our risers is dirtier than cold water. Before going to our homes, it goes to the boiler room. There it comes into contact with the metal of the system. Water supply companies do not recommend using this water for cooking. In addition, it is impossible to regulate its temperature if you do not have autonomous heating, but this is necessary, since there are restrictions. For example, in Bosch machines it is unacceptable to use water whose temperature exceeds 60 degrees. When connected to a hot pipe, the check valve suffers. And although there will be no leaks with a high-quality installation, an unpleasant odor may appear.
When connecting the machine to a boiler that is regularly cleaned and in which the magnesium protector is changed promptly, the water quality can be satisfactory. But power loss cannot be avoided. From 5 to 10 liters will be wasted at each start to warm up the supply hose.
Connection steps:
- Before starting work, you must turn off the water.
- Unscrew the mixer hose.
- We install a splitter - tee.
- We connect a mixer to one of the inputs.
- To the second - a coarse filter, then a ball stop valve and only after that the dishwasher hose.
- We seal all joints with fum tape, 10-15 layers are enough.
If the length of the hoses supplied with the equipment is not enough, you can purchase them separately and extend them.
Drain device
To drain water from the dishwasher, a connection to the sewer system is required. You can, of course, abandon the complex installation and simply throw the hose into the sink, but this does not look aesthetically pleasing. The drain will interfere with cooking. Dirty water with waste will flow into the sink and pollute it. Therefore, it is better to integrate the hose into the connection point of the sink siphon using an angled outlet from the pipe.
Drain hose connection process:
- We remove the siphon.
- We install a tee on the pipe.
- We connect the sink siphon to one of the outputs.
- We install an intermediate valve that blocks water from flowing back into the dishwasher.
- We install the drain hose.
To provide additional protection against sewer water entering the machine, the hose must be installed correctly. We attach it to the kitchen furniture at a height of 60 cm above the drain, and then make a bend and connect it to the system.
Electric outlet
A separate outlet is required to connect the dishwasher to the mains. It must be of the European type and be moisture resistant. It should be placed at a distance of 25-30 cm from the floor surface. If you don't have one, you will have to arrange for its installation. In order to power the outlet, you need to lay a wire with a cross-sectional diameter of 2 mm from the electrical panel to the installation site. Especially for the dishwasher, a separate 16A circuit breaker is installed in the panel. If the network load level reaches the maximum permissible level, the machine will turn off and protect the machine. Grounding is carried out using a three-wire wire. It is unacceptable to try to “ground” electrical equipment to gas, water and heating pipes. Advice! It is better to entrust the installation of the socket to a professional. If you are not an electrician, you should not do this work yourself.
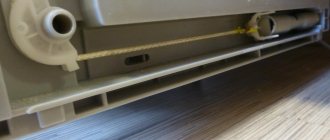
Water hose
The dishwasher has two hoses:
- Jellied.
- Drain.
The first (inlet) hose is designed to supply water to the machine. It must withstand operating pressure and meet temperature requirements.
So, for hot water supply lines the permissible temperature is 65-70°, and for hot water supply lines - 20°. Externally, it is a smooth hose with two threaded connecting elements at the ends (in the form of union nuts).
The drain hose ensures that waste water is discharged into the sewer system. It is not designed for high pressure, so the requirements for it are much softer.
Basically, such hoses are selected by length. As a rule, drain hoses are corrugated, and their connecting elements are of the usual bell-type type, without threads. You can learn all about dishwasher hoses here.
Housing installation
Electrical and water connections are complete. Before installing the device in place - in a cabinet or niche, you need to check its functionality. If everything is in order, we proceed to installation.
Installation steps:
- Place the dishwasher in the prepared place.
- We give the machine a strictly vertical position by adjusting the legs. The rear leg is usually adjusted through a mechanism on the front panel using a special key.
- Remove the top basket and determine the location of the mounting holes.
- We attach the body to the side walls of the cabinet. To extend the life of furniture, it is recommended to cover them with vapor barrier material.
- We install a steam protection cover on the countertop.
Built-in hob
Traditionally, it is placed above the oven. This is a practical solution and does not require any additional advice.
Still, there is one important point! Now the trend is thin countertops made of quartz, acrylic and other artificial materials, the thickness of which is less than 15 mm . And the thickness of the hob is 30-60 mm . The difference in thickness of the stove and oven leads to their conflict!
Do you want a thin tabletop? Get ready for some changes!
Installation of a front door
To hide the dishwasher and give the kitchen an aesthetically finished look, we close the door with a decorative strip. In order to maintain the integrity of the interior, choose an overlay made of the same material as the furniture facades.
Installation steps:
- install the handle;
- Place the decorative panel face down on the floor. Place a paper template on the back side. The diagram will help you accurately determine the mounting locations;
- use an awl to mark these places or drill directly according to the drawing;
- we fix special fastenings;
- open the machine and remove the set screws;
- we install the facade by inserting fasteners into the grooves on the dishwasher door;
- we screw in long self-tapping screws that will securely connect the door to the façade trim;
- If necessary, adjust the degree of tension of the door springs.
Preparatory work before installation of the PMM
You can entrust the installation of PMM to specialists. In this case, you do not need to worry about the correct order of actions when embedding or installing equipment. The workers who installed the machine will also be responsible for the final result. But if you are installing the device yourself, it is useful to have an idea of the preparatory work before installation. This applies to choosing a location for installation, as well as preparing the tools and materials that will be needed during installation.
Choosing a location based on size
As mentioned above, built-in PMMs must correspond to the dimensions of the niche specially designed for them; there are no other options; they will have to be built into it. If this location is unsuccessful, it is difficult to operate the device installed there, you will have to think about partially redoing the furniture, ordering a separate cabinet to install the PMM in it, or even completely replacing the kitchen unit. The classic place for a niche for such equipment is the area around the sink - there are usually no problems with connecting communications there. How a dishwasher is built into a kitchen is discussed in detail below.
A freestanding dishwasher can theoretically be installed anywhere, but in reality there are always limitations associated with the ability to connect communications to it or ease of use. In order to correctly install the equipment, you should first determine all possible places for its installation, taking into account the dimensions of the PMM. It may happen that the desired model simply does not fit into the existing kitchen configuration. There may be two options here - remodeling the kitchen or purchasing a more compact model that fits into the existing layout. The easiest way is to determine the location for the tabletop model. This is any flat surface that is convenient to reach; you can supply water, connect the drainage system and connect electricity.
Required tools and materials
Before installing a dishwasher in a finished kitchen, you need to prepare the appropriate tools and materials. If you plan to install a compact dishwasher on a countertop, then you can get by with a small set of tools; usually everything you need is always at hand. You may only need a screwdriver and pliers. If you need to build a dishwasher into a finished kitchen or install a full-size free-standing model, you will need more tools. Often the user manual will indicate what tools may be needed for installation. Just in case, it is useful to have the following set of tools and materials on hand:
- screwdriver or drill;
- flat and Phillips screwdrivers of different sizes;
- hammer and chisel;
- pliers;
- knife;
- shears for metal-plastic pipes;
- adjustable wrench;
- tee and stopcock (if necessary) ¾ inch size;
- FUM tape and tape.
Of course, this list can be supplemented in some cases; it is difficult to determine exactly in advance how much will be needed. It all depends on the specific conditions, features and complexity of installation.
How to protect your countertop
When the dishwasher is opened, steam escapes and moisture settles on the underside of the countertop. Regular wetting can lead to swelling and destruction of the surface. In this case, not only the tabletop will suffer, but also the facade. To protect furniture from moisture, special waterproof plates should be used. Manufacturers offer various protection options - elements made of metal, plastic or film. Bosch dishwashers come with metal linings. Electrolux offers protection from a special film. If a plate is not included in the set, this does not mean that it is not needed. In this case, you will have to find an alternative yourself - you can stick tape, attach a piece of metal, or purchase a ready-made element separately.
Top tray
The middle rocker arms are the main working element of the dishwasher; nothing should interfere with their movement.
The top tray is intended mainly for mugs, glasses and other small items. Typically, it can be placed at different height levels, depending on how necessary it is.
The basic rule for placing glasses and mugs is that they should be turned upside down and should not be placed horizontally. This will allow water to drain and not accumulate in the recesses.
The basic rule for placing glasses and mugs is that they should be turned upside down and should not be placed horizontally. This will allow water to drain and prevent it from accumulating in cavities.
Some dishwashers have a special holder for placing wine glasses and glasses; depending on their shape, you can use it in different ways.
Long wine glasses should be placed like this
After a big feast, there is an excess of dishes, here is an example of rational use of space - wine glasses and glasses do not interfere with each other
A special holder is necessary, since the elongated shape of the wine glasses and their narrow neck make them difficult to wash, and for washing it is necessary that a stream of water from the spray arm still gets inside.
One of the options for placing glasses
Also, this holder can be used for rational placement of small tea cups.
Tea cups are perfectly placed in two rows, this does not affect the quality of washing
On the left side of the upper tray there is a rack for saucers and small braids, bowls, and bowls.
There shouldn’t be any difficulties with arranging the saucers, but the bowls should be placed freely, without leaning against each other, this will ensure high-quality washing.
If there is a lot of dishes, then they can be laid out, for example like this
Incorrect placement, so the dishes will not be washed
And this way the dishes will be washed properly, nothing will interfere with the access of water to the inner surface
If necessary, the top tray can be completely removed; in some configurations, additional spray elements are provided for this case, but I don’t have them, so I won’t write about it.
Expert advice on choosing and installing dishwashers
Experts recommend:
- pay attention not only to the technical characteristics of the equipment, but also to the brand. Products from German companies are considered the most reliable. The most famous and popular brands are Bosh, Siemens. Judging by the reviews of both specialists and users, the machines of these manufacturers have proven themselves to be the best;
- carry out the first check immediately after delivery. It is better to identify the fault in front of the company’s employees than to then go through the tedious procedure of returning the product under warranty;
- leave the installation of the façade and electrical elements to professionals;
- install the machine in a niche of the appropriate size to avoid vibration.
Popular models for small kitchens
Let's look at the most interesting models of small PMMs that can be found today on the household appliances market.
Electrolux ESF 2400 OK
Main characteristics:
| type of instalation | Freestanding |
| Case dimensions (HxWxD), in centimeters | 43.8x55x50 |
| Hopper capacity, included | 6 |
| Energy efficiency class | A+ |
| Washing and drying classes | A/A |
| Control | Electronics |
| Number of programs | 6 |
| Manufacturer country | China |
| Cost, rubles | Within 22,000 |
The model has a black body color and weighs only 25 kilograms. The warranty is valid for 12 months.
Indesit ICD 661 EU
An offer from an Italian brand. The weight of the structure is 27 kilograms, the warranty is one year. Options:
| type of instalation | Freestanding |
| Case dimensions (HxWxD), in centimeters | 44x55x52 |
| Hopper capacity, included | 6 |
| Energy efficiency class | A |
| Washing and drying classes | A/A |
| Control | Electronics |
| Number of programs | 3 |
| Manufacturer country | China |
| Cost, rubles | 19 120 |
Ginzzu DC361
An option from the little-known Taiwanese brand Ginzu. Equipped with leakage protection, a display, but does not have a half load. There is a quick wash. Spends 7 liters of water per wash cycle. Condensation type drying is provided. Other features:
| type of instalation | Freestanding |
| Case dimensions (HxWxD), in centimeters | 43.8x55x50 |
| Hopper capacity, included | 6 |
| Energy efficiency class | A+ |
| Washing and drying classes | A/A |
| Control | Electronics |
| Number of programs | 7 |
| Manufacturer country | China |
| Cost, rubles | 12 990 |
Siemens SK 76M544
The machine is from the German concern Bosch (produces Bosch and Siemens household appliances). Basics:
| type of instalation | Partially built |
| Case dimensions (HxWxD), in centimeters | 45.4x60x50 |
| Hopper capacity, included | 6 |
| Energy efficiency class | A |
| Washing and drying classes | A/A |
| Control | Electronics, with display |
| Number of programs | 6 |
| Manufacturer country | Germany |
| Cost, rubles | 44 700 |
This is a relatively low-noise technique (only 45 dB during operation), with a water consumption of 8 liters per cycle. Provides 5 temperature settings and is equipped with condensation drying. Electricity consumption for 1 cycle is 0.62 kW/h. There is a delayed start up to 24 hours and a turbidity sensor. Also, this PMM with a silver body color has additional functionality: intensiveZone, varioSpeedPlus, hygienePlus, extraDry. Full type leakage protection.
Hotpoint_Ariston HCD 662 S EU
Options:
| type of instalation | Freestanding |
| Case dimensions (HxWxD), in centimeters | 44x55x52 |
| Hopper capacity, included | 6 |
| Energy efficiency class | A+ |
| Washing and drying classes | A/A |
| Control | Electronics |
| Number of programs | 6 |
| Manufacturer country | China |
| Cost, rubles | About 22,000 |
Net weight 22.5 kilograms. The warranty card is valid for one year. Case color: stainless steel.
Midea MCFD-55320 W
Basic data:
| type of instalation | Freestanding |
| Case dimensions (HxWxD), in centimeters | 48.3x55x50 |
| Hopper capacity, included | 6 |
| Energy efficiency class | A+ |
| Washing and drying classes | A/A |
| Control | Electronics |
| Number of programs | 6 |
| Manufacturer country | China |
| Cost, rubles | About 15,000 |
The machine weighs only 20 kilograms (including packaging). The warranty is valid for 24 months. Case color: white.
Connection between drain and sewer
This method of independently connecting the dishwasher to the sewer is considered very common. In this case, the connection will be made through a siphon. The method in question requires the technician to act carefully and follow all the advice regarding connecting the dishwasher to the sewer. The drain will need to be equipped with a special outlet and a check valve. This will reduce the likelihood of water flowing directly from the drain into the dishwasher.
The outgoing hose from the machine must be fixed to a wall or cabinet. It is best to place it 50 cm above the drain entrance. To drain water from the dishwasher on its own, tilt the hose at a special angle. The angle is specified in the instructions for your car model. We connect the drain circuit to the siphon under the sink itself. When there is no drain siphon under the sink, then the PMM drain hose must be connected to the sewer pipe outlet, after which the joint should be wrapped as tightly as possible with tape. Under pressure, the hose may fall out; to keep it tightly in the sink, you will need to use a special holder. To connect to the siphon, you need to use an additional fitting. In Moscow stores you can find ready-made options for PMM. Before connecting the drain, you need to re-check the hose size
It is important that there is enough of it; it is better not to use a very long one, because... this has a negative impact on the efficiency of pumping equipment.
Read the instructions carefully ↑
Let's preface the story about how to install a dishwasher (DMM) with a banal but important statement: a mandatory document for the installer, which must be studied very carefully before starting work - the installation instructions. The dishwasher must be connected to the water supply, sewerage and power supply, respectively. manufacturer's requirements. Most modern household-level dishwashers are connected using similar circuits, but machines of different types and brands have their own characteristics that must be taken into account both during their installation and during operation.
If preparation for installing a PMM is carried out at the stage of kitchen renovation, when it is not yet known which specific model will be chosen, it is advisable to first determine the type of machine. First of all, with its dimensions and type of water supply. Of course, you can always change something locally, but this is an extra waste of time and money.
Always study the installation and operating instructions for complex household appliances, they contain all the necessary information
Required tools and materials
Before you begin installing the dishwasher, you need to prepare tools and consumables.
Dishwasher Installation
Tools
To install the built-in device, you will need the following tools:
- Phillips screwdriver for adjusting the height of the legs, hanging the facade, attaching clamps, etc.;
- laser level to control the horizontal and vertical of the washing cabinet;
- pliers for fixing parts;
- wrenches for connecting the inlet hose, installing a tee and supplying water supply;
- a hammer drill with a crown for concrete and brickwork for installing sockets and hidden wiring;
- screwdriver;
- tape measure, square, marker.
Consumables
Additionally, you will need the following materials if they are not included with the machine:
- fum tape, plumbing tape, gaskets, ties;
- flexible hose with fasteners (cap nuts);
- corrugated hose with a sealing collar and a union nut with a gasket;
- siphon with a pipe for draining water from the dishwasher.
- socket with socket box.
- two-wire wire.
- RCD circuit breaker for the electric meter panel.