You brought home a new automatic washing machine. It is clear that the equipment will not work without being connected to water supply, sewerage and electricity. Therefore, questions immediately arise: is it possible to connect a home assistant yourself, and how to do it.
The new washing machine must be connected to the water supply, sewerage and electrical networks
Many stores selling household appliances offer machine delivery and connection services. But if you have minimal technical knowledge and want to save your family budget, try doing the installation yourself. If the work is carried out by hired specialists, knowing the rules for connecting equipment, you will be able to check the quality of the installation.
Before performing any manipulations with the washing machine, you need to study the operating instructions.
In our article we will tell you in detail how to connect a washing machine yourself without calling a technician.
Where to put the washing machine
Even before the car in a cardboard box arrives home from the store, you will need to find a suitable place for it. After all, the difference between automatic machines and those that were used before is that they are stationary devices. Such a machine cannot, if necessary, be moved from the corridor to the kitchen or bathroom - connected to the water supply and sewerage system, it has a permanent place of “residence”.
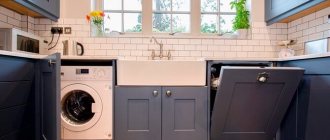
Most people traditionally allocate a place for washing equipment in the bathroom. This is understandable - after all, there are pipes with water running there, and it is also easy to install a drain. True, sometimes there is not enough space in the bathroom, and then the washing machine is installed in the kitchen.
If there is no suitable corner there, and the hallway is of impressive size, you can try a non-standard option - install a place for a washing machine in the hallway. By covering its walls with a neat cabinet, you can turn the washing machine into an original and beautiful piece of furniture.
Choosing a location: what to consider?
Even at the time of purchasing a Samsung automatic washing machine, you need to decide on the place where it will be installed.
Optimal options:
- kitchen;
- bathroom;
- utility rooms, if any.
When choosing a location, you should consider the following points:
- According to its dimensions (height, width, depth), the machine must fit in the space allocated for it.
- Proximity of water supply and sewerage systems.
- Convenient outlet location. The use of extensions and tees is not recommended.
- The floor covering must be hard and smooth. The best option is a concrete floor.
- If the floor is smooth and slippery, you may need a shock-absorbing rubber mat.
- There must be good ventilation in the designated area, since constant high air humidity is an extremely undesirable phenomenon, which can ultimately lead to equipment breakdowns.
- There should be no proximity to heating equipment or stoves, as this may cause the device to overheat.
- There should be convenient access to the washing machine and the ability to open the door freely.
- At any time of the year, the room temperature should not fall below zero.
- The power cable must not pass under the bottom of the washing machine.
- There should be no carpet on the floor under the feet of the device, which may prevent leaks from being detected in time.
- The minimum gap between the case and adjacent objects should be: at least 5 cm on the back wall and at least 25 mm on the sides.
- Protection from direct sunlight must be provided.
When choosing a machine, it is necessary to take into account the overall design of the room with which the machine should be in harmony.
The washing machine has arrived - we begin to unpack and prepare for installation
So, finally, the laundry assistant was purchased, the order was delivered, and the movers brought the box into the apartment. Well, now the first thing you need to do is remove this box. Now we remove the fasteners that secured the elements of the machine during its transportation, protecting the rotating parts from accidental damage. Fasteners are bars, brackets and bolts.
The brackets are located on the back and are designed not only to secure the electrical cord and hose, but also provide the necessary rigidity for transportation. The bars are placed between the body of the device and the tank; they are easily removed if the machine is slightly tilted forward. The bolts are on the front holding the drum in place. After removal, all these parts must be packaged and stored - they will be needed when calling for service.
Keep in mind that after the transportation bolts are removed, the washing machine tub will hang on the springs. Don't be scared - this is normal. Before connecting the device, do not forget to insert the plastic plugs included in the kit into the holes in which these bolts were previously located.
Important: do not turn on the machine under any circumstances before removing all fastening shipping parts - this may end badly for its drum.
Call the master
You can not only install the washing machine yourself, but also use the services of a specialist from a company that repairs household appliances, including washing machines. Finding such companies is not difficult on the Internet.
Connecting a household appliance and installation depends on the price list of the household appliance repair company and the complexity of the work performed. The cost of work does not include payment for consumables and additional parts required during installation.
Average prices in the capital:
standard installation with disconnected communications – from 600 rubles;- installation of a built-in machine – from 1,300 rubles;
- installation with preparation of plumbing communications – from 1,800 rubles;
- installation with preparation of electrical communications – from 1,800 rubles;
- comprehensive installation with preparation of communications – from 2,000 rubles;
- dismantling an old machine (free-standing) - from 300 rubles;
- dismantling of a built-in machine - from 600 rubles.
It is recommended to seek help in installing a washing machine from companies that have been practicing in the service market for a long time and have a reliable reputation.
We supply water
When deciding whether to connect a washing machine to a water supply system, keep in mind that there are several options for this, which have two things in common: the water pressure in the pipes must be sufficient (usually at least one atmosphere), and this water must also be clean. Low pressure can be increased by placing a booster pump in front of the washing machine, and a filter mesh is installed to purify the water.
Now we can consider options for supplying water to our machine.
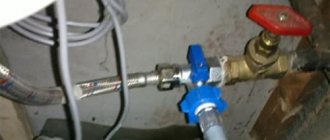
Tapping with a crimp sleeve
Taking a flexible hose with a diameter of three quarters of an inch, we connect it on one side to the washing machine, and on the other to a separate valve, which will need to be cut into the water pipe using a crimp coupling (if the pipe is metal).
Components of a crimp coupling.
Such a coupling consists of two halves, which are put on the pipe and tightened with bolts, and a threaded outlet onto which a valve (preferably a ball) is screwed. To allow water to flow through the pipe, drill a hole directly through the coupling.
An example of connecting to a water supply using a crimp coupling. Photo — srbu.ru
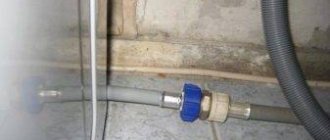
Insertion into metal plastic using a fitting
If the pipes for supplying cold water consist of metal-plastic, we use a special tee called a fitting. We cut out a piece of pipe in the right place, and insert a fitting into the resulting opening, to which we attach a ball valve. We seal the joints with rubber cuffs.
Insertion into metal plastic using a tee.
Connection using a tee
You can use a simpler option - connect the washing machine (again with a flexible hose) to the mixer, or to the water supply to the toilet flush tank. The hose must be long enough, and a tee is usually used to connect it. Before washing, the faucet hose will have to be unscrewed each time.
This option can be considered rather as temporary, and it does not look very aesthetically pleasing. Connecting a cistern to a water hose is a very practical method, but it can only be used if the washing machine and toilet are in the same room.
Connecting the washing machine to the toilet cistern inlet. Photo — gor-servis.ru
Connecting a washing machine without running water
What to do if there is no running water in the house? It’s a pity to give up such a convenient thing as an automatic washing machine in the country, for example. To connect a washing machine without running water, you need to raise a large water tank to a height of at least a meter, or preferably higher, and run a hose from its bottom to the machine inlet. This will create the water pressure necessary for its operation. A more expensive way would be to purchase a pumping station.
To start
Determine location
The most popular and most suitable places to install a washing machine are:
- bathroom,
- kitchen,
- restroom,
- combined bathroom.
To ensure safe operation of the device and also reduce noise, it is necessary to install it on a flat and stable surface, away from heating devices. Ideally, at the repair stage, make a concrete screed under the device.
But you can come up with an alternative option that will be creative and interesting. It should be noted that the washing machine can be placed not only separately, but also built into various cabinets or even placed under the sink. The main thing is that the dimensions allow it. Therefore, even at the stage of choosing and designing a space, you need to find out the width, height and depth of the body in order to successfully fit into the allotted space.
Unpacking and Preparation
When the equipment is already at home, it should be freed from the box in which it was sealed by the manufacturer and the protective foam layer should be removed. From the factory, the machine sits on a shipping pallet, which must be carefully removed.
After unpacking, you will need to remove the shipping (locking) bolts. They secure the drum to prevent internal damage during transportation. In the space left empty after removing the bolts, special plugs are inserted, which are included in all units.
Tools
Everything you need for work can probably be found in every home:
- adjustable wrench,
- wrench,
- ball valve,
- fitting,
- tee or crimp coupling (the choice depends on what type of pipe),
- threaded adapter,
- withdrawal (if necessary),
- flexible hose.
Connecting the washing machine to the sewer
Supplying clean water is only half the battle. Now we need to decide what we will do with the dirty and soapy water remaining after washing. Of course, you need to think about connecting the washing machine to the sewer. This can also be done in different ways.
Bathroom or toilet flush
The easiest way is to use a special hose called a “hook” to drain the dirty water directly into the toilet or bathtub. But one condition must be met: the top of the hose must be no less than sixty centimeters higher than the washing machine. For this purpose it has special fastenings.
The simplest option for draining waste water. Photo - SRBU.RU
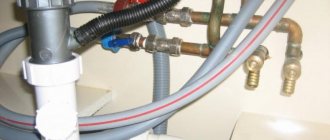
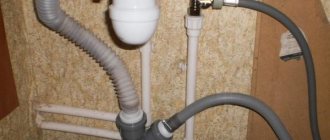
Draining through a siphon
You can do this: make the waste water drain stationary. To do this, you first need to purchase a special siphon, which has an outlet designed for washing machines - these are now available in stores. According to the rules, the outlet must be located above the siphon elbow. If you ignore this rule, or connect the machine directly to the sewer, dirty water may be sucked into the device. The result is the appearance of an unpleasant odor.
Organization of draining water from the washing machine through a siphon with a special outlet. Photo — gor-servis.ru
Draining through a sewer pipe
However, you can still do without a siphon. If the sewer pipe is four to five centimeters thick, then you can install an outlet for the washing machine directly on it. In this case, be sure to use a seal, and insert the drain hose, bent in the shape of the letter S, into the pipe so that it does not touch the surface of the waste water. We place its upper edge no lower than half a meter from the floor.
Drain water into the sewer pipe through a tee using a rubber seal. Photo — gor-servis.ru
Important: if the design of your washing machine model does not have a check valve, then it must be installed taking into account the limitation of the level at which the drain hose (otherwise, the pipe) is located. Typically the manufacturer specifies the maximum and minimum values for this level.
Non-standard options
Installation of built-in equipment
A built-in washing machine is a great space saver in an apartment or house. You can build a cabinet for the washing machine, place it in a closet, on a shelf, mount it in a wall and other places. Only such creative ideas should be carefully thought out to avoid trouble.
In a private house
The classic installation option is the bathroom. All the necessary communications are present here, and it will be convenient to use the machine here. The only risk is increased humidity in the room, which in the future may affect the performance of the equipment.
In a private house there are many unusual ideas for installing a washing machine: in a closet, under the stairs, in a closet, in any buildings located in the courtyard of the house, etc. Only here can a problem arise with communications, water and electricity.
In the kitchen or hallway
If there is not enough space in the most common places, then the equipment can be installed in the kitchen or in the hallway. But it’s unlikely that anyone in the corridor will have the required communications. You will have to bring everything to the installation site, and this will significantly complicate and increase the cost of the process. But it will fit quite comfortably in the kitchen. Most often it is mounted next to the sink or in a built-in kitchen unit. It is worth considering that the temperature and humidity of the kitchen will not always correspond to the operating rules of the device.
Drain installation
At first it may seem that organizing the drainage of such household appliances is as simple and understandable as possible. However, in reality, everything depends on certain connection nuances.
This can be done in two main ways.
- Temporary. With such a connection, the drain hose is lowered into the toilet or bathtub (in case of a combination).
- Stationary. At the same time, a tie-in is made into the sewer. However, here owners quite often face a number of problems.
The machine is connected to the sewerage system in accordance with the following important requirements:
- the length of the drain hose should not be too long, as this may cause a significant load on the drain pump, which may cause it to break;
- as the drain is connected to the siphon, it will be possible to prevent the penetration of characteristic odors into the equipment directly from the sewer, which is a significant advantage.
The drain hose must be connected to the siphon of the washbasin or sewer. The result is a very strong and tight connection.
Now let’s look in detail at how it is possible to ensure the drainage of such household equipment using different methods. You can drain the water from the device into a bathtub or washbasin. This option is quite simple, but not very practical.
Some manufacturers add to the equipment kit such an element as a special hose-hook. It is fixed on the wall of the bathtub or sink. The main advantage of this solution is that to ensure it, there will be no need to connect equipment to the sewerage system.
It should be taken into account that this solution has many more disadvantages. Firstly, the contaminated liquid will stain the bathtub or sink. This problem will be especially acute if the plumbing fixtures are made of acrylic. Secondly, even a very minor blockage in the sink during the draining process can become a provoking factor for flooding of neighbors.
In addition, in many cases, due to strong vibrations during the draining process, the hook falls to the floor, which can also cause leaks. The connection can be made using a siphon. In order for the drainage from the equipment to be stationary, the specified part will be needed.
The siphon is equipped with an outlet for machines. It should be located under the knee part of the siphon. Otherwise, contaminated liquid may be sucked into the equipment itself. Because of this, a bad smell can “settle” in it.
You can also make a connection to a sewer pipe, which should be 4-5 mm thick. Usually a special sealing element and an S-shaped hose are used here. The last part is inserted directly into the pipe so that it does not come into contact with the drains. The top of the hose should be placed at a height of 55 cm from the floor.
Without electricity the car will not work
Well, we have supplied the water, organized the drainage, now all that remains is to supply the power supply. This will avoid many unpleasant (and possibly tragic) consequences. After all, high voltage coupled with water is a terrible force. Therefore, caution and caution again are the main tips when connecting current in wet rooms.
To keep your family safe, be sure to ground your distribution board. The grounding bus should be no thinner than three millimeters. We use only a three-wire outlet. By the way, if the washing machine is in the kitchen, it is quite possible to plug it into an outlet made for an electric stove. If you need an extension cord for connection, use only one that has grounding contacts.
The optimal solution would be to connect the machine with a separate wire leading from the meter. A circuit breaker is installed on it. It is better to invite an experienced electrician for this work. If a separate wire is not installed, use a portable RCD - residual current device.
And one more thing: never connect the ground to radiators, gas and water pipes. This is deadly!
Place the legs of the car straight
In order for a new assistant to wash for a long time, without breaking or overloading, a necessary condition is the strict horizontality of its upper part. In this case, the drum will be positioned without distortions, rotating smoothly and without shaking. The maximum deviation from the horizontal that is permissible is only two degrees.
To achieve the desired horizontalness, use the adjustment of the legs of the machine - all models have such adjustment. We check the result using a level, twisting the legs until it is satisfactory. There should be no rubber mats, pieces of linoleum or blocks placed under the legs of the washing machine - the automatic machine is installed directly on the floor, preferably on concrete. It, unlike wood, for example, provides excellent shock absorption.
Leveling the machine legs.
Question answer
Can it be installed on wood or laminate flooring?
If the washing machine is installed on laminate flooring, it will vibrate. And this unpleasant moment cannot be corrected by anything, not even by twisting the legs. Plus it will slide. If there is a leak, the laminate will quickly become unusable due to moisture.
If you install the equipment on an uneven wooden floor, there will be problems with the distribution of laundry and, as a result, the bearings will fly prematurely.
When installing on a wooden or laminate floor, be sure to place a rubber mat or polyurethane spacers under the legs. Rubber bands will protect the coating and reduce vibration levels.
What to do if the car jumps?
There are many reasons why the machine jumps during the spin cycle. Basically, they arise due to improper installation and operation of the device.
Most can be eliminated with your own hands:
- If the transport bolts have not been removed, a rigidly fixed, non-shock-absorbing drum will vibrate strongly. It is necessary to turn off the equipment and remove the bolts;
- the unit is unstable on the surface - this problem is easily solved. It is necessary to place a rubber mat and special anti-vibration pads (dampers, shock absorbers, stands, etc.) under the washing machine. They will remove excess vibration and the unit will stop jumping. From available means, you can use double-sided construction tape;
- the settings of the legs are lost - they should be adjusted and fixed;
- uneven distribution of laundry throughout the drum - manufacturers advise following all recommendations for the weight of loaded items (no more than 4 kg at a time). If the problem is caused by an imbalance, then you need to stop the spin cycle and remove some of the clothing;
We carry out tests
Once again, carefully inspecting all the connections and connections, and just in case, checking the instructions, you can carry out a test run. At the same time, we consistently perform all the necessary operations and check that everything is happening as expected.
First, you need to fill the tank of the machine with water, noting the time it takes to fill it to the mark and checking it with the data specified in the passport. If it is discovered that any of the connections are leaking, the water must be drained and the leak repaired. If everything is fine, you can turn on the machine.
After five to seven minutes, the water is heated to the desired temperature. While the washing machine is operating, no extraneous sounds should be heard - after all, modern devices operate almost silently. If something grinds or knocks, this indicates a malfunction. Having determined that everything is in order, Next we will check how the squeezing device works, and then we will try the drain. At this point, the performance check of the washing assistant can be considered complete.