How to turn on the first wash
Starting the first wash is not much different from the previous method of starting the washing machine. However, it is better to consider this algorithm of actions, which will help avoid problems when setting up the wash:
- first of all, you need to place dirty things in the drum, while not forgetting to pay attention to the maximum load of the model (if the weight of the laundry is not taken into account, the machine may stop during spinning or washing, since it will not be able to completely complete the started process,
- When putting laundry in the drum, you must separate it by type of fabric and color, and also remember to take everything out of your pockets, including small debris,
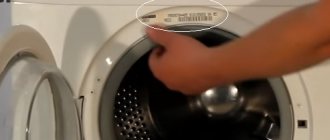
- then you need to pour the powder into a special hole (it is important to note that you should not open the cuvette while the machine is running, as this may lead to water leakage,
- the next step is to check the tap intended for supplying water (it must be open),
- You only need to plug the wire from the Ardo machine into the socket with dry hands,
- after this, you need to select the mode and temperature for washing the clothes - the programmer will help you do this (after selecting the program, some models of the Ardo machine require you to pull it towards you),
- The last step is to click on the “Start” button.
As the wash completes, you need to press the “Stop” button, unplug the cord from the socket, remove the laundry, and leave the door for 15-20 minutes to dry the drum.
As we were able to notice, the launch of Ardo washing machines, regardless of the model, has some features in comparison with other types of this household appliance. For example, they rarely have a “Start” button, but it is replaced by a programmer or another button with this function. Therefore, before starting the washing machine, the manufacturer recommends that you read the instructions for use, which will help to avoid difficulties during operation of the device.
Tilt the machine and remove the two inner corners from polystyrene...
Page 4
- Image
- Text
Page 4
•
Tilt the machine and remove the two inner corners from
polystyrene (if available) by pulling two cardboard
tapes “E - F”. First remove cardboard “E” and then cardboard “F” (Fig. 4).
REMOVING THE PACKAGING AND TRANSPORT BOLTS FROM THE MACHINE MOD. B
•
Park the machine close to where it will be installed.
Following the instructions located at the top
packaging (Fig. 1-A), install the supplied
set of lower protection (Fig. 1-B).
Remove the outer packaging (Fig. 1). If you have any doubts about the integrity of the machine, do not use the device and contact a qualified technician.
•
To transport the device, its swinging unit is blocked by 4 plastic spacers with bolts.
Before connecting the machine, use a wrench (Fig. 2) to loosen the transport bolts and remove them together with the plastic spacers (Fig. 2-A). Save the bolts and spacers in case you move.
Close the holes left by the transport bolts with special plastic plugs included in the bag with documents (Fig. 2-B)
•
Raise the machine and remove the polystyrene tray (Fig. 3).
4
Preparing for launch
Before “making” the Ardo machine perform the washing process, it must be properly connected to the communications. This may determine whether the machine will turn on at all. If you connect the inlet or drain hose incorrectly, the washing machine may not start, and an unfamiliar message will appear on the display, informing you of an error. Some models of machines react to the floor level, so the machine must be level.
So, after the unit is delivered home, you need to:
- unpack it and remove the shipping bolts;
- make sure that the hoses are long enough to install the machine in the chosen location;
- connect the inlet and drain hose to the machine;
- connect the water inlet hose to the water supply twin;
- connect the drain hose to the siphon branch;
- Place the machine level by adjusting the legs.
Important! The drain hose should be located approximately 60 cm above the floor level to ensure normal drainage. As for connecting to electricity, it should be directly into a grounded outlet without an extension cord or tee.
[custom_ads_shortcode1]
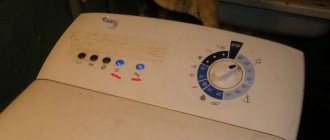
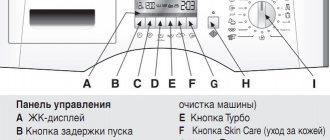
Main programs
The number of washing modes, as well as various functions, will be excellent for different models of washing machines. However, the designations on all machines are interpreted the same way. The decoding is indicated in the operating instructions for the machine. First of all, let's look at the main programs.
- Cotton – the sketch of the mode is made in the form of a small box of cotton. Used when washing cotton fabrics - the water temperature for this program is from 60°C to 90°C, the approximate process time is from 2 hours 25 minutes to 2 hours 50 minutes.
- Synthetics - the mode is indicated by a bulb on the control panel. It is possible to clean linen made from synthetic and semi-synthetic fabrics, washing time is 2 hours 7 minutes.
- Express 20 (water heating up to 35°C) – with this program you can refresh or wash lightly soiled items; the process lasts 20 minutes.
- Wool - the mode is indicated by an interesting symbol - a ball of thread. When choosing this program, the most gentle cleansing is guaranteed. Washing lasts on average 56 minutes.
- Hand wash – the mode on the panel is represented by the symbol of a basin with a hand lowered into it. Suitable for washing clothes that have a “Hand Wash Only” icon on the label.
- Quick wash - in 35 minutes, allotted by the intellect for washing, you can clean lightly soiled laundry from mixed fabrics.
- Daily – The mode is indicated by the image of a T-shirt on the control panel. Perfect for daily laundry. The program is characterized not only by careful handling of things, but also by low consumption of electricity and water resources.
- Sportswear – suitable for cleaning items that do not need ironing. The water heats up to 40°C, which allows clothes to stay in shape.
- JEANS – a special mode for denim fabrics, allows you to prevent items from shedding and discoloration. Washing time – 1 hour 10 minutes.
- Shirts – indicated by the same symbol on the control panel. The water is heated to 40°C, which will allow you to carefully wash your shirts, and the spin cycle is performed at low speed - this prevents the fabric from creasing.
- Spin – the button allows you to adjust the speed of rotation of the drum when squeezing out the laundry.
You don’t have to set the spin cycle yourself, but rather wash things using the parameters set by your intellect.
By understanding what a particular program means, you can make your washing even better. Having determined the type of fabric and the degree of contamination of things, it is easy to choose the ideal mode for each specific case.