When your washing machine suddenly stops during the wash cycle, the lights go out and other electrical appliances stop working, then most likely the washing machine is knocked out.
Such incidents may be accompanied by a burning smell, which indicates a malfunction in the power supply of the household appliance. Below are the reasons for washing machine malfunctions that cause the machine on the electrical panel to break. Measures that will help prevent or correct this situation are also indicated.
Why does it knock out traffic jams?
When you turn on the washing machine, the plugs are knocked out: what is the reason? As practice shows, most often this can be a consequence of typical malfunctions:
- socket failure;
- problems with control buttons;
- short circuit of the network wire;
- network filter failure;
- problems with the heating element
- short circuit on the engine;
- wiring problems;
- short circuit on the control module;
- condensation on electrical elements
Some of these problems require a professional to repair, so they are easier to prevent than to fix.
Is it worth repairing the machine yourself?
Even if you managed to figure out why the washing machine is knocking out, it is not a fact that repairing it yourself will be as easy. Many people prefer not even at the diagnostic stage to seek help from qualified specialists in order to exclude even the slightest possibility of incorrect actions, because your personal health and safety are at stake. It’s up to you to rely on your own strengths or turn to professionals for help; it should only be noted that many attempts at self-repair without the proper experience, skills and knowledge lead to aggravation of the malfunction and even greater repair costs.
Faulty socket
Electrical outlets can become damaged due to cracks or overheating. Don't delay repairing damaged sockets, they are potentially life threatening and repairing them is not a difficult or expensive task. Provided you have some knowledge of electrical engineering, this is a fairly simple job.
- Turn off the electricity in the apartment at the distribution board.
- Unscrew the bolt and remove the plastic shield. Make sure all your connections are carefully inserted into the correct terminals and securely fastened.
- Press the front bezel against the back of the case. Make sure the cables are not twisted and sit neatly inside the box so they don't get pinched when you screw the faceplate on.
- Align the bezel and secure it with the mounting screws. Make sure the bezel is level when tightening the screws.
- Place a level on top, tightening the screws one at a time unless you have a good "eye" for checking the level.
- Reinstall the jack bezel
Damage in the wiring - the washing machine is not to blame
Where to start troubleshooting? Firstly, you don’t need to immediately climb in and disassemble the machine. Maybe it has nothing to do with it at all, but the socket, wiring or the machine itself is to blame.
How to find out? Connect a load of approximately the same power to the same outlet. For example, an electric kettle and see how the machine behaves.
If he knocks it out again, then the washing machine has nothing to do with it. You need to look for damage:
- in the socket
- in the wiring
- in a machine, RCD or panel
If nothing turns off, then most likely the machine is to blame. To make sure of this 100%, temporarily connect it from a portable outlet from another outlet that is not connected to the bathroom line.
True, several conditions must be met here:
- this should be a short-term option, just for testing
The SMA cannot be permanently connected through a carrier.
- such an extension cord must have grounding contacts
- the protection device of the other outlet must correspond to the rating of the bathroom line
- the plug must be installed in exactly the same way, that is, you need to guess the phase and zero
The fact is that if you turn the plug 180 degrees, the protection often stops triggering.
For a faulty washing machine, it turns out that there is a difference where the phase is supplied and where the zero is supplied.
Sometimes people “treat” their problems this way. Although the device cannot be turned on for a long time in this operating mode.
Only if all the above conditions are met, in the event of a malfunction of the washing machine itself, another machine or RCD will trip.
By the way, when you do not have a dedicated line to the bathroom, and there are other sockets on the same circuit breaker, before all manipulations and checks, be sure to turn off all extraneous loads.
Suddenly it turns out that the reason is not the washing machine at all, but other equipment connected in parallel.
So, if you find out that without the machine in the outlet, nothing turns off. We are looking for a leak or short circuit before it.
Turn off the machine, check that there is no voltage in the outlet and disassemble it for visual inspection.
It is very important that only waterproof sockets are used for washing machines in the bathroom. Otherwise, oxidation of the contacts and constant tripping of the RCD or automatic circuit breaker are guaranteed.
When opening a simple socket, all its contacts and the housing itself will be constantly wet. In this case, the RCD may spontaneously trip even at idle, when nothing is connected in the bathroom.
In order to somehow work with such an outlet, you will have to constantly keep the exhaust fan on in the bathroom.
Also, condensation often forms inside machines with a washing temperature of no more than 40 degrees. With this mode and when rinsing in cold water, droplets of moisture first settle on the inner walls and then reach the electrical contacts.
If there is damage in the outlet, you will definitely see it by soot and burnt contacts.
Well, if you don’t find anything suspicious here, then check the cable.
In a good way, this is done with a special device - a megohmmeter.
The ends on both sides of the cable are unscrewed and the insulation is caused.
The problem is that not even all electricians have such a measuring device at home. What can we say about ordinary consumers?
How can we manage without it? A modern home electrical panel in most apartments and private houses no longer consists of just two switching devices or plugs.
It contains at least ten switching devices, or even more.
All you need to check is to transfer the cable going to the outlet in the bathroom under the washing machine to another protective device of a similar rating.
To do this, for greater safety, turn off the common input and check that there is no voltage in the switchboard.
Next, unscrew the phase conductor from the terminal of the washing machine and transfer it to another protective device of the same rating.
Having first removed the original cable from it, which goes to another load. Turn on the input and the “new automatic” protection. Again, check everything by turning on the load in the form of a kettle in the bathroom.
Normal power supply
Power test circuit
If your other machine is knocked out, it means there is a defect in the wiring. You will have to check the entire chain, open all junction boxes, etc.
Read more about the steps of this check in the article below.
By the way, an RCD in such cases can often trip simply due to a weakened zero in the switchboard itself. You will run around the whole room, open the wallpaper, and the reason will be right under your nose. Don't rule out this option either.
If, after switching to the new device, everything works properly, then change the original switch. Most likely, the contacts in it have burnt out and it no longer holds its rated load.
Problems with control buttons
Problems with control buttons may be caused by wear or manufacturing defects. If the repair is under warranty, contact the technician at the appropriate service center. If the warranty period has expired, you should contact any reputable appliance repair company that you trust.
If you want to replace the button yourself, follow these steps:
- use the tester to determine which button needs to be replaced;
- disconnect the machine from the power supply;
- remove the control panel to remove the faulty button and replace it with a new one;
- disconnect the contacts of the old button;
- attach the contacts to the new one.
Car breakdowns
The reasons can be not only external, but also inside household appliances. Often the answer to the question of why traffic jams are knocked out in an apartment is a banal malfunction of the socket, car plug or cord. If the socket is not in order, you can simply figure out the malfunction: try plugging in another device - the power should be 2000-2500 W. If in this case it knocks out, repairs are required, it is quite possible that the contacts have simply become loose. To check the cord, a specialist will ring all three wires that are present in the network cable. Usually the cable deteriorates from twisting, kinks and other mechanical damage.
Other violations are usually associated with malfunctions in the equipment itself. And if all external troubles are excluded, under no circumstances should you restart the car; on the contrary, you should turn it off and invite a technician to repair it.
Short circuit of the network wire
If the socket is working properly, the reason may be a short circuit in the power cord. A short circuit occurs when a wire carrying voltage touches another live wire or neutral wire. Preventing this emergency situation is possible if tension or overlap of wires is detected and eliminated in time.
To diagnose a short circuit you need:
- closing the valve supplying water to the machine;
- draining water from it;
- removing the bottom;
- For diagnostics, connect the wire to the FPS and to the output on the housing.
Reasons for turning off the device
The reason for turning off the machine when such a device is operating can be sought in the following points:
- wiring problems;
- a problem with the equipment itself.
Before checking both versions, you should definitely turn off the power to both the machine itself and other high-power electrical appliances. After this, you can begin work on finding damage.
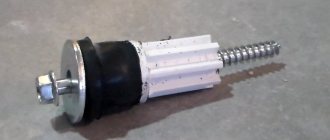
Faulty heating element
Often, when the washing machine is operating, plugs are knocked out due to problems with the heating element - a tubular electric heater. The main reasons for its failure:
- contact with moisture and detergents;
- layers on the surface of the element that form scale;
- constant heating and associated wear.
To check, the back cover is removed, a visual inspection is done for scale, the heating element is checked with a multimeter for a break between the connected supply wires (the norm is from 20 to 50 ohms). If there is no break, a short circuit between the terminals and ground is checked.
To remove the old heating element, loosen the nut of the tightening bolt, press it inward and remove the heating element by prying it up with a screwdriver. The new heating element is installed in the reverse order.
Correctly connecting the SMA
The washing machine is in contact with electricity and water at the same time, and therefore is a potentially dangerous device. Correct connection ensures the safety of people and the equipment itself.
Wires
The machine must be connected to a grounded outlet to prevent electrical injury. It is advisable to use a separate wiring line coming directly from the distribution board. This is necessary in order not to overload other wiring, since the washing machine uses a powerful heating element during operation.
The wires must have three copper cores with a cross-section of at least 2.5 mm², with a separately installed automatic circuit breaker and RCD.
RCD
Washing machines have different powers up to 2.2 kW and higher; they must be connected through an RCD to protect people from electric shock.
The device must be selected taking into account the power consumption. The element can be designed for 16, 25 or 32 Amperes, the leakage current is 10-30 mA.
RCD
Machine
Also, equipment can be connected through a circuit breaker with differential protection. Its selection proceeds in the same way as the RCD. The marking of a device for a household network must have the letter “C”.
The appropriate class is indicated by the letter "A". There are machines with class “AC”, but they are less suitable for working with heavy loads.
Automatic machine for home
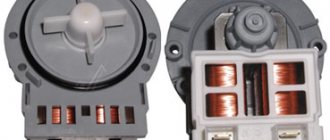
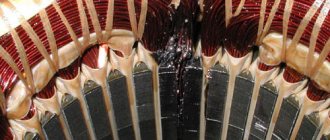
Motor shorted
To diagnose a short circuit, all contacts and the engine (motor) housing are “ringed” in order to detect an electric current leak. To replace the engine, the following steps are required:
- removing the back wall;
- removing the motor mounting screws,
- disconnecting the wiring leading to it.
The motor installation sequence is reversed.
If the motor is intact, but the brushes are worn out, they can be replaced by removing and disconnecting the motor.
Short circuit on the control module
Damage to the control module is obvious if other parts are in good condition. Oxidation of the module contacts is possible due to excessive moisture.
It is not recommended to diagnose and repair this complex unit yourself; it is better to contact specialists.
Let's check the electrical network
When turned on and running, the machine puts a significant load on the electrical network. Manufacturers of household appliances, including Bosch, warn about the “electrical gravity” of washing machines and prescribe certain requirements for its operation. Among them, there is the need to allocate a separate branch for SMA, protected by RCDs and automatic devices. The type of wires is also recommended: VVG cable with a cross-section of 3x2.5. It doesn’t matter what washing model you buy, compact, full-size, equipped with a dryer or not.
In reality, users do not follow safety precautions. More often, the washing machine is connected to a common outlet with other household appliances, through an extension cord or “tee”. All this leads to overheating and damage to the wires, after which the socket melts, the RCD is triggered and the light turns off. It’s easy to suspect something is wrong: the insulation on the conductors is dark, the plastic is melted, and you can hear a burning smell.
You can avoid network congestion and subsequent problems if:
- allocate a separate branch for the washing machine;
- evaluate the quality of the installed wiring;
- insert a moisture-resistant socket (has a special lid);
- include an RCD in the circuit.
It is strongly not recommended to connect the washing machine to the network through an extension cord or adapter - it is dangerous!
If there are no visible signs of overheating and damage to the wires and socket, then you need to check the power cord from the inside. We unscrew the bolts holding the back panel, remove it, and then take out the cable itself. Then, using a multimeter, we “ring” the wires for breakdown. We immediately assess the condition of the terminals and contacts. Defective parts must be replaced.
Condensation on electrical components
If you've ever seen dew on the grass in the morning, you've seen a phenomenon called condensation. And while it may be picturesque on someone's lawn, the same phenomenon can wreak havoc on your washing machine, even if they are inside an enclosure.
Choosing a durable enclosure for an electrical or electronic device means considering all the environmental hazards the device may encounter. Condensation should never be overlooked as it can allow moisture to enter the appliance.
Important! To eliminate condensation, allow the washing machine to acclimate for some time in a well-ventilated room. This process will take a matter of days.
You need to know everything stated above so that the burning smell from your machine does not ruin your life, and other, no less sad consequences of breakdowns make themselves known.
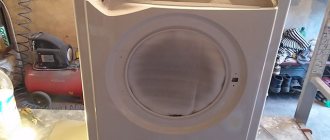
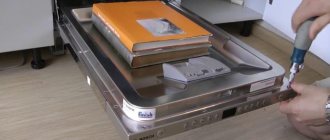
If the washing machine breaks, how do you get to all the parts?
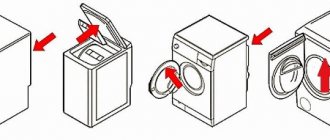
At the diagnostic or repair stage, one way or another, you will need to get to any elements that are inside the unit. Due to the design features of each individual machine, it should be noted that in order to get to certain elements you will need to disassemble the home assistant. To do this, we recommend following the following sequence:
- It is better to disconnect the washing machine from all possible communications and move it away from walls and other objects that may block access.
- Remove the top panel by first unscrewing the fastening bolts located at the back of the machine.
- Remove containers for powders and rinse aids.
- Remove the lower front panel. Underneath it, unscrew the remaining fasteners.
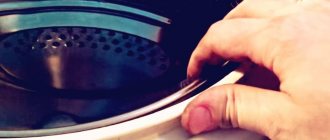
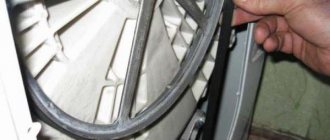
- Remove the hatch and then the rubber cuff.
- Now you can completely remove the front panel without any problems.
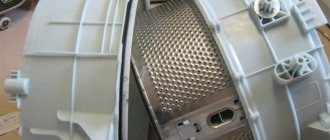
- Before knocking out the washing machine drum, disconnect the springs and shock absorber.
- Remove the belt. The same procedure must be followed to replace the electric motor.
- Disconnect the pipes and remove the drum; to lighten the weight of the drum, it is better to remove the front and rear counterweights.
If a situation arises when, due to a water leak, you need to replace the old bearing, disassemble the drum and unscrew the pulley. Check whether the shaft is wobbling; if you feel any play, then it will have to be replaced. Before knocking out the washing machine bearing, you should remember that the small bearing is knocked out from the inside of the drum, and the large one from the outside. The blows are applied using a barb or rod with sharp blows. The points for striking are not chosen randomly, but are located crosswise relative to the previous one, so as not to distort the bearing and harm the drum. Also remember that the place where the new bearing will fit must be thoroughly cleaned of dirt and other debris that may have accumulated there. New bearings get clogged in the same way as the old ones were knocked out: first the small one, then the big one. Make sure that each of them sits in the hole all the way, this will produce a louder sound from the impact.