SMA ElG combines wide functionality, nice design, relative durability and reasonable cost. A breakdown of an LG washing machine due to the fault of the manufacturer is a rare occurrence, but due to unfavorable factors it happens often.
Basically, problems occur for the following reasons:
- water is too hard;
- voltage drops in the network;
- careless use of the machine;
- neglect of care and prevention.
The latter is what causes blockages. Usually, the user manual describes in detail how to clean the filter in your LG washing machine. But if you have lost the instructions, we will tell you in detail how to remove the part and clean it of dirt.
This will prevent a lot of possible breakdowns in the future.
Why is cleaning necessary?
An element clogged with dirt provokes problems:
An unpleasant odor appears - a consequence of the proliferation of dangerous pathogenic flora from hair and skin particles.- The pump is damaged - difficult draining leads to constant overload and critical heating of the pumping unit. Debris can get into the impeller and jam it.
- The drainage mechanism is disrupted - clots of dirt become in the way of water movement along the main line.
A clogged filter leads to breakdown of the “helper”. How to know when it's time to clean the drain filter:
- increased washing time;
- the machine works with effort;
- the display shows errors;
- The electronics get confused - the washing modes get confused.
The most unpleasant thing is that the machine does not rinse, spin, or drain the water. A sudden stop of the machine will require professional intervention.
What happens if you don't clean it?
Ignoring cleaning can have unpleasant consequences and can even lead to component failures.
Unpleasant smell
If the filter is not cleaned, dirt, mucus and debris will accumulate in it. This is a suitable environment for the development of microbes. The constant presence of moisture causes all these accumulations to begin to smell unpleasant, spreading the stench to the tank and drum. As a result, things will also begin to emit an unpleasant aroma after washing.
Deterioration of drain
A clogged filter part of the LG washing machine prevents the water from draining normally. When completely filled, it can even completely block the flow of used water into the sewer.
When cleaning the filter, when draining no longer occurs normally, a fairly large volume of water will pour out through the emergency drain tube; this must be taken into account when preparing the container.
Pump failure
If a foreign object that has already entered the filter slips back into the pump, the pump may break. The impeller blades and the impeller body itself are in the “risk zone”. If this happens, the pump will have to be replaced.
How often is it needed?
Frequency of the procedure, according to the manufacturer’s recommendation: every 3-6 months . But this is conditional - the prevention time depends on the frequency of turning on the device, the weight of the loads, and the degree of soiling of the laundry. In large families with children, the car is turned on every day, so it is serviced once a month.
In winter, warm, fluffy items made of wool, flannel, and flannel are washed - the element quickly becomes clogged with fabric substrates, so they clean it more often. The machine is cleaned immediately after washing natural down jackets and feather pillows.
Consequences of prolonged blockage
The frequency of cleaning the drainage unit depends on the intensity of use of the unit. The manufacturer recommends removing debris at least once every 2 months. Some users do not comply with these requirements, which leads to complete clogging of the device and freezing of the error signal indicating the impossibility of pumping out water.
As a result of the filter being completely clogged, it is difficult to open and clean. To do this, you will have to remove the drainage unit and clean the internal cavity through the pump discharge pipe. The periodic appearance of an error signal on the display indicates the need to inspect the filter and remove the blockage.
A clogged filter disrupts the operation of the pump, which rotates idle, and can lead to its breakdown.
What filter elements are included in LG?
The machine has two filters: for water supply and drainage. Where to find them:
An inlet (drainage) filter in the form of a fine mesh is installed at the valve that connects the machine to the water supply.
Located at the top right side of the rear of the machine.- The drain filter element, which prevents small fragments from entering the drain pump, is located at the bottom of the washing unit, closer to the left edge.
On modifications with vertical and horizontal loading, the location of the elements is approximately the same.
Preventive measures
Despite the fact that the filter catches many small objects, including specks of dust, it is advisable to adhere to the following preventive measures:
You should not send things for washing that have lint and hair coming out of them.
They are not only capable of clogging the drain filter, but also accumulate on other parts, including the heating element, literally welding to it and causing rapid wear of the heating element.- Do not allow small objects to get into the drum while relying on the filter. Coins, nails, paper clips and other similar objects can cause a lot of trouble, including damaging heating element tanks.
- If the filter is broken, it must be replaced.
Preparing for cleaning
Cleaning takes 10-15 minutes. Proceed as follows:
- The floor near the device is covered with polyethylene or a rag.
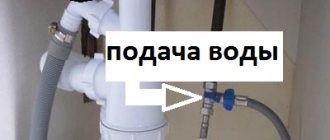
- They turn off the water supply - you may have to move the machine or lift it during the process so that the floor will not be flooded with water.
- Turn off the electrical power - this is a common safety requirement for servicing all household appliances.
- Find the location for installing the filter; it is covered with a door-lid (false panel).
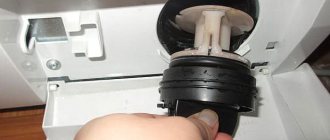
- They open the door. It is equipped with a latch and holds tightly. Usually the panel is easy to open by hand. If you are comfortable, you can pry the cover with a flat screwdriver, move the tool to the side, and fold the panel towards you - in LG models it is not completely removable.
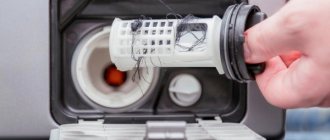
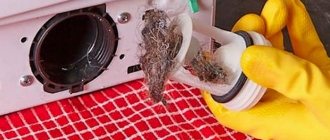
- There is a filter behind the door. It is inserted into the pump chamber and looks like a large plastic plug with a small protrusion. The dirt trap is equipped with a thin hose for emergency drainage.
- Pull the hose out of the fastener (this does not require effort), unscrew the plug, and drain the water into a prepared container.
The machine completely pumps out water only from the tank; a certain amount always remains in the drain system. It is removed before cleaning the mechanism.
Cleaning the drain
When the drum is dry, begin cleaning the part. How to do it:
take the element by the protrusion and turn it counterclockwise until the filter is completely free;- remove the element from the seat;
- remove large debris with your hands: threads, hair, foreign objects;
- The part is placed under a stream of warm water, a dish sponge with an abrasive surface is cleaned from deposits, washed with detergent, and rinsed;
- inspect the hole from which the filter was removed, clean it with a sponge and rag to make sure that there is no dirt left, illuminate it with a flashlight;
- the clean part is inserted into the socket evenly, without distortions, and screwed tightly;
- close the plug on the emergency drain hose and put it in place.
The filter should not be washed with very hot water or aggressive cleaning agents - the plastic parts may become deformed.
How to clean the filler?
Water entering apartments and washing machines through the central water supply pipes carries:
- metal impurities,
- particles of rust and sand,
- lime deposits.
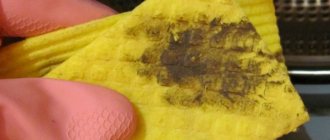
All this is captured by the inlet filter - it looks like a mesh in the form of a cylinder.
Clean it like this:
- De-energize the device.
- They turn off the water.
They move the car away to get to the rear wall of its body.- The floors are covered.
- Loosen the nut with the rubber gasket holding the filler sleeve. Scroll it counterclockwise.
- Remove the filter element from the valve. To do this, grab the protruding part of the catcher with pliers.
- Clean and rinse the mesh under running water - it is convenient to use a toothbrush.
- Some LG modifications have duplicate grids installed - they are also cleaned.
- The clean element is put in place.
- Connect the water supply hose to the unit body.
- Tighten the fastening nut, not forgetting to insert the rubber ring.
Fasteners often wear out. If necessary, components are changed while cleaning the filter element.
Some useful tips
In the vast majority of cases, the owner of a washing machine cannot influence the quality of water in the water supply, as well as the condition of the pipes; the only thing that can be done to protect yourself from the need to clean the inlet valve mesh is to purchase an external water filter. This is far from the cheapest device, so purchasing it only makes sense if there is a large amount of debris in the tap water.
Every car owner can reduce the likelihood of drainage filter clogging. To do this, you need to follow a number of simple recommendations:
- Before washing, be sure to check the pockets,
- if there are loosely sewn buttons on clothes, it is better to rip them off and sew them back after washing,
- children's toys should be washed only in special covers,
- covers are also necessary for clothes embroidered with beads, rhinestones, and other decorations that may come off during washing,
- Do not wash torn clothes under any circumstances, since during washing there will be a lot of threads and rags; before throwing the torn item into the machine, it must be sewn up,
- Heavily soiled items should be washed separately before placing them in the machine drum,
- things from the beach must be pre-soaked, sports shoes must be washed in a special case.
Compliance with simple rules will guarantee a long service life of the washing machine, but this does not exempt you from the need to periodically check the condition and clean the filters. It’s not difficult, it won’t take much time and won’t take a lot of effort, but it will bring a lot of benefits. Clean filters will ensure the normal functioning of the machine and protect the owner from having to remember the basics of hand washing during an unexpected repair.
How to check the machine after the procedure?
After cleaning, check the washing machine for leaks - set the test rinse mode. If no streams or drops of water appear from under the filter, close the panel.
Sometimes the test rinse shows a water leak. Users are looking for reasons:
- misalignment of the part along the thread, when the part was placed crookedly in place, or the element was loosely tightened;
- gasket defect - dried out over time;
- Damage to the thread - this happens if the filter was pulled out forcibly or tightened too tightly.
Main inlet and additional water purification filters
The water entering the washing machine may be more or less dirty. It depends on the area of residence and the quality of public services. It's very rare that it's spotlessly clean.
Metal impurities, lime, rust, sand and other undesirable elements present in tap water clearly reduce the efficiency of washing.
The function of the inlet filter is precisely to purify the water entering the unit from impurities.
Externally, the filling filter resembles a small cylindrical mesh. The mesh filter traps metal particles and debris.
This cleaning is quite “rough”. In addition, it is important to note that inlet filters are not installed in every washing machine!
Therefore, owners of washing units often install an additional external filter in front of the inlet hose. It not only filters more delicately, but also softens tap water.
Article on the topic: How to properly wash a newborn’s clothes in a washing machine
The frequency of cleaning the filling filter depends on:
- the degree of “hardness” of water in the water supply,
- presence of an additional filter,
- frequency of use of the washing unit.
In any case, another check and preventative cleaning of the inlet filter will only benefit your washing machine.
Possible problems
The work doesn't always go smoothly. Sometimes users are unable to unscrew the part or remove it. This occurs if the sump pump assembly is not cleaned often enough.
What they are doing:
- Use pliers. Use a tool to grasp the protrusion of the filter, turn it carefully so as not to break it.
- Clean the element through the removed pump. This can be done by owners with plumbing skills.
Average users are advised to call a service technician.
Step-by-step instruction
Unscrewing a soured washing machine filter is sometimes very difficult.
It is necessary to act carefully, not to apply too much force, so as not to break the machine parts.
In addition, you need to make sure that the rotation is in the right direction - counterclockwise. To resolve the issue, you can use several methods.
Using a tool
One of the easiest options is to try to grab the filter handle with pliers and unscrew it
Caution is required here as the force is quite large.
Without proper calculation, you can break the handle of the knot. You need to act slowly, rocking, turning the plug in both directions and gradually increasing the amplitude.
If the filter can be turned a quarter turn but does not go any further, do not apply force. It's better to try another way.
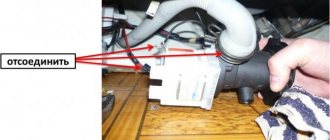
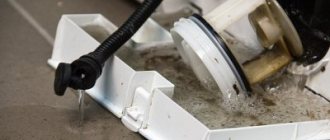
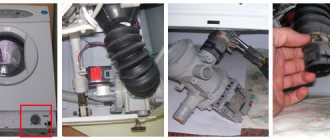
Removing the drain pump
If you cannot unscrew the cover using the usual method, you can try dismantling the entire pump. As a rule, it is attached to the machine body with two screws, but there are a lot of manufacturers, so any options are possible.
Getting to the node from the other side is much more difficult. Partial disassembly of the machine body will be required. In order to determine the location of the device, you need to look inside the case.
The easiest way is to tilt the car and look from the bottom. Sometimes it is not there at all, or it can be easily removed. Then you can support the housing on a wall or other strong object and disassemble the pump from below.
Another option is to turn the car around, remove the back wall and disassemble the pump from the back. This method is somewhat worse, as you will have to reach for the part through the entire thickness of the machine, which is filled with other parts.
However, the issue is completely solvable. The main thing is to acquire the necessary tools and ensure maximum ease of work.
The insides of the machine should be well illuminated, act carefully, trying not to damage the plastic tank of the machine.
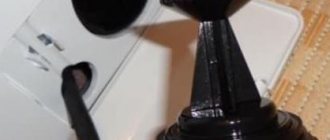
Deflection of the machine and tapping on the filter unit
One effective way is to carefully rest the machine on the wall at an angle of approximately 45° and tap the filter with something soft.
The easiest way is to use your own fist. Shock may cause debris and particulates to fall off the filter cover. After this procedure, it is often possible to unscrew the filter without much difficulty.
Sometimes things don't work out the first time. You can try repeating the procedure several times if any positive changes are noticeable.
The main thing is not to overdo it and not to drive the lid in even harder. Then the only option left is to completely break out the problem unit and replace it with a new one.
Breaking out
Sometimes situations arise when no methods help. For example, the filter cover broke immediately (or during previous attempts), or when unscrewing, parts of the housing, pipes and other elements were damaged.
If such situations arise, all that remains is to resort to the last, most drastic method - break out the filter in order to get rid of the defective unit and replace it with a new one.
To perform the work, the machine is placed on its side and work begins from the bottom. Unscrew the mounting screws. If this cannot be done, they are drilled out or carefully cut off.
Some craftsmen destroy the plastic case from the inside and gradually break off pieces of plastic from it. After some time, the filter and pump can be disconnected from the machine body.
Immediately you need to unscrew and disconnect the pump - it is in order, it will still serve. Be careful with the terminals, they are fragile and can be damaged! The remains of the housing with screws are removed, the spring clamps are pressed out and the pipes are disconnected.
It is necessary to remember which of the rubber pipes leads where, since for an untrained person they are all the same.
ABOUT
Often it is possible to completely disconnect the filter with the pump, but the cover still does not unscrew.
In such situations, you can try to disconnect the filter from the pump, clean it from the inside and soak the housing in a basin or bucket.
Take warm water, dissolve liquid soap or washing powder in it and leave the body for several hours. Fatty deposits and dirt will become wet and fall away from the inner surface of the lid. Now you can try again to unscrew it in the usual way.
Replacing the snail
The washing machine pump (pump or “snail”) sooner or later fails. In addition, when removing a soured filter, it is easy to damage the pump, which will require replacing the entire assembly.
The procedure is simple if the old filter and pump are already disconnected and turned off. The main problem is to find suitable replacement elements.
Then all actions will consist of sequential installation of the filter and pump in their standard places in the machine body.
Effective cleaning products
It is very problematic to rid the LGI machine filter of limescale deposits, scale or rust using water alone, especially if this procedure is not carried out regularly.
Proven methods will help you put the part in order.
Homemade formulations
Minor stains can be removed with toothpaste and a medium-hard brush.
Sticky debris can be easily separated with a screwdriver or knife, and small blockages can be pushed out of the holes with a toothpick.
Soda and citric acid can deal with scale, mucus and rust. Method for preparing the solution:
- Stir a sachet of citric acid in 1 liter of warm water;
- lower the filter into the resulting solution and wait 30 minutes;
- Wash the part with a sponge and rinse in warm running water.
Citric acid is a simple remedy that can be purchased at any grocery store.
However, despite its environmental friendliness and relative harmlessness, its excessive use at high temperatures can lead to deformation of plastic elements.
Professional household chemicals
In household supermarkets, you can purchase effective preventive products such as Pemolux and soak the parts in them according to the instructions.
But the most optimal means of prevention and protection against limescale deposits is Calgon “for washing machines”. It is added to the drawer when washing or during an empty run.
It softens the water and allows you to remove fresh scale. However, if similar products are used regularly and in large quantities, the exact opposite effect will occur - their excess will simply settle on the heating elements.
Possible errors and options for correcting them
Problems often arise after cleaning the filter. The most common is water leakage. The cause of the malfunction may be an incorrectly or unevenly installed filter. To correct the problem, remove the part and reinstall it.
A worn gasket can cause the problem. As a result of long-term use, the rubber dries out and cracks; in addition, it may be damaged when the filter is removed. To fix the problem, replace the gasket with a new one.
The cause of the leak may be damage to the filter or threads. In this case, the part needs to be replaced.
If the filter is installed incorrectly or damaged, there is a high risk of leakage. Before closing the compartment, turn on the unit in test mode and make sure it is operating normally