If any breakdowns occur in the washing machine, it is often necessary to remove the drum. The procedure is most often carried out by specialists, but if you wish, you can do everything yourself. Especially if there is no desire to spend the family budget on the services of a third-party specialist. By following the basic rules for working with equipment, you can easily remove the drum and repair the required unit.
Gather everything you need for repairs
In order to disassemble an automatic machine “without incident”, you need to carefully prepare for the procedure. First, you should take care of your workplace. You need to move the washing machine to a spacious room where 4-5 square meters will be free. m. It is important that the room is well lit and ventilated. The floors must be covered with rags, or even better, with film, since the work to be done will be “wet” and not entirely “clean”.
In addition to arranging the workplace, you should:
- Study the instructions for the washing machine. Pay special attention to the wiring diagram;
- prepare the tools and devices that will be needed in the process;
- remember the safety rules. It is important to follow them when working with electrical appliances.
Before disassembling the washing machine, be sure to study the factory instructions and other documents included with the equipment.
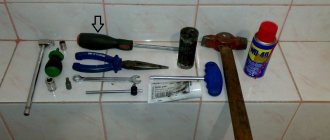
To remove the drum from the washing machine, you will need the following tools and tools:
- a pair of screwdrivers: Phillips and slotted;
- screwdriver;
- set of wrenches;
- small hammer;
- 8 mm hexagon;
- pliers;
- WD-40 aerosol lubricant;
- silicone sealant;
- hacksaw for metal;
- marker;
- a low basin and a dry rag (to drain remaining water from the machine).
Craftsmen also recommend taking photographs or even recording video of individual stages of disassembly during the process of “home” repairs. This will make it easier to assemble the washing machine in the future, connect sensors, pipes and valves. Pay special attention to the wiring; it is important to reconnect strictly to the terminals and connectors provided for this.
Required Tools
Even a master shouldn’t start complex repairs without consumables and the necessary set of tools. Therefore, the owner of a faulty washing machine first needs to purchase or borrow from friends:
- screwdriver, set of screwdrivers and open-end wrenches;
- car puller;
- blowtorch (gas torch);
- drill and drill bits;
- hacksaw (jigsaw);
- copper hammer or drift adapter;
- wooden blocks;
- special lubricant.
Other tools and consumables may also be required.
What will prevent the tank from being removed?
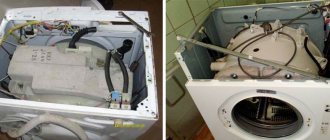
Even a person who has never looked “inside” a washing machine will be able to remove the “tank-drum” assembly if he strictly follows the instructions. First of all, it is necessary to remove all elements and components that come into contact with the tank: pressure switch, dispenser, heating element, motor, counterweights, etc.
For smooth and quick disassembly, it is important to understand in what order it is best to disconnect the parts from the tank. Algorithm of actions.
- Turn off the power to the washer.
- Turn off the water supply tap.
- Remove the bolts holding the “top” of the housing. Remove the lid and set it aside.
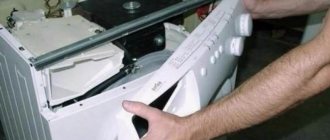
- Unhook the control panel. The “tidy” is held on by several fasteners; they will have to be loosened. The first pair of clamps is “hidden” behind the powder receptacle, the rest are located around the perimeter of the module. There is no need to disconnect all wiring connecting the panel and the electronic unit. You can simply carefully place it on top of the case, or even better, hang it on the side on a special hook.
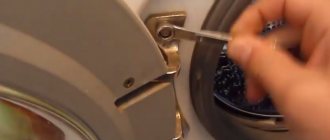
- Drain any remaining water from the machine. At the bottom of the front panel, in the right corner there is a special hatch. Pry it open with a flat head screwdriver and open the door. Place a basin under the body and cover the floor around with rags. Unscrew the drain plug and catch any water that comes out of the hole.
- Remove the front panel of the case. First, loosen the clamp holding the door cuff and pull it out. Then tuck the sealing rubber into the drum. Then unscrew the bolts located around the perimeter of the wall and pull it towards you. When the “end” moves forward a couple of centimeters, disconnect the wires from the hatch locking device and remove the lock. Behind it, the front part of the housing can be completely detached.
- Dismantle the main elements connected to the tank: heating element, drain pump, pressure switch, solenoid valve, etc.
Be sure to disconnect the pipe that connects the dispenser to the tank.
- Remove counterweights. Each Electrolux washing machine has two concrete blocks under the lid. Weights give the body stability and “dampen” vibrations that occur during washing. To remove them, unscrew the fixing bolts and lightly shake the “stones”. Keep in mind that the elements are very heavy, do not drop the concrete from surprise.
- Remove the shock absorbers. Springs are the last thing that will interfere with the removal of the drum. Unscrew the racks holding the tank and remove the shock-absorbing elements.
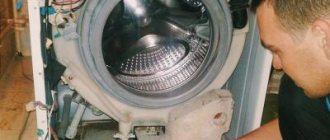
The tank in which the drum is “hidden” is very heavy, so it is better to pull the unit out together. You need to grab the edges of the container, lift it and pull it up.
The dismantled tank should be placed on the floor or table with the cross facing up. After removal, you need to disconnect the motor from the plastic container. Unscrew the fixing bolt, remove the engine and set it aside.
Experts recommend taking advantage of the situation and immediately checking all removed parts for functionality. Use a multimeter to test the heating element, water level sensor, motor, drain pump. It is also better to immediately clean the “insides” of the machine. Wash the garbage filter, pipes, powder receptacle in soapy water, and remove limescale from the heating element.
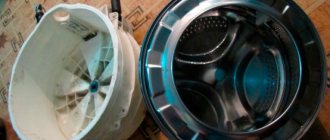
Divide the tank into two halves
It will not be possible to saw the tank located in the machine - you need to take it out. Despite the apparent lightness, this knot is very heavy, so it is better to enlist an assistant. Next, we grab the edges of the drum, swing the container to the side, lift it slightly and pull it towards us. The tank should move and leave its seat.
Having freed the tank, we inspect it. You need to make sure that the container is solid and really needs this manipulation. If so, let's get to work:
- prepare the place for cutting: put a tire on it, which will increase stability;
- Place the tank on the tire vertically, seam side up;
- take a saw or a hacksaw for metal and halve the tank strictly along the seam.
It is necessary to act extremely carefully, since the slightest deviation to the side in the future will affect the tightness of the container. Having finished cutting, remove the upper part of the tank and turn the lower cross upside down. The bearings are “hidden” right under the shaft, so we move on to the next stage - removing the seals and “rings”.
“Half” the tank and remove the drum
After the plastic container is removed from the case, all that remains is to halve it and pull out the drum. Most Electrolux washing machines are equipped with collapsible tanks; they can be easily separated if necessary.
The tank halves are securely fastened together; this is a prerequisite for protecting the tank from depressurization. Carefully examine how the parts of the plastic “shell” are connected. Typically, to halve the tank, you need to unscrew the screws located around the circumference (this is done using a screwdriver), or loosen the bracket fasteners (using a thin screwdriver).
Afterwards the algorithm of actions is as follows:
- move the bottom of the tank to the side;
- dismantle the pulley;
- put a bolt in place of the pulley and knock out the shaft.
When the shaft does not give way, treat the joint with special lubricant WD-40. Wait 15-20 minutes and repeat the procedure. After this, you can remove the drum from the tank and perform the necessary repairs, in particular, begin replacing the bearings and oil seal.
If the tank is non-separable, you can cut the container with a hacksaw, exactly along the seam, then connect the halves using silicone moisture-resistant sealant and screws.
Then all that remains is to assemble the automatic machine in the reverse order and run a test wash. If everything works and nothing is leaking, we can assume that the repair has been successfully completed.
How does disassembling a horizontal machine differ from a vertical one?
Disassembly schemes for machines with different loads differ in the types of fasteners, bolts and other small points. The process of removing broken parts from the case is almost the same. We create universal instructions to help repair any equipment, so we omit unnecessary nuances.
At the end of the material there are videos with disassembly of different models of machines - watch them to “free” understand the subtleties “in pictures” and repeat everything with your own hands at home.
How to disassemble an Electrolux washing machine with your own hands
Electrolux washing machines, like equipment from other manufacturers, break down over time. In this case, the device displays a special code or reports the type of failure by flashing the indicators in a certain sequence. After decrypting the message, the user can contact the service center or try to replace the faulty parts themselves. To do this, he needs to know how to disassemble an Electrolux washing machine.
Is it worth taking the job?
Most often, the washing machine drum is disassembled in order to replace failed bearings. It is not difficult to identify this breakdown; you just need to turn it manually and listen. If resistance to rotation is felt, extraneous noises are heard, usually crunching and crackling noises - the bearings need to be changed.
Without a doubt, replacing bearings, like a number of other works, can be performed by a specialized service center, but the cost of a specialist’s services is often unreasonably high, this is especially true in the case of repairing a machine with a non-separable drum. Not a single service center will undertake repairs of this kind, offering to install a new module instead of replacing the bearing.
If it is expensive to repair in a workshop, you have the time, desire, tools and experience of this kind of work, you can disassemble any drum yourself, it is only important to be extremely careful and attentive.
Washing machine malfunctions
The most common malfunctions of Electrolux washing machines are:
- Water heating does not work.
- The Electrolux machine does not fill with water.
- The drain does not function.
- The rinse program does not run.
- Spin does not work.
- No powder is collected.
- The equipment does not turn on.
- Knocks out the machine gun.
These are the most common faults; in fact, there are many more of them. To solve some of them, for example, to replace a pressure switch, only partial disassembly of the device is necessary. Others will require more serious work to eliminate. So, to replace the bearings, in addition to the housing, it is necessary to disassemble the tank.
The main reasons for drum failure
The drum of an automatic washing machine is one of its most important components; it is the basis, at least, of its mechanical component. Like any other component and assembly, it can fail, which will entail the need for repairs. In addition to the most common malfunction - bearing failure, repairs may be required in a number of other cases.
Drum jamming caused by foreign objects getting inside. Unfortunately, this happens quite often. A torn button, a fastener, a metal object forgotten in a pocket - all this can end up in the space between the body and the drum, get caught on the heating element, fall into the hole, blocking rotation and destroying the tank.
The use of certain types of detergents can cause rapid wear of the seals, they lose elasticity and crack. The seal does not cope with its task, water seeps through it, which negatively affects the operation of the machine as a whole and can cause an accident.
You cannot do without dismantling the drum even if the shaft is damaged. A broken drive belt, a skewed pulley - all this may lead to the need for serious repairs involving complete disassembly of the device.
A common reason for a machine to suddenly stop working is the failure of the electric motor or the need to replace the commutator brushes. To repair the engine, it is not necessary to disassemble the drum, but you definitely cannot do without removing it.
Preparing to disassemble the washing machine
To disassemble the Electrolux washing machine, you need to prepare the tools, and then disconnect the equipment from communications and electricity and move it to free space for more convenient work.
When disassembling, you should record every action on camera, especially removing the wiring. This will help you avoid making mistakes during assembly and prevent more serious equipment breakdowns that require expensive repairs.
If you need to purchase new parts, it is better to stay with original or similar ones, but not inferior in quality. The selection and purchase of parts should be carried out strictly in accordance with the model and brand of the Electrolux washing machine.
Reassembly and inspection
Once the new drum is installed, you can begin the reassembly process.
Algorithm of actions:
- put a drive belt on the pulley;
- connect heating elements to the wiring;
- connect drain hoses;
- install UBL connectors (hatch blocking device);
- mount the front panel of the washing machine in its original place;
- install the hatch cuff;
- fix the counterweights in place;
- install and fix the top cover of the washing machine.
All previously dismantled elements are fixed exactly in their places in the reverse order of dismantling. To avoid making mistakes, experienced craftsmen recommend making the necessary notes with colored markers (for example, recording the location of wires, the installation height of mechanisms).
It will also not be superfluous to check with the diagrams indicated in the user manual.
After the washing machine is assembled, it is necessary to check the quality of the work done. To do this, the household appliance is connected to the power supply network for water supply and sewerage.
They start any washing program, during which, with the drum correctly installed, there are no extraneous sounds or vibration of the washing machine body.
Disassembling the washing machine
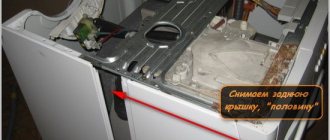
The peculiarity of the Electrolux washing machine is that its body is assembled from two halves: front and rear, connected by screws under the top cover. To carry out repairs, in most cases it is enough to remove the rear part of the case.
The disassembly process is as follows:
- Unscrew the two screws, slide and remove the top protective cover.
- On the left side, you need to unscrew the two screws holding the back panel.
- Repeat on the right side.
- At the back of the bottom of the Electrolux machine there are two more screws that need to be removed.
- The next two screws are on the sides and are covered with plugs. It is necessary to remove the latter and unscrew the fasteners.
- Now the panel is fixed only by a plastic holder secured with two latches. It is necessary to unclench them and lift the holder. In some models it consists of two halves connected by a screw. You need to unscrew the fasteners, release the latches and remove the holder.
- You can now remove the back panel of the washing machine.
Having completed these steps, the user can begin to repair and replace components such as the tank, motor, shock absorbers, pump and pump, belt, drain hose, heating element, etc.
Removing the front panel is necessary to replace the bearings. The following steps must be followed:
- Pull out the detergent tray and unscrew the screws underneath it.
- Remove the control panel. It is held on by latches; you need to act very carefully so as not to damage them.
- You need to disconnect the wiring with caution and after photographing the connection in order to avoid errors during assembly.
- Open the hatch, pry and remove the clamp, tuck the cuff inside the drum.
- Remove the wiring and hose from the pressure switch, remove the fasteners, and disconnect the part.
- Remove the drive belt.
- Disconnect the wiring from the engine, remove the screws, and pull out the motor.
- Pull out the heating element by unscrewing the fasteners and disconnecting the wiring.
- Disconnect the drain pipe and then the hose, having first loosened the clamps.
- Remove counterweights.
- Remove shock absorbers.
- Remove the tank from the springs and pull it out of the machine body.
To replace the bearings you need to disassemble the tank. To do this, unscrew the bolt and remove the pulley. After this, the fasteners securing the tank halves are removed. After the tank is disassembled, the drum is pulled out and work is done to replace the bearings.
If the tank in the Electrolux washing machine is non-separable, it is cut with a hacksaw. Bolts are used to connect the halves back together. Before cutting, fasteners are selected and holes are drilled according to their diameter along the connecting seam of the tank.
Main rules of disassembly
Before removing the drum from the washing machine, users watch an instructional video that gives them confidence. After watching, you get the impression that disassembling a washing machine is a simple task that can be completed in a couple of hours. But this is a misconception. In fact, this is a delicate process that conceals a lot of nuances unknown to home craftsmen. Without knowing about many little things, you can completely break the device - so much so that it cannot be restored.
Before disassembling the drum on an automatic machine, you need to gain access to it. You have to almost completely empty the body of all parts - they are removed so that nothing interferes with the removal of the elements of the washer. When disassembling the machine, you need to follow the rules that apply to all SMAs:
- The knot must be removed with extreme caution. 90% of washing machines have tanks made of plastic, which is not able to withstand serious mechanical stress.
- Take an assistant - it will be difficult to disassemble the device alone.
- If you have to saw the element to be removed, drill holes along the seam for future fastening. This will avoid displacement. A large number of bolted connections will allow the sawn halves to be tightly connected. Use waterproof sealant generously.
- When you unscrew the screw connection that holds the pulley, act extremely carefully. You need to apply force, but in such a way as not to damage the faceted surface of the screw head - otherwise there will be more problems.
- To remove the rear part of the SMA, you have to knock on the shaft - but you should not hit it hard.
How to disassemble an Electrolux vertical washing machine
Disassembly of vertical washing machines occurs as follows:
- Use a slotted screwdriver to pry up the control panel, pull it up and slide it back.
- Tilt it a little, take a photo of the wire connection, disconnect them, and move the panel to the side.
- Disconnect the remaining wires from the electronic board, unscrew the fasteners, and remove the board.
- Remove the fill valve by first disconnecting the hoses from the clamps and disconnecting the wires.
- Unscrew the fasteners and remove the side panels.
- The fasteners holding the front panel in place are now visible. You need to unscrew it, remove the cover and put it aside.
Now the user has access to all important components of the washing machine, including bearings. There is no need to disassemble the Electrolux vertical tank to troubleshoot the problem.
Getting to the tank
If the preparation is complete, you can begin the analysis. First of all, remove the cover. To do this, you need to unscrew the bolts from the back wall to which the cover is attached, and then pull it towards you and up. Nothing complicated.
Next, you need to remove the hatch from the back of the car. It is held together with several bolts - they need to be removed with the right screwdriver. We remove the front and back panels and see the internal parts of the device. When we remove them, we will get to the tank itself.
Let's start with the drive belt. To remove it, you need to hold the pulley with one hand and the belt with the other. Next, turn the pulley and wait for the belt to slip off.
Look at the wall behind the pulley. If there are rusty smudges or oil stains on it, then the bearings will definitely have to be changed. So let's continue the analysis. You need to find a heating element (tubular electric heater), its tail can be seen under the tank. You need to remove all the wiring from the heating element, and then remove the nut, which is located in the center of the shank between the contacts. Next, remove the heater from the groove.
Next, remove the electric motor. We remove the chips and electrical wiring from it, unscrew the bolts, and then remove the engine and put it aside. Let's move on to the top. Manufacturers place a counterweight under the top wall, the purpose of which is to dampen the centrifugal force during washing and spinning. The counterweight looks like a large stone. Essentially, the counterweight is just a large stone. You can remove it using a socket wrench by removing the bolts on which it is attached. Set the counterweight aside.
We've almost reached the tank itself. Next you need to remove the control panel. Proceed as follows:
- remove the fasteners located at the powder dispenser;
- go to the front of the washing machine, there is another fastener on the left, remove it as well;
- now the block is held only by latches; to disconnect the block from them, pull it up (act smoothly and carefully, otherwise there is a risk of breaking the wiring);
- disconnect the wires connecting the control panel and the inlet valve;
- put the part away with the rest of the removed parts; if there is a service hook, it will be even better.
Now you need to access the tank from the front. We begin to remove the cuff. Find the clamp that holds the rubber seal. Pry it off with a screwdriver (it is better to use the thinnest one available). Using a screwdriver, go around the clamp until you feel the fastening. Unscrew the fastening. Remove the clamp. Thread the rubber band into the drum.
There is a fastener at the back of the machine, next to the fill hose - you need to unscrew it. Next, we take out the inlet valve and the receiver niche for detergents.
Let's move on to the pressure switch. We disconnect the wiring from it, and then disconnect it from the mount. The mount itself is plastic, so be careful when removing the sensor - it can be easily damaged.
Before removing the stand pipe and drain, place the “home assistant” horizontally. As a rule, Indesit models do not have a bottom, so you will see the necessary part right away. We remove the pipe clamps. To do this, simply loosen the fastening element.
Using a 10mm socket wrench, unscrew the fasteners holding the posts in place and then remove them. After this, you can put the car upright again - we have reached the tank and can start cutting it.
Cutting the tank
Of course, you can’t saw the tank inside the body - first, take it out from there. You may not have enough strength alone, so involve another pair of hands in the repair. When the tank is disconnected from the main body, you need to very carefully, trying not to damage the drum and other parts, cut it into two parts along the seam. To do this, perform a number of necessary manipulations. Place the tank vertically, with the seam you will be sawing facing towards you. The tank can be mounted on a car tire to provide stability.
Make sure the tank is soldered and sawing is really necessary. If this is the case, cut the tank strictly along the seam. After sawing, remove and set aside the top of the tank. The back remains attached to the drum for now. The bearings are located there, so it will also have to be removed.
How to remove the drum from a washing machine without the help of a specialist?
In the event of a breakdown, sometimes it becomes necessary to remove the drum from the washing machine. This is mainly due to damage to the bearings or penetration of foreign objects into the space between the drum and the tank. It is possible to eliminate the malfunction only after completely disassembling the tank and pulling out the drum. This difficult work can be done on your own or you can call a specialist.
Ideally, it would be good to entrust this work to a specialist. But such a non-standard service will not be cheap for the family budget. Using the following recommendations, it is easy to remove the drum from the washing machine yourself and fix the damage.
How to put it back?
In fact, reassembling the washing machine after complete disassembly is very simple. You need to do everything the same as during analysis, only in reverse order.
The main rule of high-quality reassembly is that there is no need to rush! In a hurry, you can forget about installing any (even very small) part. Haste often leads to mistakes that require you to disassemble the washing machine again.
At each stage of reassembly, it is necessary to check the notes, photos or videos that were made during the disassembly of household appliances.
Replacement features
As a result of prolonged use or due to a manufacturing defect, the drum of the washing machine may become damaged. Usually the following damages cannot be repaired: damage to the walls with the formation of a hole or destruction of the bushing seat. In such cases, there is only one solution - to install a new element. Replacing a washing machine drum is a very labor-intensive procedure, as it involves disassembling the entire main device.
Manufacturers usually do not supply drums separately. They are sold complete with a tank.
The process of disassembling the washing unit will differ slightly depending on the type of product: top-loading or front-loading. But before starting work, you should perform the same steps for both models: unload the laundry, unplug it, remove the inlet hose.
In a horizontal (front) loading machine
In such models, the drum is mounted in one place - to the rear wall. This feature requires the following actions:
- Unscrew the screws that hold the back wall;
- remove the entire cover (including the powder container, control panel);
- pull out the hatch cuffs;
- remove the wiring and disconnect the bolt that holds the drum at the back.
It is better not to completely unscrew the control panel, but simply move it to the side to avoid damage. If removed, it is recommended to photograph the wires to make it easier to return everything to its original place.
In a top loading machine
In such models, the drum is attached to the walls on both sides, which naturally complicates its removal. The operating procedure is as follows:
- unscrew the screws on the front and rear walls;
- remove the side panel;
- remove all wires and unscrew the remaining screws.
The second side panel is removed in a similar way. Then you need to remove the screw for attaching to the shaft and pull out the drum.
Specialists strongly recommend taking photographs of all the main stages of work, so as not to confuse the sequence of actions later.
Causes of breakdowns
The situation when, after starting the washing machine, after some time it stopped rotating and the drum jammed, is familiar to many owners of household appliances. The reasons for the failure of a household unit may be related to mechanical damage, wear of parts, structural components, malfunctions of electronics, and problems with wiring. To eliminate the malfunction, it is very important to establish the root cause of what exactly caused the malfunction of the household device, and for this the device will have to be disassembled.
Reasons that led to drum failure:
- ingress of foreign objects into components, structural parts, drums - buttons, coins, underwires from women's bras. The drum is jammed, does not spin, and turns with difficulty. To establish the causes of malfunctions, it is necessary to dismantle the heating element, after which third-party objects can be removed;
- jamming, wear of bearings, flanges, seals. The problem arises with the frequent use of household cleaning products. The cuff wears out over time and water leaks into the bearings. The bearings fall apart, the drum shaft jams, and the drum does not spin. It is best to entrust replacement to washing machine service specialists;
- broken drive belt, which is equipped with machines with commutator motors. The problem occurs when automatic washing machines are idle for a long time. The belt material loses its properties, cracks appear on its surface, which lead to rupture during operation of the machine. In this case, the most vulnerable spot is the electric motor pulley. Before replacing the belt, remove the back cover of the unit and examine the markings on its outer surface;
- The drum drive motor is not functioning. During operation, the operation of the motor wears off the material of the brushes, and an unpleasant specific smell appears when the washing machine operates. If the brush life is exhausted, the drum stops rotating. Before installing new brushes of the appropriate size, the commutator is cleaned;
- malfunction of the electronic programmer module, which, depending on the model modification, is responsible for the water supply valve, operation of the drain pump, collector motor, thermistor, timer. In fact, the electronic module is responsible for the performance of the main parts and engine components of washing machines.
The drum may jam and not spin if the tachometer fails, the electrical wiring is damaged, or the capacitor burns out. In this case, it is necessary to carry out serious diagnostics. The reason why the drum does not spin may be overload with laundry or clogged filter. All of the above reasons require troubleshooting, so you cannot do without disassembling the washing machine and removing the drum.
Inoperative state of the electronic module
Foreign object in drum
Belt break
Bearing wear
Drum motor malfunction
How to remove the drum
There are many brands of washing devices. The most famous are: LG, Samsung, Whirlpool, Indesit, Zanussi, Bosch, Kaiser. Each of them has design features, but the main elements, as well as their location, are almost the same. For this reason, the procedure for disassembling will be approximately the same.
Removing fasteners
Removing the drum, as well as other repair work on the unit, begins from the top panel. As a rule, the bolts for fastening the latter are located on the rear side. But it happens that they are found on the sides.
The back panel is removed after unscrewing the screws that hold it in place. To separate the drive belt, you need to carefully rotate the pulley wheel in a clockwise direction.
The dashboard is secured with screws located in the niche of the detergent tray.
Before dismantling the front cover, the hatch door is removed and the rubber cuff is disconnected. Then, after unscrewing several fixing screws, the front panel is carefully removed.
Removing parts
To release the upper part of the tank, it is necessary to remove the pipe, counterweight, water intake valve, and pressure switch.
In the lower part, the heating element, engine, drain pipe, lower counterweight, and shock absorbers are removed. In most devices, the heating element is located under the tank. To remove it, the contacts are disconnected and the nut, which has a central location, is unscrewed.
Unscrewing the “stones” is done very carefully so as not to accidentally drop them on the body of the washing machine or on your feet.
To remove the electric motor, you need to remove the power plug and grounding wire from it, and only then unscrew the mounting bolts (usually four). To remove the drain pipe and shock absorbers, place the machine on its side. Using pliers, the clamp is removed and the pipe is disconnected from the pump. Only then are the shock absorber mounts unscrewed and the tank freed from the hooks. To dismantle the pipe, the clamps that hold it are loosened and removed.
After completing all the procedures described above, the tank can be removed from the body of the washing unit.
Removing the tank alone will not be easy. It is best to perform this procedure with a partner. One person must neutralize the springs, and the other must remove the tank. In addition, you should be very careful, since the part is heavy and easy to drop.
Pulling out the drum
It is possible to remove the drum from the “remains” of the tank only after unscrewing it (with a wrench) and removing the pulley. Then return the bolt that held the pulley to its original position (all the way). Finally, using a hammer to lightly tap the shaft, tap the drum out of the tank.
If the washing device is to be reassembled, it is recommended to carefully check the integrity of the bearings and replace them if necessary. It is imperative to install a new oil seal and treat it with lubricant.
When thoroughly disassembling the washing machine, you need to check all its parts for functionality. An ordinary tester will help assess the condition of all electronics. A visual inspection will also be helpful. You should definitely take a closer look at the heating element: if there is scale, it is recommended to clean or replace it.
Washing machines with collapsible tank
50% of SMAs are collapsible. It is this solution that allows craftsmen to change bearings without problems. In the collapsible version, the halves are connected by bolts. The joint of the parts is lubricated with sealant or sealed with rubber - all this is done to prevent leaks. Disassembling a glued drum:
- A wooden beam is placed in the drum pulley and jammed. In this case, the tank is located with a hatch in the floor.
- Take a socket of the required size with a ratchet to unscrew the bolt securing the pulley to the shaft.
- Remove the pulley. Next, unscrew the bolts connecting the halves of the tank.
- Having unscrewed the bolts, they hit the shaft lightly. Remove the rear part of the element being dismantled.
- Use a blowtorch to heat the bearings and then pull them off with a puller.
How to disassemble (halve) a drum
In some models of washing units, the tank can be easily disassembled: you only need to remove the bolts that connect its two halves. But in almost all modern washing devices it is non-separable, its two parts are soldered. How to disassemble the drum of such a washing machine? The problem is solved by the following actions:
- Remove the pulley. It is recommended to take into account that the bolt holding this part is sometimes secured with glue. If unscrewing is not successful, the fastening element can be treated with WD-40 or knocked down with a hammer. You need to be prepared for the fact that this will be difficult.
- Divide into two parts using a hacksaw (cut along the seam).
- For ease of future assembly, it is recommended to drill holes around the perimeter of the seam with a drill. Bolts will subsequently be inserted into them to fasten the halves together.
- From the cut tank, after disconnecting the fastening, it is easy to remove the drum. The oil seal and bearings also become available.
- The bearing assembly includes two metal elements and a rubber gasket - an oil seal. Disassembling the drum begins from the bearing that lies closer to the outer part. The drum is placed with the hole down, the metal ring is knocked out with a chisel or hammer. This work is done very carefully and accurately. If the tool slips, the impact will occur on the ring (inner). If the latter flies out, it will be very difficult to remove the remaining parts from the socket.
- The second bearing is removed using the same method, and then the oil seal is removed.
The work of disassembling the washing unit is completed (it is quite possible to halve the drum). After replacing damaged parts, as well as troubleshooting, it is necessary to install the drum in the reverse order. It is possible that at this stage you will need previously taken photographs of the device design.
Using the information received, as well as recommendations and advice, you can independently repair the washing machine and bring it into working condition.
What indicates a bearing failure in an Electrolux machine?
How can you tell if the bearing is worn out without disassembling the car? When in good condition, the washing machine operates almost silently. The first signs of wear are noise and hum during operation. Each time the vibration and grinding will increase - and you will not hear anything except the hum of the equipment.
A characteristic sign of a problem is drum play. If you shake it with your hand, it noticeably moves upward from the tank.
Bearing failure is a serious failure. However, replacing a part is much more profitable than buying a new car, so after studying the sequence, proceed to action.
How to choose the right bearing for a washing machine? Remove the old part and take a sample to the store. The seller will select the necessary parts for you.
What tools will you need?
For self-repair you will need:
- Screwdrivers (phillips, flat).
- Pliers.
- Rubber hammer.
- Socket heads.
- Bit.
- WD-40 product.
- Sealant or sealant.
How to remove the main node?
Before removing the tank, you need to gradually remove most of the parts of the washing machine that are attached to its body. It is enough to strictly follow the analysis recommendations to achieve success.
To prevent the machine from accidentally receiving an electric shock, it should be de-energized before starting repairs. Simply remove the plug from the socket.
- The first step is to disconnect the water supply pipes.
- Then drain any water that may remain in the tank. To do this, the drain program is activated. Upon completion, you need to unscrew the filter with debris.
- Check the drum again. There should be no foreign objects in it.
- Turn the device so that there is nothing obstructing access to the rear panel.
- Then remove the back panel and top of the car.
- Remove counterweights. To do this, the retaining bolts are unscrewed.
- The instrument panel and powder dispenser are detached.
- The next step is to remove the pressure switch.
- The hatch cuff and the device door are removed.
Access to the tank is open. Now, sequentially disconnect the wires, pipes and other elements that are connected to it and remove the engine. Then disconnect the dampers and springs. After all the parts have been dismantled, carefully take the drum from both sides, lift it and remove it from the machine. It is better to do this work together, the drum is heavy.
What are the types of liquid products?
The range of liquid products for automatic washing is huge. Some formulations are famous for their high efficiency, others provide average results, and others absolutely fail to cope with the task assigned to them. The selection of gel for the Indesit washing machine should be taken seriously, taking into account all the characteristics of the composition. Here is a review of liquid powders from different manufacturers.
- Universal liquid LOREMS. Suitable for cleaning both white and colored laundry. Copes with stubborn stains. Dissolves in seconds even in cold water. The concentrated product is economical, convenient to dose, and easy to store. The composition is phosphate-free, hypoallergenic. The price of a 3-liter bottle is about 900 rubles.
- Gel-con. Can be used for both automatic and hand washing. Suitable for all shades of fabrics. The composition has earned a huge number of positive reviews from users, as it provides high quality cleaning and removes the most stubborn stains. A liter bottle of the composition costs about 280 rubles.
- Persil Color gel is a concentrate suitable for automatic washing of cotton and synthetic fabrics. The composition includes a liquid stain remover, this allows you to cope with old, stubborn stains. Keeps things bright and gives them freshness. The cost of an almost two-liter bottle of Persil Color is about 1,150 rubles.
- Liquid composition Frosch “Apple” for colored fabrics. It has high cleansing properties and can not only preserve, but also restore the intensity of bright colors. The average price of a 2-liter package is 780 rubles.
- Gel MYTH 3 in 1 “Frosty freshness”. The concentrated product carefully cleans both white, light-colored items and colored linen. It fights dirt perfectly and gives clothes the freshness of a frosty morning. Contains conditioner and enzymes. To achieve optimal results, the manufacturer advises pouring the gel not into the powder receptacle, but directly into the drum.
- Universal Synergetic is a hypoallergenic, biodegradable composition, suitable even for washing baby clothes. Special additives help prevent re-contamination of fabric fibers. The gel rinses out well and does not settle on things. A pleasant aroma is achieved through natural essential oils. The average price of a 1 liter bottle is 320 rubles.
- PROSEPT Crystal liquid detergent concentrate is a phosphate-free product. Removes difficult stains and leaves no streaks on clothes. The cost of a 3-liter container is approximately 530 rubles.
- Gel Eared Nyan. The hypoallergenic composition is positioned as a detergent for washing children's clothes, as it is safe for the most sensitive skin. Suitable for cleaning white, light and colored fabrics. Capable of removing complex stains - from juice, chocolate, grass, etc. Affordable price - about 190 rubles per liter of product.
- Ariel washing concentrate for sensitive skin. Suitable for cleaning delicate fabrics due to its mild formula. The gel is dermatologist approved. To ensure higher quality washing, the cap with the product is placed directly into the drum. The average price of a liter container is 360 rubles.
Share your opinion - leave a comment