Over time, the drum assembly of any washing machine fails: the shaft becomes loose, the seal leaks, and the bearings wear out. All this interferes with smooth rotation and leads to backlash, which increases the outgoing vibration and noise of the machine. This situation is not uncommon for Beko owners, so you should prepare for possible failures. To solve the problem, you will have to disassemble the drum of the Beko washing machine and replace the worn parts. All that remains is to find out where to start the repair and how to finish it.
Description of the work progress
The degree of disassembly of the washing machine depends on the existing problem.
If it is necessary to replace the drive belt or inlet valve, then 10-20 minutes will be enough. In the case of repairing a bearing assembly, you will have to remove almost all the main components of the machine and spend at least 40 minutes. However, the procedure will not change. Before starting disassembly, make sure that the washing machine is disconnected from the power supply and water supply!
The instructions are as follows:
- disconnect the hatch door (unscrew the two bolts on the hinges, lift it and remove it from the rod);
- unsnap the technical hatch door;
- loosen the outer clamp of the cuff and insert the elastic into the drum;
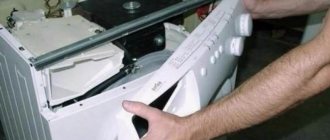
- unscrew all the bolts located around the perimeter of the front panel;
- bend the front panel 2-3 cm, and through the vacated gap unhook the wiring from the UBL;
- remove the “end” completely;
- unscrew the retaining bolts from the rear panel;
- remove the drive belt from the pulley;
- unscrew the screw that secures the pulley wheel (you need to insert a screwdriver between the blades to prevent the wrench from turning);
- release the wires connected to the drum;
- pull out the water supply hose attached to the tank;
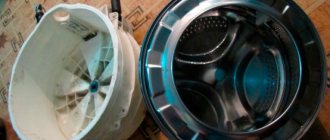
- Using pliers, remove the metal brackets inserted around the perimeter of the tank;
- pull the front half of the tank towards you.
On Beko washing machines, the heating element is removed along with the tank - be careful not to damage the heating element during disassembly!
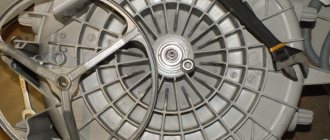
The next one is the drum. We go around the back of the washing machine, place the “dull” tip of the chisel in the center of the cross and punch it with a hammer. As soon as the fixing bolt “falls through,” insert the screw and release the tank.
Next we knock out the bearings. We insert a metal rod into the hole freed from the cross and tap it with a hammer until the oil seal and bearings leave their seat. If the parts are strongly stuck, then the area is treated with WD-40 lubricant.
Experienced craftsmen advise not to rush and record the dismantling on the camera, especially when disconnecting the wires. This measure will help avoid confusion and protect against errors during reassembly. The Beko machine is assembled in a similar way, only in the opposite order. The seat for each part is pre-cleaned, as are the components themselves.
Water does not fill
If water does not flow into your household appliances, you should first check the presence of water and the presence of pressure in the water tap - to do this, open the tap and assess the pressure. After this, we check the water supply hose, which may be pinched.
It is possible that the water supply filter is clogged.
Do-it-yourself repair of the Veko washing machine must be done in the following way:
- Shut off the water supply to the washing unit.
- Remove the supply hose from the nozzle.
- Using pliers, remove the filter.
- Rinse under running water.
- Reinstall.
- Put on the hose.
If the inlet valve is clogged or broken, then to solve this problem you should turn off the water and then remove the hose. In addition, you need to remove the cover so that you can get to the valve, which is located after the location of the inlet pipe. It needs to be removed, washed and checked, for which:
- Connect to the inlet hose - since it is normally closed, the water can be opened.
- Direct the valve into a tank and alternately apply power corresponding to 220V to the relay windings:
- If power is present, the relay is activated, resulting in water appearing.
- If there is no water, the winding is faulty, which means the valve must be replaced.
When using the device for a long time, harmful microorganisms very often appear in it. And to solve this problem, learn how to clean mold and black mildew from your washing machine quickly at home.
In a top loading machine
In such models, the drum is attached to the walls on both sides, which naturally complicates its removal. The operating procedure is as follows:
- unscrew the screws on the front and rear walls;
- remove the side panel;
- remove all wires and unscrew the remaining screws.
The second side panel is removed in a similar way. Then you need to remove the screw for attaching to the shaft and pull out the drum.
Specialists strongly recommend taking photographs of all the main stages of work, so as not to confuse the sequence of actions later.
In a horizontal (front) loading machine
In such models, the drum is mounted in one place - to the rear wall. This feature requires the following actions:
- Unscrew the screws that hold the back wall;
- remove the entire cover (including the powder container, control panel);
- pull out the hatch cuffs;
- remove the wiring and disconnect the bolt that holds the drum at the back.
It is better not to completely unscrew the control panel, but simply move it to the side to avoid damage. If removed, it is recommended to photograph the wires to make it easier to return everything to its original place.
Your right choice is contacting Remtehnika LLC! want to make sure?
- Your call is accepted until 23.00 on any day, as well as on holidays and weekends.
- You get a complete diagnosis for free.
- Washing machine repair at home was carried out on the same day.
- You are spared the hassle of transporting the washing machine to the workshop, since the technician repairs it at your home.
- Your car has original replacement parts installed.
- You receive a guarantee in accordance with GOST for all performed actions and spare parts.
- You are pleasantly surprised by the affordable prices and receive preferential prices or discounts.
READ MORE: Do-it-yourself ceiling putty: how to do it correctly (video)
Do you want to avoid unnecessary expenses and free yourself from painstaking, tedious repairs? Call!
Replacing a bearing in a beko washing machine by service center technicians
Most often, people are driven to repair their washing machine themselves by fear of financial expenses. Indeed, replacing a bearing by a professional can amount to 30% of the cost of a new washing machine. However, if you do not have the funds to buy a new car, there are still benefits when contacting a specialist.
Firstly, you will not need to spend money on spare parts and tools. Secondly, you won’t have to waste your time and nerves. And most importantly, you will be confident in the quality of the work performed. After all, with one illiterate action you can nullify all your efforts and end up with more complex and costly repairs, or be left without a washing machine altogether.
What could be the reasons?
To determine the most common breakdowns of Beko washing machines, the statistics of calls to the service department of this manufacturer were studied. Most often, units break down for the following reasons:
- accumulated dirt in the drain line, failure of the drain pump;
- failures in the operation of the electronic module (usually statistics are spoiled due to low-quality machines);
- breakdown of the pressure switch or heating element;
- leaks;
- wear of brushes located on the engine;
- occurrence of extraneous noise during operation of the unit.
In some cases, extraneous sounds occur when foreign objects, a broken shock absorber, or a damaged bearing get inside the machine.
Replacing a bearing in a beko washing machine: where to start?
As already mentioned, you will need to clear enough space to carry out the renovation work. In order to get to the bearing assembly, the machine will have to be disassembled. All removed parts must be folded separately in a certain order if you want the reassembly to be quick and easy.
Spare parts for replacement are two bearings and an oil seal. They must be selected in accordance with the size and specific model of household appliances. If you are not sure, deal with this issue after removing the worn parts. On old bearings you will find the serial number of the part. It is best to use original spare parts from the same company as your car.
You also need to have a number of tools to disassemble the machine and remove the bearings.
Electrical repair
Only users with electrical repair skills can cope with this task. If there is a break or oxidation of contacts somewhere, they will quickly fix the problem. All you need for Beko electrical repair work is a circuit diagram. Where can I get it? It is enough to know the exact name of the model to find it on the manufacturer’s website.
It is much more difficult with electronics - to repair or replace the control board, you need special knowledge and skills. The cost of the electronic module is high - reaching a third of the price of the entire SMA. Therefore, it is not recommended to touch it - it is better to trust a specialist. If the repair is minor, then repairing the module will not cost much. But independent experiments can lead to complete failure of the module - you will have to purchase a replacement for it, and a simple problem will transform into expensive repair work.
How to knock out bearings
- Arm yourself with a metal rod or long bolt, about the thickness of a pencil. Take a hammer in your other hand.
- We set the rod and, with sharp but not strong blows of the hammer, crosswise knock out the bearing, moving the rod to different sides. The large bearing is knocked out from the outside, and the small one from the inside of the tank.
After removing the bearings, clean the back cover and seats. Now drive the new bearings into place of the old ones. This is also done using a rod and a hammer; the bearing should “sit” all the way, which will be “told” by a louder sound upon impact.
After inserting both bearings, coat the oil seal with water-repellent grease and install it in place. Also treat the bushing with lithol or lubricant before you begin reassembling all the parts of the washing machine.
It is also better to replace the rubber seal between the halves of the tank with a new one. If you don't see the need for replacement, you can fill the groove with silicone sealant.
Now that the bearings have been replaced, you can reassemble the washing machine in reverse order, using the photos and videos taken during disassembly.
Problems with draining water
It is clear to everyone that waste water is not crystal clear - this is the specificity of the operation of a washing machine.
To prevent dirt from accumulating in the pump, a drain filter is installed in its path - this is what gets clogged most often. This problem is dealt with as follows:
- First you need to find the drain filter, which is always located at the bottom of the machine behind a decorative hatch or panel.
- Now you need to place a sufficiently capacious container under the machine into which we will drain the waste water.
- Some models of Veko brand washing machines have an emergency water discharge hose next to the drain filter. If there is one, you should use it - it’s more convenient to drain water than through the filter hole.
- The filter should be removed by unscrewing counterclockwise, thoroughly cleaned and rinsed under running water.
- Using a screwdriver, you can also clean the pipe into which the filter was installed - usually it is also heavily clogged with dirt and silty deposits.
Since you had to take up the tools, at the same time, for the purpose of preventive maintenance, you can clean the filter on the water supply, which can be easily found at the place where the inlet hose is attached to the body of the machine. Particles of sand and rust that accumulate in it over time can interfere with the collection of water. After cleaning the drain filter, do not rush to install it in place, first you need to check the functionality of the drain pump. In fact, the Veko washing machine, thanks to the built-in self-diagnosis function, in many cases can itself detect a pump malfunction, displaying the error code “H5” on the display.
But there are breakdowns that the machine “does not see,” for example, jamming of a loose impeller (the appearance of strong play can be guessed by the characteristic hum).
To check the pump, you need to run the machine in drain mode, observing the impeller through the hole in the filter plug. It should rotate. If this does not happen, the pump must be cleaned or replaced.
How to disassemble a non-separable drum of a washing machine
The principle of operation is similar to disassembling a collapsible tank, the only difference being that it will have to be cut down. This is hard, painstaking and thankless work. There is no suitable tool for such work and this creates a big problem.
It is difficult to cut metal with a hacksaw; it often gets stuck and breaks. But, despite this, it is considered the most optimal and proven option. Experts advise wrapping one edge of the hacksaw with electrical tape for ease of work, which will take at least 3-4 hours.
A wood hacksaw cuts so thickly that in the future it is problematic to ensure sealing of the two halves.
The grinder is generally immediately ruled out due to the high risk of damaging the part and deep penetration.
READ MORE: ♀️Choosing the best elliptical trainer for home 2020
A jigsaw can help, unless there is a hard-to-reach area where you will have to use a hacksaw.
Please note that before disassembling the washing machine drum, you will have to spend a lot of time removing it from the washing machine. Expect to do a lot of work and have plenty of time.
Top stores of washing machines and household appliances:
- mvideo.ru/—home appliance store, large catalog of washing machines
- holodilnik.ru – Inexpensive store of household appliances.
- techport.ru - profitable modern online store of household appliances
- citilink.ru is a modern online store of household appliances and electronics, cheaper than offline stores!
- ru.aliexpress.com—spare parts for washing machines
Typical faults and solutions
There are 5 common problems with the door and in all these cases the device is easy to fix.
Parts that may be damaged:
UBL malfunction
If the hatch locking device stops working, it could become clogged. Disassemble the element, check for obstructions and clean. Most often, the UBL stops blocking normally due to overheating. In this case, the part cannot be restored.
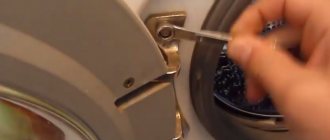
To dismantle the device and install a new one, you will need two screwdrivers: a Phillips and a slotted one.
- Pry up the clamp with a slotted screwdriver and remove. It looks like a circle made of a steel spring and wire.
- Remove the part of the cuff in the area where the lock is attached.
- Unscrew the pair of screws that secure the lock.
- Take out the device by hand and pull off the chip.
- Install the new UBL by placing it inside the washing machine and tightening the screws.
- Put the cuff back on.
- Install the clamp into place using two screwdrivers. After completing the steps, everything should work.
Latch problem
If the door breaks, check the lock of the washing machine. A problem may be indicated by the absence of a click when the hatch closes. The lever that fits into the hole may become nicked. Because of them, the device stops closing.
Unscrew the door and place it on the table. Remove nicks with a file. Apply graphite lubricant, and then remove the excess so as not to damage your clothes with it during washing. All that remains is to install the door.
If the latch is severely deformed, it is easier to replace it with a new one than to repair the lock. This procedure can take a lot of time and there is no guarantee that it will be possible to get the washing machine into working condition. It's better to spend a little money than to be caught off guard by a lock that doesn't work properly. Sometimes the problem is not the latch at all, but loose fasteners and hinges. In this case, adjust the position of the hatch so that the latch fits easily into the hole.
Glass damaged
If the glass in the door is removable and you can order a new one, this will be the best option. If it is not possible to remove the glass, all that remains is to repair the damaged element of the washing machine. To do this you will need polyester or epoxy resin.
To remedy the situation, tape the polyethylene to the front side of the glass, leaving no gaps. Cover the damaged area with reinforcing tape, which is used for plastering work. Prepare the resin: mix the base and hardener in the specified proportion.
Pour the mixture into the damaged area and wait for polymerization. After a day, remove the plastic wrap. Remove smudges with sandpaper and the glass will look like new.
Broken plastic support
Even in good washing machines, the plastic deteriorates over time due to neglectful use of the machine. If the support breaks, the hatch may not fit tightly, creating a risk of flooding. If this part becomes damaged, remove it and secure the damaged part with a vice. The diameter of the nail should be 4 mm. Cut it to the desired length, if it is different.
Drill a 3.8 mm through hole in the support. Hold the nail with pliers and heat to 180ºC. After this, insert it into the drilled hole and wait 3 minutes for the nail to cool. All that remains is to assemble the door and install it in place.
How to disassemble a beko washing machine
- Remove the top cover. It is attached to two self-tapping screws, which can be closed with decorative plugs. They are located at the top of the rear panel. By unscrewing the screws, you can easily remove the cover. Set it aside.
- Remove the upper instrument panel. Remove the detergent cuvette by pressing the plastic button inside and at the same time pulling the part towards you. Under it you will probably find some of the screws holding the top panel of the machine. In different SM models, fasteners may be located differently. After unscrewing them, carefully remove the chips with wires located on the control board, and then remove the instrument panel. Mark the chips and their sockets with a marker or take a photo so that there is no confusion during reassembly.
- Remove the bottom panel. Press the latches with a flathead screwdriver and pull it out, as if you were cleaning a drain valve.
- Remove the cuff. You will need to remove the entire faceplate, and the first thing that gets in the way is the cuff located between the tank and the front panel. The elastic band is secured with a clamp, so it will need to be removed. The ends of the clamp are connected by a spring - find it, or feel it by running your hand along the perimeter of the cuff. Pry it up with a flat-head screwdriver and pull it out along with the clamp. Now you can remove the front part of the cuff and tuck it into the tank.
- Remove the front panel. It is held on by self-tapping screws located at the top and bottom. After closing the car hatch, unscrew them and very carefully remove the panel. A wire leads from it to the hatch lock - disconnect it by removing the chip and set the part aside.
- Remove the parts from the washing machine tank. Under the dashboard, which you have already removed, there is a part of the car with a fill valve. It is secured with bolts on the rear wall of the machine. After unscrewing them, remove the pipes and wires leading to the panel with the fill valve. By removing this part of the unit, you can loosen and unscrew the clamp and disconnect the drain pipe, freeing the tank.
- Disconnect the wires from the heating element. The heating element can be located at the front or rear, so if necessary, unfasten the back cover of the housing. Remember to mark with a marker or photograph the location of the wires. As you work, you can check the serviceability of the heating element with a multimeter, clean it, or replace burnt wires.
- Disconnect the wires from the engine. The wiring can be unfastened and removed completely so as not to be damaged during replacement.
- Unscrew the counterweights at the top and bottom. They can also be located on different sides of the body, depending on the specific model of the machine.
- Disconnect the pipe that goes to the water sensor. Unscrew the shock absorbers using a wrench or a socket with an extension.
- Unscrew the engine, first removing the belt.
- Remove the tank along with the engine. Unhook the springs on which the tank hangs, supporting it from the inside with one hand.
Handmade repairs
In any case, a person, with diligence, can repair a washing machine on his own. Let's look at the most popular situations.
Drain problems
You need to understand that after washing, the drain water is not transparent. To prevent any debris from accumulating in the pump after prolonged use, special filters are installed, which are removed after some time.
Do-it-yourself repair of Beko washing machines can be done as follows:
- Find the same filter that is causing the breakdown. Most often it is located at the bottom of the machine behind the main panel.
- Next, you need to place a basin under the machine to drain the recycled water.
- Most car models have a special hose next to the filter for draining water. It is much more convenient for them to drain water than through the filter itself.
- If there is no hose, the filter can be easily removed; just unscrew it counterclockwise. Afterwards it needs to be cleaned.
- You can also clean the pipe by picking up a screwdriver. This is the space in which the filter is installed. It also often becomes dirty and accumulates silt deposits.
While the tools are at hand, for preventive purposes you can use them to clean another filter, which is usually located on the water supply. Small debris, rust, sand also accumulate in it; all this can interfere with the collection of water.
After this procedure, you should not put everything in its place. It is advisable to check whether the drain pump is working.
However, there are also breakdowns that are invisible to the device’s sensors, for example, a loose impeller jams, which can be heard through a strong hum.
To check the pump, it is advisable to run the equipment in the “drain” command, and then observe the process through the hole in the filter plug. In working condition it rotates. If not, the pump needs to be cleaned at best, or replaced at worst.
Water does not heat up
The heating element installed in washing machines is a very vulnerable component because it is exposed to high temperatures and salt water. Salts, with each new heating, crystallize and are deposited on it like a hard coating, in common parlance - scale. It begins to retain heat in the heating element, like a fur coat, as a result it burns out from overheating.
Even if there is no plaque in it, it can still burn out from normal production, since the incandescent lamp may deteriorate. A washing machine from this manufacturer can signal a malfunction with a special code on the display - “H2”, which means a malfunction of the heating element, and also “H3” means that the element is constantly working without the ability to turn off.
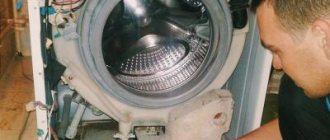
To accurately determine whether it is broken or not, you will have to get to it. On some car models, this will require removing the back cover, on some – the front cover.
Most likely, to an inexperienced person, repairing a fault with your own hands may seem difficult, but in fact, to do this you only need to be able to remove the cuff of the loading hatch. This must be done extremely carefully; any damage will damage the sealant and leaks will form.
There are 2 contacts attached to the heating element from the bottom of the tank. The wires should be disconnected and it is advisable to measure the resistance between them and the heater. At room temperature this figure is approximately 25-30 Ohms.
Sometimes, based on the test results, the heating element turns out to be working.
In such cases, you need to pay attention to the temperature sensor. It should be located immediately under the top cover; to remove it you need to unscrew a few screws
Measure its resistance, usually the indicator is approximately equal to 4.8 kOhm, and when the water heats up it begins to decrease.
If the thermostat is faulty, replace it. To dismantle the device, remove and disconnect the dispenser hopper intended for powder. Afterwards you need to remove the control panel, but before that you need to disconnect the handles and command apparatus from it.
https://youtube.com/watch?v=ifSyB_JCsaE
Replacement features
As a result of prolonged use or due to a manufacturing defect, the drum of the washing machine may become damaged. Usually the following damages cannot be repaired: damage to the walls with the formation of a hole or destruction of the bushing seat. In such cases, there is only one solution - to install a new element. Replacing a washing machine drum is a very labor-intensive procedure, as it involves disassembling the entire main device.
Manufacturers usually do not supply drums separately. They are sold complete with a tank.
READ MORE: Cersanit bathtub: pros and cons of popular models Santana and Milena, Nano and Lorena, Virgo and Sicilia 170×100, consumer reviews
The process of disassembling the washing unit will differ slightly depending on the type of product: top-loading or front-loading. But before starting work, you should perform the same steps for both models: unload the laundry, unplug it, remove the inlet hose.
Typical causes of eyelid failures and their individual solutions
As we have already noted above, malfunctions of washing units can easily reveal this through their external symptoms with incorrect operation or complete failure. But how can these breakdowns be correctly associated with certain breakdowns? Here you will already need some knowledge and advice from leading experts, which we will be happy to present in this article.
If you notice that washing is done in cold water instead of the set 40
or 60 degrees - this indicates a breakdown of the water heating element (heating element), or the control board.
You can come to this conclusion if you set the washing temperature to 30 degrees Celsius, and the machine persistently brings it to a boil, thereby mercilessly spoiling your items made of delicate fabrics. In this case, it is more likely that the board is faulty than the heating element, but just in case, check both.
When you start a program, the machine should begin to fill its tank with water. All this will happen with varying intensity, which directly depends on the washing mode you choose. To take a look at the process of filling water, look through the tank window. But if you notice that after twenty or thirty minutes the machine may freeze and stop the execution of the program, displaying some kind of error code. There are four different reasons for this development of events:
- The lack of water in the water supply system is easy to check if you simply go into the bathroom and try to open the tap.
- Clogged water filter, which is located at the base of the inlet hose (if you have one, of course).
- Fill valve failure.
- Control unit element malfunction.
If a problem arises with the hatch locking device, you need to carefully press down the hatch with your knee and turn on the desired washing program again, because there is a possibility that the locking hook simply does not reach the end of the desired part and the fixation does not have time to occur.
After the washing program is completed, the washing device should itself begin to rinse off the soapy water and pour in fresh water for rinsing. This process is usually accompanied by the hum of the drain pump.
The draining takes place quite quickly, after which the machine again begins to draw clean and fresh water. If the machine just can’t drain the water, and then it just stops and freezes, or it tries to drain the water, the pump starts to hum louder, but the draining never starts, then the problem is the following:
- At the pump.
- There is a blockage in the sewer or drain hose.
- On the management board.
If the machine is very noisy, and the drum rotates with a terrible grinding, clanging and knocking noise, then perhaps the bearings in the VEKO washing machine have broken or a standard body of foreign origin made of metal has gotten into the tank, stuck between the walls and the wall has begun to jam. This type of breakdown must be corrected immediately by first turning off the machine.
The machine may also not turn on completely or the indicator lights will begin to “blink”, and if this happens over and over again, and rebooting does not help, then this is a sign that at the moment it may:
- The on/off button of your washing device is broken.
- The power supply breaks down.
- The network cable is broken.
Rules for disassembling the tank
You need not only to know how to disassemble the drum on a washing machine, but also to properly prepare for it.
While working, do not forget that:
- The tub and drum are removed from the washing machine very carefully. Most modern tanks are made of plastic, and this material is subject to the slightest mechanical stress. You may need a friend's help when removing the tank.
- If your tank is non-separable, you will have to saw it. Before this process, it is recommended to drill many, many holes along the seam using a thin drill to reassemble the part. This way you will avoid the halves moving and ensure a good seal. Stock up on sealant.
- When cutting a tank, it is forbidden to make a bevel, even a couple of millimeters, to the side.
- The screw that holds the drum pulley cannot be unscrewed without force. But, excessive efforts will most likely rip off the head, thereby causing unnecessary problems.
- The back part of the part can be removed from the shaft by lightly hitting it.
- If the bearing is stuck, a car puller can come to the rescue. It is allowed to heat it with a blowtorch before removing it.
Preliminary stage
To make disassembling the machine with your own hands as easy as possible and not complicated by “surprises,” you need to start with preparation. The first step is to disconnect Beko from communications: first unplug the power cord from the outlet, then turn off the water supply tap and unhook the drain hose from the sewer. Then the equipment is moved to the center of the room so that free access is provided to both the front and rear walls.
Next, we collect the tools:
- screwdrivers (slotted and Phillips);
- set of wrenches;
- pliers;
- screwdriver;
- a set of different sized heads;
- WD-40 lubricant;
- gloves;
- puller (for dismantling bearings).
Before disassembling the machine, it is necessary to study the factory instructions and the electrical diagram of the unit.
If everything is ready, you can start disassembling. The amount of work ahead is serious, so we stock up on patience, time and an assistant.
Let's prepare thoroughly
If you decide to do the renovation yourself, you should be thoroughly prepared. First of all, we collect or purchase the required minimum of tools. Fortunately, the list is standard:
- a set of screwdrivers (flat, Phillips and indicator);
- saw or hacksaw for metal;
- mites;
- pliers or pliers;
- set of open-end wrenches (8-18 mm);
- set of heads;
- puller (car version is suitable);
- socket wrenches;
- hammer;
- awl;
- chisel;
- multimeter
After collecting the tools, we begin to prepare the workplace. If the washing machine is installed in a spacious bathroom, then you can work here. In small rooms where it is difficult to turn around, it is worth looking for another option - an entrance hall, kitchen, workshop or garage. It is necessary to provide at least two free square meters, otherwise disassembling the machine will be problematic. In general, we act like this:
- disconnect the machine from all communications (electricity, sewerage, water supply);
- move the washing machine to a place convenient for repair;
- we cover the space surrounding the equipment with oilcloth, rags or newspapers;
- pull it towards you and remove the detergent tray from the body;
- Having unscrewed the garbage filter, drain the residual water from the tank.
For convenience, it is recommended to allocate a separate place for small parts - bolts, screws, clamps and other fasteners. Having completed the preparations, we proceed to directly troubleshooting the problem.
Collapsible tank with drum
Modern models are most often equipped with collapsible tanks. This is convenient when repairing a washing machine and greatly facilitates the work of specialists.
The collapsible tank consists of two halves connected by bolts using sealant or sealing gum.
Disassembling the washing machine drum looks like this:
- Taking a wooden block, you need to lock the drum pulley while the hatch should be located at the bottom.
- You need to unscrew the bolt that secures the pulley to the shaft. In this case, you need to use a head of the required size with a ratchet.
- The bolts connecting both halves of the tank are unscrewed using a key, after removing the pulley.
- After this, lightly hitting the shaft, the rear part of the part is removed.
- The bearings are pulled off; if difficulties arise, then they are heated with a blowtorch and removed using a puller.
“Symptoms” of typical breakdowns
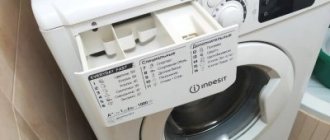
Before using a Beko washing machine, study its instructions, and before disassembling it, study its structure. If you entrust your washing machine to a specialist, there is no doubt that he will quickly find the cause of the problem and offer the optimal solution to the problem. High prices for services force home craftsmen to figure out on their own what’s broken in the machine? Many problems can be fixed without the help of specialists, especially if you have tools, instructions and a diagram of the device at hand. Almost all modifications can be repaired with your own hands - WKB 51001 M, WKB 61031 PTYA, WKB 61001 Y, etc.
Considering the prices for repair work, why not try to cope without the participation of specialists, especially if the washing machine is 10 years old and it’s no longer so scary if it breaks completely: it’s still time to update the “park”. Below are typical breakdowns that owners of Turkish washing machines encounter:
- The water does not heat up to the value provided by the program or set by the user. Items are washed in cool water, regardless of the program. The opposite effect is also possible - overheating of water above the desired temperature.
- The liquid slowly fills the washer. Or it doesn't flood at all.
- The Beko washing machine does not start due to an uncovered hatch.
- At the end of the cycle, the liquid is not drained. This condition may be accompanied by a strong hum.
- The drum makes a loud noise as it rotates.
- Programs and modes do not start, and the indicators all blink at the same time. Or the light is on, but the SMA does not start washing.
- Pressing the start button does not start the machine, but the power cord is plugged into the outlet.
- Beko washing machine models that have a display display error codes - H1, H2, H3, H4, H5, H6 and H7. SMA does not work in this case.
These are not all the “symptoms” of problems that occur with Veko machines - we have listed the most common ones. Let's look further at how to fix the most common breakdowns.