When using household appliances, even from the most well-known, reputable manufacturers, there is a risk of breakdowns and failure of individual spare parts. Very often, the cause of breakdowns in Candy washing machines is wear of the bearings. Eliminating such a breakdown requires certain knowledge and experience.
For specialists professionally involved in repairing washing machines, such repairs do not pose a problem. The work of replacing the bearing takes very little time, but after it is completed you receive a post-repair guarantee, which will allow you to contact the service center for help in case of possible troubles.
Causes of breakdowns
- wear of parts;
- breakdowns and failures in electronics;
- careless handling (for example, washing shoes, slamming the door too hard);
- blockage in the intake and drainage system (hoses for intake and drainage of water);
- foreign objects in the drum.
Depending on the type of machine, the code can either be displayed or transmitted using a special indicator (located on the panel on the left).
The display simply shows an error code. Using the indicator, the code is transmitted as follows: it flashes several times (for example, with error e06 - six times), then takes a break for five seconds, then flashes again.
By the code you can determine what exactly happened to the machine. Some problems can be dealt with on your own without calling a technician, while others require the attention of a specialist.
The most important part of the work
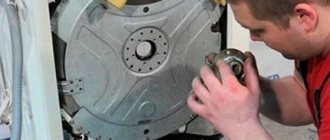
We disassemble the tank and take out the drum in which the laundry is washed. It should be noted that this is not easy.
The drum must be knocked out from the outside where the bearing bowl was. To avoid damaging the threads and shaft, a bolt or stud with a suitable thread should be screwed into it until it stops. You need to knock it out very carefully - it’s better not to rush.
Here it would be appropriate to indicate the specifics of how to replace a bearing in a Samsung washing machine. The difference is that the drum body is connected not with screws, but with plastic latches. The shaft together with the drum must be knocked out using a wooden mallet or a special guide. All other steps in repairing a machine from this manufacturer are identical to those indicated in the article.
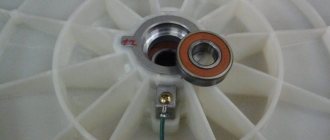
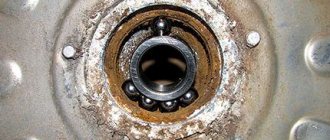
There are two bearings in the tank body - internal and external. Using a screwdriver, remove the oil seal from the inside. The first thing you need to do is remove the outer bearing. After removing it using a puller or using a makeshift method (a bolt with a washer of a suitable diameter, a stop and a nut), we move on to the internal bearing.
The place where the oil seal was pressed must be treated with WD-40 or kerosene so that when removing the part the oil seal seat will not be damaged (scratched). After processing, remove the inner bearing in the same way.
Press the bearings into the cleaned and lubricated area in reverse order. You can simply hammer them in using a wooden insert. However, a slight misalignment will lead to destruction of the housing seat. Therefore, it is better not to rush and install them using the tools that were used to remove the bearings.
We put the drum in place. Using a stop, a stud and a nut with a washer, we seat the shaft on the bearings. Next we assemble in reverse order. Don’t forget to treat the joints of the sides of the tank with silicone. We carry out the rest of the assembly in the same way.
Adviсe
If you don’t have a building level at hand, your smartphone will help you level the washing machine. Just download the “Call Quick Tools” application, select the “Surface Level” option, and then place the smartphone on the lid of the washing machine.
Based on the readings that appear on the display, you can level the washing machine body as quickly and accurately as possible.
Do not rush to throw away the removed transport bolts. If you move, they will help fix the washing machine tank in the desired position, which minimizes the risk of damage during transportation.
The nuances of performing work on machines from different manufacturers
The instructions on how to change a bearing are universal. However, each manufacturer’s devices have their own design differences that must be taken into account during repairs.
Indesit
Models from this company are considered quite complex to disassemble independently compared to other brands. They have 3 key features:
- On some models, the pulley may have a left-hand thread.
- A common malfunction is damage to the drum cross. In this case, replacing the bearings will not be enough.
- Before dismantling the elements of the device, you must turn off the self-positioning sensor. Failure to do this may damage the electronic components of the unit.
LG
Most machines of this brand are quite easy to repair. Even with front-loading appliances, the drum is positioned horizontally and can be easily removed after removing the front panel. There is no need to completely disassemble the device.
However, it should be taken into account that it is easy to damage the motor mounts on such machines. You need to pull it out carefully.
Samsung
Like representatives of the LG brand, they can be easily disassembled. The only difficulty that you may encounter when working with such devices is the fragile mounting system of the bearing assembly.
They should be knocked out carefully
Atlant
For these machines, the tank is removed from the rear wall. The units are easy to remove and install back. The fastening elements are durable and difficult to damage during disassembly. Models from this manufacturer are the best choice for those who want to repair household appliances themselves, but have no experience in this matter.
The only thing to consider is the need to apply additional sealant.
Features of repairs with vertical loading
Here the drum is supported by 2 axle shafts and 2 bearings. With such a reliable design, they fail infrequently, usually when there is some other failure.
They are often damaged by water penetrating through a faulty seal. Rusting and steadily becoming clogged with dirt, the bearing eventually fails.
Repairing such machines is much more convenient. When communications are disconnected, 2 side covers of the housing are removed, and access to the work area is provided.
The bearing on the side where there is no drive pulley is replaced first. To do this, the caliper is removed - a ready-made set of bearings and oil seal enclosed in a housing.
The calipers of the same machine have different thread directions. On the side where the pulley is missing, it is right-handed and unscrews counterclockwise. On the reverse side, such a part has a left-hand thread and is unscrewed clockwise
The seat of the oil seal, as well as the shaft itself, is freed from contamination. When installing a new bearing, it is necessary to avoid distortion of the sealing ring.
Otherwise, it will not be able to prevent fluid leakage, which will cause new bearing failure.
Changing the caliper on the motor side begins with removing the belt and drum pulley. Then comes the turn of the grounding block. Next the caliper is unscrewed. The shaft and seat, as in the first case, are thoroughly cleaned.
A serviceable oil seal is installed in its proper place, and the caliper is tightened. There is no need to put in much effort, because the carving is made on plastic. Assembly, as usual, is carried out in reverse order.
What causes bearings to break?
If a part fails, it is necessary to find out the cause of this phenomenon. The information obtained will facilitate the repair process and help eliminate the possibility of a recurrence of the breakdown. The reason for wear of a part may be:
- long-term operation of the installation (metal parts have a certain service life, after which the manufacturer allows them to break);
- corrosion resulting from moisture entering the bearing;
- design features - the belt drive causes serious loads on small parts, which leads to serious destruction of their surface layer.
Causes of malfunction
Bearings on washing machines not only from Kandy, but also from other companies fail for a number of reasons. Firstly, this happens if the equipment has been in operation for many years. Components have a certain service life, after which they break.
Secondly, the culprit of bearing failure may be a damaged oil seal. When holes and cracks appear on it, moisture begins to seep through it. It washes away the lubricant, resulting in much stronger friction, which leads to damage to the part.
Thirdly, the bearing breaks due to the design features of belt-driven equipment. In such devices, serious loads are placed on small elements, which is why they gradually collapse.
Also, bearing failure can be a consequence of improper operation of the washing machine. Overloading and improper loading of laundry lead to breakdowns and failure of equipment.
If you do not replace the damaged part and seal at the first sign of a malfunction, the situation may worsen. More serious components will fail, the cost of repairs will increase significantly, in some cases it will be easier to buy a new washing machine.
Heating element - from 1500 rubles*
As they operate, the heating elements of most machines become overgrown with scale: it is formed from impurities in tap water, detergent residues, lint and small debris from clothes. Due to scale, the efficiency of the heating element decreases. Trying to heat the water to the set value, it works “to the point of wear and tear.” As a result, either the heating coil burns out or the housing itself burns out.
SIGNS
SMA Kandy does not heat the water: in older models the cycle can take place in cold water. More modern ones - interrupt the program with an error (E3, E03, Err 3, Error 3), (E5, E05, Err 5, Error 5), (E14, Err 14, Error 14), (E16, Err 16, Error 16) or (E22, Err 22, Error 22). If there is a breakdown on the body or a short circuit of the heating element, the washing machine may knock out the RCD or machine while trying to start the wash.
HOW TO FIX
A faulty heating element must be replaced with a new one. In areas with poor water quality, it is recommended to install in-line filters.
*Rates are only for the work of the master, a new heating element is paid separately.
How to change a bearing
Replacing the bearings of a washing machine is quite a difficult task, and its high-quality replacement is only possible with specialized knowledge and special devices. To replace bearings in some models you have to completely disassemble the machine. Replacing the oil seal of a washing machine involves replacing the bearings. For this purpose it is necessary:
- Remove the side panels (for top-loading machines) or disassemble the machine;
- Remove the drum;
- Remove the old oil seal and bearing from the drum seat or flange (for machines with vertical loading);
- Install a new oil seal and press the new bearing until it stops;
- Fill the oil seal with special lubricant;
- Assemble the machine following the required sequence.
When repairing automatic washing machines designed for vertical loading, the bearing module is often changed. It is made in the form of a flange with bearings pressed into it industrially and seals installed. As a rule, the required amount of high-temperature special lubricant is placed in the oil seals. It can withstand temperatures exceeding 100*C without losing its viscosity and reliably protecting the oil seal and bearing module from water leaks. In addition, repairs carried out in a modular manner eliminate the need for additional operations and significantly reduce time costs.
After the repair, the drum should rotate on the shaft freely and without jamming. Any sound that occurs when the drum rotates indicates a poorly performed repair or installation of unsuitable spare parts.
The service life between repairs ultimately depends on the spare parts used during repairs. Long-term and trouble-free operation can only be guaranteed by the use of high-quality spare parts installed by specialists in compliance with repair technology.
If you decide to change the bearings and oil seal yourself, then you should consider some nuances:
Among craftsmen, washing machine tanks are conventionally divided into collapsible and non-collapsible. With collapsible ones everything is clear, but non-dismountable ones have to be carefully sawed along certain marks, without touching important structural elements. After replacing the bearing in such a tank, it must be hermetically sealed, secured with self-tapping screws or bolts. It happens that not only the bearing assembly itself fails, but also the bushing from the drum. In this case, it is necessary to at least break it in with an experienced turner.
If the bushing is very deformed, then it is worth replacing it. Pay attention to the quality of the spare parts you buy and purchase them only in specialized stores. Before you do any repairs yourself, study this topic thoroughly from various sources. Be sure to watch some videos
In our VKontakte group there is a detailed video about the inspection and replacement of bearings:
Very often, the need to replace or lubricate the oil seal arises due to frequent washing at high temperatures. If greasy oil stains appear on freshly washed laundry, you need to think about lubricating the part for further operation of the unit. It is possible that you will need to install a new oil seal or bearing in the washing machine.
The oil seal is a small part in a washing machine that plays a very important role. It protects the moving parts of the washing machine from water that spins in the drum during washing. Thanks to the seal, water cannot enter the electronic parts from the tank. The oil seal is put on a special bushing and fits tightly to the outer part of the drum.
The oil seal, also known as the cuff, can be made of different rubber - silicone rubber, fluorine rubber or nitrile-butadiene material. This part is constantly subject to friction and very often its wear causes malfunction of the washing machine.
To extend the service life of the oil seal, you need to constantly lubricate it so that it does not dry out. When the rubber seal dries out, water can enter the bearing and cause serious damage.
It is quite difficult to understand that the oil seal is being rubbed. A washing machine sound specialist can determine this malfunction. It is better to replace the oil seal at a service center, but you can install it at the client’s home - in this case you will have to disassemble half of the unit.
Possible difficulties
It is not recommended to replace bearings yourself without basic knowledge of the design of such equipment. Since the part being replaced has a complex location, to get to it you need to remove many other components, and this is a complex technical process.
But the main difficulty lies in reassembling the machine.
What is easy to disassemble can cause a lot of trouble when installing in its place. It is especially difficult to return all elements of the machine's electronics to their original state. There are other difficulties in this event. The task of removing old bearings and installing new ones is not an easy one. If this fails, you will need to call a technician, and the car will remain in a disassembled state until he arrives.
In addition, without the necessary experience, you can easily make a mistake in choosing the bearing size; this can only be clarified after complete disassembly. Another important nuance - when disassembling the car, it is advisable to take the opportunity to inspect all the components being removed and, if necessary, replace them.
But it is quite difficult for a non-specialist to assess the condition of the parts . As a result, it may happen that immediately after replacing the bearing something else will fail.
How to connect the motor from a washing machine to a 220V network
More modern washing machines are discarded and from these machines you can screw together a good commutator motor and use it for various devices. The motor that I got from one previous article about a discarded washing machine is brand HXGP1L.51 Welling. Operating voltage 220V, washing power 30 W , with a spin of 300 W. This is a commutator, single-phase, brushed electric motor.
Such a motor contains two stator windings, a movable rotor with windings, two brushes and a tachometer or tachogenerator.
The motor has a block with six contacts. The two leftmost contacts are the tachometer terminals and we don’t need them. Contacts three and four are the rotor terminals, the resistance of the rotor coil, the ohmmeter will show two Ohms at any position of the rotor.
Contacts 5-6 are the terminals of two stator coils connected in series, their resistance is 6.5 Ohms, and as the rotor rotates, their resistance will increase.
To start the motor from a washing machine, you need to connect contacts 4-5 together (one brush terminal and one stator terminal), and apply 220V alternating voltage to contacts 3-6. In this case, the rotor will rotate counterclockwise.
To change the rotation of the motor in the opposite direction, you need to connect contacts 3-5, and apply 220V to contacts 4-6.
When starting, the engine jumps a little, this must be taken into account when starting.
Source
Tank disassembly
To disassemble the tank, you must:
Remove the second counterweight and the rubber cuff from it. Unscrew the bolts and remove the upper part of the tank, and also remove the gasket that ensures tightness. Turn the tank upside down and remove the pulley. Use a screwdriver to block the pulley so that it does not rotate and unscrew the nut. Remove the pulley. Access to the shaft will open. Find a similar nut so as not to spoil the original one, screw it back on and knock out the shaft with light blows of a hammer on the nut. The blows are applied strictly at right angles so as not to bend the shaft. After the shaft is knocked out, unscrew the nut and remove the lower part of the tank, freeing the drum. Inspect the crosspiece for damage. If there is play, it needs to be changed. Clean the shaft from dirt and grease. If defects are found, it is also better to replace
Particular attention is paid to the shaft sleeve. If it is worn and there are transverse grooves, it should be replaced
Otherwise, moisture ingress will cause the new bearing to fail.
Recommendations for using technology
To ensure that bearings fail as rarely as possible, it is necessary to operate the Kandy washing machine correctly. The equipment should not be overloaded; there should be no more things in the drum than is allowed by its characteristics and the selected program. Bulk items should be placed inside the drum carefully and distributed evenly there. Imbalance and overload negatively affect the condition of the bearings.
If the owner of the equipment detects the first signs of bearing failure, there is no need to aggravate the situation. It is recommended to change them immediately, otherwise this will lead to failure of more important components and more expensive repairs.
Video instructions for replacing bearings in washing machines of various brands
Answering the question of how to change the bearing on an LG washing machine is still half the battle. After all, there are design differences between brands, which means it would be a big mistake not to consider other well-known brands. To make it easier for the dear reader to understand how this work is performed, the editors of Seti.guru have compiled a short video review on the repair of units from various manufacturers.
How to change a bearing on an Indesit washing machine: nuances of repairs
Replacing the bearing in Indesit washing machines is simpler than the previous option we described, as the reader will now see.
Tricks for replacing bearings on Samsung washing machines
Quite a common brand. But, despite the high build quality, this brand is also subject to bearing wear. We offer a video tutorial on repairing units from this manufacturer.
How to replace a bearing in an Atlant washing machine
Atlant washing machines have long and firmly conquered the market in this segment, although today their popularity has begun to decline. The reason for this is quite tough competition from cheaper and equally high-quality brands.
Replacing the drum bearing of an Ariston washing machine
The Ariston brand produces not only washing machines, but also dishwashers, refrigerators and other household equipment. Among the reviews on the Internet, the editors of Seti.guru could not find any negative ones. All owners are quite satisfied with the purchase, which indicates the high quality of the equipment.
How to change a bearing in a Zanussi washing machine
Despite the high cost of household appliances from this brand, they have not lost popularity among Russians for many years. As the owners say, Zanussi is equipment you can trust. Let's look at a video example of the algorithm of actions when replacing the bearing of a washing machine of this brand.
The editors of Seti.guru specifically chose shorter and more informative videos to make it easier for the reader to understand the general algorithm of actions. As can be understood in general terms, the actions are similar, there are only slight differences in operation associated with the design features of brands and models.
If you call a repairman, don’t let him deceive you and discover non-existent breakdowns. Good to know! When a hum occurs, it is not always necessary to replace components. Sometimes it is enough to simply lubricate the bearings of the washing machine (how to do this is probably already clear) - often this is quite enough
However, it is worth paying attention to the backlash. If present, replacement is required.
However, the seals will have to be changed after disassembly in any case.
Summarize
Despite the fact that the work of repairing automatic machines is not easy and quite labor-intensive, if you have free time, it is better to do it yourself. This will save money, and it’s not for nothing that they said from time immemorial: “If you want to do it well, do it yourself.” But before you disassemble the bearing, you should soberly assess your strength. Remember that a normal technician will not assemble the unit you disassembled.
Sources
- https://seti.guru/zamena-podshipnika-v-stiralnoy-mashine
- https://remonteha.ru/stiralnye-mashiny/pomenyat-podshipnik-na-stiralnoy-mashine/
- https://mashmaster.ru/zamena-podshipnika-candy/
- https://stirkaved.ru/kak-zamenit-podshipnik-na-stiralnoj-mashine.html
- https://homius.ru/zamena-podshipnika-v-stiralnoy-mashine.html
- https://stroy-podskazka.ru/stiralnye-mashiny/neispravnosti-i-remont/zamena-podshipnika-candy/
- https://sovet-ingenera.com/tech/stiralki/zamena-podshipnika-v-stiralnoj-mashine.html
- https://StiralkaInfo.ru/remont/kak-pomenyat-podshipnik-na-stiralnoj-mashine-kandi.html
- https://balashikha.trade-services.ru/services/stiralnye-mashiny/candy/
- https://tehnika-soveti.ru/menyaem-podshipnik-v-stiralka-candy/
[collapse]
Step by step disassembly
Before starting repairs, it is necessary to disconnect the machine from the electrical network. This will make the work process as safe as possible. In addition to disconnecting the unit from the power supply, you should unhook the cold water supply hose so as not to flood everything around.
How to remove the top of the hatch? First of all, you should remove the top of the device body. The cover can be fixed using various screws, which can be easily unscrewed with a Phillips screwdriver. The screws are located under the top of the panel on the back side. Once they are unscrewed, you can press lightly on part of the lid. You will need to press on the front side. Now you can lift the cover body up.
How to remove the detergent tray? The Candy washing machine has a dispenser that is easy to remove. In order to properly remove the detergent tray, you will need to find a separate plastic button by feeling. Typically the element is located in the central part of the tray. You should press the button and pull the container in your direction.
How to dismantle the control panel? The control panel is secured to the washing machine with two screws. The first screw is located under the powder dispenser. The second screw is located on the opposite side. The control panel will need to be handled with extreme care as it is very fragile. As soon as it is removed from the device, you must immediately hang it on a hook or put it away so as not to accidentally damage fragile elements.
How to remove the service panel? To dismantle the service panel, you will need to simultaneously press two locking latches, and then press the third one located in the middle. How to remove the front wall? You must first remove the metal clamp that holds the hatch cuff. The cuff is installed in the loading hatch. The metal clamp is secured with a small spring. You can push it slightly and the clamp will be removed. Now you can push the cuff inside the drum.
The hatch door may interfere with the removal of the front wall, so it would be a good idea to unscrew it. It is tightened with several bolts. After this, you will need to remove the front panel of the device. We unclip the latches that hold the protective cover. If you lift the panel a little, you can easily remove the additional hooks that hold it in place. Inside the control panel there are microcircuits that can be disassembled individually, if necessary.
How to remove the back cover. It is necessary to unscrew the screws using a screwdriver. Typically, screws are placed around the entire perimeter of the back wall to securely fix the elements.
Selecting a location
A washing machine is a large, heavy household appliance that requires a permanent location. When choosing a location to place the washing machine, a number of important factors are taken into account:
- Proximity to water and sewer pipes.
- Possibility of connection to a grounded outlet.
- Good ventilation.
It is important to place the washing machine in such a place that nothing interferes with free access to the loading hatch and control panel. Place the household appliance on a flat, hard surface
To ensure natural ventilation of the housing, the washing machine is positioned in such a way that there is 5 cm of free space between the wall and the back and side walls.
Most often, the washing machine is installed in the bathroom or kitchen, less often in the hallway or utility room (closet).
It is strictly forbidden to build freestanding models of Candy washing machines into furniture. Otherwise, the lack of free space around the case and the lack of ventilation can sharply shorten the period of operation of the household appliance without repair.
How to remove and replace a bearing from a front-loading washing machine drum
In this case, first of all, let's prepare the tools. This process is more labor-intensive, since you have to remove the drum. Let's look at the whole process using the example of working with a Samsung automatic washing machine, model s-1052. We specifically took a standard model in order to use an example of working with it to show the principle of replacing bearings, which is suitable for similar work with many other household appliances of this type.
Next, follow the following instructions.
Illustration Description of action
An important point: before you begin any work on assembling and disassembling your washing machine, check its service model and purchase the required replacement set of bearings. The data can be viewed on the back panel, here.
The peculiarity of our model is that it has a blank back wall and we will have to do all the work from its front side. But don't worry, it's quite simple. And we will show all the stages in detail.
We dismantle the top cover and powder receiver
Before doing this work, it is important to disconnect all elements and terminals.
Carefully remove the panel, having first unscrewed all the fixing screws. Please note: the upper part of the panel is secured with latches - do not damage them during dismantling.
Remember or photograph the original position of the chips and terminals, if they are similar - mark the necessary wires with electrical tape of a certain color to prevent mistakes during assembly.
This way we freed up the front panel for work.
We begin work by releasing the bottom panel, which is usually used to clean filters. We free the front panel from the screws.
We take out the tank, remove the strap. Next, we dismantle the engine and shock absorbers, since they will not allow the tank to be disassembled in half.
We remove the pulley, clearing the approach to the oil seal with bearings
For disassembly, it is better to use a 17 mm spanner to unscrew the pulley.
This is the deplorable state our oil seal is in. Now you need to get to the bearings.
Before continuing work, pay attention to the condition of the shaft itself. If the bearing jams very often, the wear on the shaft can be quite severe.
Next, we free the oil seal from the bearing, replace them, and coat the oil seal with grease. In this case, the work is carried out similar to that which we described above.
Further, all stages are carried out in reverse order.
Related article:
Required Tools
You won’t be able to get to the bearing without special tools, because you first need to disassemble the washing machine. In order not to damage the spare parts, it will not be possible to arm yourself with only one screwdriver. For this purpose you will need a whole list:
- pliers;
- screwdrivers - slotted and Phillips;
- chisel;
- regular hammer;
- waterproof sealant;
- a set of keys;
- rubber mallet (optional).
Changing a bearing yourself is a labor-intensive and responsible process at every stage. In fact, you will have to completely disassemble the washing machine and then reassemble it. It is advisable to photograph each step, and write down the sequence of actions. Only in this case will it be possible to carry out the replacement successfully.
You will need to purchase waterproof bearing grease for your tool kit. If it is unavailable, lithol can be used.
Disassembling the washing machine
To replace the bearing, you first need to disassemble the Kandy washing machine. The process looks like this:
Unscrew the screws, slide the top cover back and remove it. Remove the top counterweight plate. Unscrew the fasteners and remove the back panel. Pull up to remove the left and right top side panels. Unscrew the two bolts on the sides, turn off the wiring, photograph it, and remove the control panel. It is held on by several plastic latches, which are very fragile.
They need to be squeezed out with caution. Remove the hoses for filling water into the detergent dispenser. Turn off and remove the pressure switch. Unscrew the fasteners holding the control unit, remove the board, photographing the wiring. After removing the bolt, remove the rheostat. Disconnect the outer and inner clamps and remove the cuff on the hatch door. Remove the screw and remove the detergent tray. Disconnect the pipes holding the powder receiver and the tube from the rheostat. Remove the belt, heating element, motor, temperature sensor. Disconnect the remaining wiring. Disconnect the hose from the tank to the pump.
Now you need to make sure that all wires and hoses are disconnected and all parts that may interfere with the removal of the tank are removed. The washing machine door must be open. To remove the tank, you need to remove it from the side springs and pull it up.
Preliminary actions
Surely, every owner has a small drawer with the most important tools: a hammer, drill, pliers, screwdriver, screwdrivers and hexagons. To disassemble Kandy's automatic machine, the listed devices will be sufficient. The only thing, in addition to this, in order to repair the unit, you will have to prepare a hacksaw for metal.
It is better not to order parts that need to be replaced in advance. You can confuse the markings of components and purchase unsuitable parts. It is advisable to first get the elements, and only then buy new ones, similar to the ones removed. Having prepared the tools, you can start working on the automatic machine itself. The repair process will take a lot of time, so it’s better to immediately arrange a comfortable workplace for yourself. Ideally, take the washing machine to a garage or workshop.
If this is not possible, the device should be moved to a spacious room where nothing will interfere with the disassembly procedure. The floors in the room must be covered with fabric. You also need to ensure that free access is provided to all sides of the washing machine. After preparing the workplace, you can begin repairs.
Features of repairs with vertical loading
Here the drum is supported by 2 axle shafts and 2 bearings. With such a reliable design, they fail infrequently, usually when there is some other failure.
They are often damaged by water penetrating through a faulty seal. Rusting and steadily becoming clogged with dirt, the bearing eventually fails.
Repairing such machines is much more convenient. When communications are disconnected, 2 side covers of the housing are removed, and access to the work area is provided.
The bearing on the side where there is no drive pulley is replaced first. To do this, the caliper is removed - a ready-made set of bearings and oil seal enclosed in a housing.
The calipers of the same machine have different thread directions. On the side where the pulley is missing, it is right-handed and unscrews counterclockwise. On the reverse side, such a part has a left-hand thread and is unscrewed clockwise
The seat of the oil seal, as well as the shaft itself, is freed from contamination. When installing a new bearing, it is necessary to avoid distortion of the sealing ring.
Otherwise, it will not be able to prevent fluid leakage, which will cause new bearing failure.
Changing the caliper on the motor side begins with removing the belt and drum pulley. Then comes the turn of the grounding block. Next the caliper is unscrewed. The shaft and seat, as in the first case, are thoroughly cleaned.
A serviceable oil seal is installed in its proper place, and the caliper is tightened. There is no need to put in much effort, because the carving is made on plastic. Assembly, as usual, is carried out in reverse order.
We also have a separate article on our website that discusses in detail the process of replacing bearings in an Indesit washing machine.
Other breakdowns
If the machine cannot get rid of waste water (error “E03” or 3 flashes), the problem is most likely a clogged filter. The pump could also break down. Do the following:
- With the front lower panel removed, locate the drain filter on the left side of the machine.
- Place a container under the machine, unscrew the filter and free it from accumulated dirt.
- Also inspect the tank pipe to which the filter is attached. It often becomes clogged with silty deposits, which must be carefully removed with a screwdriver.
- After turning on the machine, run it in drain mode and look at the pump impeller (it can be seen through the hole in the filter plug). If the pump is working properly, it will rotate. It happens that the impeller rotates, but the operation of the pump is accompanied by a strong hum, and when the impeller rocks from side to side in a direction perpendicular to the axis (the machine, of course, must be turned off), you can feel that it is very loose. In this case, the impeller may jam from time to time, which is the cause of drainage problems. Such a pump needs to be replaced, for which you will have to remove the back wall.
It will also be useful to clean the inlet filter, for which you need to disconnect the inlet hose. It also often becomes clogged with sand and rust, as a result of which water begins to flow into the machine very slowly (error “E02” or 2 blinks).
Washing machine filter
The reason for the lack of normal drainage can also be a malfunction of the level sensor, also called a pressure switch (located under the top cover). If the tube attached to it becomes clogged with dirt, the sensor will not be able to function. After removing the dirt, you can check the operation of the pressure switch by blowing into the tube. A working device should respond with a click.
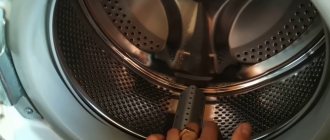
If the machine starts to make a loud noise, one of the bearings most likely needs to be replaced. To do this, you need to remove the tank, which in Candy machines is done through the top. In some models, the tank is solid and to replace the bearings it needs to be sawed and then welded. This can only be done correctly in a workshop. At home, replacing bearings is only possible for machines with a holding tank. To get to it, you need to remove the panels - top and back.
It is also better to dismantle the front panel so as not to accidentally scratch it when removing the tank.
Before you remove the tank, you need to do the following:
- disconnect all the hoses connected to it (the clamps are opened with pliers);
- remove the powder distribution hopper;
- unscrew the counterweight;
- remove the belt from the drum pulley;
- disconnect the wires from the heating element;
- after unscrewing the bolts and disconnecting the wires, remove the engine (slides out along the guides);
- remove the hatch by unscrewing the screws located under the sealing collar (the clamp securing the cuff is pryed off with a screwdriver).
Having disassembled the tank into two parts, remove the pulley from the drum shaft, and then carefully knock the shaft out of the bearing. You cannot hit the shaft directly - you need to place a wooden block. Next, you need to use careful, uniform blows around the perimeter to knock the bearing out of the tank.
The new bearing is installed in place using a simple device consisting of a pressure washer, a threaded rod and a pair of nuts. One nut is screwed onto the rod from one side - it will put pressure on the pressure washer that presses the bearing. The second nut is screwed onto the rod on the other side (rests against the tank) - it must be rotated slowly.
In small apartments, residents prefer to save time on everything as much as possible. Let's look at how to choose a compact washing machine under the bathroom sink and how to install it.
This information will help you decide on the choice of kitchen faucet. Characteristics of devices by manufacturer, material and mechanics.
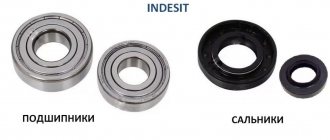
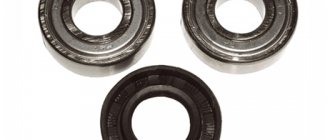
In order to replace bearings in a Candy washing machine, we will need:
- Actually the bearings themselves. The machine has two of them: one large and one small. You can order them online or buy them in a company store, if you have one in your city.
- Stuffing box. It closes and seals the bearing housing. You can buy it separately or purchase a whole repair kit, which includes all the necessary parts.
- Special lubricant for oil seals.
- Sealant.
- Flathead screwdriver.
- Screwdriver with a set of hex bits.
- Pliers.
- Bearing puller.
- Washers made of durable metal, the outer diameter of which is slightly smaller than the diameter of the bearings, and the inner diameter is slightly larger than the internal cross-section of the bearings.
- Threaded rod and two nuts for it. The rod should fit easily into the washers. Length – about 30 centimeters.
- An adjustable wrench or set of wrenches.
- Mallet (rubber or wooden hammer).
Note that a number of models of cars of this brand have a one-piece tank installed. You can remove the block with bearings from it only by sawing the tank itself in half. It is not advisable to do this at home - you will have to change the entire unit with the drum as a whole, which will cost about 6-7 thousand. We will talk about a less extreme case - replacing bearings in Candy machines with a collapsible tank.