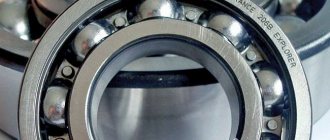
A bearing is an important element of the internal structure of a washing machine. It is installed on the drum and serves as a support for the shaft that rotates it. At all stages of washing, and especially during spinning, the bearing assembly experiences serious loads, so the part often fails.
The bearing installed in the drum of the washing machine can be replaced with your own hands.
Most modern budget models of Indesit washing machines, such as WISL 82, WISL 85, WISL 102, WISL 105 X, IWSD 5085, are equipped with a solid tank, which makes access to the bearings difficult. Collapsible tanks are installed on older models with a mechanical control system, for example, Indesit WI 101 EX.
If, when a bearing fails, you are offered to completely replace the washing machine tank, it may be better to turn to other specialists who can make a spot replacement and save your budget.
Manufacturers of household appliances, if a bearing is damaged, recommend replacing a non-separable tank with all the parts inside: drum, shaft, bearings, etc. The cost of spare parts alone in the case of such repairs can reach half the cost of the washing installation itself. However, there is a way out - you can try to replace the bearing yourself or entrust it to a specialist.
Even service centers do not trust newbies to replace a washing machine bearing, so if you do not have the necessary experience and do not have the necessary tools, it is better to entrust the repair to specialists.
Bearings are important elements of the internal structure of a washing machine.
In this article we will tell you how to replace the bearing in an Indesit washing machine with a glued, non-separable tank. Repairing an installation with a tank that is disassembled will be similar, except for the need to open the plastic.
Design and principle of operation
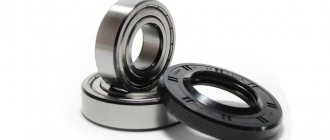
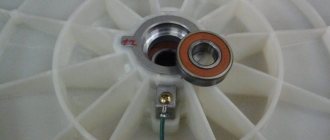
A typical washing machine assembly has two bearings. They serve as a connecting link between the drum and the pulley. There is a larger bearing near the drum because it carries a high load. The smaller part is located at the other end of the shaft.
Thus, the washing machine bearings allow the drum to rotate evenly during washing and spinning.
Diagnosis of failure
It is necessary to first check and find out whether the washing machine needs to replace the bearings.
To identify malfunctions, you can rely on the main symptoms:
- The machine makes a louder noise than usual when spinning;
- During manual rotation, the drum begins to beat.
It is important to take into account that the machine can make noise for various reasons, and before diagnosing a malfunction in the bearing system, it is necessary to exclude factors such as foreign objects getting inside the device, and also make sure that the water intake and drainage system is working properly. In the case when the tested mechanisms operate without interference, we can assume that it is the old bearings that are causing the noise and it is necessary to begin replacing them immediately. In the case when the tested mechanisms operate without interference, we can assume that the old bearings are the cause noise and it is necessary to immediately begin replacing them
In the case when the tested mechanisms operate without interference, we can assume that it is the old bearings that are causing the noise and it is necessary to immediately begin replacing them.
Causes of wear
With proper operation, bearing replacement on an Indesit machine will be needed after 5-6 years. This is how long it takes for natural wear and tear to occur. If the breakdown occurred earlier, the following factors contributed to this:
- Incorrect drum loading. Constant overload of laundry causes imbalance, which leads to rapid wear of parts.
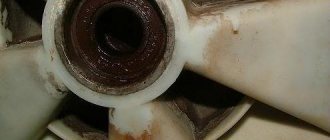
- Damage to the oil seal, which acts as a sealing rubber. Thanks to special lubricant, the oil seal reliably protects the bearing from water ingress. As a result of its damage, a leak occurs. Water washes away the lubricant, which causes corrosion and bearing failure.
Find out about the breakdown by external signs:
- There is a leak under the washing machine.
- When spinning, the SM makes a lot of noise, hums, and vibrates. A grinding sound is heard.
- As you spin the drum by hand, you will notice that it does not rotate uniformly. A backlash is formed (a gap between the tank and the drum).
Why do you need to change the bearing?
Bearing failure is a problem with many Indesit washing machine models. Typically, the part is designed for 6-10 years of service, but additional loads, for example, exceeding the norm of laundry loaded into the drum, reduce the service life of the metal rings.
Often the first thing to fail in a bearing assembly is the seal - a rubber gasket that protects metal parts from contact with water. Water from the drum gets onto the bearings, washes out the lubricant, and the parts can no longer ensure smooth rotation of the shaft. Knocking, grinding and other unpleasant sounds occur, especially during spinning. If you shake the drum by hand, play will be noticeable relative to the tank.
Remember that even the slightest mistake when repairing the installation can lead to irreparable consequences. In order not to damage the equipment with your own hands, before you start replacing the bearing, carefully read the operating instructions for the washing machine.
You should not delay replacing the bearing - improper rotation of the drum can lead to destruction of the shaft, the drum itself, the tank and other parts of the washing machine.
How to choose a new part
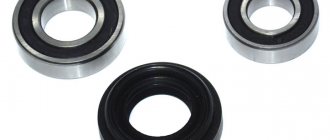
If you do not know what bearings are in the Indesit washing machine, then it is better to remove the old parts and go to the store with them. For example, for the SMA Indesit WISL 86 model, parts ZVL 6204-2RSR and ZVL 6205-2RSR are used.
The easiest way to find out how much a bearing for an Indesit washing machine costs is in the online store. Buy the part you need, specifying the make and model of your car.
Be careful! Before replacing, purchase two replacement bearings and seals at once. You need to change all the parts at once, otherwise after a short time you will have to change everything again.
It's time for the reverse process
A rather important point on which the entire outcome of the event will depend is to correctly and hermetically connect back the two halves of the tank of the Indesit washing machine.
First you need to carefully and accurately align and clean the edges of the halves. You can use sandpaper. It's better to degrease it too. We put the two halves of the tank next to each other. In order to do this accurately, we previously marked them with a marker. Remember?
But now you need to drill about 20 holes for the bolts at the joints. Accordingly, you need to choose places for drilling in such a way that nothing interferes with tightening the nuts later.
You should not use self-tapping screws; our task is to tighten the tank halves well. In order to ensure tightness we will use silicone sealant. Carefully coat the joints and tighten with bolts. Who did the Indesit developers want to confuse?
In general, the further assembly process occurs in the reverse order and there is no point in describing it. The main thing is that everything falls into the right places and there are no excess parts left.
And finally, in conclusion. There is nothing that a person with the right head and hands cannot fix on his own. Any problem or trouble is just an additional challenge and incentive to prove to yourself and others that everything is possible and everything is real. You just need to try a little.
Preparing for work
How difficult is it to replace a bearing in an Indesit washing machine with your own hands? The repair itself is not difficult, the most difficult thing is to get to the bearings, since this requires completely disassembling the washing machine.
What tools are needed?
You will need:
- Set of screwdrivers: flat, Phillips.
- Socket wrenches.
- Open-end wrenches.
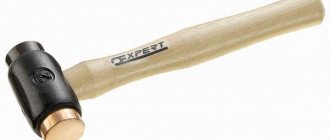
- Hammer.
- Bit.
- Hacksaw, metal blade.
- Pliers.
- WD-40 product.
- Glue or sealant.
- Replaceable parts.
Prepare the car for repair. Disconnect it from the power supply. Turn off the water supply and turn off all communications, draining the water from them. Also drain the water from the pump filter - it is located below, under the front panel behind the hatch. Unscrew the filter and drain the remaining water.
Move the SMA away from the wall so that it is convenient for you to replace the motor bearing of the Indesit washing machine. Now you can start disassembling.
Stages of disassembling a washing machine
First of all, the washing machine must be disconnected from the communications that supply it with water and electricity, and provide drainage. To get to the broken bearing, you will have to remove the tank, and to do this, virtually disassemble the entire car.
It would be a good idea to have a camera or cell phone with a similar function to record all stages of disassembly.
When assembling, such forethought can be of invaluable help, because relying 100% on memory is more than risky. As a last resort, the entire process needs to be recorded, especially the order in which the wires are connected.
Step #1 - remove the cover and dashboard
First the cover is removed. To do this, unscrew 2 screws on the back wall and lift it, moving it slightly back.
The next task is to remove the washing powder tray. It will leave the grooves quite freely if you pull it towards you by extending and pressing a special latch.
In models not equipped with such a button, the powder receptacle can be pulled out by slightly pressing it down.
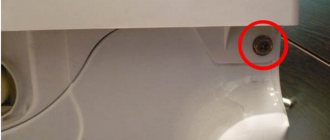
Before removing the upper instrument panel, you need to determine where the bolts securing it are located. Their location and number may vary depending on the model, but in the place where the powder tray was removed, some of the screws are located exactly.
Another one is always placed on the right side of the washing device. If after unscrewing them the panel does not want to be removed, you need to continue searching for the missing fasteners.
In principle, the panel can be left hanging, but it will not be very convenient to work, and besides, the wires can be accidentally damaged
Before disconnecting a whole bunch of wires going to the control board, be sure to photograph them - this will be very helpful when reconnecting.
Next you need to remove the bottom panel: after pressing with a flat screwdriver on the latches holding it, it is easily released.
Step #2 - release the hatch, remove the front wall
The next step is to release the cuff, that is, the rubber gasket, one side placed on the tank and the other on the front panel of the washing machine. It is fixed with a spring and a clamp. We discussed the removal process in more detail in this instruction for replacing the cuff.
By running your hand along the perimeter of the cuff, you can find a spring holding the ends of the clamp together. The spring together with the clamp is taken out into the light by prying it off with a flat screwdriver. The cuff is carefully disconnected from the hatch hole and tucked into the tank
It was time to dismantle the front wall. To do this, with the hatch latched, remove the bolts holding the panel and carefully remove it from the hook, remembering the wire connecting the panel and the hatch lock.
As soon as possible, the wire should be disconnected. There are no obstacles left to remove the wall.
Step #3 - remove the heating element, wiring and tank
First of all, the internal top panel is removed, for which the screws securing the water supply valve are found in the back of the device and removed. After this, the bolts on the panel begin to twist.
But you shouldn’t rush to remove it right away - before this action you should disconnect it, not forgetting to take pictures of the wires and pipes with the camera.
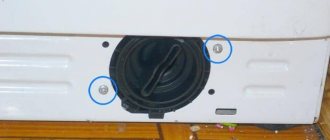
Next comes the dismantling of the drain pipe, connected to the tank using a clamp. The clamp is unscrewed and the pipe is removed. It’s a good idea to have a rag on hand, as remaining water may leak out of the nozzle.
The heating element must also be removed. To do this, disconnect the wires leading to the heater.
In different models, the location of the heating element is possible both in the front and in the rear of the automatic washing machine, so you need to be prepared to dismantle the back wall.
Dismantling and installation
To remove the bearing, use a puller. If this is not the case, place a chisel on the outer race of the part and lightly tap it with a hammer until you knock out the bearing.
Before installation, clean and lubricate the seat. Once the new part is seated, tap the outer race evenly using a bolt and hammer. Make sure the bearing sits evenly.
Do the same with the second part. Pre-lubricate the oil seal, then install it on top of the bearing.
Return the drum to the tank. Connect the two parts by covering the edges with glue or special-purpose sealant. Then tighten the bolts in the correct places. You can begin reassembling the machine.
Now you know how to change a bearing in SMA Indesit - it’s quite possible to do the work yourself. A video on the topic will help you:
Common replacement mistakes
Please carefully study the following recommendations so that replacement does not become an expensive repair:
the pulley is broken, you can’t pull it, just rock it slightly to the sides and pull lightly;- breakage of the bolt heads; if the bolt does not fit, spray WD-40;
- break in the temperature sensor wire, be careful with the tank lid;
- the moving unit is damaged;
- The gasket of the moving unit has not been replaced;
- All sensors and wires are not connected during assembly.
So, you are convinced that replacement is quite a labor-intensive task, but doable if you have at least a little experience working with equipment.
If this process is difficult for you, we advise you to contact professionals, for example, an official service center; check the price on the website.
see also
Comments 69
I'm very concerned about how the pulley should fit on the shaft. Flush or the shaft does not reach the end of the pulley by about 1 mm. The second time I changed the bearings I didn’t remember.
I got it so it doesn't reach 1 mm. And this, as I understand it, is correct - in this position it turns out to be good to tighten the pulley later when tightening. A friend of mine installed it for himself - I don’t know how it happened, maybe the bearing was a little smaller - but he managed to install it flush. So, when tightening, the pulley dangled and it was not possible to tighten it properly.
Thank you. Yesterday I was pulling the shaft with notches into the bearings, I thought I would break the bolt. So I’m not completely sure whether the edge of the seal is in the right place on the bushing. The first replacement was in the 9th year of operation. The second one in three years.
What sealant should I use? Can we say abro red which is for gaskets?
I don’t know which one is correct according to Feng Shui... I took the best, most expensive white silicone sealant. I haven't tried red, so I won't recommend anything. . But in my opinion, someone made a car, if I’m not mistaken. It’s better to consult with artisans—those who do this all the time. They know exactly what lasts longer
Well done, Leonid! Test 5+! It is presented in an accessible, simple, short and, plus, humorous manner. Everything is clear...how long did it take to do everything? Now, of course, everything is on sale and everything can be bought... And I’ll think about how much time it will take me to repair... Once upon a time, my Vyatka tank leaked (after 20 years of service) and I dismantled it, cooked it, etc. .d. and so on. Now I think I can shake off the old days and start repairing...Indesit...Now I know the whole algorithm...Thank you. .
Thanks for the comment) I didn’t expect there to be so many views.)) I don’t remember how long it took, but after working with her I was free to fiddle around. Taking into account all my misadventures, trips in search of spare parts, tools, cleaning all the guts, etc. I think I spent about 5 days fiddling with it, doing a little bit at a time. There, a year and a half after this renovation, there was a continuation of the story... if you’re interested, I can tell you) )
Well, listen... epic. After my repair, the machine threshed for a year and a half almost every day, and one fine day it froze at the stage of draining the water. Those. washes, reaches the first drain of water, and. . pumps out, pumps out, pumps out... And so on ad infinitum. Until you knock it out. It seems like there is no water anymore, but it still puffs and puffs. I have to turn it off, there is still water, drain it through the bottom, doggy style, with a rag in my hands, remembering Benya’s mother and cursing that day “when I sat down at the steering wheel of this vacuum cleaner.”, the laundry is wet, in short. The first idiotic thought that came into my head was pompe haplyk. I'm looking for a disassembly, buy a pump, install it - figs, it didn't help. Then, on the advice of the disassembly master, I disassemble this fool, remove the engine, tensile and brains, and drag it to specially trained people in the workshop. (All this a couple of days before the vacation, happens before departure, in emergency mode). Washing machine repair gurus tested the brains, engine and heater and found that the tacho sensor on the engine and the temperature sensor on the heater are faulty. Nothing criminal was found in the brains. Do it, I say, motherfucker. They rewound the tacho sensor, they didn’t have a thermal sensor like that, I traveled half the city looking for one, found it, brought it to them, tested it - it’s good, it doesn’t break through. I’m taking all this fuckery and trotting home - I’m leaving tomorrow, there’s plenty of laundry to do. . I assembled the machine, loaded it with laundry, and started it up. Phew, I think, finally. Yeah, right now. . .The same crap again. Again forced shutdown, rag, profanity. . I called the guys and said - shozakher, guys? They say, well, we don’t know. . You need to bring the machine to us and we will continue to look. I say, I’m going on vacation tomorrow, damn it. Okay, I'll be back and continue. While I was away, I thought about different things. I tried to explain what was happening logically. At night, some people have ironic dreams, but for me this beast with its shadows and tacho sensors. I can’t understand what she’s missing. And this incomprehensibility has already begun to bother me. Because when I arrive home, she is waiting for me there. And then it dawns on me: pressure switch! Well, he’s trying to get out of it, since the brains on the stand with another pressure switch worked normally! I'm returning from vacation. Immediately 3.14 I'm going to disassemble it, please give me a known working pressure switch, for the sake of the experiment. I'll put it on. I launch in full confidence that I have defeated her. . The same. Bleat. There is an irresistible desire to throw the washing machine from the 9th floor and watch it fly into pieces. I'm picking my brain again. I'm taking it to the boys. Another one is already testing. I don’t know, he says, everything works. Some kind of shaitan. Well, look for a short circuit somewhere. We don't want to do this. Damn, I’m certainly patient, but now my patience is starting to run out. I’m off to the showdown again. I take another shade. I’m driving, I put it down, and it passes by again. The disassembly guy is already laughing at me and offers me to exchange for his excellent LG. Although it is also not new, it works perfectly, with a collapsible tank. And he even gave a guarantee for a couple of months. With my extra payment. And it’s like he’ll be picking mine himself. He agreed, exchanged money, brought it home and crossed himself) Well, of course, I told him about repairing the tank. After a while I called him and said: what happened to her? ? ? And he says: like, when you glued the tank, you didn’t put the sealant everywhere. Like, I didn’t put it on the appendix, because of this there was no tightness and the pressure switch did not work correctly. And he re-sealed the tank and everything was ok. I say - how did she grind for a year and a half? ? ? If she hadn’t glued something there, she would have done a hell of a job. Apparently, maybe some of the sealant has come off, I don’t know. Well, in short, I was choking on this bloodsucker, I’ve had enough.
What are the options for mounting the unit?
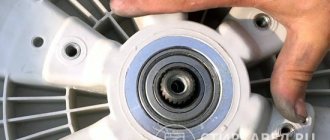
To remove the pulley from the electric motor that drives the tank using a belt, you must first determine the type of its fit.
Mounting methods differ in appearance and are defined as:
- spline connection (has a serrated edge of the shaft end);
- “hot” landing (the end of the engine axis is visually smooth and completely round);
- keyed fit (a groove is visible at the end);
- fit on a cone with a lock nut (the presence of fasteners is visually noticeable).
Automatic washing machine drive pulley
The vast majority of modern front-loading washing machines (Indesit, Bosch, Electrolux, Elgie and others) are equipped with a serpentine belt drive. Their pulley looks like a cylinder with transverse annular grooves. The fit of the part is usually splined or hot. The large wheel that turns the tank is usually secured with a locknut or screw.
Activator-type machines and older frontal models with a bottom-mounted motor are equipped with a conventional V-belt, and the pulley for them has deep flanges that prevent the belt from slipping off. These parts often have a keyway and a threaded connection.
Signs of pulley failure
Since without a part the entire washing process goes to waste, identifying a breakdown is as easy as shelling pears. You obviously won’t miss the fact that things remain dirty even after the washing machine, so start repairing them immediately. However, it is better to be one hundred percent sure, so we have collected signs for you that will help you accurately determine the condition of the pulley:
- The most obvious thing is that the drum does not rotate during washing. It's hard not to notice.
- When washing, you hear a lot of noise and knocking.
- The rotation occurs jerkily with a strong roar.
Now, if you are sure of a breakdown, it’s time to move on to the repair itself! Rest assured, it will not be difficult and even beginners will be able to do it.
Video
In the video below, you can once again familiarize yourself with the procedure for replacing the bearing on Indesit washing machines.
About the author: Natalya Mironova
Mom, wife and just a happy woman. She draws inspiration from travel and cannot imagine life without books and good films. She strives to become an ideal housewife and is always ready to share her experience.
Found a mistake? Select it and click the buttons:
Ctrl + Enter
Interesting! For washing small items on the road or in a hotel, it is convenient to use a regular plastic bag. Socks or tights are kneaded inside a tied bag along with water and a small amount of detergent. This method allows you to pre-soak things and wash them without damaging the fabric or wasting a lot of powder and water.
Astronauts, while in Earth orbit, solve the problem of dirty things using an original method. Clothes are dropped from the spacecraft and burn up in the upper atmosphere.
There is a washing machine “for bachelors”. Linen washed in such a unit does not need to be ironed at all! The thing is that the device does not have a drum: some things can be placed inside the container directly on hangers (for example, jackets and shirts), and smaller things (for example, underwear and socks) can be placed on special shelves.
The expression “soap opera” (“soap”) did not arise by chance. The very first series and shows that had a female audience were broadcast on television at a time when housewives did cleaning, ironing and laundry. In addition, to attract female viewers to the screens, commercials for detergents: soaps and powders were often played on air.
Washing machines equipped with the “No Iron” or “Easy Iron” functions can wash clothes with little to no wrinkling. This effect is achieved through a special approach to spinning - it is performed at low speeds, with long pauses, and a small amount of water is retained in the tank.
Washing machines have something to do with the origin of the expression “money laundering.” In the 1930s, American gangsters used a network of laundries as a cover for their illegal activities. By passing off the proceeds of crime as proceeds from cleaning clothes, they turned “dirty” money into “clean” money.
History knows the fact that a kitten fell into the drum of a washing machine and, after going through a full wash cycle on the “Wool” program, got out of the unit unharmed. The only trouble for the pet was an allergy to washing powder.
There are a variety of balls that are used in the washing machine. Antistatic ones will prevent the fabric from sticking to the body after washing, balls with special loops will “comb” the lint and prevent the appearance of pills, and silicone ones with pimples will prevent fluff from matting when washing outerwear.
The first officially patented washing machine was made of wood and was a box with a frame, half filled with wooden balls. Laundry for washing and detergent were loaded inside and the frame was moved using a lever, which, in turn, made the balls move and grind the laundry.