When a dishwasher from the German brand Bosch has been purchased and all the necessary connections have been made, the owners can’t wait to try it out as soon as possible in order to feel the joy of washed dishes without personal effort. The first start of a Bosch dishwasher should be carried out according to the instructions, which will help to properly commission the household appliance. Tips about this are posted in the article and will be useful to new members of the Bosch dishwasher user club.
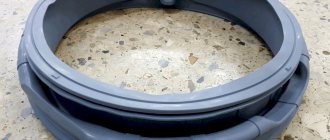
Purpose of the rubber seal
In any model of washing machine, the rubber seal performs the same function - it serves as a sealant.
It reliably isolates the space between the body and the tank. If the integrity of this part is compromised, then water can leak onto the electrics - the control board. The second rubber band - the one you see every day - is located on the door. It prevents water from overflowing from the drum and prevents short circuits.
Let's find out the reasons for the breakdown
To fix the problem yourself, it is first recommended to figure out what the cause of the breakdown is. Most often, the malfunction is associated with wear of the part or mechanical damage.
- As a result of long service life, the rubber of the cuff has worn out.
- When washing, caustic, corrosive chemicals were used, which could also damage the cuff.
- Entry of foreign solid or sharp objects into the hatch (all kinds of metal products, plastic, badges, keys, etc.).
- Frequently machine wash unsuitable items (e.g. hard-soled shoes, heavy outerwear, thick hats).
- Using low-quality washing powder or exceeding its permissible volume. Powder of inadequate quality can often cause destruction of the rubber element.
How to extend the life of the pump
Advice from household appliance service technicians will help you extend the operating time of your washing machine, reduce the likelihood of breakdowns, and save on repairs. Many recommendations overlap with the requirements of the SMA operating instructions. Trouble-free operation of the device is facilitated by the following actions:
- Before washing, empty clothing pockets of small objects, pre-clean fabrics from dried dirt and pet hair;
- use laundry bags for items with beads, appliqués, and other decorations;
- pay attention and respond in a timely manner to leaks and extraneous sounds when the machine is operating.
The cause of failure is also increased vibrations of the case - the wires powering the pump can fray. Therefore, you must initially install the unit in accordance with the standards. Sometimes the SMA control unit fails.
If trouble does occur, you should not use parts purchased from random sellers or used parts. Such repairs will not last long; they will lead to even greater damage.
When to remove the seal
Typically, removing the old cuff and installing a new cuff is necessary in the following situations:
- The rubber has served its service life.
- The cuff received mechanical damage.
The rubber seal breaks, as a rule, in the following cases:
- Low quality washing powders were selected.
- There are often hard and heavy items in the drum, such as shoes or jackets.
- Inaccurate loading of things.
- The washing temperature is too high.
- Keys, coins and other objects that could damage the elastic have fallen into the drum.
To understand that the seal is no longer suitable for use, take a closer look at your equipment. There are a lot of “symptoms” that indicate a violation of the integrity of the rubber cuff:
- You find water under or near the machine.
- When washing, you may hear sounds uncharacteristic of SMA.
If you hear a crash, it is very dangerous! Turn off the machine, drain the water, and replace the rubber band to avoid shorting.
- Closing the hatch is more difficult than usual.
Further repairs involve removing the rubber band. Next, we will tell you how to remove the cuff and not mix anything up.
Preparation for repair
In order to change the hatch cuff on an LG front-loading washing machine without much difficulty, you need to prepare. First, of course, we will study the instructions on the procedure for carrying out work and the safety instructions for repairing electrical appliances.
- We need to turn off the machine and drag it to where it will be convenient to work with it.
- We also need to purchase a new hatch seal that is guaranteed to fit your LG washing machine.
- After this, we need to collect simple tools, prepare mentally and begin work.
So, turn off the machine using the on/off button. We completely de-energize it by removing the power plug from the outlet. Next, turn off the water supply to the machine and remove the hoses: drain and fill. We twist the power cord and hoses, and then drag the machine to the place where the repair will be carried out.
Open the door of the washing machine. There is a silver plate right above the hatch that shows the full model name of your LG washing machine, for example LG F1056MD. We rewrite the name and go to the washing machine spare parts store. Knowing the name of your machine model, the seller will give you the cuff you need.
Now a few words about tools. You don’t need anything serious for the job, just a Phillips and flathead screwdriver and a flashlight. If you are too lazy to turn the screws, you can use a screwdriver. That's all, let's start the repair.
Purpose and principle of operation of the drain pump
The drain pump is designed to pump water out of the tank after individual operations and complete the wash cycle.
It consists of the following components:
- an asynchronous motor with a moving part (rotor with a permanent magnet) and a stationary part (stator with a ferromagnetic core and winding);
- rotor shaft with bushing;
- impellers;
- housings;
- seal;
- inlet and outlet pipes.
Through inlet pipes located on the top and sides, water from the tank enters the housing. The impeller, which rotates by the force of the motor, creates flow turbulence, moving water to the lower (outlet) pipe. A drainage hose is connected to the latter, which is discharged into the sewer.
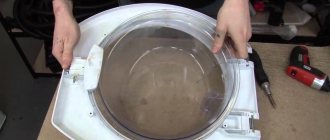
Disassembling the machine
The cuff is difficult to replace without disassembling the washing machine, so we’ll start with disassembly. We go around the back of the machine and unscrew the screws that hold the top cover. Pull the lid towards you and lift it up.
Now we go around the front of the car. We need to get the powder tray out so that it doesn't interfere with our removal of the control panel and front wall. Pull the powder tray out towards you until it stops, press the plastic tab in the center and remove the powder receptacle completely.
Having pulled out the powder receptacle, you will see that there are two screws to the right and left of its niche. We unscrew these screws as carefully as possible using a Phillips screwdriver.
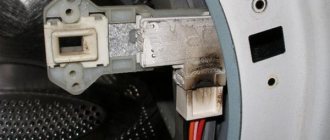
Now we need to remove the control panel of the LG washing machine. There are special latches on the back of the control panel behind the end of the housing. You can press them out using the same Phillips screwdriver. We press the latches one by one and carefully pull off the control panel.
Proceed with caution; there will be a large bundle of wires trailing behind the control panel. There is no need to disconnect them, just place the removed panel along with the wires on top of the corner of the machine body.
We take a flat screwdriver in our hands and squat down. We hook on the manhole cover that covers the garbage filter. This cover is located at the bottom on a narrow decorative panel.
Having opened the lid, we move aside the emergency drain hose, which may interfere with access to the fastening element. Using a Phillips screwdriver, unscrew the screw that holds the decorative panel. The screw is located to the right or left of the filter, depending on the LG CM model. Carefully grasp the decorative panel and pull it off the latches, first on the right side, then on the left.
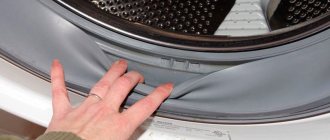
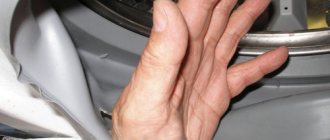
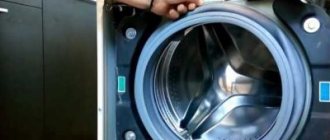
We open the hatch door wide, take a flat-head screwdriver and try to remove the front clamp of the hatch cuff. This needs to be done precisely at this stage, since this clamp will interfere with removing the front wall of the SM housing. We find the spring on the clamp. The spring can be located both above and below. We pry up the spring with a flat screwdriver and, moving it towards ourselves, carefully pull off the clamp.
Instead of a flat-head screwdriver, you can take a dull table knife; it will be even better for this operation.
At this stage of disassembly, we cannot yet remove the door sealing rubber. But we can tuck it inside the drum so that its edges do not catch the front wall of the case during further disassembly. Thread the cuff into the drum. Next, unscrew the two screws that hold the UBL of the LG washing machine. There are screws to the right of the hatch and you will need a Phillips screwdriver to remove them.
To release the front wall of the LG washing machine, you need to unscrew five more screws. First unscrew the two screws on top, and then the two screws on the bottom.
Using a screwdriver, carefully press the UBL out of the front wall so that it falls inside. Now you can remove the front wall and put it aside. There is no need to specially remove the hatch cover; let it remain assembled with the front wall of the machine body. Next we need to remove the hose attached to the cuff fitting.
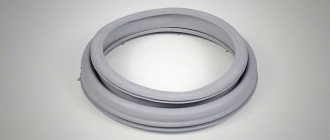
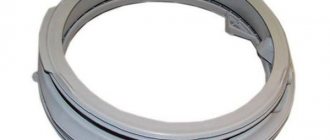
Replacing the hatch cuff of a washing machine: step-by-step instructions
The seal is attached to the tank and to the front wall of the machine with two clamps. The replacement process involves removing the clamps from the damaged cuff and putting them on a new one, placed in a shrinkable place.
Step 1: Preparing for removal
- Unplug the machine and turn off the water supply.
- Open the hatch door of the washing machine.
Step 2. Remove the outer clamp
If the clamp is plastic, you need to pull the elastic band at the junction of the latches towards you. The clamp can be attached to the body with a screw. Loosen it with a screwdriver and pull it towards you. If there is no screw, pry up the spring with a screwdriver and pull it out towards you.
There is a mark on the top of the cuff that should be opposite the mark on the tank. If there is no mark on the tank, draw it with a marker so that later you can correctly install the new seal.
Step 3. Pull out the inner clamp
To get to the second one, remove the top cover of the machine. To do this, you need to unscrew the bolts holding it.
Selecting a program and starting a Bosch dishwasher for the first time
German manufacturers produce dishwashers with different types of control, but most models have five similar program modes:
- Intensive. It is marked with a pan icon and is performed when the water is heated to 70 degrees. Suitable for plates and containers heavily soiled with food. Consumes maximum water and electricity. Designed for storing dishes throughout the week and for one-time washing.
- Auto. The most popular, which adapts to the weight of the load and selects the washing intensity at a temperature of 45-65 degrees.
- Eco. The program heats water up to 50 degrees, while the consumption of water and electricity is minimal.
- Careful. Accompanied by a fragile glass icon and suitable for crystal and fine glassware.
- Preliminary. Plays the role of soaking and pre-cleanses dishes before the main wash.
It is recommended to start the Bosch dishwasher for the first time without dishes in Eco or Automatic mode. This will allow you to test the operation of the heating element, water supply and drainage, and thoroughly clean the pan of factory liquids and small debris.
Dismantling the clamp
Before removing the elastic band from the washing machine, buy a new original cuff that matches the model of your SMA in advance.
Important! You can buy a cuff at a service center, in a specialized store, or even on the Internet. The main thing is that the part is original and fits your SM model. The new rubber band should feel soft to the touch. Also, a high-quality new elastic band bends well.
Prepare for repair:
- Unplug the machine.
- Arm yourself with two screwdrivers: “plus” and “minus”.
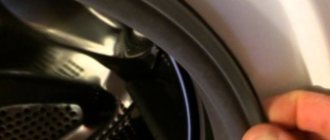
At the first stage of dismantling the rubber seal, you will have to remove the clamp holding it in place. It can be made of either metal (in the form of a thin wire) or plastic. The clamp is removed, regardless of the model of the machine, always the same way:
- Locate the clamp latch or spring. It can be located at the bottom of the hatch or on the side - where the blocker is located.
- Take a minus screwdriver and pull back the spring, loosening it.
- If there is a screw there, take a second screwdriver and unscrew it.
- The plastic clamp is held in place by latches - they will open easily when you pull it towards you.
- Use a thin screwdriver to pry up the ring and remove it.
- Now you can remove the cuff by tucking it towards the drum - this way you will remove it without damaging it.
If you removed the cuff to get to other parts of the case, and are going to put it back in place, pay attention to one important nuance. There are small triangular marks on the elastic band and drum. They must necessarily match.
If one mark is missing, draw it yourself - this way you will assemble the structure correctly.
Removing the front panel
In order to completely remove the rubber band from the drum of the washing machine, you also need to disassemble the facade. It's not difficult if you follow our recommendations:
- After unscrewing the fasteners on the back of the machine, remove the top cover.
- Remove the detergent dispenser - underneath you will find other bolts that hold the front panel in place.
- Using a thin screwdriver, bend the latches of the control unit, remove it and place it on top of the case.
- Also remove the bottom panel (where the drain filter is).
- Walk around the perimeter of the front panel to unscrew the fasteners holding it in place.
- Now you can pull the wall towards you, thereby providing access to the inside of the seal.
Attention! In brands such as AEG, Samsung or Indesit, you don’t have to remove the front part of the machine. It is enough that you simply unscrew and remove the top cover.
Assembly of the SMA
Reinstall the counterweights and gradually tighten the screws.
View of the washing machine without the front panel
We install counterweights
Disassembled machine with front panel
Reinstall the front panel. You need to get the holes into the plastic fasteners on the SMA body. We tighten the screws.
We insert the bottom bar using latches.
Bottom bar and cover
Then we mount the control panel and tighten the screws.
Control panel
Don't forget to install a washing powder dispenser.
After this, we pull the cuff onto the body and install the outer clamp.
Cuff clamp
Let's check the operation of the LG washing machine!
Video
In addition to LGi, it is not difficult to change the cuff on the following machines: Samsung, (Bosch), Siemens. And “Indesit”, “Ariston” and “Beko” have a non-separable body.
AEG, Zanussi and Electrolux washing machines are collapsible, but this will not help to replace rubber, because the front panel of these machines cannot be removed. Changing a cuff there is not so easy. Step-by-step master class.
Replacing the hatch rubber
Now it's time to remove the rubber seal from the tank of the machine. It’s true that the internal clamp is preventing us, but removing it is a matter of technique. As in the case of the external clamp, we find the spring, hook it with a screwdriver and pull off the clamp.
We firmly grasp the cuff and try to pull it off the grooves. You'll have to put in some effort. Don't be afraid to damage the old cuff when removing it, as it will be thrown away anyway. Once you manage to remove the old cuff, move it to the side so it is out of the way.
After removing the old LG washing machine cuff, you may notice a huge amount of dirt that has accumulated in its seat. Take a rag and thoroughly wipe off all the dirt. We remove the bushing from the old cuff and place it on the new cuff.
What happens when you start the dishwasher for the first time?
Even if you are filled with impatience, do not rush to turn on the PMM. Read the instructions carefully. The first run is a test run, so there is no need to load dishes. This condition applies to dishwashers of all popular brands - Bosch, Siemens, Electrolux, Samsung, Miele and others. If you purchased a built-in model, install it in a furniture niche only after the first installation has been successfully completed.
Checking all connections before using the dishwasher for the first time
Before turning on the dishwasher for the first time, it must be connected to the utilities. When you turn it on for the first time, it will become clear whether the work on installing the PMM was carried out correctly, and whether this household device is ready for long-term use.
Below are the main reasons why dishes are not washed when you first turn them on:
- During the production process and further sale, dust, dirt, stains and grease deposits accumulate inside the PMM from the hands of workers, sellers and buyers. All this is removed during the first launch.
- All systems are tested for serviceability. You can determine how quickly the water flows and heats up, how the modes for draining used liquid and drying dishes work, and whether the chamber has been cleaned well.
- All connections to the water supply and sewerage systems are checked for leaks. The dishwasher should not be pushed into a furniture opening before first use, so that there is access to possible leakage areas. The correct installation of the electrical network is also checked.
- Owners receive knowledge on how to operate a dishwasher. This will help them use this equipment correctly, avoiding mistakes in further operation.
If a leak is immediately detected when you turn it on for the first time, it must be eliminated.
What other problems may occur?
After replacing the cuff, it is best to check its functionality by running the washing machine “idle” (for example, on a short program, without loading laundry). This way you will understand whether the new part is installed tightly and whether repeated removal is required.
A common problem is a broken machine handle, especially the plastic part. Replacing the door handle of a washing machine is a very simple process, for which you probably only need one screwdriver. You can purchase a new part in a specialized store, indicating the make and model of your car. Qualified specialists will select a new part and offer their assistance in installing it.
It is worth noting that the hatch cuff requires regular maintenance. It must be cleaned, otherwise the dirt accumulated on it will become a source of not only an unpleasant odor, but also bacteria that corrode the material.
Required Tools
Replacing the cuff of a washing machine hatch with your own hands is possible; no special skills are required.
Therefore, you can avoid calling repairmen and save money. The main thing is to approach this process confidently and carefully.
Before replacing, prepare a new seal, a screwdriver, detergent (soap) and a marker.
Advice: in order not to make a mistake when buying a new cuff, take your old one with you and select the same model specifically for your machine.
Prevention measures
In order to encounter cuff malfunctions as little as possible, it is necessary to follow simple preventive measures.
- After each wash, wipe the cuff with a dry cloth to remove any remaining water. Otherwise, pathogenic microflora will actively multiply, and with constant contact with water, rubber will lose its performance characteristics.
- Powder residues gradually collect in the grooves of the seal and turn into a thick coating. It must be removed periodically, since washing agents have a detrimental effect on the characteristics of rubber.
- When loading things, you should carefully check the contents of your pockets. Foreign objects in the drum during washing can damage the cuff and render it unusable.
- The manufacturer's recommendations regarding the weight of the laundry to be loaded must be strictly followed. Not only the maximum, but also the minimum weight is important.
- Clothes with iron elements and large decor should be washed in special bags, which are also necessarily used for shoes.
- Cleaning the washing machine using special products should be carried out regularly - at least 2 times a year. It is advisable to carry out complete mechanical cleaning every two years.
- The hatch should be slightly open if the machine is not in use, which will provide ventilation.
Watch a video about replacing the cuff below.
Signs of trouble
Signs of a broken drain pump are:
- clicks, crackling sounds before or during draining;
- leakage of the pump housing;
- stopping the machine with water;
- a strong hum during draining when water is slowly removed.
If the water is not drained within the 5-8 minutes allotted by the manufacturer, the OE code lights up on the display. In units without a display, this error is indicated by flashing or lighting of all spin or rinse indicators.
Before assuming a pump failure, you should check that a non-draining washing program (for example, “Delicate Wash”) is selected.