A device for washing plates from Bosch greatly simplifies the worries of every housewife. If we compare the amount of water consumed when washing dishes by hand and using dishwashing equipment, the conclusions will be in favor of a useful invention, the cost of purchasing which will pay off quickly enough. It should be noted that the functionality of the dishwasher depends on many factors, including valves. If one of them fails to operate, the machine stops performing its duties or suffers interruptions in operation. Let's try to figure out which valves the manufacturer uses for a Bosch dishwasher.
How to understand that there is a problem with this particular device in the dishwasher?
The fill valve is located inside the machine body and is hidden from view.
However, even if it were outside, the plastic case would not allow you to see the condition of the device. Therefore, possible problems can only be determined indirectly by analyzing the specifics of the problems. The main signs of element failure are:
- lack of water supply when starting the program;
- non-stop supply of water to the machine, accompanied by constant discharge into the sewer;
- intermediate states when the amount of water in the machine does not correspond to the level determined by the program.
As a rule, these signs most reliably indicate problems with the water supply to the machine.
What is this device?
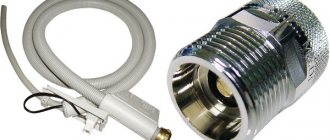
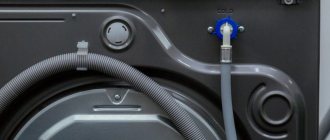
The water supply valve (sometimes called the “fill valve”) acts as a shut-off element. A supply hose under mains pressure is connected to it.
The valve’s task is to open in a timely manner to fill the machine with the required amount of water and close when the desired level is reached.
Externally, the fill valve looks like a plastic body bent at 90° . One end is connected to the inlet hose, and the outlet is equipped with contacts for the terminal block. It belongs to the group of electromagnetic locking elements.
Inside the device there are solenoids and a damper. When a command is given from the control unit, the solenoids move the damper to the “open” or “closed” position, providing water supply or shutoff.
Replacement nuances for different dishwashers
The method for replacing the inlet valve in dishwashers from different manufacturers is not too different.
The only nuance is the location of the device. There are models with lower and upper water supply (location of the connecting pipe), so the method of disassembling the machine will depend on the type of structure.
Some models are more convenient to lay on their side, others just need to be turned around and slightly tilted, leaning against the wall.
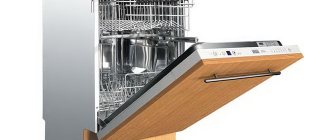
For Bosch dishwashers, the optimal method is a complete revolution, since all the main components are located in the bottom area. Otherwise, the replacement procedure is almost the same.
What materials and tools are needed?
Tools required to complete the work:
- Adjustable wrench - install pipe fittings.
- Drill - drill holes to fix the pipe.
- Screwdriver - tighten the bolts securing the pipes.
- Level - check the slope of communications.
The set of materials depends on the selected connection method:
- When connecting a dishwasher directly, a 40/50 mm adapter . The diameter depends on the size of the pipe. You will also need clamps (2 pieces) and a check valve.
- For the second option - when connecting through a fitting, no components are needed. If, of course, there is already a siphon with a side fitting.
- For the third scheme you will need a tee (diameter 40/50 cm) , clamps (4 pcs.), adapters of the required diameter (4 pcs.), check valve .
If you decide to connect the dishwasher to the drain yourself, you may also need the following consumables (taking into account the method of connection to the drain):
- Siphon for drains. It is made of plastic. May have one or two three-quarter-inch diameter side fittings. The second fitting can be used to connect the SMA. While nothing is connected, you can put a plug on the second fitting.
- 3/4 inch metal-plastic tee . It is necessary for inserting into a sewer pipe.
- A check valve is not mandatory, but extremely useful. It is necessary to prevent the siphon from overflowing in the event of a clogged sewer system. If it is not there, then in case of a blockage, the drains will flow into the dishwasher.
How to extend service life?
The service life of PMM parts and assemblies is quite high. However, it depends on operating conditions, which may not be acceptable. This significantly reduces the operating time of the device.
The following actions will help increase service life:
- Using a water filter. Rust and small particles fill the internal cavity of the valve and prevent the seats from shutting off the water.
- Installation of an apartment pressure reducer. Excessive load at the inlet contributes to early failure of not only the valve, but also other components.
- Using a power stabilizer. This is a general rule that allows you to protect not only the valve, but also the entire PMM electronics.
Unfortunately, most dishwasher owners ignore these tips, but the result is only a shorter service life.
Solenoid valve function
The small part plays an important role: it controls the dishwashing process and is responsible for the timely cessation of water flow when the device turns off or this is provided for by the selected program. The part also ensures that the process of draining water begins when the engine is running.
There are two types of dishwasher solenoid valve:
- active;
- responsible for the uninterrupted operation of the device, are triggered in critical situations or at moments specified in the program.
The second type of dishwasher valve is located at the end of the hose through which the liquid is supplied. It can withstand significant loads and pressure drops in the water supply system. The operating valve opens when the machine engine starts. If the device is disconnected from the power supply, there is no voltage.
How a dishwasher works
Copying the washing process, water enters the dishwasher bypassing the inlet valve. Single knot. Water fills the tank, touching the level of the lower waterproofing of the door, sometimes heats up, and is pumped through a pipe into the rocker arms by a recirculation pump. A rain of jets washes the dishes, the individual holes are directed to create a torque on the rocker. Movement is happening.
Water is collected by the lower part of the compartment, passes through a cascade of coarse and fine filters, is collected by a settling tank, and is re-supplied according to the program. Once completed, the sump pump releases the dirty stream into the sewer.
The progress of the cycle is monitored by a pressure switch, the heating element heats the water if necessary, the solenoid valve adds softening salt according to the readings of the sensor set to the regulator. Powder and other products are poured into the door dispenser and thrown into the working chamber as the need arises.
Let us add that the pressure switch pressure is taken in two places:
- On the side tank, water is stored during the filling period (preheating).
- The level in the settling tank is controlled during descent.
It is clear that the central board is free to use the information in various ways.
Recommendations and lifehacks
- Clean dishes from food residues before loading them into the PMM.
- Load the upper basket with small, not heavily soiled dishes.
- Load the lower basket with the dirtiest dishes.
- Start unloading dishes after drying from the bottom section.
- Do not overload the PMM.
- Carry out preventive cleaning of parts regularly - at least once every 3 months.
- Use professional dish degreasing products.
- Do not overuse short wash cycles.
Replacement nuances for different dishwashers
The method for replacing the inlet valve in dishwashers from different manufacturers is not too different.
There are models with lower and upper water supply (location of the connecting pipe), so the method of disassembling the machine will depend on the type of structure.
Some models are more convenient to lay on their side, others just need to be turned around and slightly tilted, leaning against the wall.
For Bosch dishwashers, the optimal method is a complete revolution, since all the main components are located in the bottom area. Otherwise, the replacement procedure is almost the same.
Tools
only regular tools:
- Phillips or slotted screwdriver;
- pliers.
Depending on the model and design features of the PMM, other tools may be required; this is determined during dismantling.
Preparation
Before starting the actual replacement, you need to perform several preparatory steps:
- close the water supply valve (outlet from the pipe to the PMM);
- disconnect the machine from the power supply;
- disconnect all hoses (especially the water supply hose;
- Partially disassemble the housing to get to the valve.
Finding the element does not present any significant problems, since most machines have a supply hose attached to it. However, for some models you will first have to disassemble the body of the AquaStop system.
Replacement procedure
Replacing a part consists of the following steps:
- All hoses and wires are disconnected from the defective device. It is recommended to take a photograph of their location so that you have a sample before your eyes when assembling.
- Remove the used valve and install a new one.
- Connect all the wires to it, attach the hoses.
The procedure is not complicated and is quite accessible to any home craftsman.
Cost and how to choose the right model
There are many models of fill valves on sale. They may have structural differences. In particular, the contacts may be mixed up, the dimensions of the pipes may not match, etc. Therefore, to eliminate errors, you need to remove the standard device from the machine and go to the store with it.
Then select the same model and install it in PMM . This is the optimal method of selection, providing a full guarantee of the compliance of the elements. The cost of the part can range from 610 to 2700 rubles, depending on the model and manufacturer.
Important! For some PMM models (for example, Hansa ZIM4677EV), the valve is sold only complete with a hose. The set costs much more (about 5,000 rubles).
How to replace the heating element
If the problem is in the heater, buy the part and change the heating element. Before doing this, calculate how profitable the repair will be: if the PMM is old and they won’t give you more than 10,000 rubles for it, then it’s not profitable to buy a spare part. But the decision is yours to make.
How to replace the heating element:
- Open the hopper and remove the baskets.
- Turn off the power to the machine, remove the hoses.
- Remove the spray arm.
- Unscrew the filter.
- Remove the stainless mesh.
- Unscrew the fasteners that hold the pipe and instantaneous water heater.
- Turn the appliance upside down.
- Turn the pump half a turn to the right and pull to remove the part.
- Remove the sensor and set the pump aside.
- The flow heater is held on a rubber mount. Find the fastener and disconnect.
- Then remove the sensor plugs, pipes and remove the burnt heating element.
- Install the new part, reassemble the machine, proceeding in the reverse order.
FAQ
How to stop the program and unlock the door
Canceling a program is most often done by pressing the “Start” key and holding it for 3 seconds. After stopping the program, the machine will drain and unlock the door.
If the water is turned off and the process is running
We recommend disabling PMM as soon as possible to avoid program failure.
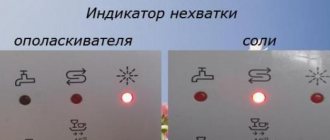
Why does the tablet fall out?
Incorrectly selected tablet, you need to change the brand. It is also necessary to check the operation of the dispenser.
Required pressure
Each equipment has its own operating pressure (standard 1.5-2 atmospheres), determined by technical parameters. In city water supply there is usually from 0.3 to 6 atmospheres for cold water and from 0.3 to 4.5 atmospheres for hot water. To get acquainted with information on a certain PMM, you need to study its passport.
How to find out about a breakdown?
The main function of this device installed in a bosch dishwasher is to constantly monitor the required liquid level. If the device begins to work incorrectly, this means that the working tank of the unit is probably overfilled, which will lead to poor cleaning of kitchen utensils and flooding
To avoid such problems, you must carefully monitor the fluid level in the work tank. If you notice that it exceeds the norm, this indicates a failure of the pressure switch.
Typically, breakdowns of the water sensor in any dishwasher occur for the following reasons:
- Wear of device parts.
- The contacts on the device connections have undergone an oxidation process.
- Poor quality of dishwasher components, which limits the service life of the pressure switch.
What are the types of valve related problems?
As a rule, if the water fill valve in a dishwasher has become unusable, it cannot be repaired, only completely replaced. After all, the overwhelming majority of breakdowns are associated precisely with the failure of the valve membrane, which, in general, is entrusted with the main function of shutting off the water. The membrane cannot be replaced, which means the entire valve for the dishwasher will have to be replaced. It is highly not recommended to use a dishwasher without a properly functioning valve. After all, firstly, a broken valve simply will not supply water to the car’s tank, and this is in the best case, and secondly, the valve may not shut off the water supply in time, which will lead to a flood.
What causes most breakdowns?
Unfortunately, in many cases dishwasher malfunctions are caused by users. Owners who do not carefully read the operating instructions create problems for themselves.
The most common causes of their occurrence are:
- incorrect connection of the PMM to the water supply, electrical network and sewerage system;
- violation of the dishwasher operating rules;
- use of detergents, salt and rinse aids not intended for these household devices.
You need to connect the dishwasher with skill or entrust this work to professionals.
If the connection to communications is incorrect, the PMM may not work. One example of installation errors is exceeding the maximum length of hoses connected to the water supply and sewerage systems. As a result, the drain pump (hereinafter also referred to as the pump) may not have enough power to pump liquid into the sewer, and water from the water supply will not flow into the tank in sufficient volume.
By placing dishes with a large amount of dried dirt into the appliance, you risk clogging the dishwasher filter.
Before washing in a PMM, the surface of the dishes must be cleaned of dried and burnt pieces of food - this is one of the important rules of operation. Otherwise, even soaking and prolonged intensive washing will not help to wash kitchen utensils well. In addition, the machine may stop working if the filters, clogged with dirt, stop passing liquid through them. Therefore, clean the filter from grease and dirt after each operating cycle and at least once a week.
If you use household chemicals that are not intended for dishwashers, this may result in poor dishwashing or damage to the unit.
The use of cheap and low-quality preparations leads to poor quality of washing and rinsing. For example, stains with a whitish tint remain on the surface. Sometimes this can cause high levels of foaming and liquid leakage into the pan, causing the dishwasher to stop working and an error code to appear on the control panel.
In addition to the above reasons, there are also those that arise due to the fault of utility services. Eg:
- tap water hardness level is too high;
- voltage surges in the electrical network, leading to damage to electronic circuits.
If there is a large amount of salt impurities in the water, regenerative salt cannot soften the liquid to the required level. This situation leads to the appearance of lime deposits in the PMM parts and on the walls of the working chamber. The scale that forms on the surface of the flow-through electric heater (hereinafter also referred to as the heating element) does not allow it to heat the water to the required level. Limescale deposits clog the holes in the sprinkler arms, causing the cleaning quality to drop sharply.
This amount of scale is unacceptable for a dishwasher - it urgently needs to be washed with a special cleaning agent
Powerful voltage surges in the electrical network (sometimes up to 380 volts) are fraught with fatal consequences for household appliances. The control units of dishwashers suffer the most from such processes. In most cases, experienced technicians will check and replace the burnt part. But it also happens that you have to change the entire module.
Control triac in the control unit, burnt out due to surge voltage
The last cause of damage to PMM is wear of parts or defects that arise during their production. Over time, this leads to breakdown of the household appliance.
Readers can learn how a dishwasher works and what breaks in it from the following video:
Drain connection and installation in the kitchen opening
All that remains is to connect the drain hose from the PMM to the sewer outlet through an adapter collar of the appropriate diameter.
Do not forget that the drain pipe must be mounted at an angle, allowing for a 1cm height difference per 1m of length.
And the drain hose itself has a bend at 70cm from the floor. That is why it is attached to the top of the dishwasher, and not at all so that it does not dangle.
All that remains is to connect the washing machine to a power outlet and check the functionality of the entire system. Then secure it in a specially prepared opening.
By the way, some models, for example from Siemens, have non-standard sizes. Therefore, think about your kitchen furniture in advance.
When installing in an opening, do not forget about the metal plate that must be nailed to the bottom of the tabletop (for the Bosch model).
This thing is mounted at the very edge and is a vapor barrier, like a screen. With it, the countertop will not swell from steam.
For some reason, many people throw it out and replace it with aluminum tape, securing it both to the table top and to the side walls of the car.
Electrolux, instead, comes with something like a piece of rubber that sticks on the sticky side.
After installation and connection, the first wash should be done without dishes, using powder or special cleaning tablets.
This procedure should destroy all bacteria and deposits formed after long-term storage in the store.
Dishwasher repair tool kit
Before you start repairing your dishwasher, you should know for sure that all the necessary tools are at hand. It is very inconvenient to constantly be distracted and run to the hardware store for a washer, nut, bolt or electrical tape.
An approximate list of required tools:
- Set of flat and shaped screwdrivers. They occupy first place out of necessity, as they are an almost universal tool.
- Set of wrenches. It is most convenient to use a special wrench with a set of heads, but open-end wrenches are also suitable for household appliances.
- Multimeter. A measuring device that is always useful in the household, especially in the electrical field.
- Construction knife with a set of replaceable blades.
- Insulating tape or heat shrink tubes of various diameters.
- Flashlight. An ordinary pocket flashlight will do, since the room does not always have good quality lighting.
- Operating instructions or electrical diagram for the model of dishwasher that requires repair.
Connection diagram
The PMM can be connected to the drain in different ways. Sequencing:
Some users do not bother themselves with such work. They place the end of the drain hose directly into the sink. Dirty water will flow into the sink, and from there into the sewer.
A responsible owner will never allow such an “installation”. Firstly, this option is not very aesthetic and hygienic. And secondly, to maintain cleanliness and order, you will have to wash the sink every time after washing.
If you spend money on a dishwasher, you should take advantage of all its advantages, including automatic draining. By connecting the PMM to the drains, the user does not have to worry about dirty water.
There are several options for connecting a dishwasher to a drain; let’s look at each in detail:
The third method is especially convenient and effective - dirty water from three sources at once passes through the tee - the washing machine, dishwasher and from the sink.
Having chosen one of three connection options, do not rush to get to work. We need to think about where to put the device. It should not be placed too far from the connection point. If it is removed more than 3 m, the pump may break, since it will have to pump dirty water, experiencing maximum loads.
If the PMM is located too far from the connection with the drain, its pump will wear out twice as quickly as with a normal location.
Dishwasher does not drain water: reasons
The first common cause is clogged filters. To an inexperienced viewer it seems that the gaps are large. In practice, after the coarse step there is a fine one; it is almost impossible for a person without a magnifying glass to see the size of the holes. Unless into the light. It will be more difficult for the owners of Whirlpool, if there are any in Russia. To remove the filter, you will have to disassemble the impeller subsystem by first removing the lower one and undocking the plastic segment of the water supply. Afterwards you can, at the very least, remove the sump cover with filters.
Clean the filter, rinse with running water, try pumping out. You can manually fill the working chamber with a couple of glasses. After turning on, the dishwasher, detecting the presence of water, will try to get rid of it by turning on the pump. The convenience of the equipment, unlike washing equipment, is obvious: the drainage pump is relatively easy to dismantle. It is recommended to remove the lower bezel. You will find access to the pump from the bottom. Perform the necessary operations.
The sump pump is held in place by a pair of screws, in Whirlpool's case it will be Torx. The mechanism resembles what you saw in a washing machine:
- The asynchronous motor is equipped with a pair of coils at the base.
- The rotor is magnetic with several poles.
- The impeller crosses, due to centrifugal acceleration, pushes water to the periphery with a snail.
- Power supply 230 volts.
Bottom impeller
Check if the pump impeller is spinning. It rotates tightly, immediately a quarter (half) turn, jerkily (synchronous motor). The coils ring, the nominal value is about 200 Ohms. It is easy to check the mechanism by connecting to a 230 volt network. We remind you again: the starting mode is individual, indicated in more detail by the unit body. When dismantling the pump, water will probably pour down. There are no emergency measures in dishwashers, the volume is small, inferior to washing machines (devoid of Aquastop).
In most cases, you wind the pump coils by hand. The cost of a new part starts from 300 rubles. Decide for yourself whether it is worth wasting time. The rotor can be adapted for homemade designs in the future.
Water in a Bosch appliance: what to do?
The question that deserves special attention is what are the reasons for standing water in a Bosch dishwasher. In appliances manufactured by the Bosch brand, moisture often accumulates at the bottom or in the filter. The flow sensor may also not work correctly. If it is broken, it will either continuously drain fluid or the water level will not be displayed correctly.
There are many reasons why there is water in the dishwasher. Correctly identifying troublemakers without special equipment and experience is quite difficult. That is why, in order to extend the life of your equipment, it is recommended to contact qualified technicians for repairs.
Step-by-step instructions for connecting a PMM via a tee
Let's consider the most interesting and promising option for connecting PMM with wastewater. Before starting work, it is necessary to ensure the stability of the device. This is achieved by adjusting the height of the legs.
Next, hoses are connected to the PMM and it is placed in a place where it will stand permanently. The built-in equipment is placed in a cabinet, pulling communications through the holes in the wall.
The procedure for connecting a dishwasher through a tee:
Watch a useful video that shows one of the ways to lay dishwasher drains:
What could be the problem?
Lack of heating can be caused by several factors:
- The heating element has burned out. This is the most common fault that is checked first.
- Incorrect installation or connection of the machine. Because of this, it can constantly drain water, which simply does not have time to heat up. Other violations of the water treatment regime are also possible.
- The heating element is covered with a thick layer of lime deposits. They act as a heat insulator, which is why the heating element cannot heat the water, although it itself operates at full power.
- Problems with the thermostat. It does not give a command to heat the water.
- The electronic control unit has failed or the firmware has failed.
Most often, the problem is registered by the electronic control unit, and a certain combination of symbols is displayed on the display (usually a letter and one or two numbers).
The self-diagnosis system allows you to quickly detect a malfunction, which simplifies the work of repairmen.
Bosch
In addition to the standard reason (malfunction of the heating element), Bosch dishwashers may have a problem with the water filter. If it becomes clogged and does not allow water to pass through well, the circulation mode stops.
Because of this, the control unit may give a command to replenish the water level, which will make heating impossible. Determining such a malfunction is quite simple - during operation, you need to open the door and look at the pan. If the filters are clean, there should be no water in them.
Electrolux
The main factors for the lack of heating in the Electrolux PMM are:
- failure of the heating element;
- broken wires;
- control unit failure.
Most often, the reason lies in a malfunction of the heating element. On the Electrolux PMM it is combined with a circulation pump, so the entire assembly will have to be replaced.
Replacing one heater is quite possible, but they are extremely rarely sold separately, only ready-made assembled units.
Korting
Korting dishwashers, like all German equipment, are very sensitive to water quality. Due to the appearance of deposits, heating elements quickly fail.
The heater operates in normal mode, but cannot provide the set water temperature, since it is covered with an insulating layer of limescale. Because of this, the control unit gives a command to increase heating, the element overheats and fails.
Another risk factor is the temperature sensor. It has the same problem - scale, which reduces the heating of the thermistor.
Indesit
The design of PMM Indesit differs little from analogues of products from other companies. Problems with heating water are also a consequence of the failure of the heating element, sensors, and control module.
Often the cause is a clogged filter, due to which the pressure switch does not give a command to execute the work program.
Features of the water valve
Often, when there is a malfunction, the PMM diagnostic system is turned on. Depending on the models of Bosch, Electrolux, Siemens and other brands, an error code is displayed on the display, which indicates problems with the flow of water into the hopper.
The fact is that the machine works like this: after turning on and selecting a program, the control module sends a signal to the valve, after which the filling element opens the valve and lets water in. When the level sensor reports that there is enough liquid in the tank, a signal is sent to the electronic coils again and the damper closes. This is how an electromagnetic element works.
In addition to the error code, the following symptoms may indicate a problem:
- Water does not enter the tank. The part does not respond to controller commands and therefore does not open the damper.
- Continuous flow of water into the bunker. The membrane is in the open position, so nothing obstructs the flow.
How to repair a dishwasher with your own hands
If, after connecting to the network, the PMM displays an error code on the display, try to reboot. How to reset the system and restart the dishwasher:
- disconnect the equipment from the power supply for 15-20 minutes;
- reconnect to the network.
If after a reboot the PMM started without an error code, it means there was a failure in the system. You can continue working.
Repair needed? Before disassembling the machine, look at the diagram of its structure.
Solving problems with the filling system
Is there no water flowing into the tank? Let's look at how to correct the situation.
Remove the blockage:
- Turn off the water supply to the machine and unplug it.
- Disconnect the inlet hose from the housing.
- Check it for blockages.
- Pull out the mesh filter. Rinse it under the tap. If heavily soiled, leave the filter to soak in a citric acid solution.
- Diagnose the fill valve.
- Test the electrical coils with a multimeter.
If there is a malfunction, install a new valve. How to do it:
- Empty the tank of the machine, remove the baskets and remove the sprinkler.
- Pull out the filter and remove the water with a sponge.
- Turn the machine over to gain access to the bottom.
- Remove the front panel at the bottom by unscrewing the fastening screws.
- Disconnect the valve wiring and unscrew the mounting bolt.
Install the new part.
Checking the circulation pump
The circulation pump in the dishwasher is used to pump water. Thanks to the pump, water flows into the rocker arms and the washing of dishes begins. If you notice that the motor (pump) is noisy, buzzing and does not spray water, then it needs replacement.
DIY repair:
- Open the bottom of the machine as described above.
- Unscrew the bottom panel if your model has one.
- First you need to disconnect the drain pump.
- Unscrew the screw securing it.
- Turn the pump clockwise.
- Disconnect the engine wiring.
- The engine is secured with a clamp on the inside. Press it down to disconnect the motor.
- Using an adjustable wrench, remove the clamps from the hoses that are attached to the pump motor.
- A total of three hoses need to be disconnected.
- Remove the spring clip from the old pump and install it on the new one.
- Reassemble in reverse order.
Troubleshooting the drain system
When water does not drain from the machine and the dishes are not washed properly, check the system for blockages:
- Pull the lower rocker arm out towards you.
- Unscrew and remove the upper rocker arm.
- Inspect the spray nozzles for clogs.
- Clean out the holes with a toothpick.
At the bottom of the tank there is a drain filter. Pull it out and the metal mesh next.
Remove food and debris. Wearing gloves, check the pump impeller. Possible blockage from broken glass.
Replacing the sump pump is easy. See the description for replacing the circulation pump.
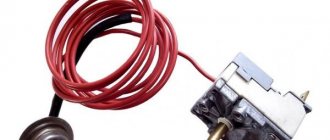
Replacing the level sensor
The level sensor or pressure switch in the dishwasher monitors the amount of water in the tank. Its electronic or mechanical part may break, or the tube may become clogged. Therefore, before replacing, check the device for serviceability and clear the tube from blockages.
The pressure switch is located at the bottom of the machine. The device looks like a box from which a tube comes. Unscrew the two fastening screws, disconnect the clamp and tube. You can check the part by blowing into the tube. If you hear clicks, it means the sensor is working. The electronic part is checked with a multimeter.
Heating element diagnostics
The flow heater is used to heat water when washing dishes. If heating does not occur, you need to check the wiring and connectors of the heating element; it is located under the bottom of the Hansa PMM. In case of burning, its parts need urgent replacement. The heater contacts are checked with a multimeter.
How to install a new part:
- The flow-through heating element is connected to the pump.
- Unscrew the pump mount, turn it clockwise, and remove it from its seat.
- Disconnect the rubber heater seal.
Remove all pipes and connectors that are attached to the heating element.
Carry out the installation in reverse order.
How to change a part?
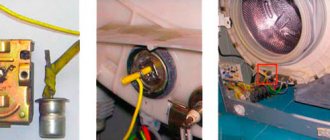
If it is discovered that the cause of problems in the operation of the PMM lies in the filling valve, it will have to be replaced.
Important! The water supply valve is one of the most critical parts. It is difficult to repair it, and the result of the repair is unknown in advance. Therefore, if problems arise, immediately replace the problematic device.
Step 1
- Required parts:
• Water supply valve
Required tools:
• Impact wrench set • Slotted screwdriver • Adjustable wrench • Standard pliers • Plumbing tape (sometimes called Teflon tape) • Work gloves • Towel
How to Replace the Water Inlet Valve on a Dishwasher
Turn off the power and water supply to the dishwasher
Unplug the dishwasher or turn off the household circuit breaker for the dishwasher. To make sure the power is off, check that the control panel does not light up when you press the control button or power button.
Locate the dishwasher water valve under the sink (or in the basement for those who have one). Close the valve to shut off the water supply to the dishwasher. Turn off the breaker.
Step 2
- Remove the outer door panel and control panel
With the dishwasher door open, remove the Torx mounting screws from the interior door panel. Support the outer door panel with one hand so it doesn't fall when you remove the last 2 screws.
Carefully remove the outer door panel and control panel from the inner door panel and place the outer panel on the floor; now by disconnecting the user interface (display board) control wires from the control panel.
Remove the outer door panel and control panel.
Remove the outer door panel.
Step 3
- Remove the lower front access panel and strike plate
Using a wrench, remove the screws holding the front access panel and impact plate in place. Pull the access panel and strike plate forward towards you, then remove them and set them aside.
Remove the lower strike plate
Step 4
- Disconnect the water supply line
Place a towel under the water supply valve.
Disconnect the dishwasher water supply line from the inlet valve using channel pliers.
Collect spilled water. Disconnect the water supply line.
Step 5
- Remove the water supply valve
Remove the retaining screw from the inlet valve and pull the water inlet valve out of the mounting bracket.
Pull the intake valve forward slightly to gain access to the wiring harness and intake pipe connection.
Release the clamp and disconnect the intake valve wires.
Release the wire clamp on the water supply tube and pull the inlet tube out of the water inlet valve.
Remove the inlet valve. Disconnect the inlet pipe.
Step 6
- Install a new water supply valve
Connect the water intake tube to the new water inlet valve and secure it with a wire clamp.
Insert the wiring harness.
Install the water inlet valve into the bracket and secure it with the mounting screw. Install a new water supply valve.
Step 7
- Connect the water supply line
Connect the water supply line to the water valve and tighten it securely using pliers.
Open the water inlet valve and check the connection for leaks. If there are leaks, tighten the connection tightly. Connect the water supply line.
Step 8
- Install the lower front access panel and strike plate
Replace the impact plate and then install the access panel on top of it. Insert the mounting screws and tighten them firmly.
Reinstall the strike plate.
Step 9
- Install the outer door panel and control panel
Locate the outer door panel and control panel close enough to the inner door so that you can reconnect the user interface (indication board) control wires.
Connect the user interface control wires and attach the outer door panel and control panel to the inner door panel.
Install the mounting screws. Install the outer door panel.
Advice. Use longer screws to secure the control panel.
Power restoration
Connect your dishwasher to your home circuit breaker or simply plug it into an outlet to restore power.
Required parts:
• Water supply valve
Required tools:
• Impact wrench set • Slotted screwdriver • Adjustable wrench • Standard pliers • Plumbing tape (sometimes called Teflon tape) • Work gloves • Towel
You will need:
- 1. Tool kit YIHUA tool kit (45 in 1) for repairing mobile phones and iP laptops
- 2. Slotted screwdrivers: slotted screwdriver BAKU BK-373 -1.5
- 3. Pliers BAKU BK-031 pliers
Checking the correct use of the dishwasher
Often the cause of many malfunctions is failure to follow the manufacturer’s instructions for operating the equipment.
It is important to check that the dishwasher is being used correctly. First of all, you should make sure that there is water flowing into the tap.
In apartments, water is supplied to the kitchen by one riser. If there is no water coming into the faucet, the dishwasher will not get any water either. Interruptions in the water supply often lead to temporary problems with the dishwasher.
It is important to use a suitable and high-quality detergent. Using low-quality household chemicals can lead to serious dishwasher malfunctions
Usually the manufacturer gives recommendations regarding the choice of detergents.
The water supply valve may be closed. The mechanism is located at the point where the device hose connects to the water supply system. When the tap is closed, the equipment cannot draw water, so it must be opened.
Role of check valve
After the dishwasher has finished the program, the dirty water is drained and replaced with new rinse water. This function is performed by a check valve; it prevents it from penetrating back into the tank. In appearance, this is a small part made of plastic, on which there is a connecting tip for connecting a hose.
The dishwasher check valve has the following features:
- easy to install (with regular replacement);
- made of high-quality plastic (does not emit toxic substances);
- availability (can be purchased at any plumbing store).
Specifics of the Aquastop valve
A dishwasher, even if it is connected correctly, can leak at the most inopportune moment. The Aquastop valve for the dishwasher will protect the apartment from flooding; if the hose is damaged or broken, it reduces the pressure. It has a long service life, but during service it is necessary to check its safety. The same goes for the shutter and release valve.
Types of dishwashers
The main difference between a domestic and commercial dishwasher is the way it is loaded. In a household unit, alternate loading is used, that is, for each cycle of operation of the machine, a certain amount of dirty dishes is loaded.
Industrial dishwashers use in-line loading, where dirty plates or trays are continually added to a continuously moving conveyor (with dish grabbers). In addition, many industrial designs filter and reuse used water, allowing for more economical operation.
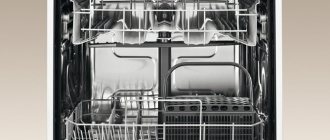
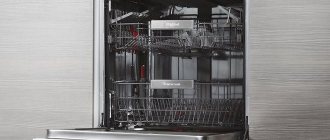
Dishwasher device
The design of a dishwasher is not complicated. Any such unit consists of several elements: 1) Housing. As a rule, plastic or assembled from stamped metal sheets; 2) Electronic control unit. Electronic control board with microcontroller. Allows the user to set the dishwashing mode. Controls all processes in the machine; 3) Electric motor. Activates the water pump and sprinklers (rocker arms); 4) Pump pump. Provides liquid under pressure to the spray nozzles; 5) Water spray system. It is a rotating block of injectors (rocker arms). When spraying, the rocker arms change the angle of water supply to cover the entire surface of the dishes; 6) Drying system. A powerful fan (hair dryer) forces air through a heating element onto the surface of the dishes (some models use condensation drying - in fact, the dishes dry on their own, due to the heat accumulated during the washing process).
Dishwasher cycles
The entire operation of the machine is controlled by a special electronic control unit. The microprocessor monitors the readings of many sensors (temperature, water level, door closing, etc.) and sets the operating mode of the device. The washing process consists of several stages:
- Water inlet. Water (usually cold) begins to flow into the machine from the water supply when the solenoid valve opens. The amount of incoming liquid is monitored by level sensors. Some models allow the supply of both hot and cold water; such machines are more economical, since they do not consume electricity for heating. After the solenoid valve, the water is softened by a special device (usually an ion exchanger with resin). Soft water washes dishes better and does not leave limestone deposits on machine parts;
- Heat. The water entering the machine is heated using heating elements (heating elements) in batches or continuously (in a flow-through heater);
- Supply of cleaning agent. Water heated to a certain temperature (determined by the washing mode) is mixed with detergent (supplied from a chemical container). The supply time and amount of cleaner is determined by the washing program;
- Washing dishes. The electric motor drives the pump, which supplies hot water (mixed with the purifier) under pressure to special spray units. Rotating at different angles, the sprayers clean the entire surface of the dishes with jets of water. Some dishwasher models pre-clean dishes from heavy soiling by supplying steam. Steam is generated in a special device - a steam generator. At the end of the wash, the dirty water is automatically drained into the sewer (during the cycle itself it circulates in a circle);
- Rinse. After completing the washing process, the dishes are cleaned of any remaining cleaning agent using jets of cold water under pressure. This process can take a certain time (cheaper models) or be controlled by special sensors for the cleanliness of dishes and the level of wastewater contamination (expensive models).
Types of drying dishes
There are the following types of drying dishes: 1) Condensation drying. The most common type of drying, widely used in inexpensive household models. The washed dishes are doused with hot water, which evaporates and condenses on the inner walls of the machine, and then flows down the drain. This process is very time-consuming. 2) Turbo drying. The process occurs through continuous exposure of washed dishes to hot air. The air is pumped by a special fan, then, passing through the heating element, it heats up and enters the compartment for dishes. Turbo drying allows you to dry dishes in the shortest possible time, without leaving streaks on them. Dishwashers equipped with this drying mode are quite expensive, due to the use of additional devices. In addition, they consume a lot of electricity.
A source of information.
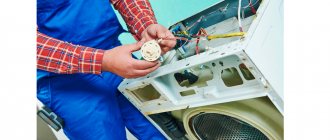
Features of the water fill valve
This part, if it fails, cannot be repaired - only replacement will solve the problem. The dishwasher fill valve regulates the amount of liquid entering the device in accordance with the set washing program. If the engine is running but no water flows, you should also check the solenoid valve (in Bosch, Beko and other models). In the photo you can see what it looks like.
The dishwasher water supply valve is responsible for the smooth flow of liquid into the dishwasher tank. Depending on the parameters of the model and its power rating, several parts of this type can be installed in the device. The dishwasher inlet valve comes in a variety of diameters. An electric voltage is applied to the electromagnet winding of the part when the engine is turned on, this sets the core-rod element in motion. The fluid flows into the tank under pressure. It stops when the required volume has been reached (the membrane made of elastic rubber material returns to the return position).
Valves for filling water are selected according to the machine model. Thus, a part intended for a Bosch brand device will not fit Zanussi products.