Repair of Indesit washing machines differs from repair of machines of other brands due to design features. Manufacturers, in the race for customer appreciation, equip SMA with more and more new systems, sensors, and functions. All this, of course, is useful for the user, but sometimes it significantly complicates repairs.
Fortunately, the design of the Indesit washing machine does not require any special technical sophistication, and there are even a number of typical breakdowns for machines of this brand.
In this article we will look at how to repair an Indesit washing machine with your own hands.
Frequent failures of Indesit washing machines
Repairing Indesit washing machines is a common thing for employees of workshops and service centers. Experts say that Indesit washing machines are not the most reliable; they have many vulnerable components that need to be addressed first if the SMA does not work.
We used statistics from the world's leading service centers to come to a simple conclusion: Indesit washing machines are the leaders among the most broken brands. During the first 5 years of use, every third Indesit machine requires repair, unlike German or Korean-made equipment.
What is this connected with? In 8 out of 10 cases, owners of SM Indesit contact service centers with the following breakdowns:
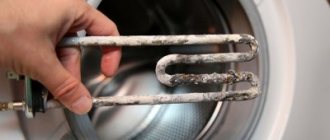
- A tubular electric heating element (TEH) is one of the typical breakdowns for machines of this brand. Why is this such a problem area for Indesit washing machines? Manufacturers decided not to coat the part with any protective compounds; they provided only stainless steel (while, for example, Samsung took care of the coating). In this regard, scale accumulates on the heating element 2 times faster.
- Network filter. Failure of this element is a common cause of malfunction of the Indesit washing machine. There are entire batches of machines that have a defective filter installed. They usually burn out after 3-4 years of operation. The only plus is that in this case, repairing an Indesit washing machine with your own hands is a completely doable task.
- Bearings. A breakdown of the Indesit automatic washing machine caused by bearing wear is a real scourge. The difficulty is not in replacing the bearings, but in disassembling the housing and getting to them. Therefore, problems with the Indesit washing machine associated with bearing failure are among the most severe.
- Indesit washing machine control unit (electronic module, controller, board). Masters believe that this is the most “sore spot” of the SMA, especially the model range that came off the assembly line before 2012. Machines manufactured from 2014 onwards have more reliable processors, but they often require repairs. Repairing the control unit of an Indesit washing machine is almost impossible at home - you can only check the wiring and cables connecting the controller to other elements of the washing machine. But it is too difficult to repair or replace the unit yourself; such work should be entrusted to a professional.
- sensor . If the engine itself can be classified as a more or less reliable part, then problems with the electrical connected to it often occur. The weak point is capacitors. The problem is that they are not repaired; when they break, capacitors need to be replaced.
Important! We specifically did not draw your attention to factors such as blockages in the drain and fill system (hoses, filters and pipes). The fact is that these problems are a problem not only for SM Indesit, but also for any other brands.
SMA Indesit control unit - do-it-yourself repair
All the buttons on the Indesit washing machine flashed
To begin with, I want to warn you that I only provide proven material; the breakdown that will be discussed in this article can be easily fixed by replacing several containers. If in your case this did not help or you have other problems with the control module, I am unlikely to be able to help you. The fact is that the brains of a washing machine are a rather complex part, and even if you see that some diode or resistor has burned out, this does not mean that replacing it will make the unit work. The failure of one part often leads to a problem with other components, so before you rush into the module, think carefully about whether you have the skills that are needed for this procedure or not, because this spare part costs a lot of money. Next I will speak in question-answer language, those who follow my blog remember that there was a forum on it and this article was written based on one of the topics of this forum
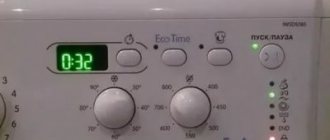
The essence of the problem is that I have an Indesit washing machine and for no reason at all the display panel on it blinks, that is, the lights above the buttons blink quickly, quickly, like color music. I looked in the instructions, there’s nothing like that, I went through all the error codes and couldn’t find anything.
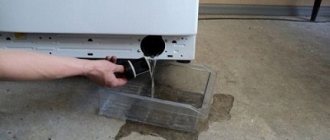
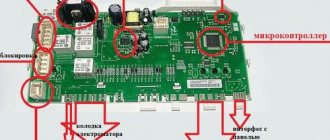
Apparently, the power supply in your washing machine, or more precisely in the control unit, has failed. Remove the control unit, if you have a horizontal-loading washing machine, then it is located in the lower left corner of your SMA, when viewed from behind, in the vertical lines at the top under the control panel. You will need to remove the module from the plastic box and inspect the containers for swelling. I think this will help you. Good luck
Thanks for the advice, I'll try it now. I removed the board, it was quite difficult, I had to unscrew the hatch at the back of the washing machine, it is attached with six screws and tried to get it out, but nothing worked, I couldn’t disconnect the wires. As a result, I put the machine on its side, on the side where the powder is poured, although the floor was flooded with water, I had to first drain the water from the washing machine. In short, when I put it on its side, it was only then that I easily disconnected the wires. I wrote this to those who will remove the control module themselves. I just pulled the board out of the box and, in fact, two of the containers were swollen, now I’ll remove them from the receiver and solder them here. I think I'll post the results in an hour.
Fast guy, I didn’t even have time to say “A”, but he had already dismantled the washing machine. Be careful not to confuse the polarity on these capacitors; it often happens that out of ignorance people install them in vain, and as a result the display panel may burn out. be careful
Strike iron without leaving the site. Hooray, it worked, the washing machine washes like a sweetie. I wonder how much money I saved. Thank you for your work, I don’t know how to thank you, I just say thank you
I am very glad that what I advised helped you. After this article was published, a washing machine came into my workshop with a similar problem; all the display buttons on the control panel were also blinking. The video I made can be seen below.
Video about what causes the buttons on the control panel of the Indesit washing machine to blink
In addition, I would like to clarify some things about the capacitance and voltage of the capacitors that need to be changed. The fact is that these capacitors are designed to dampen the pulse, so it is undesirable to set other values, that is, if the capacitance is 680 μF, then you must set the same one, but the voltage can be increased, for example, set to 16 volts and 680 μF. Don't forget about polarity, it's very important. Next, let's look at another example of such a repair, although it turned out to be unsuccessful, as the processor burned out
Why the Indesit washing machine does not turn on
This topic was also taken from the form that was on my website. The essence of the problem was that the owner of the Indesit washing machine connected the ground wire to one of the terminals of the heating element, the result was what you will read about in this paragraph
Hello, help me repair the control module of the Indesit wisl washing machine, control unit 215009152.02. According to the owner, the heating element was not connected correctly, as a result of which the relay leg k5, inductor l1, resistors and varistors were normal. The tny264 and uln2003 PWMs were replaced, as well as the mains and secondary capacitors. The result is a surge in voltage from 0 to 6 instead of 12 volts and from 0 to 2 instead of 5 volts. I changed everything in the harness, the result was the same. Is it possible to have a short circuit in the transformer? I found a diagram of the power supply, maybe you can advise
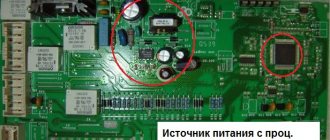
Judging by the diagram, I assume that you are torturing the EVO-II board. I didn’t understand how it was possible to connect the heating element incorrectly; if it threw a phase onto the body, then most likely there was a short circuit, and the result may well be that the microcircuit was pierced. How the control panel behaves, what blinks. Why did they change uln2003, was it clearly broken or is this just your guess. It is not advisable to check the transformer on the board; it is better to remove it and check it. A short circuit on the transformer is quite possible, but it behaves differently; there would hardly be any pulses. This behavior is more like a broken diode, zener diode, capacitor or transistor, and also - the PWM is definitely working. Did you take measurements from the transformer? And if so, then you need to dig the chain to it. In short, there could be a lot of reasons. From personal experience, in such cases, I first of all check the parts that I indicated in the photo, their denominations under the photo, then unsolder the uln2003 and check without it, then depending on the circumstances. And write about the result
Zener diode = 4.35V, SMD capacitance 0.1 µF, but I don’t know the voltage, I take it from other boards, I don’t remember the transistor value either - again, I’m taking it from another module, as there was no need to look
Yes, there was exactly a phase on the case, nothing works on the display unit, because there is no constant voltage of 12 volts, uln2003 changed all the relays clicked in time, short circuit on all legs, the whole memory is readable and sewn. All measurements were made with a load, the 12V light flashes in time, the capacity when measuring is 280 volts without ripple, I removed all the triacs, varistors and relays, there is a bare power supply at the output, not counting the ulnka, so as not to break the 12 V, without it, the same thing at 5 volts. I’m not sure about the transistor, is it an analogue for bc817? And where is the p6ke diode located on the diagram?
An analogue of a transistor, you need to look on the Internet, but in general I have a lot of junk, I remove it from dead boards, and where the diode is located - I won’t tell you at face value, but in general it looks like there really is a short circuit somewhere. Try the transformer, maybe there really is a short circuit on it, although usually there is pulsation, it doesn’t look like it. Something here smacks of a processor failure, and why is there a ripple coming from the transformer without holding the board in your hands? It’s difficult to advise anything. Try changing the zener diode with the transistor
I figured out the diode, d9 according to the diagram, I changed the zener diode, unfortunately I can’t select a transistor from what I have
Without him, there is simply no point in continuing to drip, it is quite possible that he may be lying.
I completely removed T1, same thing.
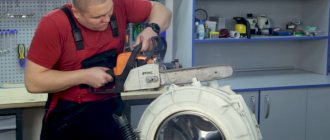
Master. Remove the transformer, but in general I already wrote that it looks like the microcircuit has been punctured. After such a blow to the brain, it’s rare that they survive, and it turns out that the phase almost directly hits the mikruhu. Today they brought Indesit to me with the same problem, the heating element exploded, the owner called the repairman, he said that the module was dead. The rest of the story is this: the client decided to do the repairs himself, changed the heating element and the control module, in short, he says that it’s the same garbage again, that nothing works and nothing burns. I took off the back cover, and there the ground was connected to the heating element, but I didn’t look at what kind of board it was (Arcadia or EVO-2), I was in a hurry. On Tuesday I'll throw it on the stand, maybe I'll dig up something there, the breakdown is basically identical. But I think that I will have to change the microcontroller or the entire module. In general, I'll watch it on Tuesday
I replaced the t1 with kt3102b, the power supply started working after removing the microprocessor. Brain dead, topic closed
In principle, this is to be expected
How to find a breakdown of SMA Indesit
In search of answers to the question: how to repair an Indesit washing machine, you can refer to the operating instructions. If you have lost the manual, we will provide you with a detailed algorithm for finding the breakdown and its cause.
Proceed as follows:
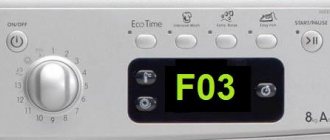
- If your model has an electronic display, great! On it, the self-diagnosis system displays fault codes when it detects a breakdown. Indesit washing machines are characterized by the following error codes: H20, F02, F05, F10, F18 and others.
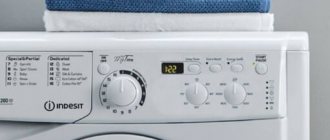
- If there is no display, the machine will still notify you of a breakdown - the indicators on it will light up in a certain combination or sequence. Also, some breakdowns can be detected by simply listening to the operation of the drum and electric motor - in the event of a malfunction, you will hear noise, hum, whistle, clanging and other uncharacteristic sounds.
- If there are no signs of breakdown, but the SM still does not work, you will need to disassemble the washing machine. The easiest way is with the parts located under the top cover - surge protector, water level sensor, and so on. But access to the motor, heater, bearings or pump is a little more difficult. You will learn more about disassembly in this video:
- Also take a tester with which you can test all sensors, contacts and wires. If there is no power in any of them, then it can be judged that there is a breakdown.
Attention! Before disassembling the SMA body, you need to study the structure of the washer. The electrical diagram of the Indesit washing machine will help you with this.
If you haven't found it, sketch, record, photograph or videotape all the stages of disassembly to put everything back together correctly.
How does an automatic washing machine work?
In general terms, all parts and components are contained in the body of the washing machine. Regardless of the Indesit washing machine model, the body consists of:
- front,
- rear,
- two side panels and a cover.
In front-loading washing machines, the hatch door is located on the front panel. In top-loading washing machines, the lid is both a hatch door and the location of the detergent dispenser.
The internal structure of the Indesit washing machine is a certain set of mechanisms and parts, each of which carries a certain functional load.
Control module and electronics elements
The control module is the “brain center” of the Indesit washing machine. This is a printed circuit board on which electronic parts are located in a certain sequence. They record signals about the start or stop of operation of individual elements of the washing machine.
The microprocessor synchronizes the received information, thereby ensuring uninterrupted operation of the washing machine.
In addition to the module, the control system includes the following elements:
- pressure switch (monitors the amount of water in the tank);
- temperature sensor (monitors the temperature of the water entering the washing machine tank);
- tachometer (records and regulates the number of engine revolutions).
All information about running processes is displayed on a special display. If there is a failure in the program or some mechanism fails, an error code is immediately displayed on the display (the “self-diagnosis” system is triggered). Having studied the decoding of the codes, you can easily determine the cause of the breakdown and eliminate it on your own.
When the washing program starts, the control module receives a signal, which it transmits further to the corresponding executing elements of the internal devices of the washing machine.
UBL
UBL (hatch blocking device) is an electronic lock that blocks the opening of the hatch door after starting the washing program (a kind of protection against leaks). The UBL consists of three parts: a thermoelement, a bimetallic plate and a fixing device.
The control module sends a signal to the thermocouple to start the washing program. The thermoelement begins to heat up, transferring heat to the bimetallic plate, which, expanding when heated, pushes out the latch. As a result, the lock blocks the opening of the hatch (a characteristic click is heard).
After the module receives a signal about the end of the wash and the complete emptying of the tank, the lock unlocking system is activated and the hatch door opens.
Inlet valve and water level sensor
After the electronic lock locks the hatch door, the washing process starts and the inlet valve is activated. This is a small element with a coil inside . After a signal is sent from the module about the start of washing, current begins to flow to the coil. Under the influence of an electromagnetic field, the inlet valve opens (water flow into the tank begins).
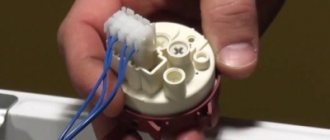
The drum fillability is controlled by a pressure switch (water level sensor). This is a small plastic washer with wires connected to one side and a tube on the other. Inside the sensor there is a thin membrane. During the process of filling with water, the air pressure in the tank increases. Having reached a critical point, the air squeezes the membrane, causing the sensor to transmit a signal to the module to stop the water supply.
Powder receiver
Detergent dispenser (powder receiver) is a plastic tray divided into three parts . Each compartment, responsible for a certain stage of washing, has pipes connected to it from above. As soon as the washing process starts, the control module sends a signal and water begins to flow into the desired compartment.
Mixing with the washing powder, the soap solution goes further through the pipes into the drum of the washing machine. You can find the powder receptacle in the upper left corner of the Indesit washing machine.
Heating element and temperature sensor
Depending on the washing mode, you must select the water heating temperature before starting the program. It is the heating element (heating element) that ensures heating of water to the specified temperature values. In appearance, the heating element is a curved tube, inside of which there is a spiral and a dielectric insulator (accumulator and heat transmitter from the inner spiral to the outer shell of the heating element).
The ends of the tube are connected to contacts through which signals about the heating of the coil are received from the module. As soon as the tube heats up and brings the water temperature to the programmed value, the thermostat is activated.
Temperature sensor (thermostat) is a cylindrical semiconductor resistor (diameter no more than 10 cm). The sensor is fixed in a special connector located at the bottom of the Ten between the contacts. As the water heating temperature increases, the electrical resistance of the temperature sensor increases.
As soon as the resistance value reaches the limit value (set by the program), it transmits a signal to the control module to stop the supply of electricity, thereby blocking the water heating process.
Motor and tachogenerator
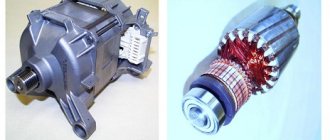
It is the motor that is responsible for the rotation of the drum. In modern models of Indesit washing machines, commutator-type electric motors are most often installed. Unlike asynchronous-type motors (installed on older models of washing machines), commutator-type motors are smaller in size and provide the highest possible rotation speed, regardless of the frequency of the electrical network.
The engine consists of enclosed in an aluminum housing:
- rotor,
- stator,
- tachogenerator and two brushes.
An electrical impulse passing through the winding of a stationary stator and graphite brushes sets in motion the moving element of the engine - the rotor. During operation of the washing machine, the brushes wear out, the contact between the stator and the rotor weakens, and the engine loses its power.
Tachogenerator (Hall sensor) is an electric coil that determines the rotation speed of the electric motor . This is a small metal ring connected by wires to the motor shaft. When the motor rotates, an electromagnetic field is formed inside the coil. Depending on the rotation speed, the voltage indicator changes. The sensor reads this information and sends it to the control module, which in turn regulates engine operation.
Drum
The central element of the internal structure of the Indesit washing machine is the drum. It is here that the washing process is carried out directly. The drum is a cylindrical container with perforated walls made of stainless steel. The flow of water from the drum is prevented by a tightly closed door and a rubber cuff surrounding the entrance to the hatch. The drum is placed in the tank.
In Indesit washing machines, the tank is most often made of thick plastic. Depending on the model, the tank can be dismountable (the two halves are bolted together) or non-separable (welded).
The tank and drum are connected to each other by a shaft with bearings. On the back of the tank, a pulley with a transmission belt is attached to the shaft. It is the belt that transmits the revolutions from the motor hub to the pulley, thereby causing the drum to rotate.
There are many auxiliary elements connected to the tank:
- Shock absorbers (dampen vibrations of the tank during washing or spinning). One side of the shock absorber is attached to the tank, the other - to the base of the washing machine body.
- Springs (compensate for vibrations of the tank, are attached with one side to the upper part of the washing machine body, and the other to the top of the tank).
- Counterweight (heavy concrete block installed on the tank to compensate for imbalance during the washing or spinning process).
- Hoses, pipes (tap water mixed with powder from the dispensary flows into the drum through the upper elements; waste water goes into the drain through the lower elements).
The tank is attached to the body using a special rubber cuff (it can be seen by opening the hatch door) and a metal clamp.
In modern models of Indesit washing machines, the motor is attached directly to the drum along the rear wall (the so-called direct drive). This type of connection of two nodes is considered more efficient. Rotating the drum requires less energy, and the motor itself takes up less space.
Drain pump
After the washing process is completed, the control module sends a signal to start the drain pump (consists of a motor, drain filter and snail). Through a rubber pipe connected by special clamps to the tank and volute, waste water enters the drain pump (pump) .
To prevent foreign particles from dirty water (threads, lint, hair) from getting onto the impeller of the drain pump motor during the draining process, a drain filter is installed between the volute and the pump.
Next, the water flows through a corrugated hose (length from one to four meters) into the sewer. A corrugated hose is attached to the pump on one side and lowered into the sewer system on the other.
You will find maximum useful information about Indesit washing machines in this section.
How to fix an Indesit machine yourself
Next we will talk about repairing the Indesit washing machine with our own hands. We will give advice with photos and videos, and step by step consider all the work that you can do without the help of a specialist.
Checking and replacing the heating element
It doesn't take much effort to detect problems associated with a burnt-out heater. Problems with the heater can be identified by a number of signs:
- In the vast majority of cases, the Indesit machine itself informs the owner about the breakdown of the heating element. Error F07 is displayed on the screen, or the 1st, 2nd and 3rd indicators are flashing.
- Indirect signs will also indicate its breakdown. So, the powder may not dissolve during washing because the water is not heated. 20 minutes after starting the program, touch the hatch: if it is cold, it means the heating element is not working.
To find, check and remove the heating element, proceed as follows:
- Take a suitable screwdriver and unscrew the back panel, which is usually secured with four bolts.
- At the bottom of the tank you will see 2 contacts protruding from its wall. This is the heater shank - the heating element itself is located under the drum. Remove the wiring from the heater and the sensor (located inside the heater).
- Take a tester and take measurements - place the probes against the contacts. If the device shows a value in the region of 20-40 Ohms, then the heater is in order. If the value is 0, then the heating element is closed, and 1 or ∞ indicates a break in the heater.
- At the same time, check whether the heating element is breaking through to the housing. To do this, turn on the buzzer mode on the tester. Place the probes like this: one to the contact, the other to the body. If everything is in order, then the tester works quietly, if there is a breakdown, it will beep.
- Next, remove the old heating element, even if the tester readings are normal. To do this, unscrew the central fastener by unscrewing the nut. Take out the seal.
- Inspect the heating element. If there is a thick layer of scale or dark spots on it, then the element 100% needs to be replaced.
Important! Buy a new heating element together with a rubber seal to tightly install and secure the heater.
- Before installing the heating element, clean the place in which it is attached from scale and debris. If this is difficult to do by hand, use a wire hook or bottle brush.
- Install a new heating element, connect the wires and assemble the machine.
Replacing the surge protector
Malfunctions of Indesit washing machines and their elimination are a problem for many users, especially due to manufacturing defects. But if the filter is not defective, it means that it was “finished off” by unfavorable operating conditions - high humidity in the room or constant power surges in the network.
While people are thinking about how to protect the filter from unstable voltage in our homes, we will tell you how to carry out the repair yourself. Proceed as follows:
- Remove the top cover by unscrewing the bolts that secure it.
- The filter is located on the back of the power cord, like a plug - only inside the machine.
- Once you have found the filter, unscrew the screw that holds it in place.
- The part cannot be repaired. You need to replace the element by purchasing an original part.
From user experience:
The owner of SM Indesit came to the workshop, already desperate to change anything: according to him, he had already changed the filter 3 times. His working capacity was enough for 5 months at most. The technician examined the machine and said that the filter was burning out due to high humidity. He installed a new part, and treated the contacts going to it with silicone sealant. The lucky owner has been using the machine for the second year.
Important! If you decide to follow this experience, dry, clean and wipe them before applying sealant to the contacts.