Household appliances from the famous Bosch brand are popular due to their reliability. After purchasing, many owners wonder how to install a Bosch dishwasher themselves. If you have the necessary tools at home and you know how to use them, connecting the machine will not be difficult.
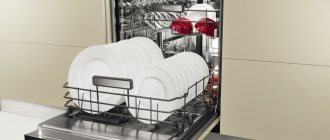
You can install a dishwasher yourself
The best place for a dishwasher
The best place to place a dishwasher (hereinafter also referred to as dishwashers, PMM) is in the kitchen. You need to decide where the equipment will be placed before purchasing it. Much depends on whether furniture is installed in the kitchen and whether there is a free opening in it to build in a dishwasher.
Manufacturers produce two types of dishwashers: built into kitchen furniture and free-standing. Built-in PMMs come in three types (hereinafter W – width, H – height, D – depth):
- full-size – W 54-60 cm, H 80-86 cm, D 54-63 cm;
- narrow – W 44-45 cm, H 80-86 cm, D 54-63 cm;
- compact – W 40 cm, H 44 cm, D 50 cm.
Fully integrated narrow dishwasher "Bosch"
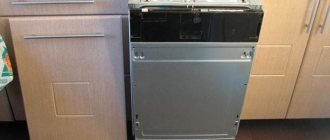
Built-in PMMs are divided into two categories: fully and partially built-in. For the former, the control panel is located at the end of the door and is completely covered by the facade of the furniture. The doors of partially built-in dishwashers can be partially closed with decor, since the control panel and handle are located outside.
Partially built-in full-size dishwasher
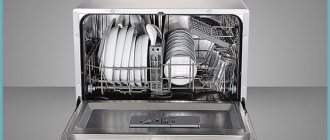
If installing a built-in Bosch dishwasher is not possible for some reason, choose a model that can be placed separately. A family of two living in a small apartment will need a compact dishwasher, which can be installed in a separate cabinet or under the sink (see photo below).
Compact Bosch dishwasher in the cabinet under the sink
If you have not yet purchased kitchen furniture and want to place full-size household appliances there, first measure or take its dimensions from the documentation. This way you can order cabinets with openings of the required sizes.
An example of calculating a furniture opening for the dimensions of the selected PMM model
The best location for the dishwasher in the kitchen is no further than 1.5 m from the sink, near which it is most convenient to connect to the water supply and sewerage system . Experts note that otherwise, malfunctions of this equipment or premature wear of the drain pump are possible.
The dishwasher and washing machine are built into the furniture next to the sink
When installing PMMs near water supply and sewer outlets is impossible, it will be necessary to organize the supply and drainage of water through new connections to nearby sections of pipelines. There are no particular difficulties with small water pipes. Drainage will be more difficult to work with. In addition, you will have to buy long hoses, since you rarely find parts longer than 1.5 m included with the products.
The video will introduce readers to how to calculate the dimensions of the opening for a built-in PMM:
General recommendations and rules
To ensure that the machine does not cause any complaints during use and does not require repairs and frequent maintenance, it is necessary to think through the procedure for its installation.
The following connection procedure applies to all types of dishwashers:
- Checking the complete set and integrity of the equipment after transporting it to the house.
- Installation at a predetermined location on a table, floor or furniture module.
- Connection to the sewer using a drain hose, which is inserted into the sink or connected to a siphon using an adapter.
- Connection to the water supply using a water supply hose.
- Installing a separate power outlet or using a pre-installed one.
If difficulties arise with connecting the hoses or the socket device, the connection order can be changed, however, you will need to complete each item from the list.
Access to the side walls of built-in dishwashers is not possible, but countertop, attached and freestanding models do have it. Provide protection from burns - the side surfaces become very hot during the washing process. To do this, you need to install side covers sold by service centers.
There are a number of rules, the implementation of which will help to avoid problematic and emergency situations. They are usually listed in the instructions, so the most important requirement is to carefully study the documentation.
Image gallery
Photo from
Serviceability of the case and parts
Compliance with safety standards
Proximity of other electrical appliances
Level base and stability
It is not recommended to place the dishwasher near a radiator: the heat emitted by the battery negatively affects its “well-being”. If the machine is built next to a refrigerator, on the contrary, it will “suffer.”
Make sure that the power cord is also not exposed to heat, otherwise the insulation will melt and a short circuit or current leakage may occur - both of which are dangerous.
If you have not previously installed or repaired home appliances, if a large number of questions arise, it is better to combine your own efforts with the services of a service center. Intervention on your own will only cause harm.
After installation, be sure to check whether the door opens well and whether the loading module(s) are working properly. If there is not enough space, then an open door will create a lack of space - do not forget about this during further use and try to arrange the furniture so that it is easy to service the machine.
Preparing to connect
First of all, check the completeness of the equipment. It must correspond to that declared by the manufacturer (the list is usually indicated in the instructions). Next, inspect the case for any damage that may have occurred during transportation. If defects are found, do not perform the installation, but exchange the machine for a working copy.
Checking the completeness and integrity of the dishwasher body
Required tools and materials
To perform installation and connection of the PMM with your own hands, you will need the following tool:
- hammer drill for cutting walls and installing sockets;
- a screwdriver or a set of flat and Phillips screwdrivers;
- small adjustable wrench;
- pliers and duckbills;
- building level.
To install the dishwasher you will need tools
You should also purchase materials:
- cable with 3 copper stranded conductors, cross-section of at least 2.5 mm2;
- difavtomat, designed for 16 A shutdown current and 30 mA leakage current;
- moisture-resistant sockets with sockets, designed for a current of 16 A;
- bronze or plastic tee with 26.44 mm (3/4 in.) OD elbow and shut-off ball valve;
- siphon under the sink with 1 or 2 additional outlets (2 outlets are needed if there is also a washing machine next to the sink);
- inlet and drain hoses (if the length of the tubes that come with the PMM is not enough);
- flow filter;
- FUM tape.
Diagram of the left-side and right-side connection of the PMM to communications, with the approximate length of hoses and wires
Some dishwasher models are designed to be connected to both cold and hot water. Then you will need 2 tees. But experts recommend connecting dishwashers only in cold water , because the equipment is equipped with a heating element for heating the liquid. A shut-off valve in the tee is necessary to quickly shut off the water supply in case of an emergency.
To make it easier to install your Bosch dishwasher, do not push it completely into the furniture opening. Place the PMM as close to it as possible, but in such a way as to provide access to the connections to the water supply and sewerage.
Setting water hardness
Hard water contains many different salts. Over time, they settle in the hoses and on all internal parts of the dishwasher. This can lead to complete failure of the device.
For PMM, it is optimal to set the hardness to 3. First, you need to carefully study the instructions. Then start the dishwasher and hold the button for 2-3 seconds. After that, press “+” or “P”.
If there is a display, indicators from 1 to 5 are visible. The higher it is, the harder the water.
- After the hardness is selected, you need to wait about 10 seconds.
- Then evaluate the result.
The correct setting is indicated by the absence of marks on the dishes.
Have you set the water hardness in PMM?
Yes, of course. No.
Electrical connection
This stage of work is quite complicated, so if you lack experience, use the services of qualified electricians. Remember: electricity is not to be trifled with; any mistake can cost you your life . If you are confident in your abilities, before starting work, read again the basic rules for indoor electrical wiring.
Connection diagram of the dishwasher to the electrical network
As can be seen from the figure, the electrical wiring to the PMM must be extended from the input electrical panel in a separate line. In the electrical panel it is necessary to place a residual current device (hereinafter also referred to as RCD) and a 16 A circuit breaker that turns off the power grid in an emergency. Instead of these two devices, you can install a differential machine with the parameters indicated above.
Optimal layout of sockets in the kitchen, taking into account the connection of the PMM and washing machine
If the apartment has already been renovated, you don’t have to spoil the walls by gating. Lay the cable channels along the wall, then fix the cable in them and close the box. Such wiring will not spoil the interior (see photo below).
Electrical wiring in cable ducts
Expert advice
- When purchasing a Bosch PMM in winter or late autumn, especially if the temperature outside the window is below “0”, it must be warmed up in the room for 10-12 hours before connecting it.
- After transportation, you should inspect the accompanying documentation, pay attention to the integrity of the device and the presence of the necessary components. It is advisable to do this in the presence of the courier.
- You should begin work by installing the drain hose. A special adapter will help to correctly match the diameter of the pipes.
- When installing a built-in model, it is necessary to take into account that the water temperature during operation of the PMM can reach 100 degrees. Therefore, you should take care in advance to protect the sidewalls of the niche.
- It is not advisable to install a Bosch dishwasher near a refrigerator or radiators. This may negatively affect its performance.
- It will be necessary to provide the power cord with overheating protection in advance for safety reasons.
Important! Upon completion of installation work, you need to make sure that the door closes tightly and the internal grilles are in good condition.
Having a dishwasher makes life much easier for the housewife, saving time and effort. If you follow the tips and simple recommendations, you can install it yourself, without the help of a specialist.
Connection to water supply
Supply only cold water to the Bosch PMM. With it, the dishwasher will last longer, since cold tap water is much cleaner than hot water. You need to connect to the water supply at the point where it connects with the flexible hose going to the sink faucet.
Communications under the sink, which are most convenient to connect to
To successfully connect, follow these steps:
- Shut off the cold water supply at the entrance to the apartment or house.
- Disconnect the flexible faucet hose from the water supply.
- Connect the water pipe to the tee. The inlet and outlet of the tee should have an outer diameter of 20.9 mm, the branch with the tap should have an outer diameter of 26.44 mm.
- Connect the inlet of the flow filter to the outlet of the tee with a ball valve.
- Direct the dishwasher inlet hose to the outlet of the in-line filter and connect them.
When installing the tee and hose, do not forget to use FUM tape to seal the joints.
Connecting a Bosch dishwasher to the water supply through a tee
The nuances of installation under the countertop
If the kitchen is already equipped with furniture, then installing a dishwasher under the countertop is ideal. It is better to give preference to compact models of free-standing or built-in type.
As a rule, in this case the machine is installed in the place where the cabinet was previously located. It is very easy to dismantle. It is necessary to remove the doors, remove the shelves and make holes in the back wall for the hoses.
You need to make sure you have the necessary tools and parts in advance. First of all, you need to arrange the wiring and remove the outlet. If the tabletop is made of wood, its inside will need to be protected from moisture with metal or other suitable material.
Work algorithm:
- Attach the edge of the intake hose to the outlet of the tee.
- Connect the drain hose to the siphon.
- Take care of the tightness of the connections.
- Perform a test run of the device.
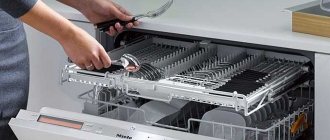
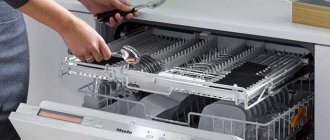
Dishwasher control panel Bosch Silence SMS24AW01R
Connection to sewerage
The last step before setting up and test running the dishwasher is connecting to the drainage system. To do this, the siphon located under the sink will have to be replaced if it does not have a free fitting (branch). If you are going to connect the washing machine, you will need a siphon with two branches.
Siphon with two outlets, one of which is already connected to the PMM drain hose (the second is free and plugged)
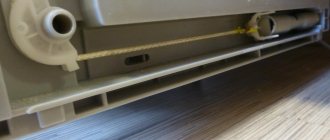
The drain hose must be tightly attached to the fitting with a clamp, otherwise it may be torn off by the pressure of the liquid. It’s not for nothing that the fitting through which the drain hose is connected to the siphon looks like an inverted Latin letter V (see photo). This form prevents gases from the sewer from entering the house. For any connection to the drainage, the hose must have such a bend.
A special mounting clip is attached with a self-tapping screw to the wall to fix the bend of the drain hose on the way to the sewer
In conclusion, I would like to note that it is necessary to fix the dishwasher in the furniture opening only after test activation. Therefore, having connected the device to communications, do not rush to push it into a niche - the first launch is ahead. It will show whether the work was completed correctly.
If you can’t handle connecting the machine yourself, call the company where you bought the product and call a specialist
What kind of socket is needed for a dishwasher?
The choice of outlet is of no small importance when installing a dishwasher. It is strictly not recommended to use an extension cord - if moisture gets in, the consequences are quite difficult to predict.
Use the extension cord only when necessary, and do not leave the kitchen unit turned on when the owners of the house are absent.
It is prohibited to place an extension cord between plastic pipes, near the tap, or near gas appliances. If it breaks, it can damage the plastic, cause a leak, and even cause a fire.
To avoid troubles, it is better to take care in advance of a convenient location of the dishwasher near an electrical outlet. Choose an adapter made of durable plastic, with a smooth surface, without chips or scratches. Poor fixation of the device components, flimsiness, thin wire and a plug made of low-quality rubber are reasons to refuse the purchase. It’s better not to save money and buy a reliable adapter from a well-known brand that will last for a long time.
If possible, it is better to connect separate electrical wiring to the dishwasher, especially with a built-in oven with a dishwasher - the load when both devices are operating will be too high. It is better to leave the laying of a new line to professionals
Inexperience or carelessness in work can lead to an accident. Place the socket low from the floor, the recommended height is from 15 to 40 cm
It should be taken into account that there may be flammable materials on the floor (carpet, linoleum, laminate), so make sure that there is sufficient distance between the outlet and the floor covering.
First wash
There is no need to rush to launch the PMM immediately after the test run. It will take time to cool down. How long and well it will last will depend on the correct use of the equipment.
Before you put the dishes into compartments, you need to inspect them. Remains of food are washed off under running water. If the machine has cooled down, load the dishes. Salt and rinse aid remain in the compartments after the first start, but you need to add detergent.
Proper loading is the key to clean dishes. There should be a distance between objects, then nothing will prevent the streams of water from rinsing the dishes.
Selection of household chemicals
PMM uses products in the form of powders, gels and tablets. Also, for the first start you need a special salt that softens the water. It prevents the formation of scale on machine elements.
When the product runs out, a special indicator lights up and housewives must add salt.
The amount of salt that is poured into the compartment depends on the degree of water hardness. City services have the data, but there are modern models of dishwashers on sale that determine it themselves.
Loading the cart correctly
If the owner of the PMM does not have the opportunity to read the instructions compiled by the dishwasher manufacturer, then the following recommendations should be followed:
- Frying pans, tureens, pots and any other large items are placed in the lower basket. If necessary, the stand located at the bottom can be removed,
- Glasses, dessert plates, forks, spoons and many other small items are placed on the upper shelves. It is important to maintain the distance between rows.
- Any dishes are placed upside down.
- There is no need to load easily breakable dishes and highly durable items into the machine at the same time. In case of urgent need for joint washing, you need to choose the temperature mode and program, taking into account the presence of fragile objects in the car.
Many dishwasher models have special compartments for small items. They are used to wash spoons and forks.
How to turn it on
The PMM is turned on as follows:
- loading cart;
- program selection;
- pressing the "Start" button.
You can start the dishwasher in 2-3 minutes. If after starting the program you need to put an object, the work is stopped by clicking “Stop process”. Such a button is available on PMMs produced by Bosch and other companies.