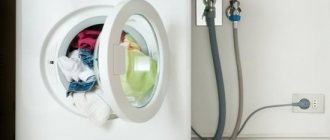
The washing machine must be connected to three networks at once: water supply, sewerage and electricity. Therefore, it is necessary to choose a place for installation so that all three systems are located nearby or there is an opportunity to bring them there. The optimal places to install a washing machine are the bathtub, toilet and kitchen - they have all the necessary communications. Most often they require a little modification, but connecting the washing machine is not very difficult. The connection process itself is simple, you don’t need to do anything super complicated, if you have “direct” ones, you can do everything yourself.
Site selection and equipment
Before you go to the store to choose a washing machine, think about where you will place it. Measure the depth, width and height of the selected location, adding at least 1 cm on all sides (correction for uneven walls). Agree, the situation when the equipment is physically unable to stand on the prepared area cannot be called pleasant.
The most common options for the location of automatic machines are:
- Bathroom
It is convenient because most of the communications are nearby. In addition, the device fits harmoniously into the surrounding space. To save space, the machine can be installed under the sink. Then you will have to choose a special form of plumbing with a drain in the back.
However, experts do not recommend placing the machine in the bathroom if there is an alternative, since in conditions of high humidity the parts wear out much faster and rust appears.
- Kitchen
Also, all connection nodes are located nearby, there is no need to re-equip anything additional. If you think through the design of the headset in advance, you can install a built-in washing machine or hide it behind one of the cabinet doors.
There are disadvantages here: increased humidity and temperature effects from the stove and oven. Therefore, it is recommended to install the device away from heating devices.
- Toilet
Some originals manage to install the unit even in a small toilet. In this case, the machine is located above the toilet.
This option requires special preparation and thoughtfulness: you need to be confident in the strength of the walls, install a reliable podium, and provide a vibration damper.
- Corridor
The location in the hallway is more common in desperate situations, when there is simply nowhere else to put the equipment.
The location has few positive features: communications have to be delayed, equipment takes up a lot of space, noise can be heard in all rooms.
- Lumber room
If you have a storage closet in your home, you can try converting it into a laundry room. This way, the washing machine will not interfere with anyone, and will be preserved better.
Some houses have special rooms that are designed for washing. If you are the lucky owner of such an apartment, well, congratulations, you are lucky.
- Basement
Such placement is possible in a private house, provided that the basement is heated and has electricity, water and sewerage installed.
If all requirements are met, this arrangement is very advantageous: the unit is not exposed to moisture, and its operation is inaudible for residents.
When the choice in favor of a certain room is made, you should think about the surface on which the machine will be located. The floor in this place should be hard and level.
Small differences in height can be corrected with the help of screw-in machine legs or a rubber mat, but they cannot compensate for strong unevenness. Therefore, if the installation is carried out on a wooden or uneven floor, then it makes sense to think about filling the area under the device with a concrete screed or installing a pallet.
First launch
When starting the test program, be sure to take the technical data sheet of the device and keep it in front of you. It will be needed for data verification. The test run does not involve loading laundry into the drum; it only involves water and detergent.
To begin with, the water intake into the SMA tank is turned on. It is necessary to detect the time of filling the drum to a certain point. Be sure to inspect the systems for leaks, and if any are found, drain the liquid and carry out work to seal the problematic connections. If there are no emergency leaks, check the unit further. Heating of water to the specified temperature should occur in 5-7 minutes. Check the measured time with that specified in the technical data sheet.
During normal operation, the washing machine should carry out all operations silently; strange creaks, knocks or rustling noises during the water heating stage indicate a problem in the system.
If the machine functions properly, almost silently, carry out a further test, examine other functions and capabilities of the washing machine, including the functionality of the drainage system. At the end of the mode, look again at all the tubes, connections, walls, floor covering around the device - everything should be dry.
Getting to know the instructions
Before you start working with the automatic machine, read the instructions! It contains a lot of useful information: what kind of outlet should there be, how to connect the drain and water supply, how to adjust the position of the unit, what malfunctions occur most often and whether you can fix them yourself, and much more.
Reading technical documentation is a separate step, since rarely does anyone turn to the manufacturer's prompts before a problem arises. This is usually only done if something doesn't go according to plan. You shouldn't do that.
The instructions provide detailed recommendations regarding the model of your washing machine, compliance with which will prevent many troubles. Do not ignore the manufacturer's advice: in the event of a breakdown, failure to follow them may result in your case being considered non-warranty.
Removing the shipping bolts
Before connecting the washing machine, you need to unpack it and remove the mounting bolts and replace them with plugs.
The shipping bolts look something like this
This procedure is required immediately after unpacking. If you leave the bolts and turn on the machine, it will break. And this is not a warranty case. The number of bolts varies from manufacturer to manufacturer, but their installation diagram is in the instruction manual, and they are visible on the back wall. Just take a screwdriver and unscrew it, and close the opened hole with a plug.
Preparation of communications
The washing machine is connected to three systems: sewerage, water supply and electricity.
Sewerage
There are several varieties possible here:
- Siphon under the sink - you need to install a splitter to the drain running under the sink. It will provide an outlet for the washing machine hose.
- Directly to the sewer - in this case, you will have to make a special outlet in the pipes or attach a tee when approaching the sink or bathtub.
- In the toilet or sink - the simplest and most unreliable option. Using a hook, the hose is hung on the plumbing fixtures, and the water flows out freely after washing.
Water supply
Most often, the machine is connected to cold water, and the device itself, using heating elements, heats it to the required temperature. However, some models provide connection to both cold and hot water.
This reduces electricity consumption, but increases the cost of hot water supply. In addition, such water often contains impurities and rust, which can lead to damage. And the units are more expensive. Therefore, the most common option remains connecting to cold water.
It is quite simple to install an additional outlet for water on polypropylene, metal-plastic and plastic pipes. A tee with one transition to metal should be installed. If there is a free outlet on the water supply pipes, great, the task is greatly simplified! All that remains is to install a shut-off valve.
You can install the simplest ball one. At the same time, do not forget to apply sealant and flax tow. There is an alternative option: a tee with a built-in tap. They are designed specifically for washing and dishwashing appliances. It is more convenient to install such a part, but if one of the parts fails, you will have to change the entire element, and they cost a lot.
Electricity supply
For correct and safe operation, the machine is connected to a separate grounded outlet. Please be aware that if there is no grounding, the manufacturer's warranty on the unit will no longer apply.
It must be located in close proximity to the device, since connecting extension cords or straining the wire is not allowed.
If there is no outlet that meets the stated requirements, contact an electrician. It will extend a separate power supply line from the panel with the required current parameters.
Do not attempt to install the outlet yourself unless you are properly qualified!
Required Tools
Installing a washing machine should begin with the preparation of tools, without which it is not possible to perform this action:
- Adjustable wrench.
- Gas key.
- The hose is flexible for connection to the pipeline system.
- Adapter with threaded connection.
- Withdrawal if necessary.
- Depending on the pipes to which you will need to connect the washing machine, you will need to acquire a crimp coupling, fitting or tee.
The connection process itself is simple, you don’t need to do anything super complicated, if you have “direct” ones, you can do everything yourself.
Connection and installation
Now all that remains is to free the unit from the packaging, remove the foam protection and unscrew the shipping bolts that are located on the back of the case.
They are designed to protect the internal parts of the device from damage during transport. Place plastic plugs (included in the kit) into the resulting holes.
Do not throw away shipping fasteners. They will come in handy when you move or need to take the device to service.
The corrugated drain hose into the sewer (usually included in the kit) must be installed in the siphon outlet and secured with a clamp. If the connection is made directly to the sewer pipe, then a rubber cuff is used as an adapter.
With any connection method, it is necessary to ensure that there are no kinks or strong kinks in the hose. But a bend at 60 cm from the floor is a common requirement. This is necessary to form a natural water seal - so that water and odors from the sewer do not penetrate into the device. A plastic clamp is used for fixation.
This rule is true for devices in which the drain hose is located at the bottom of the housing; if it comes out from the top, then the bend has already been made in the inside of the device. There are also now units with a check valve, for which you do not have to create additional “elbows”. This point should be clarified in the equipment documentation.
To connect to the water supply, we use a hose that is sold with the device. The side with the curved end should be connected to the machine: install the mesh filter (included in the kit) with the convex side towards the outlet and manually screw it on. The other end is also screwed onto the water supply tap by hand. There is no need to tighten too much, since there is a rubber seal at the joints that ensures tightness.
To make it even clearer, take a look at how this process goes in the video.
Connecting to the water supply
This procedure can be carried out in several ways. The choice of connection option will depend on the existing skills of the person installing the washing machine. Consider the communications to which the connection will be made; if necessary, it is better to replace them before installing the machine. Let's look at the main methods by which you can connect the unit to the water supply.
If the pipes are old steel
Under such conditions, you will have to tap directly into the water pipe. For this, a mortise clamp or a special crimp coupling is used. On top of the element there is a cavity with a thread, where the SMA water intake hose will be attached.
Additionally, with the coupling you can find a guide sleeve and a rubber gasket in the shape of a rectangle. The insertion is performed as follows:
- close all mixer taps and the valve that shuts off the water supply;
- clean and sand the surface of the communications where the gasket will be located until smooth;
- insert the guide sleeve into the mortise clamp and fix it in the cutout of the rubber gasket;
- attach the clamp to the water pipe using 4 bolts, tighten each of them in turn so that the elastic is pressed very tightly;
- using a drill with a drill bit with a diameter of 6 to 8 mm, make a hole in the pipe wall.
Place a small container under the clamp and open the faucet slightly, this will allow the water remaining inside to pour out.
When the liquid flows out, thoroughly clean the hole from metal shavings, attach a new faucet and examine the system for leaks. If the communications are made not of metal, but of metal-plastic, instead of a mortise clamp, a special element is used - a tee-fitting. The procedure will be even easier: after turning off the water in the riser, simply mark the connection location and cut off a piece of metal-plastic. Insert a fitting with built-in rubber seals into the resulting opening and attach a ball valve.
Connect to the mixer inlet
The following method requires the user to place a special straight-through valve between the eccentric and the mixer. This faucet is equipped with a hose extension for the hot water system. This method is very popular due to its simplicity, the work is carried out quite quickly. However, all tubes and hoses are located in plain sight, as a result of which the aesthetics of the interior are compromised.
You can carry out manipulations on a mixer made according to European standards in a few minutes. For this:
- disconnect the hose responsible for supplying cold water;
- screw a tap made in the form of a tee onto the eccentric;
- Connect the mixer hose into one of the holes, and the machine’s inlet hose into the second.
If the mixer on your bathtub is from a domestic manufacturer, then the algorithm will be slightly different. Once disconnected, unscrew the eccentrics and install a pass-through valve equipped with a special extension.
Connect the inlet hose to the faucet or tank
This method is the most practical and frequently used. The taps are installed on ready-made connections, which are used to drain liquid to the toilet flush tank, water heater or faucet. The outlet for the washing machine is mounted between the water riser and the faucet for the tank or mixer.
When connecting an element in the water heater area, carefully ensure that the pass-through valve is placed between the pipe and the valve, otherwise if the hot water supply is turned off, you will not be able to start the wash. The inclusion algorithm will be as follows:
- turn off the cold water;
- twist the tap responsible for its supply;
- take a tee tap, wrap the external thread with FUM;
- screw the part in place of the removed one;
- connect the hose from the mixer to one hole, the intake hose of the automatic machine to the second.
It is not difficult to carry out the work yourself; the main thing is to carefully study the basic installation rules and strictly follow the algorithm of actions stated in the instructions. Don't forget to follow safety precautions.
Alignment
To prevent the washing machine from jumping, it is necessary to adjust its position - it must stand level. If this is not done, the internal components will quickly fail and the washing machine will have to be repaired.
To carry out the procedure, a building level is used, which is laid along each side. If there is a tilt somewhere, then you need to tighten the legs until the horizon line is perfect.
When this condition is met, try to slightly rock the machine: if it wobbles, then the adjustment should be continued.
Do not place pieces of wood, cardboard or linoleum under the legs! The device will still “move off” them.
Also, the floor should not be slippery. If the device is installed on tiles, you should lay a rubber mat or use special rubber stands for the legs.
What to do if the car “jumps”?
Most often, increased vibration occurs after the installation of machines. But time-tested units can show their “character” by bouncing and moving across the floor.
It is better to prevent the problem of vibrations in advance than to deal with it. This will save the unit from breakdown and the owner from repair costs.
To prevent equipment failure, it is necessary to establish the cause of the vibrations and eliminate it immediately.
Strong vibrations can be observed in the following cases:
- They forgot to remove the fasteners (brackets, bolts) that hold moving elements during transportation.
- Uneven floor causing the machine to wobble.
- The floor is slippery and too flat and should be covered with a rubber mat.
- The laundry inside the drum has curled up into a ball.
Excessive vibrations can also be caused by technical reasons, which can only be identified and eliminated by a specialist. Such reasons include breakdown of shock absorbers, wear of the springs that secure the tank, loosening of the counterweight fastenings, destruction of bearings, etc.
Any of the listed reasons must be urgently eliminated, since delay is fraught with breakdown. Self-confidence and previous experience are good reasons for installing household appliances yourself.
Professional advice on how to properly install a washing machine yourself, as well as clear instructions, will help you do it without errors.
Examination
All adjustment steps have been completed, which means it’s time for the first launch. You need to run the machine without laundry at the highest possible temperature. This will allow you not only to check the correct installation, but also to clean the inside of the device from any dirt and oil from the factory.
During the debut cycle, check all the joints: is there any dripping at the joints of the pipes, are there any leaks in the sewer hose, is the housing electrocuted, how loud is the unit, is it jumping around the room?
If any of the above deficiencies are detected, it is better to interrupt the work and immediately begin to eliminate it.
If you don’t know how to get rid of shortcomings, then stop being a hero and call a specialist. The quality of washing, service life and, of course, safety depend on the correct connection.
Expert advice
Some experts recommend adhering to the following features when installing a washing machine:
Use an adapter on the water supply. It will reduce the negative effect of periodically occurring water hammer in the system.
By following all the above recommendations, you will receive a reliable and safe connection to your washing machine.
Do not connect the products to gas or solid fuel dispensers. Since this may disrupt the setting mode in the washing machine. And this will cause breakdown of the entire product.
By following these simple, but at the same time numerous rules, you can achieve correct connection of the product. And this will be the key to reliable and long-term operation of the washing machine.
Recommendations for reducing vibration
There are several tips to reduce vibration:
- there is no need to overload the machine with things - modes with the maximum permissible weight are always described in detail in the instructions for the device;
- It is worth using anti-vibration stands and mats;
- It is worth checking the level of fixation of the machine and adjusting it;
- replacement of bearings and shock absorbers, when it comes to old equipment.
These tips will help reduce the noise level that occurs during spinning, but nothing more.
Anti-vibration stands and mats
Vibration reduction mats and stands are effective helpers in reducing vibration levels.
Vibration dampening mat
The mats are made of two layers - a rubber top layer to level the legs and a bottom foam layer to prevent vibration transfer to the floor. The stands are often rubber or consist of a mat with a special tray to dampen vibrations.
Subscribe to TechnoCouncil on social networks so you don’t miss anything: