You can entrust the replacement of the hatch cuff in your washing machine either to professionals in this field or completely independently. This part of the washing machine has a sealing function, sealing the loading hatch with the body, preventing unwanted water leakage.
This part fails due to temporary wear, lack of proper maintenance of the product, its incorrect installation and careless handling. To replace the hatch cuff in a washing machine with your own hands, you will need a few tools and a new cuff. The main thing is to be patient, because repairs can take a lot of time.
How to clean an elastic band in the washing machine with soda?
How to clean mold on the rubber band of a washing machine with soda and vinegar Mix water with soda 1:1, apply the mixture to the seal and leave for 30 minutes. Then rinse thoroughly. Include idle wash.
Interesting materials:
How to remove a stain from a sofa? How to remove sunflower oil from a jacket? How to remove a pen from dermantine? How to remove a pen from wallpaper without leaving marks? How to remove a pen from wallpaper? How to remove the handle from the bag? How to remove a pen from a journal? How to remove rust from fabric? How to remove rust from laundry? How to remove rust from white clothes with citric acid?
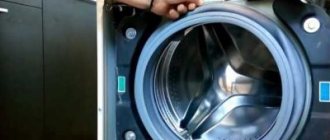
Removing the hatch cuff
How to remove a rubber band from a washing machine tub depends on the individuality of the washing machine and the way you load laundry into it.
But in general it consists of several stages:
- Removal from the washing machine body.
- Removal from tank.
But these stages in each model may differ in the course of the entire process due to technical design, and therefore, in order to replace the hatch cuff of a washing machine of a certain model, an individual approach will be required.
Many manufacturers of washing machines have included in their design a removable front part of the housing, which makes it easier to replace the cuff if it fails.
But most washing machines do not have such privileges, and replacing the cuff of the washing machine hatch with your own hands in such models is much more difficult, up to and including removing the tank from the outside.
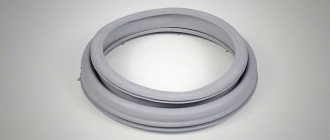
What is a sealing cuff and its purpose
This part of the washing machine ensures reliable sealing of the unit between the tank and the body, as well as for tightly closing the hatch door.
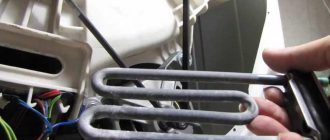
The loading hatch cuff is an element made of heat-resistant silicone rubber, which is highly resistant to water.
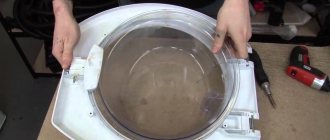
Installing a new cuff
Before replacing the rubber band in the washing machine with a new one, you need to inspect and thoroughly clean the seating areas on the body and tank.
When installing the cuff, the place where it is installed on the tank can be lubricated with liquid soap to make the task easier.
We begin installing the seal from the place of the mark, subsequently holding it to prevent spontaneous removal. After this, we check whether the cuff is correctly fixed; there should be an equal gap around the entire circumference between it and the drum.
How to choose a cuff?
In order to correctly replace a deformed cuff, it is necessary to pay attention not only to the features of dismantling and installation, but also to the rules for selecting a new part . To ensure the maximum level of tightness, only original products or the most similar analogues, such as Diamond, are allowed to be installed. You can purchase products exclusively from official representatives of the company or in large retail chains, the products sold in which meet international standards and have quality certificates.
If the repair of the washing machine is carried out by a service center, then it is its specialists who must take care of purchasing the necessary components for repair. And also specialists from these organizations will help you choose a high-quality analogue that will become a full replacement for the original part.
Many novice craftsmen buy a cuff to replace other brands, relying only on external similarity. The presence of even minimal differences will lead to difficulty in installation and lack of tightness.
By giving preference to a high-quality analogue, you can significantly reduce financial costs and time spent on delivery. Original components not only have a high price, but also a long delivery period.
Removing the second inner (second) clamp
Having removed the first clamp, we move on to the second. The next stage will take a different amount of time depending on the design of your machine, the presence or absence of a removable front wall of the body, the need to gradually remove other parts and the possible removal of the entire tank from the body of the machine.
The second clamp on the machine body can be a wire clamp with a spring, a wire clamp with a clamping screw or a self-tapping screw; spring clamps are also often found. Having good access to the clamps, their dismantling does not take much time and labor. Then you need to remove the rubber band from the washing machine drum. Pay attention to the marks on it and the tank; if there are no marks, make your own with a marker, then replace the rubber band on the washing machine with a new one.
Subtleties of cuff repair
Sometimes situations arise when the “elastic band” located on the hatch of the washing machine breaks, and it is not yet possible to replace the cuff.
When might repairs be needed?
For example, at the moment it is impossible to find a part suitable for the existing car model, or it is on order, and delivery will take a long time.
There are also circumstances when right now it is impossible to allocate money from the family budget to purchase a new part. In such situations, repairing the cuff, that is, sealing the damage site, will help out.
High temperature, detergents and constant friction of the laundry will soon take their toll, and the hole in the cuff will make itself felt again
Please note that gluing the patch is a temporary measure. Therefore, you need to try to replace the worn seal with a new one as quickly as possible.
How to select and prepare a cuff?
First of all, you need to inspect the leaky cuff and determine the cause of the damage. This is the only way to find out whether it is advisable to repair the seal or whether there is no point in it. To do this, you will have to remove the cuff from the machine using the method described above.
Only by removing the front clamp and pulling the cuff towards you can you detect damage, assess its size and the possibility of repair
If the cut, puncture or abrasion is small, then repair definitely makes sense. And when the damage is large or there are several of them, it is better not to rush with sealing.
After determining the cause of the repair, the material for the patch should be selected. It must be durable and at the same time elastic. Some experts recommend using condoms or medical rubber gloves for this purpose.
A great option is special patches designed for repairing swimming air mattresses. You can find them in sports stores.
The glue planned for use must have excellent adhesive properties. In this case, the substance must remain elastic after complete drying. This is exactly how products intended for repairing shoes and rubber products behave.
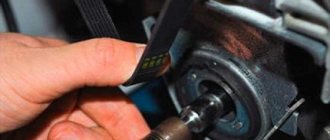
How to dismantle the first clamp
Before removing the rubber band from the body of the machine, pay attention to how it is secured there, namely with what kind of clamp, usually a metal wire, the ends of which are connected with a spring.
But there can also be a plastic clamp in the form of a ring with latches.
In the plastic clamp, release the latch and separate the ends of the fasteners. In a metal one, you need to put the spring on with a minus screwdriver and pull the clamp towards you gradually along the entire circumference until completely removed. The leading edge of the cuff is then removed from the front of the machine body.
What to do if the cuff is covered with mold
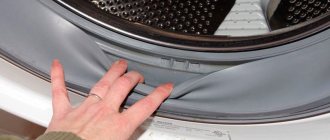
If you feel signs of mold (stains are visible, there is an odor), the cuff must be washed and cleaned. Remove the rubber band. Wash it in a large container of water with detergent and bleach. Wipe the drum and door thoroughly with a sponge soaked in a chlorine-containing solution. Once all the components are dry, return the rubber to its place.
Important! The fungus can grow quite deeply in the rubber - most likely, even after cleaning, the cuff will still have to be changed.
Preparation for the process
In order for repair work to proceed as quickly as possible, it is necessary to prepare properly.
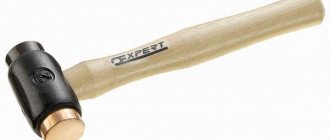
First of all, assemble a set of tools:
- screwdrivers (phillips and flat),
- pliers,
- hammer.
Also during the cuff replacement process you may need:
- liquid soap,
- rag or soft sponge,
- marker.
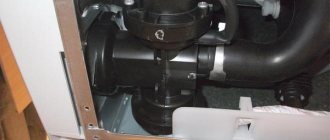
Secondly, the washing machine is placed on a flat, stable surface, away from walls and pieces of furniture. For safety reasons, before starting repairs, the household appliance must be disconnected from the electricity, water supply and sewerage networks (turn off the water supply tap, unscrew the drain hose).
Installing the front (front) outer clamp
If replacing the cuff was accompanied by removing the front part of the body, then put it in place. Then we install the outer clamp in place. The plastic one should be in an open state, closing its ends directly into the installation groove.
The wire should be in an assembled state, starting from the junction of the spring with the bent edge of the wire, gradually seating it in the groove.
After installing the cuff of the washing machine with your own hands, you need to check the tightness of the connections. To do this, close the hatch and turn on the washing mode for wool, delicate fabrics or rinsing. After a few minutes of work, drain the water and tilt the machine back towards the wall. There should not be a drop of water under the car.
We also use additional lighting to inspect the internal parts of the washing machine for leaks. If there are no leaks, then you managed to change the rubber band in the washing machine yourself, without the help of a specialist.
Here is the approximate time required to replace the cuff:
| Sequence of stages | Approximate time spent |
| Removing the front clamp (and removing the rubber from the body) | 1-5 minutes |
| Removing the inner clamp (and cuff from the tank) | 5-15 minutes (without removing the front part of the case and with removal, respectively) |
| Installation of a new part (with preparation of the seat) | 3-5 minutes |
| Installation of the internal clamp | 5—15 minutes (without mounting the front wall of the case and mounting, respectively) |
| Installation of the front clamp (with preliminary installation of rubber on the body) | 1-5 minutes |
Causes of damage: briefly
Wear and time
After each wash, the shelf life of machine parts decreases. The sealing rubber deforms, stretches or shrinks (depending on the material and how often the equipment is used), becomes less airtight, small cracks appear on it, and then large holes.
Mechanical damage during washing
Damage may appear:
- when loading or unloading things carelessly;
- due to sharp objects in pockets. When the drum rotates, they can even become a coin or piece of paper, so check your clothes carefully, turning out your pockets while still “dry”;
- from friction of hard objects or parts: in some Indesit and Ariston models, the drum touches the cuff and rubs against it.
Powder quality
The most common cause of seal rupture is cheap or low-quality washing powder. Aggressive chemical components in the inexpensive powder spoil the cuff material, making it “compressed,” porous and therefore fragile.
Mold and dirt
Fungi and mold appear due to poor ventilation and care of the machine. Reasons: installation in a very humid place, improperly connected drain to the sewer, constantly closed door (due to which moisture does not evaporate after washing). The fungus appears as dark spots, complemented by an unpleasant odor from the machine.
Fold back the side after any wash and see how much moisture, and sometimes debris, remains in the gaps. Ideally, after each use, wipe the “bins” with a soft cloth.
Causes of damage
The cuff is most often replaced due to the appearance of ruptures or cracks in the seal that allow water to pass through during washing. As a result of the formation of such damage, the owner of the machine will see water leaks under the hatch, and upon examining the cuff itself, he will notice cracks or tears, which may have different sizes. The reasons for this situation are the following factors:
- Natural wear of the seal. During operation of the machine, the cuff is constantly subject to friction between the drum and the laundry. It heats up during washing and then cools down. In addition, it is affected by detergents. Over the years, this leads to brittleness and brittleness of rubber.
- Poor quality washing powder. Under the influence of cheap powder and detergents of dubious quality, the rubber of the cuff begins to deteriorate, so saving on powder leads to expenses for replacing the seal.
- Excessive dosage of detergents. If you use an excessive amount of powder or liquid, the structure of the sealing rubber may also be damaged, which will require the cuff to be replaced.
- Parts of clothing that could damage the seal. Such elements can be metal and plastic fittings. In addition, screws, nails and other objects can get into the machine from clothing pockets, which can cause tears in the cuff.
Over time, if the sealing collar is not cleaned, mold may grow on it. Therefore, it is necessary to periodically clean the washing machine. You can see how to do this in the following video.
Wear and time
After each wash, the shelf life of machine parts decreases. The sealing rubber deforms, stretches or shrinks (depending on the material and how often the equipment is used), becomes less airtight, small cracks appear on it, and then large holes.
Mechanical damage during washing
Damage may appear:
- when loading or unloading things carelessly;
- due to sharp objects in pockets. When the drum rotates, they can even become a coin or piece of paper, so check your clothes carefully, turning out your pockets while still “dry”;
- from friction of hard objects or parts: in some Indesit and Ariston models, the drum touches the cuff and rubs against it.
Powder quality
The most common cause of seal rupture is cheap or low-quality washing powder. Aggressive chemical components in the inexpensive powder spoil the cuff material, making it “compressed,” porous and therefore fragile.
Mold and dirt
Fungi and mold appear due to poor ventilation and care of the machine. Reasons: installation in a very humid place, improperly connected drain to the sewer, constantly closed door (due to which moisture does not evaporate after washing). The fungus appears as dark spots, complemented by an unpleasant odor from the machine.
Why can the cuff get damaged?
- As already written above, the reason may be the long-term use of the machine. Absolutely any parts of household appliances have their own safety margin. And with regular and long-term use they can fail.
- The cuff is made of rubber. This material may become unusable with excessive use of certain detergents that are added for washing.
- During operation of the machine, contact may occur with some internal structural elements. That is, friction about them. This friction can cause holes in the rubber.
- Friction can also occur on solid elements of the items being washed or on large items such as shoes, clothes that use a lot of metal parts, etc.
- In addition, sometimes fungus can appear on the rubber surface, which deteriorates its quality over time.
- You can also easily damage the cuff if you carelessly load and unload laundry items.
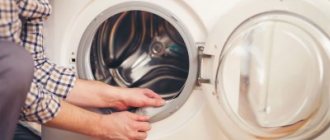
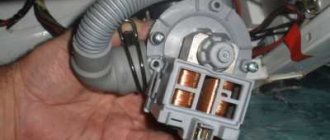
2. Removing the cuff
Almost all front-loading SMA cuffs can be replaced from the front without disassembling the washing machine. True, this requires a certain skill and patience. When starting replacement, make sure that the new cuff is identical to the one you are replacing.
Remove the front clamp
The outer edge of the cuff with its curved part is recessed into the groove of the front wall and is held there using a plastic or wire clamp. The wire clamp is tensioned using a screw, spring and hooks, the plastic clamp is fixed and tensioned with latches. The plastic clamp is removed if you pull towards you with force where the latches connect. The wire clamp can be removed by unscrewing the screw or carefully prying the spring with a flat screwdriver.
Remove the second (inner) clamp
Before removing the inner clamp, you need to find the alignment mark on the collar. The mark determines the strict position of the cuff relative to the tank, which ensures proper drainage and tightness. If the mark is not found, you need to mark with a marker the location of the old cuff relative to the tank. This will be useful to us when installing a new cuff.
3. Preparing to install the cuff
We thoroughly clean the mounting edges and recesses of the tank from dirt and deposits, and generously lubricate them with soapy water. The slippery surface of the edge will make it easier to install the new cuff.
4. Installation of the cuff
Pulling the cuff over the edges of the tank is the most important operation, requiring a certain skill and effort. First you need to align the installation marks of the tank and cuff.
Our task is to pull the shaped recess in the cuff onto the edge of the tank. We take the cuff from the inside and with two thumbs we push it in a circle. The cuff fits easily along the lubricated edge. When most of the cuff has been inserted, a situation will arise where further advancement will become difficult due to the sliding of the already inserted part.
If you've ever installed a drive belt, you'll quickly understand which direction to go. In our case, the remaining area needs to be planted, walking with two thumbs towards each other. Did you manage? Now run your fingers along the entire perimeter of the ring, checking the tightness of the cuff to the edge of the tank.
How to put on the inner clamp
If the clamp has an adjusting screw, unscrew it to the required diameter of the clamp, put the clamp in place and tighten it, tightening the screw. The situation is more complicated if the clamp is of a spring type. It is important here that the clamp is fixed at the initial tension point. To fix the spring clamp, use a screwdriver, which must be inserted all the way into the hatch locking hole.
Putting the spring on the screwdriver, stretch it and put it on in a circle, gradually pushing it inward to the seat.
When about 2/3 of the spring is laid down, it will become difficult to hold the spring due to the change in tension angle. You will have to show skill and a little patience.
On older SMA models, tensioning the clamps is carried out only with the help of special round-nose pliers, since their clamps do not have adjusting screws and springs.
Installing the front (outer) clamp
After installing the internal clamp, this task is simple, since the installation site is open for manipulation. Only clamps that do not have tensioners in the form of a screw and a spring will require special L-shaped pliers. Using round-nose pliers, the spring mounting hooks at the ends of the clamp are opened and closed.
Checking the work
Such labor-intensive work requires careful verification. We start the SMA in rinse mode, after 2-3 minutes we drain the water. After draining is complete, tilt the washing machine back and inspect the cuff from below (shine it with a flashlight) for fresh signs of leaks. They shouldn't exist.
Replacement steps
Tires should be changed in the following order:
- Disconnect the equipment from electricity, turn off the water supply and open the door.
- Remove the outer collar of the hatch cuff. This part can be attached to the wall in different ways. If you have a plastic sunroof collar, it will be secured with latches. In this case, you need to unfasten the latches and pull the part towards you. Metal models are fixed with a spring or screws. If there is a spring, pull it back with a screwdriver and loosen it. If the product is attached with screws, remove them. After this you can remove it without difficulty. On some models of equipment, to remove the hatch cuff clamp, you need to unscrew the front wall. This must be done very carefully, otherwise you may damage the electrical circuit of the equipment.
- Remove the inner clamp. It promotes a tight seal of the seal directly to the tank. The inner clamp of the hatch cuff is not always visible through the door. Sometimes you have to remove the top cover of the machine to access it. This part is attached using a spring or wire. Before removing it, you need to find a mark for mounting the rubber. If the new seal is placed incorrectly, the water drainage and door seal will be disrupted.
- Pull out the old rubber band and make sure it is faulty.
- Prepare a place for installing the cuff. Replacement should only be carried out after thorough cleaning of the seat. When you remove the old rubber, you will find accumulated detergents and dirt underneath. All this needs to be removed with a soft sponge dipped in soapy water. Soap foam does not need to be washed off with clean water. It will serve as a lubricant when installing a new seal. Therefore, it is not recommended to wipe the surface of the seat from water and soap.
- Install a new rubber band. This is not as easy to do as it seems. The material is difficult to stretch by hand to fit the hem. To make work easier, use soapy lubricant. After installation, you need to check that the seal fits tightly to the metal in all places. If you miss the peeling at any point, a leak will appear during the washing process.
- Install the inner cuff clamp. Fix it in the same way as you removed it, but only in reverse order.
- Pull the seal onto the front wall and put on the outer clamp. It also needs to be carefully secured using the method used in your technique.
After finishing work, be sure to check the machine for leaks. To do this, run a quick wash (without powder) or rinse cycle. If water does not leak around the perimeter of the door, wait until it drains, open the door, tilt the machine away from you and carefully inspect the rubber band with a flashlight for signs of leaks. If installed incorrectly, they may be minimal. In this case, water will not flow out at first. The situation will worsen in the future. If there are no traces, then you carried out the repair correctly.
Strict adherence to these instructions does not guarantee a high-quality replacement of the washing machine hatch cuff. If you do not have experience in such work, you risk damaging the new seal and disrupting the electrical equipment of the equipment. Therefore, it is better to call a specialist from our service center via the website or by phone. He will come to you, quickly change the tires and check the car for leaks.
If you are energetic, responsible, independent!
If you have experience in repairing household or industrial appliances, then join the strongest league of professionals in your field! Call or send your resume.
What other reasons could there be for the malfunction?
Cuffs also become unusable under other circumstances:
- Operation over a long period of time.
- The appearance of defects due to the presence of mold and fungi. This happens if the doors are closed very tightly after the washes are completed. Or when washed clothes are left inside for too long.
- Use of harsh cleaning agents.
- Using items with large dimensions that do not wrinkle or fold.
- When loading and unloading are carried out sloppily.
Most often, devices fail because the user handles them incorrectly. Fulfilling operational requirements and selecting suitable cleaning products will be an excellent option to extend the life of the device. This makes it easier to postpone replacing rubber bands, or to do without such repairs altogether.
Manufacturing companies that have taken leading positions sell parts whose wear is minimal. On average, they last up to 10-15 years.