The modern process of washing things does not require much effort and time. The laundry is simply placed in the drum of the washing machine, powder is added, the required operating mode is set, and the machine takes over the rest of the work. The unit works efficiently, but in order to extend its service life, you must follow all the rules for using the equipment. These include the issue of connecting to communication lines, for which you need to know what adapters are used for the washing machine to sewer and water.
Basic connection details
Connecting a washing machine to the sewer is not a problem if you approach this process responsibly. The drainage is carried out into the sewer or directly into the septic tank, if this is a summer cottage.
- To carry out this procedure, you need to prepare all the materials that will be required. Basically, a corrugated pipe or pipe with a small diameter is used. It must be connected to a siphon or directly discharged into the riser of the general sewer system.
- If you properly design the drainage system of a technical unit, its productivity will increase several times. Then you can count on the machine operating for a long period of time without any failures.
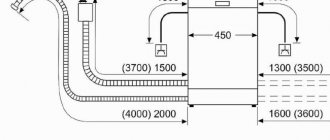
- The hose must be no more than two meters; this requirement must be observed. If you take a longer pipe, the pump will consume more energy to drain the water. Then the equipment will quickly fail and will need to be repaired.
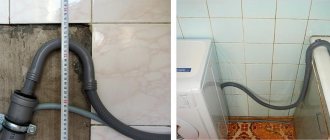
The hose should not be fixed high, for example, at a level of 1.5-2 m.
Often the drain pipe is lowered directly into the sink; this is a fairly common mistake. Water will get onto the unit, and this will cause the electrics to stop working.
Due to moisture, the system will fail, since there is not always special protection for electronic elements. The best option is to install a drain system using a siphon located under the plumbing. It is worth remembering that the pipe should not rise higher than 0.6 m.
Adapter for connecting the washing machine to the water supply
How to properly connect an automatic washing machine?
Before you figure out how to connect an automatic washing machine correctly, you need to figure out several points.
- Where is the best place for installation - in the kitchen, in the bathroom or in the hallway?
- Is additional floor preparation necessary?
- Check if the outlet has an additional contact that provides grounding. If not, think about what kind of grounding scheme will be used?
- Will the connection be made to cold and hot water or only to cold?
After all, this will affect both how long the new equipment will work and its noiselessness. You need to choose the location where the new assistant will be installed based on four parameters:
- Ease of use;
- free space of the required size;
- location of utilities for connection to water supply and sewerage;
- flat surface of the base (floor).
Where to install the washing machine?
The location of water and sewer pipes near the washing machine is one of the main conditions. If it is not possible to install the washing machine in the kitchen or bathroom, near communications, you can increase the length of the hoses connecting to cold and hot water. It should be taken into account that the drain hose may have a limited length, depending on the power of the pump. It is desirable that after extension the total length is no more than 3.5 meters.
Each housewife decides for herself where it is more convenient for her to use the machine - in the kitchen, in the bathroom or in the hallway. There are no general recommendations here. But a flat floor surface is one of the necessary conditions. If you do not provide a level base, the machine will not behave in the best way during operation - it will bounce and make noise. During such work, the fastening elements in the mechanism become loose, which leads to breakdowns. You can level the area under the machine using special floor screed mixtures. If this is not possible, you need to purchase special rubber attachments for the legs.
Preparatory stage
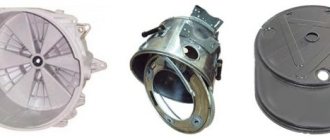
Before proceeding with installation, it is necessary to bring the equipment into working condition - remove bolts and other transport elements. The drum of the machine in working condition is attached only with the help of springs, and during transportation it is secured with bolts. They are on the back panel. If you do not unscrew them, the machine will be damaged during the first wash. The holes remaining after the bolts are closed with plastic plugs. You also need to check the drain and intake hoses for mechanical damage.
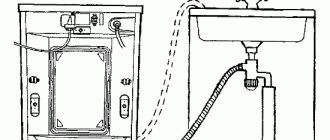
We connect the drain of the machine to the sewer
There are two ways to connect the machine drain to the sewer system: with a tap into the pipe or through a siphon in the bathroom or washbasin in the kitchen. The second method is simpler, but is only suitable if the sewage system is working well. The first one is universal and more reliable.
Step-by-step instructions on how to properly cut into a pipe through an adapter.
- Stop draining water into the sewer system.
- Clean the surface of the pipe in the area where the tapping will be made.
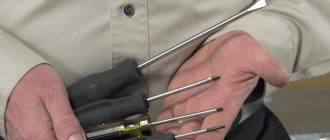
- Using a core drill attached to a drill, drill a hole of a suitable diameter in the pipe (22 mm for a 50 mm pipe or 50 mm for a 110 mm pipe).
- Place the adapter on the pipe and tighten with bolts.
- If fastening is provided not with bolts, but with clamps, before tightening them, sealant is applied to the surface of the pipe.
Connecting the washing machine to the sewer yourself by cutting into the pipe using an adapter is the easiest way. In addition, it is suitable for both plastic and cast iron pipes.
You can use a tee instead of an adapter.
- The pipe is cut and a part corresponding to the length of the tee is cut out of it. This can be done with a hacksaw if these are plastic pipes, or with a turbine with a stone for metal in the case of cutting into cast iron communications.
- The burrs at the cut sites are cleaned off (with a file).
- The places where the tee and pipe will be connected are coated with sealant.
- A tee is put on the pipe.
If the automatic machine is not installed immediately after the tapping, then the outlet must be closed with a plug.
After the insertion, all that remains is to connect the drain of the machine to the outlet. The drain hose is connected through a sealing collar or with the installation of a siphon.
Installation with the installation of a siphon consists of the following operations.
- Fixation: the drain hose is fixed at a height of 80 cm: there is a special lock on the back of the machine body.
- Installing the siphon into the outlet through a rubber cuff.
- Hose installation: the tip is inserted into the siphon hole and secured with mounting nuts.
Connecting to a sewer with the installation of a siphon is a more preferable option. In this case, the siphon performs an additional function: it does not let water and “odors” from the sewer back into the machine. If the drain (drain mechanism) of the purchased equipment is equipped with a check valve, then you can choose any method.
Connecting to the water supply
There are three ways to connect the washing machine to the water supply:
- through the coupling;
- through an angle tap;
- through a tee valve.
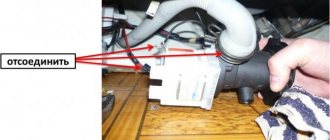
The choice of connection method to the water supply depends on the location of the connection. For example, if the kitchen sink faucet is connected to the water supply through a flexible hose, you can connect at the same point. To do this, you need to turn off the water, unscrew the hose from the outlet and connect the tee.
There are special tees for sale for washing machines: the size of the fitting in them corresponds to the size of the nut on the intake hose, and they are also equipped with shut-off valves. Next, the previously disconnected plumbing fixture and the intake hose of the machine are connected to the tee. The connection point can be sealed with FUM tape for reliability.
If this method is not suitable, you will have to connect to the water supply in a different way - cut into a pipe in the bathroom or kitchen. To do this, you will need a coupling with a sealing gasket, screwdrivers and a drill with a metal drill. The insert must be in an accessible place so that it is possible to open/shut off the water.
Step-by-step instructions on how to properly insert.
- Check the fastening of the water pipe and, if necessary, secure additionally with clamps or clips.
- Turn off the water.
- Secure the coupling with bolts or clamps to the pipe over the sealing gasket.
- Drill a hole in the pipe by inserting the drill through the coupling.
- Tighten the coupling, making sure that the gasket does not move.
- Attach the shut-off valve and the intake hose of the machine to the coupling.
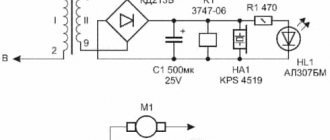
- The current-carrying cable and sockets must match the power of the device. The wire cross-section is calculated based on how much electricity the machine consumes.
- It is necessary to allocate a separate power line with the installation of an RCD (residual current device) and a circuit breaker. You can install a difavtomat that combines the functions of a switch and an RCD.
- Installing an RCD does not eliminate the need for grounding, since this device does not protect against overcurrents.
- Grounding is carried out depending on the grounding scheme of the entire house.
- All electrical installation work must be carried out by a suitably qualified specialist.
- In apartment buildings, before installing wiring, you need to find out what kind of grounding scheme is used throughout the entire house.
When connecting with an extension, you need to make sure that the extension hose is located in a safe place - under the bathroom or furniture in the kitchen. It is also possible to mount it to the wall and then cover it with plasterboard.
Hot water connection
Modern machines have only one intake hose. It is designed to be connected to cold water due to the nature of the washing process. After all, many programs provide washing in warm rather than hot water. Enzyme powders also work at low temperatures. The washing machine has equipment for heating, in other words, a heating element, but it cannot cool water that is too hot when connected to the central hot water supply. Refrigeration units are not provided in washing equipment.
Some older models, for example Ariston Margarita, have two intake holes - for connecting separately to hot and cold water. Their program provides for alternate collection in accordance with the washing cycle. If you need to install such a model in a new place, they connect it to both cold and hot water. The procedure for connecting to hot water - a DHW pipe - is the same as for a cold water supply pipe. In this case, the drain is connected to the sewer in the usual way. If the water is heated in a water heater in the kitchen, but there is no centralized supply of hot water, then the machine will have to be installed there.
We provide power supply
To properly connect an automatic washing machine to the electrical network, you need to get an idea of the safety rules. This type of household electrical appliance is characterized by a high level of energy consumption and works with water, therefore special requirements are imposed on the installation of the machine, including the need to ground it.
Grounding the old fashioned way by connecting a wire to a battery or water supply is strictly prohibited. Even if the grounding is good, the equalizing current will flow not only throughout the apartment, but also through communications to the neighbors. Due to overcurrents in such a design, there is a high risk of fire.
Checking the operation of the installed machine
To check whether the washing machine is connected correctly, you need to turn it on and follow the following nuances.
- Set of water. If it does not stop, it means that the drain hose is connected in the wrong position and the water immediately goes down the drain.
- The drum should rotate, and there should be no extraneous noise, such as the knocking of metal parts. Such sounds appear when the transport fasteners are not completely removed.
- Heat. The collected water should heat up in 5-15 minutes (depending on the washing mode).
- When connecting to hot and cold water, you need to monitor the water supply in different modes. One of the connections may be incorrect.
- Wait for the drain to turn on. If the water drains slowly or does not drain at all, the water sensor (pressure switch) may not be working.
- Be sure to check for the absence/presence of leaks both in the machine itself and in the places where water is taken in and drained.
All other parameters depend on the washing modes of a particular model. Therefore, before turning on the machine, be sure to read the operating instructions.
Do you want to lose excess weight?
Excess weight is not just an aesthetic problem, it is a health problem. Proven by doctors - every 10 kg. Excess weight shortens a person's life by 3-5 years. It has also been proven that everyone can lose weight, they just need to.
Share on social networks!
Connecting a washing machine to the water supply with your own hands - we do everything according to the rules
Purchasing a washing machine inevitably raises the question of whether you can connect it yourself or whether you will have to call a technician for this. Connecting a washing machine to a water supply is often considered too complicated an undertaking, so many people prefer to pay for the services of a technician from a service center. In reality, the work is not particularly difficult; you just need to have some tools.
Modern washing machines such as those in the photo come with hoses for draining and supplying water and an electrical cord. Everything else will have to be purchased additionally. In addition to the basic set you will need:
- ball valve to shut off the flow of water into the device;
- waterproof socket;
- tee for connecting to a cold water supply pipe;
- siphon for the sink with an outlet for connecting the drain hose.
As for the work, how to properly connect a washing machine to the water supply, this process can be divided into four interconnected stages:
- unpacking and removing fasteners for transportation;
- connection to water supply;
- connection to the sewer (more details: “How to connect a washing machine to the sewer correctly “);
- electrical connection.
Before you begin installing the washing machine, you must read the instructions supplied with the appliance.
Unpacking the washing machine and installing it
When you deliver your washing machine, you need to unpack it and check it for scratches, dents and other external damage. It is also necessary to check the integrity of the drain hose and power cord, which are already installed on the device at the time of delivery. If damage is found, it is better to return the product to the store and request a replacement.
Before you think about ways to connect the washing machine to the water supply, you should install it correctly.
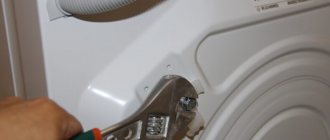
Front-loading washing machines are secured with special bolts or screws and spacers during transportation to avoid imbalance. The transport bolts are located at the bottom of the equipment. They are unscrewed with a wrench, first one side of the machine is lifted, then the other. At the same time, the adjusting feet are unscrewed as much as possible. Some models also have shipping screws with spacers on the back panel - they serve to secure the drum. They are also unscrewed, the spacers are removed and the holes are closed with the plugs supplied in the kit.
The washing machine is installed in a permanent place, making sure that the distance from the wall to the back panel of the device is at least 5 centimeters. The position of the equipment is checked using a level; if necessary, the height of the legs is adjusted. The machine must be leveled, otherwise vibration will increase and the service life of the equipment will be shortened.
Connecting to the water supply yourself
Now you can move on to how to connect an automatic washing machine to the water supply. The complexity of the work depends on how the cold water supply is made. If during the repair a separate circuit with a ball valve for the washing machine was created, then to connect it is enough to connect the hose included in the kit. Otherwise, you will have to make an insert into the pipe or install a tee at the junction of the pipe with the sink inlet (read: “Connecting the sink to the sewer with your own hands correctly”).
They purchase a tee, be sure to take into account the type of thread (it can be external and internal), as well as the diameter of the connected pipes. The supplied hose has a nut with an internal thread on both sides; for this reason, the outlet on the tee must have an external thread with a diameter of 0.5 inches. Before you start connecting the washing machine, be sure to shut off the water in the apartment using the inlet valve. The remaining water from the pipes is also drained by opening the taps. Then, at the required level, the pipe is cut or sawed off. The second option involves disconnecting the pipe and flexible connection. If the pipe had to be cut, then, depending on its type, they either cut a thread or use connecting fittings.
The tee is screwed onto the pipe using FUM tape using an adjustable water wrench. After this, connect the flexible hose and the hose from the machine, which has a plastic nut at both ends. To connect it to the tee, use its straight end. If the device is not equipped with leakage protection, then a ball valve must be installed between the hose and the tee.
The end of the hose, which is bent at an angle of 90 degrees, is connected to the machine after installing the coarse filter in it - it should face the convex side towards the washing machine. The nuts on the hose can be tightened by hand without applying much effort, since the tightness of the connection is ensured by a rubber gasket. Thus, you can make sure that the connection diagram of the washing machine to the water supply is quite simple.
Connecting a washing machine to the sewer
Water can be drained from the washing machine either into the bathtub or directly into the sewer (read: “How to connect the drain of a washing machine to the sewer without errors”). In the first case, everything is simple: you just need to lower the corrugated hose into the bath before starting washing. But this method has some disadvantages. First of all, the bathroom cannot be used while doing laundry, and in addition, if the hose breaks under the pressure of water, this could result in flooding of the neighbors.
The drain is connected to the sewer using a siphon with a special outlet. Direct connection to a pipe is also possible. When doing this work, you must follow certain rules. The hose must be bent so that the distance in its upper part to the floor is at least 70-80 centimeters, and a water seal is formed. If the drain is connected to a siphon, it is important to ensure good clearance of the sewer pipes and the absence of blockages (for more details: “How to connect the drain of a washing machine, how to do it correctly”).
Electrical connection
Washing machines are usually installed in bathrooms, which are potentially hazardous rooms with high levels of humidity. For this reason, the socket for the machine must be waterproof. It is also worth considering that the body of the washing machine is metal, so the outlet must have a grounding conductor. In new houses, grounding is usually carried out in compliance with all standards, but in old houses only two wires are connected to the outlet. In this case, electrical wiring will be required to connect the machine through an RCD with a leakage current of less than 30 mA.
First use of the washing machine
First you need to carry out a test wash in accordance with the manufacturer's recommendations regarding the weight and mode specified in the instructions.
Before turning on, you need to make sure that the device is level and secure, and if necessary, adjust the legs. Then you should plug the machine into a power outlet, open the ball valve on the hose, if there is one, select a mode, add powder and turn on the device. If leaks are detected, after finishing washing, you need to unplug the machine and check whether the gaskets fit tightly and whether the nuts are skewed.
There are no particular difficulties in such work as connecting a washing machine to the water supply yourself. You just need to strictly follow the manufacturer’s recommendations specified in the instructions for the household appliance.
Connection via siphon
Connecting the drain through the elbow is simple and does not require much effort. This item is already available from under the sink; most of them already have a special pipe on the side.
- To connect the washing machine, simply remove the plug and connect the drain hose.
- If the siphon is of an old modification, then you need to purchase a new and modern model.
- It is worth noting that some sinks have a cabinet or a ceramic base, then connecting the drain through the elbow is not possible. TO
- In addition, if the washbasin is small in size, then it is impossible to make an additional drain from under it.
Installation does not take much time; you just need to remove the plug. The hose is put on the pipe, but first the joint must be lubricated with silicone sealant. It is also necessary to tighten the corrugation with a clamp for secure fastening.
Tube extension without adapter
If there are difficulties in selecting an extension cord, the drain hose can be extended without it. You should find a suitable rubber or plastic tube. You will also definitely need clamps.
Washing machine drain hose Installation
How to achieve the desired dimensions of the drain hose:
- First put on the clamps.
- Place the used tube onto the hoses so that they can connect in the center. The tube should fit very tightly.
- Secure the parts with clamps.
In order for the device to perform its functions normally, the extended hose for the washing machine should not exceed 3.5 m in length.
Direct connection
This drainage system is carried out using a tee. It has an outlet for a machine and a bathtub, washbasin, and toilet. The other one is at an angle, it overflows a little towards the top, and it is to this that the drainage system is connected.
- It is necessary to cut directly into the central sewerage hose if it is not possible to install a tee.
- This option is quite problematic, since it is necessary to block the common stand, and also obtain approval.
When connecting the corrugation to the tee, it is necessary to install a rubber gasket so that the fastening is reliable. If the fastening is not done correctly, then under the pressure of the machine pump the hose will fly out and a flood will occur.
Connection using plumbing equipment
This method differs from others in that the drain is carried out directly into the bathtub or sink. This option is not practical, since the plumbing needs to be washed constantly.
- When the machine drains dirty water, the surface of the sink becomes coated and an unpleasant odor occurs.
- After several washes, the plumbing needs to be treated with special detergents.
- The drain corrugation must be fixed to the tap or wall, and a special semicircular element is used.
- However, when getting rid of water, the machine is running, and at this moment it can break the fastening due to high speeds.
- Therefore, it is necessary to constantly monitor the work so that the drain pipe does not jump off.
This method cannot be used if the dimensions of the washbasin are small, as this will lead to water flowing beyond its limits.
In addition, this causes inconvenience; while the unit is operating, you cannot use the shower or bathtub.
Method 2: moving the water connection location
If the geometry of the room allows, you can lengthen the water pipe. This is especially easy to implement if you have polypropylene pipes. The order of work is as follows.
- Shut off the water supply.
- Just below the tap, cut the pipe and solder a polypropylene coupling.
- Solder a piece of pipe of the length needed for extension to the coupling.
- Solder another coupling onto the end of the pipe.
- Fix (for example, with a clip) the pipe on the wall.
- Connect the inlet hose to the new pipe.
Tips for work
The drain hose should not be positioned too low or too high. Since this directly affects the operation of the equipment. If you make a mistake, it can cause a breakdown.
- Be sure to make sure that all fasteners are firmly connected. When the drum is running, the machine shakes a little, and if the hose is not securely fastened, it can become disconnected and all the water will flow onto the floor.
- The length of the corrugation should not exceed 2 m; if this condition is violated, then a large load is placed on the machine pump. She cannot work constantly in this mode.
Upon completion of all procedures, you must turn on the automatic machine empty; there is no need to pour in powder or put clothes inside. The test mode is necessary to ensure that there are no leaks.
How to extend the inlet hose?
This process is much simpler. No extension or connector for the inlet hose is needed. The easiest option is to buy a longer one. Replacement can be carried out without disassembling the device. Procedure:
- The machine is disconnected from the water supply;
- The fastener is unscrewed by hand without using a tool. Plastic fasteners are easily damaged if metal keys are used;
- The hose is replaced. Screw the fastener back - again without tools;
- Open the tap and check the tightness of the connections;
- Start the test process.
It happens that a suitable option is not available for sale. You will have to lengthen the filler “pipe”. You can use a 3x4 inch brass nipple as an adapter to connect two short pieces.
Recommendations from professionals
In a private house, the drain is done directly into the septic tank. In houses where there are many apartments and a common sewer drain, such a supply is simply not feasible, but in rural areas, it is quite practical and convenient.
If you use soap and not powder when washing, then draining is possible anywhere. But Nelya allows water to seep under the foundation.
However, if people live in the house all year round, then the washing machine must be drained in accordance with all rules and regulations.
When working, you must carefully follow the instructions. The fastening points must be securely connected to avoid leaks.
- If a malfunction is identified during the test wash, it must be corrected immediately.
- The gasket is installed in this place and the joint must be securely fastened.
- If everything is done correctly, the equipment will serve its owner for many years.
Since a lot depends on the quality of the connection of the unit to the drain system.