Share on social media networks:
If you are tired of washing by hand and decide to purchase an automatic machine, then it is important to consider that one purchase is not enough to immediately start using the equipment. To save money and not have to pay for the installation of equipment, try installing it yourself, using the rules for installing a washing machine. But first, check with the sellers whether the warranty on this household unit is lost if you install it yourself. If the warranty remains valid, then you can safely carry out the installation yourself, having first read our article.
Selection and preparation of a site
Connecting a washing machine begins first of all with choosing a place where to install the washing machine. These can be various options in the apartment:
- In the kitchen
- In bathroom
- In the corridor
For all placement options for the washing machine, the location must meet the following requirements:
- Water supply and sewerage must be at least 1.5 m from the washing machine
- The machine must stand isolated and not come into contact with other objects: cabinets, bedside tables. There should be a distance of 15-20 cm between the back wall of the washing machine and a regular wall. There should be a distance of 10-15 cm between the side walls and other furniture. The floor under the machine should also be level.
- In private homes, machines are usually installed in boiler rooms or laundry rooms. This is the most convenient option, since this is where it is most convenient to use this device. Moreover, it will not disturb anyone.
Often in large families one washing machine is not enough. Therefore, the question arises: how to install a washing machine above a washing machine. This is again easy to do using a metal shelving unit. As a rule, a lighter version of the device with a small load of up to 4 kg is used as a washing machine.
Other reasons for the “movement” of the SMA along the plane
If the adjustment is made correctly, and the jumping and shaking do not disappear, the cause may be the close proximity of large stationary objects - cabinets, walls. With slight vibration, which is natural, the SMA can hit an object and move from its established boundaries. Therefore, a gap of 5-10 cm is left between the wall and the device.
A smooth floor can also cause the washer to “move” around the kitchen or bathroom. In this case, it is worth purchasing a rubber mat 1-2 cm thick and placing it under the device.
If the above reasons are eliminated, but jumps and movements during washing remain, there may be a malfunction inside the machine. You can fix the problem yourself if you have certain knowledge and skills in this matter.
But it’s better not to take risks and entrust the solution to the problem to professionals. The experienced technicians of our specialized service center, located in Rostov-on-Don, will help you properly install or repair your washing machine.
Preparing for installation
Before bringing the car into the house, you need to prepare the place for its installation, namely:
- Check how smooth and strong the floor will be under the car.
- Free access to water supply and sewerage
- It is advisable that the floor under the washing machine be tiled. This usually happens in the kitchen or bathroom.
Important! Before you start connecting the washing machine, it is important to free it from all fastening elements, clamps and bolts that are necessary during transportation. If you don't do this. The machine may fail when first started.
Accommodation options
There are several places where you can put a washing machine:
The most problematic option is the corridor. Usually there are no required communications in the corridor - no sewerage, no water. You will have to “pull” them to the installation site, which is not at all easy. But sometimes this is the only option. In the photo below there are several interesting solutions for how you can place the typewriter in the hallway.
The photo shows an option for installing a washing machine in a narrow corridor. Making something similar to a portal is also a solution. Hide it in a bedside table. Build it into hallway furniture.
The toilet has all communications, but in typical high-rise buildings the size of this room is such that it is sometimes difficult to turn around there - there is no space at all. In this case, washing machines are placed above the toilet. To do this, make a shelf so that when sitting on the toilet you do not touch it with your head. It is clear that it must be very durable and reliable, and the machine must have very good shock absorbers. In addition, they must be set perfectly, otherwise they may “jump away” during the spin cycle. In general, with this method of installing a washing machine, it doesn’t hurt to make several strips that will prevent it from falling off the shelf.
The shelf is solid and reliable, but slippery - a rubber mat is needed under the legs for shock absorption. Powerful corners are built into the wall, with a washing machine installed on them. The plastic stops were removed from the legs, and holes were drilled in the corners for the remaining screws
The installation is reliable, the only important thing is that vibration does not tear the corners out of the wall. You can close it with vertical blinds. This is already a whole cabinet. The only thing missing is the doors
In the bathroom and combined toilet there is usually not very much space either, but still more than in the toilet. There is a choice here. If you have space, you can place the washing machine next to the sink. You can install a table top on top, which will be a logical conclusion and will also solve the problem of water getting on the body. To make everything look organic, you need to choose a machine of such a height that it fits into the size, and the sink itself is better square - then they will be wall to wall. If there is not enough space, you can slide at least part of the body under the sink.
Place the washing machine next to the sink. Nowadays fashionable countertops in the bathroom can be decorated with mosaics. If space allows, simply place the machine next to the sink.
There is a more compact way - to place the washing machine under the sink. Only the sink needs a special shape so that the siphon is installed at the back.
To place the washing machine under the sink you need a special sink
One of the sinks under which you can put a washing machine
The next option for installing a washing machine in the bathroom is on the side of the bath - between its side and the wall. Today, case sizes can be narrow, so this option is a reality.
Narrow bodies are no longer a rarity Between the bathtub and the toilet The sink should not be smaller than the body No one bothers you to install a sink on top
Just keep in mind that installing such equipment in bathrooms or a combined bathroom is not the best idea. Due to increased humidity, the case begins to rust quickly (tested from my own experience). However, there is usually not a lot of space, although in principle, you can put the car under the washbasin or hang shelves above it. In general, it's up to you.
Another popular place to install a washing machine is in the kitchen. It is built into the kitchen set. Sometimes they close doors, sometimes they don’t. This is at the discretion of the owners. Several interesting photos are in the gallery.
Doors with a cutout for a “porthole” Place in a kitchen cabinet The washing machine looks quite organic in the kitchen unit
Tools and materials
In addition to the installation location and the machine itself, it is also necessary to prepare tools. Would need:
- Flexible hose, 1.5 meters long. The hose is included with the machine, but it is usually short.
- Additional three-phase wires and socket, since it will need to be installed separately for the machine.
- Common tools: pliers, wire cutters, small hammer, nails, tape measure.
- A sewer siphon with three holes, if there is none and a permanent connection to the sewer is assumed.
- Hose fasteners and additional rubber gaskets.
- Tee and end valve for a water pipe.
- Plumbing sealant or FUM tape.
- Level.
After all the preparatory steps have been completed, you can begin connecting.
Level check
The correct installation of the SMA is checked during washing with a full load and maximum spin speed. An incorrectly aligned machine will manifest itself immediately after the drum begins to rotate, and maximum - in the centrifuge operating mode. To prevent strong vibration and movement on the floor, you need to adjust the unit at the moment the defect begins to appear. The adjustment is carried out on a de-energized SMA. There is no need to drain the water.
It is recommended to remove minor vibration by installing rubber pads under the supports. In addition, they will prevent the machine from moving on the tiles. During operation, it is necessary to periodically check the horizontal installation and the tightness of the locknuts. If any comments are found, they should be corrected.
Connection to sewerage
First you need to connect the washing machine to the sewer. There are two main connection methods:
- Temporary, when the drain hose is simply moved to the sink or bathtub.
- Stationary, when the drain hose is tightly connected to the sewer. This usually happens through the siphon of the sink.
When asked how to install a washing machine in the bathroom under the sink, many choose a temporary method of connecting to the sewer. In this case, the bathtub is located very close to the washing machine and therefore it is easier to take out the hose each time and immerse it in the bathtub. This is also due to the fact that the bath is quite low.
When connecting in the kitchen, the washing machine drain hose is usually connected to a siphon under the sink. It is important to take into account the points that the connection point is not lower than 50 cm from the floor level.
Advice. A stationary connection will eliminate the appearance of unpleasant odors during drainage.
Helpful Tips:
- You should not overpay for a hot water valve and connect the unit to a hot water supply, because such a connection can cause a lot of problems when washing delicate items.
- To reduce noise and vibration in the washing machine, use rubber stands.
- When installing a washing machine, do not use an inconvenient drain in the bathtub or sink using the standard drain hook. This method has a lot of disadvantages: when the unit is running, you will not be able to use the sink or bathtub; in addition, the siphons of sinks and bathtubs often become clogged, and the water may overflow.
- To prevent sewer water from entering the machine, secure the drain hose approximately 60-80 cm above the outlet into the sewer.
- The washing machine is equipped with a wire with a Euro plug, which means that when connecting, be sure to buy a Euro socket that has a third contact for connecting the ground wire. Sometimes such an outlet is included when purchasing equipment.
- Do not extend the drain hose, since in low-performance machines the drain pump is low-power, and the additional hydraulic resistance of a long hose will overload it. As a result, the pump will quickly fail.
- Be sure to securely fasten the drain hose to prevent it from falling to the floor and flooding the apartment.
Important! And, finally, you should draw your attention to the fact that you need to monitor the equipment from the moment of purchase. And the washing machine is no exception to this rule. Be sure to read the publication “Caring for your washing machine.”
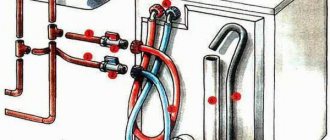
Electrical connection
It is important to consider that a washing machine is a fairly powerful unit. Therefore, it must be connected via a separate, dedicated cable. To do this, it is necessary to make a separate wiring in the panel and install a separate circuit breaker or residual current device for the machine.
Thanks to this scheme, if a short circuit occurs in the machine, the machine will turn off the power to the machine without affecting the network of the entire apartment. A separate three-phase wire is laid from the shield and then attached to a special waterproof socket.
The wire is usually attached to the wall using special brackets with nails.
Important! The socket must be located above the level of the washing machine. It should also be located so that there is easy access to it.
Recommendations for reducing vibration
There are several tips to reduce vibration:
- there is no need to overload the machine with things - modes with the maximum permissible weight are always described in detail in the instructions for the device;
- It is worth using anti-vibration stands and mats;
- It is worth checking the level of fixation of the machine and adjusting it;
- replacement of bearings and shock absorbers, when it comes to old equipment.
These tips will help reduce the noise level that occurs during spinning, but nothing more.
Anti-vibration stands and mats
Vibration reduction mats and stands are effective helpers in reducing vibration levels.
Vibration dampening mat
The mats are made of two layers - a rubber top layer to level the legs and a bottom foam layer to prevent vibration transfer to the floor. The stands are often rubber or consist of a mat with a special tray to dampen vibrations.
Useful articles, news and reviews on our Yandex Zen channel
Subscribe
Aligning and checking machine operation
After all three types of connections have been completed, all that remains is to turn on and check the machine.
This is done in the following order:
- Using the legs, the machine is leveled. Level installation is the easiest way to install a washing machine so that it does not jump. Since it is the distortions that lead to the car starting to drive and jump all over the apartment.
- Turn on the machine to a simple program.
- When collecting water, it is important to ensure that there are no leaks at the points where it is attached to the water supply. If a leak occurs, the device must be turned off immediately.
- After completing the idle program, check the operation of the sewer drain.
If everything is in order with the washing machine and it works properly, then you can safely use it.
How to adjust the legs of a washing machine
Vibrations are a serious problem that can cause irreparable harm: they lead to damage to screws, bolts and other fasteners in the machine. Vibrations also cause frequent breakdowns of the plastic tank - if it bursts, water will flow. To prevent all these problems from happening, you need to tighten the legs on the washing machine.
Incorrect installation can not only damage the washing machine, but also damage surrounding objects. The machine may move due to strong vibrations.
Smooth and correct installation is ensured by special adjusting feet provided by SMA manufacturers.
To increase or decrease the height, screw the leg into or out of the body. These steps will help you level the machine without much effort.
There is no need to immediately twist the legs as much as possible.
Important points when adjusting the feet
When figuring out how to adjust the washing machine, you can tighten or unscrew the legs, setting it in a level position. To check the slope of the MCA, you will need to adjust the washing machine to the level. With its help you can measure deviations.
- Place the tool on the top of the washer body.
- Place the level so that it is parallel to the walls of the machine. The bubbles in the flasks must be within its lines. The same applies to installing the tool parallel to the side walls.
- Deviation in any direction is evidence that the legs of the washing machine need to be adjusted. We have already discussed how to do this.
There are a lot of videos on the Internet on how to properly adjust the legs. To cope with this task, use one of these:
Photo of the correct installation and connection of the washing machine
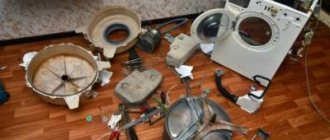
Technical problems and other causes of vibration
If, after the measures taken, the machine continues to “jump” during operation, this indicates a problem in the technical condition of some components and parts.
If the shipping fasteners that provide rigidity for holding the drum during transportation have not been removed, vibrations may increase. When the transport fasteners are removed, the drum hangs freely on the shock absorbers and the vibrations stop.
Another source of bouncing is imbalance due to laundry not being loaded correctly into the drum. You can fix the problem by reading the operating instructions for the washing machine.
Article on the topic: How to set up smart TV on a Sony TV
Also, foreign objects may get between the device body and the drum.
Shock absorbers are checked by pulling the drum towards you. The norm is if in a free state it easily returns to its previous position. If there is a wide range of swings, you need to think about replacing the shock absorbers.
The fasteners of the counterweights, designed to create inertia of the machine, may become loose. Vibrations and a specific knock warn of this malfunction.
Bearings are a wearing part, and their wear is recognized by the increased free movement of the drum, which causes additional vibration in the washing machine.
An automatic machine is a complex technical device, so it is recommended to contact specialists to install it. Installing or repairing the device yourself may result in machine failure.
Initial actions
When the courier delivers the washing machine, you need to carefully inspect its body again. It is often during transportation that equipment is damaged. Therefore, you can sign the acceptance certificate of the device only after making sure that the equipment was delivered intact and safe.
After releasing the courier, let the machine “sit” at room temperature for several hours. During this time, it is advisable to study the user manual. The instructions for the washing machine provide all the necessary information: rules for connecting, operating and caring for the equipment.
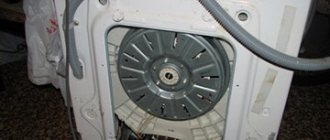
The latches are located on the rear panel. They are necessary to secure the tank so that the tank does not “dangle” during transportation and does not damage the body and internal elements of the washing machine. Starting the automatic machine with the transit bolts installed can cause serious damage to the equipment. Such a breakdown will be considered non-warranty.
To remove the transport screws, you will need an appropriately sized wrench or pliers. After removing the bolts, it is necessary to close the resulting holes with special plugs that come with the machine.
First wash
Manufacturers advise performing the first wash without throwing things into it. The fact is that a new washing machine has a specific smell that can be transferred to clothes. Modern models allow you to perform the first wash with laundry, but it’s not worth the risk. Follow the rules:
- fulfill the above criteria, without clothing;
- put a small amount of powder or detergent;
- turn on;
- choose the shortest time mode;
- wait until the procedure is completed.
Selecting a washing mode
When the above operations have been completed, you need to select a suitable washing program. Each model has different features, but in general they are similar to each other. Based on the degree of soiling of the laundry and its characteristics: bed linen, white items, wool or delicates.
For each type there is a specific washing mode with a suitable temperature. In some machines, you can independently select washing criteria: temperature, spin speed, number of rinses.
Please note that intensive modes consume more energy than gentle modes. They should be used for washing only heavily soiled items.
Try not to use them too often; they will cause the washing machine to run at full power, which may affect the service life.
Recommendations from installation experts
It often happens that equipment installed independently or by a master begins to vibrate during the spin cycle. This indicates that the installation was performed incorrectly. Therefore, even before purchasing, you need to decide on a place for the machine and read the recommendations of installation specialists.
Professional advice on installing a washing machine, as well as step-by-step instructions will help you complete the installation and connection according to all the rules.
Tip #1 - prepare the conditions for installation
When choosing the overall dimensions, type of construction and technical characteristics of the model, they are guided not by their own wishes, but by the capabilities of the room in which it will stand.
In a spacious bathroom, as a rule, there are no problems with installing a washing machine. In order to save money, it is placed as close as possible to the outlet, water supply and sewerage distribution
Necessary conditions for the operation of the washing machine include close proximity to an outlet and water. This will help avoid lengthening of electrical cables and hoses.
They also pay attention to ease of use, as well as the aesthetic component. Problems with placement most often arise in small apartments
Tip #2 - choose the optimal room
Most users, when choosing a location, choose the bathroom as the most suitable from a logical point of view. After all, this is where the water pipes and sewer drains are located. In addition, the washing process will be hidden from view.
The washing machine can also be placed in a small bathroom, having previously decided on the size and location. In this case, to save space, the machine was installed under the sink
When choosing a location for the machine, pay attention to the following points:
- the ability of the floor to withstand vibrations;
- possibility of laying communications over remote distances;
- during measurements it is necessary to take into account unevenness on the walls;
- the space for installing the machine must be at least 1 cm larger than its nominal dimensions.
If space is limited and the dimensions of the machine are large, you should think about placing the unit in the kitchen or hallway.
Tip #3 - The Importance of Proper Connection
The issue of correctly connecting the washing machine to communications should be treated extremely carefully. Next we will consider this process in more detail.
Connecting water to the machine
Machine washing, like any other, is impossible without water. The water supply must meet two basic requirements: sufficient pressure in the pipes and clean water.
If they are not met, a pump is installed to increase the pressure, and the water is filtered. A tap is built into the pipe supplying water to the machine to shut it off. Thus, the likelihood of leakage becomes minimal.
Electricity supply issue
A washing machine is a powerful unit. Residents of old apartments in which the wiring has not been changed are recommended to install a separate cable, since the wires and sockets installed many years ago are not suitable for connecting modern equipment. The cable cross-section must correspond to the expected load.
The socket for connecting the washing machine is installed with grounding. If we are talking about a room with high humidity, for example, a bathroom, then it is advisable to choose models with a protective cover
We discussed in detail the installation and connection of a grounded outlet in this material.
Tip #4 - take into account external factors
The ambient temperature and type of flooring should also be taken into account when installing the washing machine.
High quality flooring and flooring
There are high demands on the quality of the floor. It must be strictly horizontal, hard and even.
The floor covering will have to withstand the vibrations created by the rotating drum. If there are doubts about the quality, it is necessary to strengthen it at the installation site of the machine.
Ambient temperature
In a heated apartment or house, equipment is kept warm. During prolonged heating outages, which are often observed in country houses and technical rooms, the equipment cannot be left in place.
The water remaining inside the machine after washing will definitely freeze. This will result in a rupture of the hose or even the pump and will require repair/replacement
Drainage equipment for a summer house or private home
At dachas or in private houses there may be no sewerage. The only way out is to drain the dirty water outside - through a window, into a large barrel or water tank. If the hose is long, it should not be placed on the floor, otherwise water will stagnate in it. The tube will have to be placed at an angle, otherwise the liquid will constantly return to the drum, slowing down the operation of the “washer” and wearing out its internal elements.
The amount of water in the tank must be constantly monitored. It’s good if the barrel is installed outside. The water will go into the ground without flooding the floor. If the barrel is installed indoors, you will have to constantly monitor its filling
You also need to pay attention to water pressure. At low pressure you will need a small pumping station
Important!
Low fluid pressure leads to premature failure of the machine.
We supply cold water
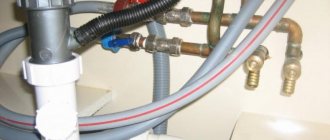
First, you need to carry out the most labor-intensive task - connecting the washing machine to the water supply.
To make it more clear to you, we provide step-by-step instructions for connecting a washing machine to cold water:
- Select the connection location. It's best to use the area where the metal-plastic pipe connects to the flexible faucet hose, although you can even connect to a shower faucet.
- Unscrew the flexible hose.
- We install the tee, having previously wound the fume tape onto the thread.
- Again, having wound the fume tape around the remaining two threads of the tee, you need to connect flexible hoses from the washbasin mixer and the washing machine itself.
- Carefully tighten all threaded connections with a wrench
Be sure to check that there are O-rings at both ends of the inlet hose to prevent water leakage at the connections!