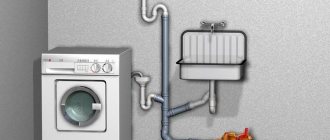
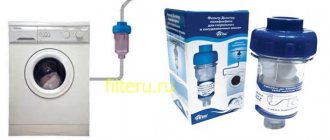
Is it difficult to connect a washing machine to the water supply? Not at all. In this article, I will offer several connection scenarios with a description of the necessary fittings and the technology for their installation, and also tell you how you can connect the drain hose of the machine to the sewer system.
With new clothes! All that remains is a mere trifle - connecting the product to the sewer and water supply.
Purpose
The idea that a tee tap for a washing machine is not so important appears in many people’s minds. Such users are most likely unaware of the concept of water hammer in water pipes, as a result of which both metal and metal-plastic pipes can separate at the seam. And if the inlet hose is connected directly to the water supply, there is a high risk that it will break due to such a water hammer, which will lead to water flows in the apartment.
Using a tee tap will save you from the need to redo repairs both in your apartment and in the neighbors below. And it is the tee that is especially convenient, as it allows you to connect several household appliances into the water supply at once, for example, a dishwasher and washing machine.
Given
First, let's formulate the terms of reference as clearly as possible:
- Modern washing machines are connected only to cold water supply. The water is heated to the required temperature by its own heating element;
- The thread diameter of the inlet hose is DN 20. To connect it, you will need an external thread of the same size;
The photo shows the inlet hose. The size of the attached threads is 3/4 inch, or DN 20
- A hermetically sealed solenoid valve is responsible for drawing water from the water supply system. Accordingly, turning off the water with a separate tap is necessary (for example, in case of going on vacation - it will serve as additional insurance against flooding of neighbors), but the corresponding element of the shut-off valve will be used infrequently;
- The automatic machine is installed at a minimum distance from the water supply and sewage system. Its typical location is a bathroom (or a combined bathroom), a kitchen, or a storage room located near the bathroom.
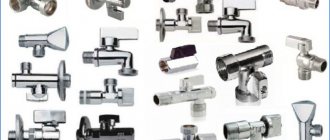
Types of cranes
The following can be used to connect a washing machine:
- Tees or straight-through taps. They are used for tapping into pipelines.
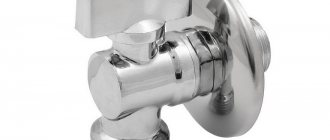
- Angle taps. They are chosen if you need to connect equipment to a separate branch.
Each type of these valves is valve, ball or straight-through. The differences lie in the method of shutting off the water in these taps. In addition, they may differ in the material from which they are made (usually brass or silumin).
For a brief video review of tees/faucets, see the video below.
Which one is better to install?
You should first select a suitable crane based on your skills and financial capabilities. The choice of faucet type should be based on the purchase budget, and not on the location of the washing machine.
The most economical and simplest is the walk-through valve, since its installation does not require special devices. By connecting such a tap to the water supply hose, the washing machine can be connected to a faucet, washbasin, water heater (to the pipe supplying water to the heater tank) or even to a drain tank (both after the hose and before it). When choosing a walk-through valve, it is important to pay attention to the direction of its lever so that it does not rest against the wall and is easy to get to.
To connect the tee, you need to prepare a gas wrench and a set of keys. Also, for work you will need FUM tape, which must be screwed onto the thread. After tightening the connection using a gas wrench, you need to check its tightness. Installing a tee on old pipes is not recommended.
See the following video for the connection process.
If you are going to install an angle valve, you should purchase additional pipe. You will also need a special tee that is installed in sections of the pipe. In general, installing an angle tap is the same as connecting a tee tap, that is, you need to use FUM tape and wrap it around the thread. Then the valve is screwed into the pipe, and the hose from the machine is connected to it. Next, the connection is tightened with a gas wrench.
First start
To check the functionality of the installed washing machine, it is necessary to carry out a test wash. This is done in the following order:
- Connect the machine to the network.
- Select the desired washing mode and set it on the display.
- Enable work mode. When pouring water into the tank, monitor its filling time in comparison with the passport data. If the machine fills slowly, it is necessary to check the pressure in the water supply and, if necessary, take measures to increase it in accordance with the passport recommendations.
- Check the water heating time for the selected mode.
- When filling the tank with water, check for leaks; if there are any, eliminate the cause and repeat the tests.
The program and rules for conducting a trial run are described in detail in the relevant technical documentation. Recommendations for different models may differ, but these should be used as a guide.
Methods for connecting to the water supply
Metal pipe
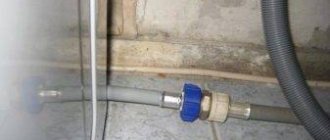
The easiest way is to connect the machine to a place where there is already a tee for a faucet, toilet or dishwasher. Having disconnected the hose of the device, another tee tap is installed in its place. The previously connected plumbing fixtures and the faucet for the washing machine are inserted into its outputs.
The second way is to use a “vampire” - a special device that is attached to the pipe with clamps. The “vampire” has a threaded branch similar to a tee. Connection technology in the next video tutorial.
If a tee has not been installed on the pipe before and you do not have the opportunity to use a “vampire”, you need to make an insert. After cutting out part of the line, you will have to make a thread, and then connect the tee.
Metal-plastic pipe
To install a tee on plastic pipes, a special tool and the correct selection of a tee with fitting elbows that connect to metal-plastic pipes are required. Using special scissors, it is necessary to perform high-quality crimping of the bends. If you don’t have such scissors and you haven’t worked with metal-plastic pipes before, it’s better to invite a specialist to connect the machine.
Choosing a location for installation
In a standard apartment there are several places where you can place a washing machine - a bath, toilet or kitchen. Narrow appliances with horizontal loading of laundry are usually placed in the toilet. In exceptional cases, the machine is installed in the corridor or pantry, if opportunities permit.
The main condition for choosing a place for a washing machine is a perfectly flat floor surface.
Advice. It is best to install the machine on a concrete floor. In this way, vibrations during operation can be reduced. And the twist-out legs will help ensure the correct position of the device.
Alternatives
Instead of a tee tap, you may prefer to install a tee fitting. After cutting the pipe, such a fitting is installed between its sections, and then a pipe is inserted into its free hole, which goes to the washing machine. This is both a simple and inexpensive method, but it cannot be called very reliable. Fitting seals wear out over time, causing leaks.
Also, the tee valve can be replaced with a regular ball valve. Its reliability is as high as that of a specialized crane, while the cost is much lower.
Required Tools
Connecting a washing machine will require you not only to study the instructions or your own knowledge, but also to have some tools. So, prepare:
- adjustable and gas wrench;
- ball valve;
- fitting, tee or ferrule (depending on the type of pipe);
- threaded adapter;
- withdrawal - as necessary;
- flexible hose.
What is a tee tap and why is it needed?
There are several ways to connect a washing machine to a water supply, but the simplest and most convenient is to use a tee tap. Its main difference from conventional shut-off valves is that it has three outlets, two of which are permanently connected, and the third is closed if necessary. Thanks to this feature, such a tap can be embedded into any pipe.
The tee tap makes it easy to connect the washing machine and helps avoid accidents. With its help, you can disconnect the machine at any time, perform any necessary actions and reconnect, which eliminates the need to shut off the water at the entrance to the apartment.
Related article: Why the washing machine does not drain water
Connection in the absence of a water supply network
Even in the absence of a central water supply, you can make a high-quality and reliable connection to a washing machine, which can significantly increase the level of comfort when living in a country house.
There are several methods of such connection, which differ in efficiency and implementation technology.
Artificial water pressure
Such a connection requires the presence of a large storage tank, a pipeline with a diameter of 15 mm, as well as a standard set represented by a tee or ball valve.
The storage tank must be installed at a height of three meters above the washing machine.
This will create optimal water pressure, so placing the tank in the attic is ideal.
The main disadvantage of this connection method is the need to constantly monitor the water level in the container.
It is also recommended to install a water purification filter at the inlet of the household appliance.
Using the powder container
The method consists of filling the washing machine tank with water through the upper container intended for filling the powder.
In this case, there is no need to use additional means and materials, but some models of washing machines do not function with this method of water supply, which is due to the built-in automatic protection.
Connecting pumping equipment
The presence of an individual source of water supply on a personal plot allows you to independently connect a washing machine using a silent pumping station for water supply to a private house (written in this article).
You must first purchase:
- pumping station (read instructions for Gilex here),
- pressure relay,
- tee,
- filter,
- main mounting hardware.
From the washing machine, you need to connect the pipeline to the pumping equipment, as well as cut in a tee and connect a relay set to the minimum pressure in the water supply system.
A filter must be installed at the pump outlet.
Main characteristics and features of choosing a tee
Various tee taps for washing machines are available for sale. They differ in material and design features. In order not to make a mistake when choosing, you need to pay attention to all their main characteristics:
- Material . Cheap tees are made from silumin (an alloy of aluminum and silicon). The advantage of this material is obvious - low price. However, there are also significant disadvantages, the most important of which is the short service life. It’s worth overpaying and buying a reliable tee tap made of brass.
- Mechanism type . There are ball valves and multi-turn valves. The former significantly benefit in terms of ease of use and durability. The tee ball valve is simpler in design and has a longer service life.
- Diameter of the connecting thread of the tee. Most often, standard models with ¾ and ½ threads go on sale, but exotic sizes can also be found.
- Tee valve shape. It all depends on personal preference. The main thing is that the tap is convenient to use, and the valve fits well in the hand.
- Manufacturer and country of manufacture . The tee is installed in a critical area; the safety of operating the washing machine depends on its reliability; you should not skimp on it. It is better to pay for products from a well-known brand than to deal with the consequences of an accident.
Drainage equipment for a summer house or private home
At dachas or in private houses there may be no sewerage. The only way out is to drain the dirty water outside - through a window, into a large barrel or water tank. If the hose is long, it should not be placed on the floor, otherwise water will stagnate in it. The tube will have to be placed at an angle, otherwise the liquid will constantly return to the drum, slowing down the operation of the “washer” and wearing out its internal elements.
The amount of water in the tank must be constantly monitored. It’s good if the barrel is installed outside. The water will go into the ground without flooding the floor. If the barrel is installed indoors, you will have to constantly monitor its filling. You also need to pay attention to water pressure. At low pressure, a small pumping station will be needed.
Important! Low fluid pressure leads to premature failure of the machine.
Main types of tee taps
Connecting a washing machine to water pipes requires an individual approach. It all depends on the system configuration, room parameters, and hose length. To make the buyer’s work as easy as possible, manufacturers offer a number of models of tee taps with different parameters; it is easy to choose the optimal solution for any project.
Straight-through and corner tees are available for sale. The difference is that in the first case, a straight section cuts into the pipe, and a washing machine is connected to the outlet. The second option, on the contrary, involves cutting into a corner, that is, the direction of the free flow of water is rotated 90 degrees.
Unpacking the machine
Manufacturers take great care in transporting their goods. The washing machine is carefully packaged. They do this in order to prevent damage during transportation.
The machine must be freed from its original packaging and the transport bolts that secure the device tank must be removed. They are easily unscrewed, and plugs are attached instead.
Attention! Do not operate the washing machine with transport bolts, as this may cause damage. The warranty does not cover such a problem.
Installation of a tee tap
These parts are primarily intended for insertion into plastic pipes. In the case of steel pipelines, the work becomes noticeably more complicated; welding is required, and adapters are often indispensable. Installation of a tee in a plastic pipeline can be described in the form of simple step-by-step instructions.
Step 1. Preparation
Before undertaking any repairs related to changing the configuration and location of pipes, connecting a washing machine is no exception, you must turn off the water. If there is a separate tap for the involved branch of the system, you can use it, otherwise you will have to turn off the taps at the entrance to the apartment.
You also need to prepare the tools and material for the job. Very little is required:
It is also worth stocking up on a pipe calibrator; it will straighten the cut and make it much easier to connect the tee tap for the washing machine. It is advisable to install a flow filter in series with the tee. It will improve the quality of water supplied to the machine, thereby significantly increasing its resource.
Step 2. Marking and cutting
Once everything is ready to begin installation, you need to decide on the insertion location. It is selected individually depending on the specific situation; in any case, it is important to ensure that the washing machine hose is not strained, and that the arrangement of the pipes ensures ease of operation.
Cut lines are marked directly on the pipe. The section to be cut must be equal to the length of the pass-through tube of the tee valve, excluding threaded sections. The pipe is being cut. You need to be prepared for the fact that some water will leak out of the cut; you should stock up on rags and a container to collect it in advance.
Step 3. Installation
Before installing the faucet for the washing machine, you should use a calibrator. With its help, it is easy to widen the hole and align the edges of the pipes, as a result of which the reliability of the fastening will significantly increase.
You can do without it, but then you need to work extremely carefully; if the tee becomes askew and water starts oozing from the joint, you will have to change the entire section of the pipeline.
Remove the mounting nuts of the tee valve and place them on the ends of the pipes. The faucet itself is installed. Be sure to use the supplied seals; they will ensure the required tightness. You need to immediately evaluate the quality of the work; to do this, just run water and check the joints for leaks.
How to level a washing machine
This operation is final and is performed after it is connected to all communications. If this is not done, the machine will be overloaded during operation, and strong drum vibrations will occur, which will not extend its service life.
The top cover of the unit must be positioned horizontally. To do this you need to perform the following operations:
- Install the washing machine in its permanent location. The distance from the back panel to the wall should be no more than 5 centimeters, otherwise the hoses may be deformed or broken.
- Loosen the locknuts on the machine legs.
- Use a spirit level to determine the direction of rise or fall.
- Adjust the position of the unit by unscrewing or tightening the screws. The tolerance for non-parallelism of the cover in relation to the floor is no more than 2 degrees.
- Having achieved the correct position of the machine body, you need to tighten the locknuts to the body.
- It is important to prevent vibration of the unit, which can occur if there is a gap between the leg and the floor. To do this, you need to try to swing the body in different directions. If necessary, tighten the legs until the same tightening force is achieved.
Features of connecting an angle tap
The procedure for installing a corner tee for a washing machine is almost the same as the sequence described above. The only significant difference is that the tap is connected to pipes located at right angles to each other. This requires greater precision in marking and a responsible approach to installation.
To prevent such a tee tap from becoming a weak link in the water supply system, you must work with all possible care; before cutting the pipe, you should once again make sure that the markings are correct.
The reliability and durability of a washing machine depends on a number of factors, the correct installation and connection being the most important of them. In this matter, everything requires attention, but first of all the quality of the parts used.
We install a tee in the water supply
Such devices are convenient to use if you have plastic pipes at home. In the case of metal pipes, installing a faucet without special tools will be much more difficult.
Regular tees do not require plumbing fixtures, just a water pipe. But, unlike straight-through valves, they require a larger set of tools.
Related article: Pressostat repair
Tools and spare parts
To install the tee you will need:
- an adjustable wrench - you can’t go anywhere without it, you need to tighten the nuts with something;
- a double hose is only needed if one is not included with the washing machine;
- calibrator for plastic pipes - necessary for correctly connecting the tee to the pipeline;
- consumable spare parts - o-rings, windings, nuts to make all connections more reliable;
- flow filter – used for water purification.
Tee installation
Once you have acquired all the necessary spare parts and tools, you can proceed to installing the device:
- First of all, turn off the water to this section of the pipeline (or to the entire apartment, if there is only one tap).
- Next, you need to mark the required section of pipe for cutting. To do this, measure the length of the tee, but do not forget that you do not need to count the threaded connections, since they must overlap both ends of the pipe.
- Cut a measured section of pipe.
- First, remove the mounting nuts from the valve and then place them on the ends of the pipe.
- Install the tee and tighten the nuts.
After this, you can connect the hose to the tee, having previously wound the FUM tape onto its thread.
Useful little things and tricks
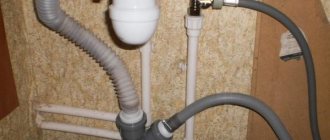
Diverting a hose into a sewer drain is not an easy task for a home handyman. Do not leave the hose on the floor. You need at least a minimal inclination so that the water does not stagnate inside the tube. In addition, the pipe can be chewed by pets. Remember about the hook on the back of the washing machine, on which you can always hook the hose so that it is in a comfortable and safe position.
The edge of the drain pipe must be located above the floor at a minimum height of 50 cm. If you have a check valve, the height may be lower, but if you do not have one, this requirement must be observed. Some modern machines include a return line. When it is not there, it is better to buy it separately and connect the washing machine to the sewer so that the water drainage system works properly. You should not save on the “little things” on which the proper operation of the drainage system depends. The average return cost is from 60 to 100 rubles. Nowadays there are different types of valves. Experienced craftsmen advise buying a “return” with a ball-shaped lock.
There are times when a technician inserts a drain hose into the place where the old unit used to be. The drain of the old washer works properly, but problems arise with the new one. It is in such cases that check valves are installed so that problems do not arise later.
Any person who has the knowledge, skills and tools to do this can do this work. The efficiency of water drainage and the correct operation of the “washer” depend on the correct approach to installing the system.
How do you like the article?
We connect the machine through a pass-through valve
Such devices are used to connect washing machines to the water supply using plumbing fixtures. Installation of the crane is very simple and requires a minimum of spare parts and tools. Such a valve can be connected to a kitchen faucet, washbasin, water heating tank or even to a cistern .
Installation
For installation you will need an adjustable wrench and FUM tape. As with the tee, you can purchase a new hose.
- Turn off the water.
- Unscrew the hose going to the plumbing fixture using an adjustable (or gas) wrench.
- Clean the threads of debris (for example, old winding).
- Wrap the cleaned thread with FUM tape and mount the valve.
- Also wrap the external thread of the faucet with tape and screw a hose from a plumbing fixture onto it.
- After this, attach the hose from the washing machine and tighten all the nuts with an adjustable or gas wrench.
At the end of installation, check the connection and perform a first test run.
Other draining methods
You can also drain the water from the washing machine directly into the bathtub, sink or toilet. To do this, almost all of the household appliances under consideration are supplied with a hard plastic nozzle for the drainage hose. It is designed to fix the drain hose on the side of the above-mentioned plumbing fixtures.
Installation and installation of washing machine drain
The main advantage of this connection is simplicity. However, the plumbing fixtures will have to be washed after each automatic wash, since the water from the washing machine that goes down the drain is by no means crystal clear. Plus, due to the high pressure, some of the drainage can spill out of the sink or toilet onto the floor. Then you will have to clean the entire bathroom.
