I am selling spare parts for this washing machine! The bearings fell apart a long time ago, it stood idle for a long time... So I decided to disassemble this device for spare parts. :)) Everything is in good condition, clean, ready for installation.
1. Corrugated pipe for draining and filling water - 500 rubles each. 2. Expansion tube for the pressure switch - 100 rubles.
All that's left. THERE IS NOTHING ELSE AVAILABLE.
Common breakdowns
All possible malfunctions of the washing machine can be divided into several groups:
- Doesn't turn on.
- Doesn't drain water.
- There is no spin.
- Does not open.
- No heating.
- Leaking.
- Doesn't take up water.
- Makes extraneous noise.
There may be several reasons for each of the listed malfunctions. For example, the lack of water in the tank can be due to either a broken inlet valve or a simple clog in the inlet hose.
Before you start repairing the Hotpoint-Ariston washing machine yourself, you need to determine the probable causes of the problems and possible methods for eliminating them.
Doesn't turn on
Possible reasons why the washing machine does not work when turned on:
- the socket or power cord is faulty;
- The control module is damaged.
It’s easy to check the serviceability of the outlet - just plug in another, working device. Damage to the cord can often be seen visually, by testing the cable with a multimeter to be sure. If there is no resistance between the “start” and “end”, the cord should be replaced with a new one.
Only a specialist can troubleshoot the Ariston Hotpoint module. The cause of failure may be a sharp surge in voltage in the network. Reflashing or replacing a module is an expensive procedure.
In some cases, after being plugged in, the machine signals that it is ready to work (the indicators light up), but after selecting a program, the washing does not start. There may be several reasons for this:
- The inlet hose is clogged or the valve is faulty. The appliance cannot start due to lack of water.
- The electric motor burned out. Most likely, in this case, the machine will fill with water, but the washing process will not advance further. As a rule, a breakdown is accompanied by extraneous noise.
Removing a blockage at the inlet is quite simple. To do this, you need to remove the inlet hose, wash it under pressure, and clean the inlet filter mesh with a brush.
Replacing a faulty valve proceeds according to the following scheme:
- The inlet hose is unscrewed.
- The top cover is removed (the 2 bolts on the back wall that hold it are unscrewed).
- The clamps connecting the pipes and the valve are unfastened, and the terminals are removed.
- The valve is pulled out from its seat and washed. After washing, its contacts should be ringed, checking the resistance. If it is missing, the problem is not a blockage, the part has failed and needs to be replaced with a new one.
After installing the new valve, the assembly is assembled in the reverse order and a test run is carried out.
The machine does not drain water
The most common cause of this problem is a clogged drain system. The breakdown may also be due to a failure of the pump or control unit (the drain command is not given).
The process of removing clogs begins with cleaning the filter. The procedure can be represented as follows:
- The filter cover, hidden behind the front panel at the bottom of the facade, opens slightly.
- A flat dish is placed under it to collect the flowing water.
- When the washing solution has completely drained, the filter is completely removed and washed.
If the blockage is severe, not only the filter can become clogged, but also the pump and even the drain hose. If cleaning does not lead to the desired result, it is necessary to check the serviceability of the pump.
Before you begin repairing the Ariston washing machine yourself, you need to dismantle the part in the following sequence:
- Unplug the power cord from the outlet, disconnect the drain and inlet hoses.
- Lay the car on its side and remove the bottom protection.
- Disconnect the terminals, unscrew the clamps on the pipes.
- Unscrew the screws holding the pump (1 or 4 depending on the model).
What you should be wary of:
- the impeller is pushed forward;
- strong backlash;
- a large amount of scale in the filter seat.
To make sure the part is in good condition, you need to check the resistance of the motor windings. If it is absent (the norm is 140–180 Ohms), the pump is faulty and the winding may break. You can check the engine by connecting it to the network. If the pump is working properly, the impeller will begin to rotate.
No spin
There are three main reasons for this malfunction:
- The motor failed and the drum stopped rotating.
- The tachometer, which regulates the speed of rotation of the rotor, is faulty. The engine runs at minimum speed and the spin cycle does not meet the specified parameters.
- The belt is broken.
- Problems with the electronic module.
- The water does not drain and the machine cannot start spinning.
It is very easy to check the last point - just drain the water through the filter or drainage tube and start the spin program.
To check the operation of the engine and the integrity of the belt, you need to remove the back cover of the device by unscrewing the fastening screws. A broken belt can be seen visually, but the motor will have to be examined in more detail.
To check the serviceability of the engine, it is necessary to measure the resistance on adjacent lamellas. It should be the same, within 0.2 Ohm. Sometimes wear on the slats can be seen visually. The part cannot be repaired - the engine must be replaced.
If the problem is not in the motor, you need to check the serviceability of the tachometer. The sensor is located on the shaft immediately behind the engine. It can be inspected and ringed without removing it from its seat.
The device is considered operational if the resistance it produces is about 60 ohms. In this case, you can check its contacts and how well it is secured to the shaft.
The door won't open
There may be several reasons why the hatch was blocked:
- There is still water in the tank and the machine cannot open the door to avoid flooding.
- The door handle mechanism is broken.
- The hatch locking device is faulty.
- Problems with the control module.
Before you begin the repair, you need to open the door by inserting a thin ruler under the hatch and squeezing the tongue or using an emergency cable (it can be found under the filter cover).
A faulty handle does not respond to pressure; if it breaks, it must be replaced with a similar one. The locking device located on the front panel must be removed by first unscrewing the bolts holding it and pulling off the cuff. The part rings and changes in the absence of resistance.
Do-it-yourself Ariston washing machine repair + Video
The Hotpoint Ariston washing machine from an Italian manufacturer is reliable and of high quality.
But some parts of the washing machine sometimes become unusable. How to repair an Ariston washing machine with your own hands? We will analyze it in this article. You can, of course, send it to a service center for repairs, but in order to save money and with skillful hands and a smart head, you can repair an electromechanical household appliance yourself.
Repairing an Ariston washing machine with your own hands is not difficult. Follow our washing machine restoration instructions, and your assistant will serve you for many years.
Ariston washing machine malfunctions
- In the Ariston electromechanical device, the main reason leading to incorrect operation of the machine is blockages.
- In addition, the heating element becomes unusable due to the appearance of limescale on the heating element due to hard water.
- The pump can also malfunction due to its long use.
- Sometimes the fill valve fails due to damage to the rubber gasket.
- In rare cases, it is necessary to change bearings and seals.
- Electronics almost never break down, but we will still touch a little on the issue of replacing the control unit.
Removing blockages during washing machine repair at home
It is easy to remove the blockage with your own hands. You need to check the drain filter, which is located at the bottom right under the panel.
By cleaning the filter, you will eliminate the cause of the washer malfunction. The drain pipe becomes clogged less often because it is thick.
The pump may become clogged, but this is rare because there is an additional filter in front of it.
The drain hose only becomes clogged if you installed it incorrectly.
Check the drain, it may also be clogged. Disassemble the unit, remove the pipe, loosen the clamps, and wash it. Remove the pump by unscrewing the fasteners and disconnecting the sensors.
DIY Ariston washing machine pump repair
Signs of pump failure:
- The drain pump hums, but the water does not drain.
- The machine may stop while the system is running.
- Water flows out slowly.
Repairing the Ariston washing machine pump should be done as follows:
- Turn off the power to the washing machine and drain the water completely by lowering the hose to the floor, while placing rags to absorb the liquid;
- You can get to the pump through the bottom, because in models of this brand it is located at the bottom of the washing machine. To remove the pump, you need to turn the machine over onto the side wall and remove the bottom bar of the bottom;
- disconnect the wires going to the drain pump, loosen the clamps and pull out the pump;
- Now we need to disassemble it. To do this, use a Phillips screwdriver to unscrew the screws on the snail. On some models of the Ariston washing machine, clamps, rather than screws, are used to secure the pump. Lightly press the snail while turning it counterclockwise. It will unscrew;
- Mark with a marker the location of the engine in the snail in order to subsequently assemble it correctly. Pull out the engine with the impeller. The impeller in the pump should rotate abruptly, and not slowly and smoothly, because it contains a magnet rotating in a coil. It provides interaction between the rotor and stator of the washing machine;
- If no debris is visible, but the impeller still does not rotate, then continue to disassemble the pump. There are latches on the motor body that need to be pressed a little with a screwdriver to remove it from the reel. Having removed the motor from the body, you will see a monolithic part - a cross. Using a construction hairdryer, be sure to wear gloves, heat the shank of the part (its long part) at low power;
- pry up the crosspiece with a screwdriver and remove it from the body along with the magnet. There is a lot of debris on the magnet and in the case from which the part was removed. Parts must be thoroughly cleaned or washed;
- Next, remove the magnet from the shaft. You will see a bearing, which you will clean from debris and lubricate;
- start assembling the pump. When assembling, make sure that the O-ring under the blades is firmly in place. When assembling the parts, lightly press them until they click.
- Sometimes bearings not only get clogged, but fail. Failure of the bearings causes runout, causing the impeller to rub against the volute casing. We hear the noise and hum of the pump, but no water comes out. The washing machine may stop. Buy bearings at a service center in Moscow, St. Petersburg or other cities of Russia, or in specialized stores. If the seals are not in order, replace them too;
- Reassemble the pump in reverse order, and then the entire washing machine. Ariston washing machine fault repair
Fill valve broken
If the fill valve in Ariston is broken, then water constantly flows into the washing machine, even when it is not working and is disconnected from the network.
To check the fill valve, you need to unscrew the fasteners and remove the top cover. The valve is located where the drain hose connects to the body of the electromechanical unit.
Check the gaskets first. If they have not lost their functionality, measure the valve resistance. Place the probes on the contacts of the filler valve and check the resistance to see if it corresponds to the optimal value (from 30 to 50 Ohms).
If it is less or more than expected, it means that the water intake valve is not working. To replace it, you need to unscrew the old valve from the body and screw in a new one. Be sure to connect the sensors.
The heating element is faulty
If the heating element is faulty, then it must be replaced. Its breakdown is indicated by the fact that the water does not heat up or washing in all programs occurs in cold water. Sometimes the machine gives an error and stops.
To replace the heating element, you need to remove the back wall. Under the tank there are two contacts with a fastening element in the middle. This is ten. Measure the resistance of the heating element with a multimeter.
If the resistance is within normal limits, then there is no need to change the heating element - it is in good working order. To remove the heating element, you need to unscrew the screw in the middle and pull it towards you with a rocking motion.
The water may not heat up due to a loose connection of the wires to the heating element, which occurs due to strong vibration of the washing machine. There may be no water heating even if the temperature sensor is faulty.
Take a tester or multimeter and check the resistance of the sensor in cold and hot conditions. If the resistance is the same, then it is broken and requires replacement. The resistance must be different.
Ariston washing machine drum repair
The high-quality and durable material from which the drum of household appliances is made also becomes unusable because solid foreign objects get into it, which can damage the unit, forming cracks on it.
The plastic rib located inside the drum may become deformed. To replace the drum, you need to remove it.
To remove the drum yourself, you need the following set of tools:
- a set of screwdrivers, especially a Phillips screwdriver and a slotted bit are needed;
- screwdriver;
- pliers;
- hammer;
- hexagons of different sizes.
Using a Phillips screwdriver, remove the bolts from the rear, front and top walls, and then remove the panels themselves.
Remove the powder container. Use a slotted screwdriver to remove the module. The control unit does not have to be unscrewed completely, the main thing is that it does not interfere with removing the drum.
Remove the hatch cuff, pull out the bottom bar, unscrewing the screws. Electronics, shock absorbers and other parts must be removed from the loading tank.
Remove the drum from the device and disassemble it. Remove the screws holding the two sides of the drum together. Use a screwdriver to pry off the seals and remove them.
Bearing repair
The bearing in the drum may break and wear out. It needs to be replaced. You only need to buy a bearing of the appropriate brand in a specialized store or order it on the official website of the Ariston washing machine, or perhaps purchase it at an equipment repair shop.
Using a metal rod and hammer, knock out the bearings. If they are defective, replace them. If the drum is deformed, replace it with a new one.
Reassemble. If the fault is in the plastic fin, then there is no need to disassemble the tank. The washing machine door can be removed. Take a metal rod whose diameter is smaller than the holes in the plastic rib of the drum.
The rod is inserted into one of the holes on the edge, the latch is opened with the help of it, and the plastic part is removed. A new plastic rib is placed in its place. Slide the plastic edge along the groove until the latch fits into the hole and closes.
Self-repair of the module
The LED indicators on the control panel receive a signal from the faulty unit. An error code is displayed on the display, indicating a breakdown of some element.
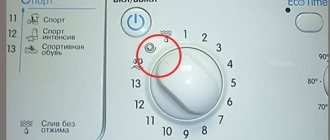
In the Ariston Margarita 2000 washing machine, if there is a malfunction, the power button starts blinking and the control knob constantly rotates. The blinking pattern varies depending on the fault. The codes can be found in the machine manual.
The control unit may fail due to mechanical damage or water getting on it. You can repair the control module yourself only when a small part has failed or you need to replace the board completely.
In other cases, contact the service. Professionals will help you repair and re-solder complex electronic circuits.
You need to unscrew the screws on the board or remove the plates using a wrench, depending on its brand. Remove the control unit and replace it with a new one. Screw in the fasteners carefully so as not to damage any part.
The cost of restoration work on an Ariston washing machine in Moscow and St. Petersburg
The price of repair depends on its complexity. If the device does not drain water, then the cost of restoration work ranges from 1200 to 3000 rubles.
Repairing the control module costs more than 3,500 rubles. The grinding and knocking of the machine can be fixed at a service center in Moscow for a price of 3,000 to 5,000 rubles.
Today we shared with you the knowledge of how to repair an Ariston washing machine with your own hands.
We hope that everything will work out for you and that your own repairs will not cost you much; you will not have to pay for disassembling and assembling washing equipment or for restoration work with the help of specialists.
Ariston Margherita AI858CTX - a veteran of the 90s still in service
If a malfunction is detected in the Ariston Margarita washing machine, the control unit rotates clockwise. The ON/OFF indicator flashes and indicates the error code.
How to decrypt it?
We look at the flashing indicator and count the number of flashes.
For example, error F02 - two series of flashes with a frequency of 1 flash per second and with a pause between the series of 4 seconds.
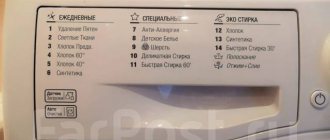
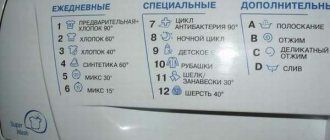
Deciphering and troubleshooting Ariston Margarita error codes
But sometimes, the error itself does not appear. For this, there is a diagnostic key that is inserted into the board connector and starts a service check. Not everyone has this key, so we will not dwell on the methodology.
We need disassembly:
Remove the top cover, unscrew the panel mounting screws, and dismantle the detergent tray as shown in the pictures.
Removing the command device will also not be very difficult. Use a thin screwdriver to pick up the handle and remove it. Next, unscrew the fastening screws.
To remove the cuff and replace it if necessary, use a screwdriver to pick up the spring clamp and remove it. Armed with the tool, unscrew the screw of the inner clamp from the top.
The service life of Margarita, if used correctly, is 15 years or more. This is explained by the build quality (Italy), reliable element base (mechanical control type)!
- The EVO-I based control module is used:
The software in the processor ROM is written once at the factory.
If the microcontroller breaks down, the board must be replaced.
Models differ in the type of “firmware” of the non-volatile memory chip (EEPROM), which can be flashed in case of failures.
- Replacing the EEPROM memory chip:
Of course, you must first make sure that the actuators are in good working order and test them with a tester.
It is necessary to carefully examine the suspicious microcircuit. Unless, of course, we take into account cases where the defect is already obvious (bursted housing, the presence of carbon deposits on the terminals, etc.), sometimes external damage can be insignificant.
Lack of nutritional regulations. Sometimes there may not be a complete short circuit, but simply a very low resistance of the power input(s) relative to “common”. In this case, you will need to have documentation for the microcircuit itself or at least the connection diagram.
Functionality check. Here everything is much more complicated: many microcircuits have many outputs, and a malfunction of at least one of them can lead to the inoperability of the entire device.
In the EVO I module, we replace the memory chip with a similar (93C86) working one with the firmware for the desired model.
Now about the most vulnerable places (due to high wear and improper operation): drain pump, electric motor brushes, water inlet valve, bearing assembly, heating element.
If a malfunction is detected in the Ariston Margarita washing machine, the control unit rotates clockwise. The ON/OFF indicator flashes and indicates the error code.
How to decrypt it?
We look at the flashing indicator and count the number of flashes.
For example, error F02 - two series of flashes with a frequency of 1 flash per second and with a pause between the series of 4 seconds.
Deciphering and troubleshooting Ariston Margarita error codes
But sometimes, the error itself does not appear. For this, there is a diagnostic key that is inserted into the board connector and starts a service check. Not everyone has this key, so we will not dwell on the methodology.
We need disassembly:
Remove the top cover, unscrew the panel mounting screws, and dismantle the detergent tray as shown in the pictures. Removing the command device will also not be very difficult. Use a thin screwdriver to pick up the handle and remove it. Next, unscrew the fastening screws.
To remove the cuff and replace it if necessary, use a screwdriver to pick up the spring clamp and remove it. Armed with the tool, unscrew the screw of the inner clamp from the top.
The service life of Margarita, if used correctly, is 15 years or more. This is explained by the build quality (Italy), reliable element base (mechanical control type)!
Features of the design and repair of the Ariston Margherita AI858CTX washing machine
Very reliable design. The front panel is non-removable. The design and electrical circuit are similar to the built-in washing machine Arison K-CD12TX, the differences are in the design of the front panel and the design of the bearing assembly and the type of electric motor with a rotation speed controller - they are designed for a lower spin speed.
The tank is suspended on two springs attached to the side walls of the washing machine. The tank is made of stainless steel, non-separable.
The bearings and the drum seal are located in a removable aluminum crosspiece; their replacement is possible without dismantling the tank
Replacing shock absorbers is usually not difficult, sometimes
The control module is completely mechanical. The engine speed controller has a fuse (rated 5A), the blowing of which often leads to a lack of engine rotation.
Features of operation of Ariston Margarita 2000
Models in this series have a wide range of functions and are distinguished by fairly high quality washing, rinsing and spinning performance, and consume a minimum of electricity and water. They belong to washing class A, because even when the water is heated to 40 degrees, they consume only 0.15 kilowatts of electricity per kilogram of dirty laundry.
This washing machine is equipped with a rather interesting program called “Golden Cashmere”, which allows you to wash only delicate fabrics and avoid the formation of pilling. But the daily wash function assumes a cycle duration of only 30 minutes, and you can load items of any color into the drum.
A quick wash in just 90 minutes allows you to wash moderately soiled items. If desired, you can delay the start of operation of the “ariston margherita 2000” als109x device for the required time. Malfunctions rarely occur in its operation, but they all require attention and, in most cases, the intervention of specialists.
Manual
Page 5
- Image
- Text
—
from 0 to 80 min. for delicate fabrics.
There is a cooling period at the end of the drying cycle.
Detergent dispenser
The dispenser has four compartments, marked with the signs 1, 2, A, C. 1 - compartment for pre-wash detergent; 2 - compartment for main wash detergent; A - compartment for conditioning additives (softening, starching and flavoring); C - compartment for bleaches.
Spin speed selection button
(models 1248 and 858)
This button allows you to select the spin speed: 1200 (850) rpm for durable fabrics and 600 (500) rpm for delicate fabrics. When the button is pressed, the speed decreases from 1200 (850) rpm to 600 (500) rpm.
Wash button at 90°C
(models 1248 and 858)
The main program of the machine heats the water to 60°C. If you want to wash at 90°C, select the 60°C wash program and press this button.
Economizer button
(models 1248 and 858)
It allows you to save water when rinsing if the machine is not fully loaded.
Spin off button
(model 1137)
When washing delicate fabrics, it may be necessary to exclude the spin cycle from the wash program. When the button is pressed, the machine will drain the water and stop.
Aqua stop button
(model 1137)
When washing synthetics and wool, you should turn on this mode. In this case, the laundry will remain soaked until you drain the water and unload the machine. This mode eliminates the formation of wrinkles when you are not near the machine and you cannot remove the laundry immediately after draining.
Machine on/off button
Pressing the button turns on the machine. This should be done after the machine has been fully programmed. With the same button you can stop the car at any time.
Indicator lamp for turning on the machine
The yellow indicator light comes on when the power is on.
Door closed indicator
The door has an additional lock that prevents access to the drum while the program is running. A red light indicates that the door is locked. Do not try to open the door while the light is on. To open the door, you must wait a few minutes after turning off the machine. Pull the door handle towards you and it will open.
Transport device
(model 1248)
If the machine needs to be moved, turn the two handles at the base. The machine is on wheels and can be easily moved. When you put the machine in place, return the handles to their original position. Be sure to check that it is aligned correctly.
Manual
5
How to buy a washing machine in Ukraine?
Before purchasing such equipment, you need to think about where exactly you are going to place it. You should be comfortable loading things into it, so decide on the type of loading:
- a vertical washing machine is perfect for installation in a hard-to-reach part of the bathroom, since such models are compact (for example, the AEG washing machine is small in size and has a large selection of operating modes);
- the horizontal version is more common, because in this case you can easily choose the right dimensions; it can also be used as a bedside table or work surface.
Separately, we should talk about built-in options. Such models most often have horizontal loading and fit perfectly into the overall style of the room.
To buy a washing machine that will serve you for many years, you should pay attention to other characteristics:
- washing intensity - the higher the class (A and B), the more careful the equipment is with fabrics;
- spin - the indicator indicates the final moisture content of the clothes after washing;
- energy consumption - this class helps determine the degree of efficiency; it is worth understanding that models from large companies (for example, a Samsung washing machine) consume less electricity than products from cheaper brands;
- different programs - almost all modern washing machines are equipped with at least a minimum set of programs, but if you need specific modes, it is better to purchase a model from a well-known brand (for example, a reliable and affordable Zanussi washing machine);
- semi-automatic or automatic washing machine - the first option is becoming less and less popular, because most manufacturers offer modern models with minimal human participation in their operation.
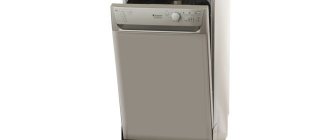
Appearance is also important. For example, an Ariston washing machine usually has an interesting, unusual design that perfectly complements a modern home.
Setting the washing mode
Initially, the machine is in a standard standby mode, indicated by the “A” indicator, and to start the desired program, you need to use a special command handle.
An indicator in “B” mode indicates that the device is ready to receive a new program, and as soon as it is selected, it is indicated by a “C” indicator. And immediately after that the washing begins. Its execution can be stopped, and to do this you need to turn the program handle to the reset position.
Powder cuvette design
The powder cuvette in the Ariston Margherita machine opens outward. It has a semicircular shape and contains four compartments. The compartment on the left is for fabric softeners and fabric softeners. Detergent is placed in the compartment on the right.
The central compartment is needed for pre-washing. Dry and liquid laundry detergent are placed in it. The fourth compartment is for bleach. It is inserted into the pre-wash compartment.
Starting the washing process
Launch is performed from the control panel. After connecting the Ariston Margherita washing machine to the mains, you need to press the power button located on the control panel.
To select a program, you need to turn the handle of the Ariston Margherita washing machine clockwise. Do not rotate the handle counterclockwise. After selecting a program, you need to press the knob itself. And in five seconds the process will start.
There are two large bottom buttons for selecting temperature and spin speed.
The control panel also contains the following buttons:
- stop washing;
- accelerated mode;
- prewash;
- enhanced wash.
Ariston model error testing
If a malfunction is detected in the operation of the Ariston Margarita 2000 washing machine, the on/off indicator will immediately begin to flash, and the command knob will rotate chaotically. The blinking pattern of this indicator indicates a fault code.
The most common fault codes:
- A short circuit has occurred in the electric motor circuits.
- The connection with the tacheometers has been lost or the electric motor has jammed.
- There is a break or short circuit in the temperature sensor.
- The pressure switch is stuck in the “Empty” position.
- The relay is stuck in the “Device full” position or there is a blockage in the drain pump.
- An error occurred in the control function.
- The heating relay is stuck.
- The heating relay has stopped working.
- The model is not EEPROM compatible.
- The relay responsible for pressure began to simultaneously send signals that the device was “Filled” and “Empty”.
- The drain pump has failed.
Important! To more accurately determine the malfunction, specialists use a special tool, namely a hardware key. It can be connected to a computer and initiate a wash, during which the machine will perform self-diagnosis. It is inserted into a special hole located on the back wall of the device. If everything is done correctly, the red indicator on the unit will light up, that is, it will be possible to begin self-testing.
Installation
The first thing you need to do is prepare a place for the Ariston Margherita washing machine and install it. When the machine is unpacked, you need to carefully inspect it. If there is damage on it, call the store immediately.
If the machine is in order, then you need to remove the transport bolts. They were needed to hold moving parts. There is no need to throw them away as they may be needed in the future. The remaining holes for the transportation bolts can be sealed using special plugs.
Next, you need to level the surface on which the Ariston Margherita washing machine will be installed. In most cases, it is not the surface itself that is leveled, but the position of the washing machine itself. This is done by rotating the front legs.
After preparing the installation site, you can connect the hoses. The inlet hose must be screwed by hand into a water pipe with a diameter of ¾. Next, you need to screw the second end of the hose to the tube that comes from the filling valve. It is located at the back of the Ariston Margherita washing machine.
Then you need to connect the drain hose to the sewer. It can also be connected to the outlet in the sink siphon. However, this must be done in such a way that the end of the hose is not in the water. The top point of the hose should be fixed at a height of 0.6 - 1 m. This is done using a clamp located on the back wall of the Ariston Margherita washing machine. In some cases, the hose length is not enough. You can get out of this situation by increasing the length of the hose.
However, it should be remembered that its total length should be less than 150 centimeters.
Before connecting the Ariston Margherita washing machine to the electrical network, you must:
- Check whether the wiring corresponds to the maximum permissible load of the washing machine;
- The voltage in the network must correspond to the permissible standard;
- Is there grounding in the electrical network;
- The plug from the washing machine cord may not fit into the outlet. In this case, you need to change the socket.
Where to buy quality home appliances?
Olx sells washing machines from popular companies. On the site you will see advertisements from various sellers who offer products from world-famous brands.
Popular products in the Laptops and Computers category:
- buy a laptop
- computer
- macbook
- PC
- gaming laptop
- buy xiomi gaming laptop
- buy a pc
- system unit
- monoblock
- buy a laptop Kyiv
- buy a macbook
- gaming computer
- buy laptop Kharkov
- samsung laptop
- buy laptop cheap
- laptops from europe
- used computers
- apple laptop
- dell laptop
- msi laptop
- buy hp laptop
- buy a server
- buy gaming pc inexpensively
- netbook price
- asus gaming laptop
- buy a system unit for games
- laptop for study
- buy acer laptop
- buy a gaming laptop inexpensively
- buy asus gaming laptop
- server bu
- all-in-one hp
- hp laptop buy
- buy a powerful laptop
- mini laptop buy
- buy asus
- fujitsu laptop
- msi gaming laptop
- laptop 8 GB RAM
- laptop 4 core
Rules for assembly and disassembly of Ariston Margarita 2000
If you want to fix the problem yourself, you need to understand how to properly disassemble and assemble the Ariston Margarita 2000 washing machine. Malfunctions of this model are largely eliminated by partially or completely disassembling it.
Important! Remember that most problems with such equipment can be prevented by competent maintenance, which, by the way, will not take much of your time. Just follow the rules outlined in the articles below:
The top cover can be removed quite easily; you just need to unclip the control panel and unscrew a few screws from the back wall. To remove the cover, you need to unscrew the two mounting bolts and simply slide the cover to the side. A screwdriver will help you carefully remove the spring ring that secures the rubber seal directly to the body and the rubber seal on the door. The screws are removed using a Phillips screwdriver. As soon as the new part is replaced, the sealing rubber returns to its place.
Ariston ai858ctx how to wash
1. Remove the packaging. Make sure that your machine is undamaged and completely
staffed. If you are in any doubt, contact the Supplier immediately.
2. Packaging elements (plastic bags, polystyrene foam, metal clips) may
be potentially dangerous to children. Therefore, immediately throw away the packaging or store it in
3. Don't forget that the drum, washing container and main motor to reduce
vibrations are suspended on springs and secured at the rear for transport
three bolts with washers (Fig. 1).
Before starting, turn them out and plug the resulting holes with plastic
plugs (they are in one package along with the Instructions).
Make sure the machine is well leveled (top surface sloped no more than 2
degrees). Leveling is done by unscrewing the legs (Fig. 2). It is necessary that
the legs were equally loaded, then the car did not swing.
If the floor is carpeted, make sure that the gap between the machine base and the floor is
sufficient for ventilation.
4. Before connecting, be sure to check the compliance of electrical and pressure
data from your car to the parameters of the electrical and plumbing networks in your home.
You will find vehicle information on the back of the vehicle.
Connecting the drain hose
Hang the bent end of the drain hose over the edge of a sink, bathtub, or place it in
special outlet for the drainage system (sewerage). High point of the drain hose
should be at a height of 50 - 100 cm from the floor. If the height of the end of the drain hose is below 80 cm,
it is necessary to secure the hose in a special clamp at the back of the machine (Fig. 4).
Connection to water supply
The machine is connected to the water supply using a hose that has two connections with
3/4 inch thread. Moreover, the hose is connected to the car with a curved end, and the connection
sealed with a gasket combined with a strainer, and the straight end is connected
to the water supply network through the gasket (Fig. 3). The gaskets are in a bag with instructions,
which, together with the hose, lies in the drum.
Attention! If the machine is connected to a new water supply or has not been used for a long time,
turn off the water and, unscrewing the hose from the side of the machine, drain the dirty water and
reconnect. This will protect the car from damage and laundry from getting dirty.
• Make sure that the power outlet into which your machine will be plugged has a
grounding device (petals), and it is really grounded.
• The socket and plug must be the same type.
• If the socket is not suitable, it must be replaced by a qualified
a specialist who must check the compliance of the wire cross-section with the current,
consumed by connected equipment.
• The use of adapters, double or more sockets and
• If you consider their use necessary, use only one
extension cord that meets safety requirements. Do not exceed the permissible
the total power indicated on the extension cord and the power outlet. The power of your
machine is indicated in the table on the rear of the machine.
• Electrical safety is only guaranteed if there is an efficient
grounding carried out in accordance with electrical safety rules.
• This requirement must be complied with. If in doubt, contact
with a specialist who will check your grounding system.
• The manufacturer is not responsible for damage caused by lack of grounding or its
Margarita, Attention, Installation Instructions
Page 2
- Image
- Text
"Margarita"
Installation and operating instructions
Please read these lines
Dear hostess, congratulations. Once again you have made a wise and tangible purchase. By choosing Margarita, you have joined the latest advances in technology and received a faithful, tireless, reliable assistant. Your Margarita is strong, reliable and durable. All these qualities have made Ariston a world famous brand. From now on, all these qualities are at your disposal to help you solve the problems of your everyday life. Margarita is simple and easy to use. Read these instructions for safe installation, use and care. Keep this booklet in a safe place. You will always find useful information in it.
Attention
This installation and operating manual contains important information for safe installation, use and maintenance. Keep it in a safe place. It may still be useful to you. Your washing machine should only be used for what it is designed for - washing 5kg of laundry or other clothing. If you decide to test your machine in another way, do so at your own risk. The Manufacturer is not responsible for damage caused by improper, incorrect or unreasonable use. When working with any electrical appliances, you must remember some fundamental rules: – never touch the appliances if your hands or feet are wet or damp; – do not use devices barefoot; – do not use extension cords in the bath or shower; if you do use them, be
extremely attentive;
– never pull the wire to remove the plug from the socket; – never expose the devices to rain, sun, etc. – do not allow children or persons unfamiliar with these Rules to use
devices without your supervision.
Your machine must be installed by qualified personnel in accordance with the Manufacturer's recommendations. Improper installation may cause harm to people, animals or your property. In this case, the Manufacturer declines all responsibility.
This equipment meets the requirements of EEC 87/308 dated 2.6.87 regarding the prevention and elimination of radio interference.
Installation Instructions
Preliminary operations
Troubleshooting the most common problems with the Ariston Margarita 2000 washing machine
You can repair the Ariston Margarita 2000 washing machine yourself if you follow the instructions below. The most common malfunctions of this device can be resolved as follows:
- If the machine has stopped filling with water, but the sound of pouring water can be clearly heard in the upper part of the body on the left side, then you need to check whether the tap supplying water is open and whether the hose supplying water to the washing machine is not jammed. You can also check if the mesh on the filter is clogged.
- The machine began to fill and drain water chaotically, but the specific hum of the pump is not heard, then you need to check at what height the drain hose is installed. This distance should not be less than 60 centimeters. The problem may be caused by the drain hose being disconnected due to vibration. To solve it, you need to return the hose to its place.
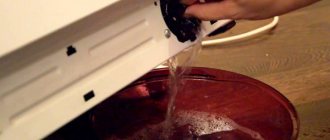
- The device does not drain water. You can try to drain it manually using a drain filter, but before doing this you need to place a tray under the machine. It is also recommended to check the cleanliness of the filter and drain hose and, if necessary, clean them.
- The machine has stopped executing software commands, namely the device responsible for selecting functions is constantly rotating in a circle. You need to take something metal with an insulated handle and set the switch handle to the black dot, then unplug the plug from the socket and short-circuit the outputs on the cord plug with this object. Thus, the residual voltage is removed from the device module and the program is reset.
Important! There may also be problems that you can easily solve by following the instructions from the articles below:
Remove packaging. Make sure your car is not damaged...
Page 3
- Image
- Text
1.
Remove packaging. Make sure that your machine is undamaged and completely
staffed. If you are in any doubt, contact the Supplier immediately. 2.
Packaging elements (plastic bags, polystyrene foam, metal clips) may
be potentially dangerous to children. Therefore, immediately throw away the packaging or put it out of reach. 3.
Do not forget
, that the drum, washing container and main motor to reduce
vibrations are suspended on springs and, for transportation, secured on the rear side with three bolts and washers (Fig. 1). Before starting, unscrew them and plug the resulting holes with plastic plugs (they are in the same bag along with the Instructions). Make sure the machine is well leveled (top surface tilted no more than 2 degrees). Leveling is done by unscrewing the legs (Fig. 2). It is necessary that the legs are equally loaded, then the machine does not rock. If the floor is carpeted, make sure there is enough clearance between the machine base and the floor for ventilation. 4.
Before connecting, be sure to
check the compliance of electrical and pressure
data from your car to the parameters of the electrical and plumbing networks in your home. You will find vehicle information on the back of the vehicle.
Connecting the drain hose
Hang the bent end of the drain hose on the edge of the sink, bathtub, or place it in a special outlet of the drainage system (sewer system). The top point of the drain hose should be at a height of 50 - 100 cm from the floor. If the height of the end of the drain hose is below 80 cm, it is necessary to secure the hose in a special clamp at the back of the machine (Fig. 4).
Connection to water supply
The machine is connected to the water supply using a hose that has two connections with 3/4 inch threads. Moreover, the hose is connected to the machine with a curved end, and the connection is sealed with a gasket combined with a strainer, and the straight end is connected to the water supply network through the gasket (Fig. 3). The gaskets are in a bag with instructions, which, together with the hose, lies in the drum. Attention!
If the machine is connected to a new water supply or has not been used for a long time, turn off the water and, unscrewing the hose from the side of the machine, drain the dirty water and restore the connection. This will protect the car from damage and laundry from contamination with rust.
Electrical connections
•
Make sure that the power outlet into which your machine will be plugged has
grounding device (petals), and it is really grounded.
•
The socket and plug must be the same type.
•
If the socket does not fit, it must be replaced by a qualified
a specialist who must check the compliance of the wire cross-section with the current,
consumed by connected equipment.
•
Not recommended
the use of adapters, double or more sockets and
extension cords
•
If you consider using them necessary, use only one
extension cord that meets safety requirements. Do not exceed the permissible
the total power indicated on the extension cord and the power outlet. The power of your
machine is indicated in the table on the rear of the machine.
•
Electrical safety is only guaranteed if there is an effective
grounding carried out in accordance with electrical safety rules.
•
This requirement must be complied with. If in doubt, contact
with a specialist who will check your grounding system.
•
The manufacturer is not responsible for damage caused by lack of grounding or its
malfunction.
3
Need to repair Ariston Margherita AI858CTX?
technicians can repair Ariston Margherita AI858CTX for most breakdowns. The typical cost of repairing an Ariston Margherita AI858CTX is from 1800 (replacement of the power switch) to 2500 rubles (replacement of the Ariston AI858CTX pump). Despite the fact that this model was discontinued more than 15 years ago, its repair is still in demand. Ai858CTX is the youngest member of the Ariston Margherita family with a drying function. The older models in the line have a spin speed of up to 1300 RPM and, due to the reduced residual moisture of the laundry, consume less electricity in the drying mode. Otherwise their functionality is identical.
Care and safety rules
The instructions for the Ariston Margherita washing machine also contain safety and maintenance rules. The following contains several recommendations that will be useful to owners of Ariston Margherita washing machines:
- Close the water tap when finishing washing.
- It is necessary to wipe the rubber cuff and drum of the washing machine with a dry cloth. This is necessary to prevent unpleasant odors and mold.
- Rinse the powder cuvette in clean water and then wipe with a dry cloth.
- To wash the outside of the Ariston Margherita washing machine, use warm water and a small amount of soap.
- You should not exceed the dosage of various detergents, since in this case there will be too much foam.
- Before starting, check that there are no objects in your clothing pockets. Otherwise, a foreign object may get into the washing machine tub.
- Once every six months, do a dry wash with washing machine cleaner.
- Clean the drain filter frequently to remove dirt and debris.
- Do not forcefully open the Ariston Margherita washing machine door.
- If a malfunction occurs during operation of the machine, you must turn off the water supply tap and then disconnect the washing machine from the power supply.