Household appliances tend to break down (for example). Your task is to operate the devices correctly, repair them on time and provide proper preventative care. Today we will look at the most unpleasant failure of a washing machine (we are talking about the heating element). Many are specifically related to heating elements.
It should be noted that not everyone can change the heating element in a washing machine. This is a rather complex and lengthy process that requires knowledge, experience and certain skills, as well as.
1.1 Why might it be necessary to replace the heating element in a washing machine?
Professionals explain that the main reason for the failure of the heating tube is water hardness (relevant for). The modern chemical composition of water provokes the formation of scale and leads to breakdowns. You should deal with this problem immediately after purchasing the device.
Use special water softeners, add liquids that overcome scale. This is the only way to extend the life of the machine.
Where is the heating element located?
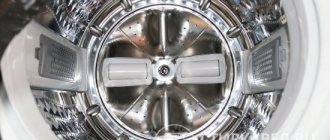
To replace this element, you need to know where it is located. Naturally, there are many different washing machines, but, as a rule, the heating element is located at the bottom of the tank. But how to get to it depends on the model. On some machines it is located behind the front panel, on others it is behind the back cover. Sometimes on side-loading machines it may be located on the side.
Heating element behind the front panel
To determine exactly where it is located on yours, first remove the back cover and look under the tank. It's easier to unscrew, so it will come first. If the heating element is located there, great, you can start removing it. When it is not there, you need to unscrew the front panel. We can say that the first stage was successful. All that remains is to take it out, check it, and, if necessary, replace it. Let's look at how to do this step by step. And to make your task easier, the article will describe two methods for disassembling machines. The first is when the heating element is in front, the other is when it is located in the back.
Here are some rules that must be followed, regardless of the brand of the device:
- If the machine is connected to the network, be sure to turn it off by unplugging the plug from the outlet.
- Completely drain all the water, use a drain filter to do this, or drain the water through a hose, lowering it below the level of the machine.
- Some water may remain, so have a bowl, rag or mop handy.
Can also be located behind the rear panel
This completes the preparatory work. For further work you will need:
- Screwdriver.
- Open-end or socket wrench 8 or 10.
That’s all, as you can see, you don’t need any special specialized tools; due to the simplicity of the work, you can do everything yourself.
Self-check of the heating element’s performance
Various malfunctions are possible if the water in the MAS is not heated. Most likely, the heating element, which is the heating element, has failed. To ensure this, you need to pay attention to the following problems:
- When washing things, the water remains cool and does not reach the set temperature.
- The wash ends quickly after 8-10 minutes, but water flows into the tank.
- After starting the car, electrical plugs are knocked out.
- At the beginning of the streak, a burning smell occurs.
- The cleanliness of the linen is not the same as before.
- When you touch the washing machine, you feel an electric shock.
If at least one of these signs is observed, then the heating element in the machine needs to be changed as quickly as possible. You can replace the part yourself or negotiate with a technician at a service workshop.
For many types of washing equipment, the heating element is located behind. In this case, you need to remove the machine panel by unscrewing the screws. If the heating element is located in the front, then the actions are the same, only the heating element is located on the front side.
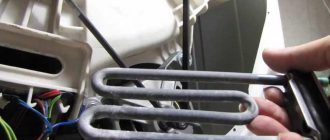
You need to look for the heating part in the lower location of the tank and try to disconnect it from the wires. In order not to lose track of the connections, you need to photograph the contacts and only then remove them. When taking out the heating element, you need to unscrew the nut located in the middle of the heating element. The visible bolt should go inside; to do this, you need to press on the end of the bolt.
When taking out the heating element, you need to pry it off with some object, for example, a screwdriver. After removal, it is easy to check its functionality. For this purpose, a visual inspection method is used. You just need to carefully examine the part. If dark marks in the form of small spots are noticeable on the heating element, then most likely the housing of the heating element is broken. Traces of scale will also be visible visually.
By carefully studying the heating element, you can understand the method of fixing it on the tank and understand how sealing is carried out. After the nut is tightened, the rubber fastening mechanism becomes wider. Due to expansion, the heater is securely held in place and does not allow water to get inside the washing machine.
The heating element can only be removed after twisting the nut and pressing on the stud to deepen it inward. You must use a screwdriver to remove the heating element carefully, without breaking the tank; in some models of machines it is very fragile, and there is a possibility of damaging it.
When returning the heating part to its previous recess, you must carefully monitor that it fits into the required opening in the lower part of the tank. If the heating element is moved upward, it may touch the drum; the problem will be revealed during the spinning process.
Ten in front
As we said earlier, often in all models the heating element is located behind the back cover. But if you have a device from Bosh, LG or Samsung, behind the back panel you will only find a drive belt that is attached to the motor. The heating element itself is located in front, under the drum. So, let's look at the work step by step.
Removing the top panel
- First, you need to remove the top cover. To do this, unscrew the two screws that secure the cover. They are at the back. They can be used with a Phillips, flat or Torx screwdriver.
After unscrewing them, pull the cover back and remove it. - Then remove the detergent drawer. In its place there will also be 2 screws that need to be unscrewed. There is a latch on the back of the front panel that needs to be removed. Then she takes off.
- Removing the steel hoop and rubber seal
The next step is to remove the steel hoop that holds the seal (rubber cuff) on the loading hatch. This ring is tightened by a regular wire spring. You need to stretch the spring and remove the hoop from the seal. - Now remove the rubber seal.
- There should be screws on the front panel, bottom or front, which also need to be unscrewed. All that remains is to remove the cover. It can be additionally attached with clips. Therefore, the lid must be brought forward a little and lowered down.
- There is a door blocker near the hatch. You need to disconnect the wires from it. Now you can remove the panel and move on to the heating element itself.
- Contacts
It is located at the bottom of the tank. Immediately at the end of the heating element you will see two power terminals, a ground wire and a temperature sensor connector. - First remove the terminals, ground and remove the temperature sensor. To connect everything correctly after replacement, the location of the wires can be remembered or better photographed.
- All that remains is to unscrew the fastening in the form of a nut. Take a socket or open-end wrench and unscrew the nut, but not all the way. Press the bolt inward so that the heating element can be removed.
- Now, using up and down movements, loosen the heating element and carefully pull it out.
- Perform tank maintenance. All remaining powder, scale and other debris must be removed. Now we need to replace the heating element.
- Buy a new heating element based on the markings of the old one. Connect the temperature sensor to it and insert it into the desired place. If there are guides, you need to get into them and insert the device. Tighten the fastening nut, connect the wires, it is important not to mix them up.
- The last stage is reassembling the machine.
Heating element seat
That's all. Ten was successfully replaced. Since there are different brands, the fasteners may be in different places, but the procedure and principle are the same for everyone.
Check the heating element
It happens that replacing the heating element does not solve the problem, so at the disassembly stages you need to check the heating element itself. You can check it using an ohmmeter. If the device shows infinite resistance, it has burned out. If not, you need to check if everything is in order with the wires and if there is any other damage.
Step-by-step instructions for replacing the heating element
We will consider a simple option - the heating element is located behind the drum.
Step 1: Drain any remaining water from the drum. To do this, open the bottom cover on the front panel of the case and remove the plug. Place a low container to collect water, otherwise it will spill on the floor. To drain completely, it is recommended to tilt the washing machine slightly and hold it in this position for several seconds until the liquid drains.
There should be no water left in the machine
Step 2. Place the machine in a free space, provide access to the rear. Unscrew the shield; it is secured with four screws. Remove the part and place it near the wall. Do not throw anything under your feet; all elements of the washing machine, electrical appliances and tools must be in order and in their places.
Remove the back cover to get to the heating element
Step 3. Find the heating element, it is screwed to the bottom of the drum. Has three terminals: phase, neutral and ground
Some models have temperature sensors on the body of the heating element; handle them very carefully, they do not respond well to impact forces
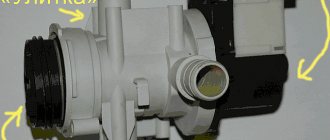
The heating element is usually located below the drum
Step 4. Remove the phase and neutral terminals, unscrew the grounding fixing nut, and remove the contacts connected to it from the screw.
Carefully remove the contacts and unscrew the nut
If the heating element is working properly, then there is no point in disassembling anything further; the cause of the breakdown is different. If you have enough technical knowledge, then you need to look for it in the control and automation system. If you have no experience, call a specialist. To make it easier to make the right decision, let us inform you that the cost of the control unit can be up to 50% of the price of the washing machine. And unqualified intervention in its work in most cases causes complete failure with the impossibility of further recovery. If the heating element is confirmed to be faulty, continue disassembling the machine.
You can check the serviceability of the heating element without removing it from the machine body
Step 5. Unscrew the locknut of the grounding screw, but not all the way, but to the length of the thread. This is done so that when tapping on the nut the thread does not jam. You need to knock until it sinks a little, thus weakening the expansion of the rubber gasket. The fact is that to seal the heating element, an internal plate is used, which, when the nut is tightened, is pressed against the rubber gasket and expands it.
With light blows of a screwdriver, loosen the fixation of the heating element.
Step 6. Using a screwdriver, carefully pry the heater body around the perimeter and slowly tear it off. The rubber has stuck a little, don’t rush, don’t deform the seats.
To pull out the heating element, you need to pry it slightly with a screwdriver
Step 7. Buy a new part from the store. Professionals strongly recommend taking an old heating element with you, this is the only way to guarantee that you won’t make a mistake with your choice. The fact is that manufacturers produce a new heater for each model; it may differ by only a few millimeters in length or width. This gives the right to assign a new series to the washing machine and, accordingly, sell it at a new price. And heating elements are no longer interchangeable.
The new heating element must have identical dimensions
Step 8. Clean the place where the heater is installed from calcium, there will be a lot of it there. Use any available items, check the quality with a flashlight.
The heating element installation site must be thoroughly cleaned
Step 9. Inspect the condition of the sealing rubber seat and, if necessary, remove carbon deposits from the surfaces.
The seal seat must also be clean.
Step 10. Loosen the grounding nut, insert the heating element into place
Pay attention so that it occupies a special niche
Insert a new heating element into the housing
Step 11. Tighten the nut and connect all the wires.
Connect everything in reverse order
Pour some water into the drum and turn on the heat for a few seconds, then turn off the machine. If the heating element is warm and there are no drips, great, screw on the remaining parts and place the unit at the place of use.
Replacing heating element in front position
Ten from behind
Indesit, Whirlpool and similar machines must be disassembled from the rear. This option is much simpler and faster.
Disassembling from the rear panel
- Unfold the machine.
- Disconnect power, drain and water.
- Using a screwdriver, unscrew the screws and remove the cover.
- At the bottom of the tank is our heating element. Disconnect all wires.
- Use a socket wrench to unscrew the nut, but not all the way, press the bolt inward and remove the heating element.
- The rubber seal may get in the way, preventing you from removing the element, so loosen it, gradually pulling it out.
- Clean the tank and insert the new heating element back. The sealing rubber can be lubricated with dishwashing detergent so that the device fits well.
- Connect all the wires and screw on the cover. Then connect the communications and check the machine.
Top-loading machines need to be unscrewed from the side. The process is exactly the same, only the location of the cap that needs to be unscrewed changes.
The machine has stopped heating the water, but all the programs are set correctly? This means that the heating element in the washing machine needs to be replaced. We will describe in detail the process of dismantling and installing a new heating element, and also share useful tips.
Operation of heating elements: here you can clearly see how service life affects the condition of the heating element.
The device of the heating element and signs of its breakdown
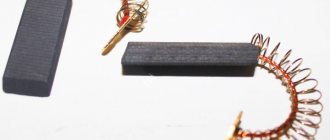
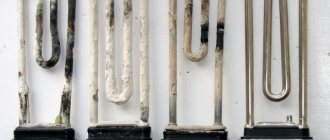
Before replacing the heating element in the washing machine, it is recommended that you familiarize yourself with the principle of its operation. A heating element is a heater whose task is to heat the water in the tank. The main part of modern heating elements is a tube. There is a spiral running inside it, which is separated from the outer walls of the tube by a dielectric material. The heater breaks down more often than other elements due to the fact that this spiral is constantly cooling and heating up. After losing its properties, it fails. This often occurs due to the formation of plaque on the heater tubes. Therefore, the main sign of failure is a thick layer of plaque.
To extend the life of the heating element, it is recommended to clean it every 3-4 months.
You can understand that the heating element of the washing machine needs to be replaced by another sign - the water in the barrel stops heating. Sometimes the reason for the lack of hot water is an incorrectly set washing program. If all the settings are correct, you can immediately proceed to replacing the heating element.
Also, the reason for the lack of hot water may be a non-working programmer or water heating sensor. It is better to entrust the replacement of these elements to professional repairmen. In any case, after dismantling the heater, you will understand whether it is the reason for the lack of hot water in the machine or not.
Reasons for failure of the heating element
When heating especially hard water, the heating element (heating element) becomes covered with a coating of scale, or water stone. It has low thermal conductivity and prevents the heating element from transferring heat to water.
As a result, in order to heat water to the required temperature, the inner surface of the element overheats, which leads to combustion of the coil, deformation of the heating element and its partial or complete destruction. When the machine panel overheats, an alarm light comes on and it stops turning on.
The heating element is a wire with high resistance placed in a tube that protects it from external influences. Electric current passing through the wire heats it, and it transfers heat to the tube, from which the water is already heated.
To heat water to a certain temperature, the wire needs to heat up much more. Therefore, the heat transfer of the heater surface is extremely important - the better it is, the less energy is required to heat the water.
If the heater is destroyed, water that gets inside can cause a short circuit if it shorts to the housing, which poses a threat to users.
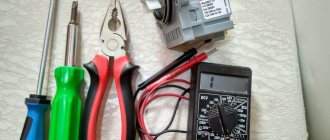
What is needed for replacement?
However, before you begin replacement work, you should arm yourself with the following parts and tools:
- New heating element. You can purchase it at the manufacturer’s service center (or receive it free of charge under warranty). We do not recommend buying a used part, since after a while you will have to replace it again;
- A set of screwdrivers (usually a slotted screwdriver is enough);
- Set of wrenches and tubular wrenches;
- Rubber hammer;
- Adhesive sealant (if a used heating element is used for replacement).
Video: how to change the heating element?
In the following video, a home technician will clearly show how to replace the heating element in a washing machine, regardless of its model and manufacturer:
Now you know how to replace the heating element in a washing machine. It is recommended to undertake the replacement yourself if you have experience in repairing household appliances. Perform all actions from the instructions carefully, since wires and terminals are fragile elements. Don't forget to check the heating element once every 3-4 months. To consolidate the information received, we recommend watching a video that shows replacing the heating element of a washing machine.
To replace the heating element in the washing machine, you need to gain access to it. It is located inside the tank, in its lower part. But the installation location of the heating element may vary among different types and models of washing machines. Therefore, together with a description of the replacement process itself, we provide a description of the location of heating elements in the most common brands of washing machines.
Troubleshooting
It is easy to understand that the heating element is broken. If, while draining dirty water, you touch the hose and it is cold, it’s time to change the heater. A few more signs:
- Deterioration in wash quality . Even if you manually increase the temperature or change the detergent, the laundry will not get cleaner.
- The amount of electricity consumed during washing has decreased . 80% is exactly how much the automatic washing machine uses to heat water.
- The device turns off on its own or the electrical protective equipment is triggered . This happens when the machine is filled with water. It is necessary to disconnect the machine from the power supply as quickly as possible and not turn it on until repaired.
Attention
At the first sign of a short circuit, disconnect the electrical appliance from the network and, if you do not have experience in troubleshooting such problems, call an electrician. Many old houses do not have grounding, the risk of injury is high, so be extremely careful.
But these signs are indirect. The heating element will still have to be checked (if it turns out to be serviceable, the help of a person with special technical education will be required, since there is a problem with the control electronics). Control is carried out according to 3 parameters:
- To break the chrome spiral . One of the most common reasons: the spiral burns out and the current stops passing through it. The test is carried out by ringing the element (when the tester leads are connected to both terminals of the spiral, and the switch is set to o). Has the needle suddenly dropped to zero? The spiral has clearly burned out.
- For breakdown of the hull .
A dangerous malfunction, especially for residents of apartments without grounding and in houses with electrical wiring. In this case, the current enters the body, and a person faces a serious electric shock if he touches it. Connect the device to the terminal with one output, and the other to the body. Watch the arrow. If it stays at zero, everything is in order; if it deviates, the element requires replacement. The switch should be set to 200 Mohms. The test is carried out on a heated heating element: connect power to it for a few seconds, turn it off and proceed. - Power check . This manipulation is not so necessary, but it won’t be superfluous either. Switch the tester to Amp AC mode. Connect all elements in order to the power source. An arrow pointing to 8A signals that everything is normal. If the current strength has decreased, the heating element has worn out to a critical state.
Gaining access and location of heating elements from different manufacturers
Through the front or back wall. On front models of washing machines of the brands Bosch, Siemens, AEG, Samsung, Beko, Whirpool, the heating element can be located both in the front and in the rear of the tank.
In order not to disassemble too much and not get confused, you need to look at the back wall. If the back cover is full-sized or occupies most of the rear wall area, then the heating element is most likely located in the rear of the tank. Then to access it you need to unscrew all the screws around the perimeter of the cover and remove it.
If the back cover occupies a small area of the rear wall, then most likely it is made only for replacing the drive belt and does not provide access to the heating element. In such models, the heating element is most likely
is located in the front of the tank and is accessed through the front wall. In any case, if in doubt, it is better to remove the back cover and check.
Through the back cover. Replacing the heating element of front washing machines Ariston, Indesit, Ardo, Candy is carried out only through the back cover. Thus, for access it is enough to unscrew all the mounting screws and separate the cover.
Through the back wall. On Electrolux and Zanussi front washing machines, the heating element is located only in the rear part of the tank and to access it you need to remove the back wall of the washing machine.
Through the plinth panel. Hansa front washing machines have a base panel on the front wall, which, when removed, provides easy access to replace the heating element. To remove it, you need to unscrew the two screws on the sides and separate the panel.
Through the side wall on vertical machines. To replace the heating element of vertical washing machines, in most cases, it is enough to remove one of the side walls. To do this, unscrew several screws securing the side wall from the rear wall and one screw from the front wall in the plinth area right next to the floor.
Heating elements for washing machines wholesale
supplies heating elements for washing machines wholesale and retail. Among our partners there are both private plumbing stores and large DIY chains, such as Leroy Merlin, OBI, Castorama and other chain stores. All products are individually packaged with a bar code, as well as all the necessary information for choosing the right heating element.
By ordering water heaters wholesale from us, you can be sure of the quality of the product and its durability. All our products have the appropriate certificates and also undergo all necessary inspections and testing.
We provide a detailed price list for all our products, and have wide options for payment and delivery.
Removing heating elements from plastic and iron tanks
To do this you need:
- drain the remaining water from the tank through the pump filter or in another way;
- after gaining convenient access, disconnect the wires from the heating element (phase, neutral, ground, sensor);
- loosen the fastening nut and press the screw inward;
- using a slotted screwdriver, prying the visible, outer part in a circle, gradually remove the heating element from the tank (heating elements from plastic tanks are usually easier to remove than from metal ones);
- After removing the heating element, we clean the growths and deposits from the tank.
Installation of heating elements
Installation algorithm:
- we install the new heating element so that it fits into the mount inside the tank and press it tightly into the seat;
- we tighten the fastening nut, pressing on the heating element (when tightening it is important to control the tightening force, if the force is too great, then the heating element will subsequently be squeezed out of the tank);
- connect the wires;
- turn on the washing mode at 60 degrees, and check the tightness and heating;
- After checking, we finally assemble the washing machine.
How the device works
The heating device consists of two containers isolated from each other. The first barrel is usually made of high-quality steel coated with an anti-corrosion coating or stainless steel.
Innovative materials are used to organize insulation. Most often this can be polyurethane foam, basalt wool or their analogues. This solution allows you to keep water hot for up to two to three days. If the liquid temperature drops below a user-specified value, an electric current is supplied to the heating element.
At the same time, in order to prevent mixing of hot and cold liquid, the latter is taken from the upper part of the device. In this case, the laws of physics apply. More precisely, cold water simply displaces hot water.
You should not leave the boiler always on. After all, any technology has its own resource. Accordingly, if you sometimes turn off the water heating device, you can significantly extend its service life
It is recommended to adjust the thermostat to t = 60. In this case, scale formation can be prevented, which will have a beneficial effect on the inner barrel and heating elements. But in any case, every month you need to turn on the device to maximum. This solution will allow you to disinfect the container, killing all harmful bacteria.