Washing machine, instruction manual
Page 2
- Image
- Text
Washing machine
Manual
Thank you for purchasing an LG automatic washing machine. Please read this user manual carefully as it contains instructions for the safe installation, operation and maintenance of your washing machine. Save it for future use. Write down the model and serial number of your washing machine.
WD-10192S WD-80192S WD-10192N WD-80192N WD-10192T WD-80192T
Preparing for work
To disassemble an LG washing machine, regardless of the loading method, you will need the following tools:
- screwdrivers of different shapes;
- hammer;
- pliers;
- open-end and socket wrenches;
- any lubricant;
- screwdriver
After the tools have been collected, they begin to prepare household appliances. To do this, perform the following steps:
- Disconnect the device from the power supply.
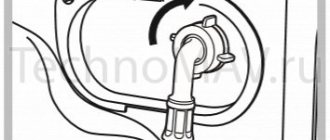
- Remove the drain hose from the sewer and turn it over so as to remove any remaining water.
- Move the machine away from the wall and interior items.
To avoid difficulties with unscrewing parts, the machine should be taken out of the bathroom. The more free space there is, the better.
new advantages O possession C...
Page 3
- Image
- Text
new advantages
ABOUT
possession
C
2
Warnings…………………………………………………….3
Specification………………………………………………………..4
Installation………………………………………………………5
Before washing………………………………………………………10
Loading powder…………………………………………………………….11
Functions……………………………………………………………………………….12
Using the washing machine…………………………13
Service………………………………………………………20
Troubleshooting………………………………………………………23
Warranty terms……………………………………………………………..26
■ Large drum
The large LG drum allows you to wash 40% more clothes compared to a conventional washing machine. The increased drum size increases washing efficiency.
■ Economical intelligent washing system
The Smart Wash system automatically determines the optimal water level and wash time depending on the amount of clothes loaded and the incoming water temperature to minimize water and energy consumption.
■ Child lock
The advanced AC motor drives the drum directly without the need for a belt or pulley.
■ Quiet speed control system
The system automatically redistributes the laundry in the machine to reduce the noise level during rotation.
■ Automatic switching on
If a power failure occurs while the washing machine is operating, after the power supply is restored, the machine will automatically continue to operate in the same mode in which it was operating before the failure.
40%
Pace.
We disassemble the ASM down to the tank
The essence of preliminary disassembly of an LG automatic washing machine is to sequentially remove it:
- top cover and top instrument panel - both parts are held in place with self-tapping screws;
- lower front panel - secured with latches.
By completing the above operations, you will provide yourself with free (relatively) access to the device tank.
We release the AFM drum from the connected devices in the following sequence:
- We disconnect all the electrical wires of the electric heating element (TEH), the filler pump and the electric motor.
- A pipe designed to drain liquid.
- Pipe with water level sensor.
- Upper and lower drum counterweights.
Disassembling the tank and replacing the bearing
- We divide the washing machine tank into two components, thereby gaining access to its drive pulley and the mount that holds it.
- Loosen the screw securing the pulley.
- We remove the pulley and insert the bolt back.
- Having placed a metal pin (stud) on the head of the bolt, lightly hitting it with a hammer knocks out the shaft with the adapter sleeve.
- After removal, we inspect for external mechanical damage.
- We rotate the shaft on the bearing.
- If vibration (play) is detected, we replace the ASM bearings and seals.
Warnings, Important Safety Information
Page 4
- Image
- Text
warnings
P
3
For your own safety, follow all instructions in this manual to reduce the risk of fire, explosion, electrical shock, property damage, personal injury, or death.
!
PLEASE READ THE ENTIRE INSTRUCTIONS BEFORE USING THE MACHINE
ATTENTION
• do not install or store the washing machine in
places with unfavorable weather conditions.
• Avoid damaging controls. • Do not repair or replace parts of the washing machine.
machine yourself, unless the process is described in a service manual or published do-it-yourself repair instructions that you fully understand and are skilled enough to perform.
•Make sure there are no flammable materials under or around the machine.
items such as paper, lint, rags, chemicals, etc.
• If there are children near the machine, carefully
keep an eye on them.
• Do not allow children to play on, in, or
near the car.
• Do not leave the washing machine door open. • If the door is left open, children may try to
hang from it or climb inside the car.
• Never touch the inside of the machine while
working hours. Wait until the drum comes to a complete stop.
• As a result of washing, the fire resistance of clothing may become
go down.
• Never wash or machine dry clothing that has previously been cleaned with flammable or explosive substances, or that has otherwise been exposed to such substances (wax, oil, paint, gasoline, degreasers, drying agents, kerosene, etc.). This may result in a fire or explosion. • To avoid this, when washing and drying, always
follow the clothing manufacturer's recommendations.
• Do not slam the door too hard or try to
open using force if the door locking system is activated (the door lock light is on). This may damage the washing machine.
• To avoid electrical hazards,
Before performing any repairs or maintenance on your washing machine, unplug the power cord from the electrical outlet, remove the fuse, or turn off the circuit breaker.
• Never turn on the machine if it is damaged,
is defective, partially disassembled or any parts are missing or broken, including if the power cord or plug is damaged.
GROUNDING INSTRUCTIONS
The washing machine must be grounded. Grounding reduces the risk of electrical shock when a machine malfunctions or breaks down by ensuring that electricity is carried away through a conductor with less resistance. The power cord of this washing machine has a grounding conductor and a grounding plug. This plug must be connected to an electrical outlet that is installed and grounded in accordance with local codes and requirements. • Do not use an adapter to connect or otherwise attempt to
connect the plug to an outlet without grounding.
• If there is no suitable outlet, call an electrician.
IMPORTANT SAFETY INFORMATION
WARNING: Observe the following precautions to reduce the risk of fire, electrical shock, or personal injury:
SAVE THIS MANUAL
WARNING WARNING: Improper connection of the grounding conductor may result in electrical shock. If you are in any doubt about the proper grounding, contact a qualified electrician. Do not change the plug on the power cord. If it does not fit into the electrical outlet, have a qualified electrician replace the outlet.
TOP 10 faults
Information about malfunctions specific to an LG washing machine with direct drive will help you quickly and independently restore the working condition of the household appliance.
The water in the tank does not heat up
The main reason for cold water in the tank is failure of the heating element . Salts and minerals, which are saturated with tap water, settle on the tubes of the heating element.
Over time, the scale layer thickens, which leads to overheating of the internal filler of the heating element.
Diagnosing a malfunction of the heating element is simple : just touch the hatch door ten minutes after starting the wash at high temperatures. The door is cold - the heating element is faulty. Testing the element with a multimeter (working value 20 ohms) will help confirm assumptions about the breakdown of the heating element.
Solution to the problem: replacing the faulty heating element. The heating element is located at the bottom of the tank. In order to dismantle the element, it is necessary to disconnect the contacts, unscrew the central nut, and remove the grounding wire.
By prying off the rubber seal, the faulty heating element is removed, and a new heating element is fixed to the cleaned seat. Why the LG washing machine does not heat the water, how to find the problem and fix it, read here, how to replace the heating element - here.
The device does not start
There are several reasons why the washing machine does not start after being plugged in:
- very low voltage (according to regulations, the voltage in the network should not be less than 200V);
- the socket, power cord or plug on the washing machine has failed;
- problems with the control unit.
To return the washing machine to working condition, first of all, check the voltage in the network (use a multimeter tester). If the voltage indicator is normal, the next step is to check the plug and power cable of the washing machine (the device is connected to another outlet).
The last stage is diagnosing the control module. If external damage to the module is not visible, a service center specialist will be able to test the device in more detail.
This article will tell you why your LG washing machine won’t turn on and what to do.
Water does not fill into the drum
The first thing that needs to be checked in a situation where water does not flow into the drum is the water pressure in the tap. Lack of pressure can cause a closed tap (just open it completely and the problem is solved).
Another reason for the lack of water intake into the drum is an inlet filter clogged with debris. To remove blockages, you need to unscrew the water supply hose and thoroughly clean the metal mesh located at the inlet.
A faulty inlet valve is another reason why water is not flowing into the tank. In order to determine the malfunction of this element, you need to:
- Turn off the water and remove the inlet hose.
- Remove the top panel (after unscrewing the fasteners on the rear wall).
- Remove the clamps and disconnect the intake valve terminals.
- Using a multimeter, check the valve coil winding resistance reading.
If there is resistance, the valve is cleaned and installed in its original place. There is no resistance - the inlet valve must be replaced. This article will tell you what are the reasons why an LG washing machine does not draw water well or does not do so at all.
Doesn't drain water
One of the reasons why there is still water in the tank at the end of the wash cycle is that the drain pump is clogged with debris. A step-by-step diagnosis will help determine whether this is so.
First, check and clean the drain filter (hidden in the lower part of the front panel behind a special hatch). The filter is unscrewed and thoroughly washed under running water.
Through the opened hole, inspect the pump impeller and turn it manually. Stiff rotation indicates that the impeller is clogged with debris and needs to be cleaned. Additionally, dismantle and wash the drain hose under the tap.
If cleaning the drain pump does not lead to the desired result, then it is necessary to check the functionality of the pump.
For this:
- disconnect the washing machine from the electricity network, water supply and sewerage;
- lay the household appliance on its side;
- test the drain pump with a multimeter.
If a malfunction is detected, the old pump is dismantled, a new one is installed, and the washing machine is assembled in the reverse order.
Instructions for replacing the pump in an LG washing machine yourself are in this article.
The drum does not spin
Failure of the Hall sensor (responsible for the motor rotation speed) is the reason why the drum does not spin in a direct drive washing machine.
You can troubleshoot the problem as follows:
The washing machine is disconnected from the electrical network, the drain and inlet hoses are dismantled.- Remove the back panel
- Unscrew the central bolt holding the engine cover.
- Unscrew the bolts located under the cover and dismantle the stator.
- Unscrew the fasteners and terminals, remove the Hall sensor, and install a new one with similar parameters.
A malfunction of the Hall sensor will be indicated not only by the drum stopping, but also by an unpleasant cracking sound that appears when starting the washing machine.
Noise and grinding noise during the washing process
Bearing failure is a common problem with direct drive washing machines. The thing is that the motor, fixed to the washing machine tank, puts additional load on the bearing assembly, which is why it will quickly collapse.
Signs of malfunction: strong rumble and squeak accompanying the washing and spinning process (with increasing drum rotation speed, the sounds intensify).
It’s easy to diagnose bearing wear: just spin the empty drum by hand. Creaking and shearing is a signal that the bearings require replacement.
In order to carry out the replacement, you need to disassemble the washing machine, dismantle the tank, open it into two parts, pull out the oil seal and carefully knock out the bearings. New bearings (exactly corresponding to the parameters of the dismantled elements) are placed in the cleaned seat, after which the washing machine is reassembled.
A guide to replacing the bearing in an LG washing machine with your own hands - this article will tell you why the washing machine makes a lot of noise when spinning.
Leaking
Failure to seal the rubber seal around the hatch (cuff), drain or inlet hose, or pipes leads to puddles beginning to collect around the washing machine during the washing process.
The exact location of leaks can only be determined by visual inspection. Having established which element is leaking, all that remains to be done is to replace the worn one with a new one that is suitable in terms of parameters and technical characteristics.
Why is the LG washing machine leaking, read here, why is it leaking from the tray - here, why is water flowing from below - here.
Doesn't wring out
There are several reasons for this problem : from a banal error in choosing a washing mode to a more serious one - failure of the pressure switch.
If the washer does not spin out water after washing, first of all you need to make sure whether the spin mode is provided in the selected program. If yes, then you need to check the pressure switch.
It is this sensor that monitors the water level in the tank. A faulty pressure switch provides incorrect data about how full the tank is with water, causing the control module to block the spin process.
It is easy to check (and, if necessary, replace) the pressure switch . It is enough to dismantle the top panel, under which the pressure switch is attached in the upper left corner. The sensor is tested with a multimeter and, if necessary, replaced with a new one of similar technical characteristics. Why the LG automatic washing machine does not spin clothes, what to do, read here.
Problems with hatch locking
A situation where the washing machine does not block the hatch door (thus preventing the washing process from starting) can be triggered by a malfunction of the UBL (hatch locking device).
Replacing the UBL is not difficult : just unscrew the screws securing the lock (located on the right side of the loading hatch), remove the UBL (to confirm the malfunction, the lock is tested with a multimeter), unhook the contacts, install and connect a new UBL.
Strong vibration
Very strong vibration of the washing machine during washing, rinsing or spinning clothes is not in itself a malfunction. But ignoring the problem can lead to very serious negative consequences for the functioning of all elements of the household appliance.
Vibration can be caused by:
- Transport bolts (fix the tank while the washing machine is being transported, must be removed).
- Errors in drum loading (dirty laundry collected in a lump, overloaded). Due to excessive load, the drum, shock absorbers and other adjacent elements quickly fail.
The washing machine must be installed only on a hard, perfectly flat surface. A minimal misalignment in any direction can cause vibration and, as a result, frequent breakdowns of a household appliance.
What to do if there is strong vibration in the LG washing machine during the spin cycle, read here, why it jumps during the spin cycle - here.
To prevent damage to the internal parts of the machine...
Page 6
- Image
- Text
installation
U
5
1
. To prevent damage
When transporting internal parts of the machine, 4 transport bolts are secured in the machine. Before operating the machine, these bolts must be removed along with the rubber plugs.
•
If the bolts are not removed, they may cause vibration, excessive noise, and machine malfunction.
3
. Remove the 4 bolts along with the rubber plugs by turning the plugs slightly. Save these 4 bolts and wrench as they may come in handy in the future.
•
Whenever transporting the machine, the transport bolts must be tightened.
To protect against damage during transportation, the machine is equipped with shipping bolts.
2
. Unscrew the 4 bolts using
wrench included with the machine.
4
.Close the holes with the supplied
lids.
Do not store the machine in locations with temperatures below freezing or in areas subject to adverse weather conditions. The washing machine must be grounded in accordance with the requirements of your local energy authority. If the machine is installed on a carpeted floor, the carpet should not block the gap between the base of the machine and the floor.
Removing Shipping Bolts
Transport bolts
Lid
09n_d.pdf, Installation, Electrical connection
Warning, Attention
- Image
- Text
Installation
9
This washing machine has a protection class against electric shock – I*.
*Class I equipment is equipment that has basic insulation and elements for
connecting exposed conductive parts to the protective conductor of an electrical installation.
Electrical connection
This washing machine uses single-phase voltage 220–240V, 50 Hz.
Make sure your wiring can handle the maximum load (2.2 kW)
taking into account the operation of other electrical appliances.
Connect the washing machine only to a grounded outlet.
The power cord of this washing machine has a grounding conductor and a grounding plug.
Make sure the electrical network has a ground wire. In the absence of grounding
it is necessary to invite a qualified specialist who will carry out the necessary work
in accordance with local codes and requirements.
The washing machine should be connected to a separate outlet, that is, this outlet must supply
electricity to only one product and have no additional outputs or branch lines
sockets Do not use a tee or extension cord.
If there is no suitable outlet, call an electrician.
After washing, always turn off the washing machine and remove the plug from the socket.
If the device is delivered in winter at temperatures below 0ºC, before using the machine
keep it at room temperature for several hours.
Install the machine so that the plug is easily accessible.
• •
• •
•
• • •
•
SAFE USE OF THE POWER CORD
Overloaded, faulty or damaged wall outlets, extension cords,
frayed electrical cords, damaged or cracked cord insulation may be
dangerous. These problems may cause electric shock or fire. Periodically
Check the cord of the product and, if you notice damage, unplug it. Contact
LG Authorized Service Center or invite a certified technician to
replacing the power cord. Avoid physical or mechanical damage
electrical cord, such as: twisting, tying, bending the cord, pinching it
door or excessive tension. Pay special attention to plugs, wall
sockets and the place where the cord connects to the product.
WARNING
•
•
Incorrect connection of the grounding conductor may result in damage
electricity. Do not change the plug on the power cord. If it does not fit the electrical
outlet, have a qualified electrician replace the outlet.
Repairs to the washing machine must be carried out by qualified personnel.
Repairs made by untrained personnel may cause damage or
serious malfunctions in the operation of the machine. Contact your local service center.
WARNING
•
The device is not intended for unsupervised use by children or the elderly
people. Do not allow children to play with the device.
WARNING
The manufacturer is released from any liability for damage to persons or property in
in case of failure to comply with the above precautions.
ATTENTION
•
•
installation U Horizontal alignment…
Page 10
- Image
- Text
9
installation
U
Horizontal alignment
1.
To prevent vibration and
To prevent excessive noise, the washing machine must be placed in a strictly horizontal position. The washing machine should be installed on a hard, level floor, preferably in the corner of the room.
2.
If the floor is uneven, ensure
horizontal position of the washing machine using an adjustable foot. (Do not place pieces of wood, etc. under the feet to level them.) Make sure that all four feet are firmly on the floor, and then check the level of the washing machine (using a spirit level).
3.
❊ Checking Diagonals
When pressing on the corners of the top wall of the washing machine, the machine should not tilt or move up or down (please check both directions). If you can tilt the machine by pressing the corners of the top panel, adjust the feet again.
Adjustable
leg
Higher
Below
Comments
Select → I found the instructions for my washing machine here! #manualza
- Click →
Addition to the instructions for the export version of the TT pistol: - Not intended for playing Russian roulette.
Manualza!manualza.ru
Still not with us?
Drain not working in LG car
Causes:
- Incorrect mode selection.
- There is a blockage in the drain system (filter, pipe, pump).
How to fix problems with a Lji washing machine with your own hands? You need to check the drain pump. For this:
- Open the hatch and remove the clamp by bending the cuff to the side.
- Disconnect the door lock connectors and close the door.
- Remove water using a drain filter.
- After unscrewing the mounting bolts, remove the filter housing.
- Lift the top panel by removing the screws.
- Remove the dispenser tray.
- Unscrew the bolts behind the tray at the front and back.
- Remove the control panel by unfastening the latches.
- Remove the front panel screws. Take it away.
- Loosen the clamps of the circulation and drain hoses. Remove the hoses.
- Disconnect the pump hose clamps by loosening them.
- Remove the pump assembly bolts.
- Unclench the clamps and remove the pump.
- After unscrewing the screws, pull the pump out of the volute.
- Look for threads on the impeller that could interfere with operation.
- If there is a malfunction, install a new part.