Specifications
The technical characteristics of the model reflect its combined features, including requirements and security mechanisms, methods of working with self-diagnostic tools and a full range of available operations. The factory description usually has a standard information structure, which includes certain sections that reveal the advantages of a particular model, as well as the specifics of working with it.
Specification, Electrical connection
Page 5
- Image
- Text
5
specification
WITH
SAFE USE OF THE POWER CORD
WARNING
Electrical connection
Most products are recommended to be connected to a separate outlet, that is, this outlet must
supply electricity to only one product and have no additional outputs or
branch sockets. Do not overload outlets. Overloaded, faulty or damaged
wall outlets, extension cords, frayed electrical cords, damaged or
Cracked cord insulation can be dangerous. These problems may cause
electric shock or fire. Check the product cord periodically and, if you notice any damage,
turn it off. After stopping the operation of the product, replace it with a similar Authorized cord.
called manufacturer. Avoid physical or mechanical damage to the power cord, such as
such as: twisting, tying, bending the cord, getting caught in a door, or excessive
pulling. Pay special attention to plugs, wall outlets, and where the cord connects to
product.
Do not plug the machine into an extension cord or tee. If the power cord is damaged, contact an Authorized Service Provider to replace it.
LG service center or invite a certified technician. After washing, always turn off the washing machine and remove the plug from the socket. Connect the washing machine only to a grounded outlet. Install the machine so that the plug is easily accessible. Repairs to the washing machine must be carried out by qualified personnel.
Repairs made by untrained personnel may result in damage or serious
problems with the machine. Contact your local service center. Do not install the machine in areas where the temperature may drop below 0°C.
Frozen hoses can burst under pressure. Reliability of electronic control circuits
may be damaged when temperatures drop below 0°C. If the device was delivered in winter and the temperature is below 0°C, before use
When calling the machine, keep it at room temperature for several hours.
1. 2.
3. 4. 5.
•
•
•
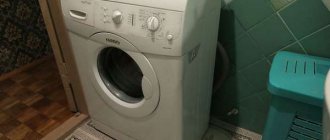
Washing machine LG F1222NDR5 reviews
Advantages:
- the car has LG DIRECT DRIVE;
- Beautiful design;
- compact dimensions;
- roomy;
- works quite quietly;
- washes well;
- many functions;
- convenient control and selection of programs;
- squeezes out very well;
- has a child lock function, the buttons are locked;
- The water level is automatically adjusted.
Flaws:
- strong vibrations;
- water accumulates in the rubber band;
- It fills and drains water noisily.
LG F1222NDR5 washing machine reviews are based on 8 user reviews in Yandex Market.
LG F 1222ndr English Version Manual
Home > LG > Washing Machine > LG F 1222ndr Russian Version Manual
Add to Favorites
Download as PDF Print this page Share this page
Share this page
Page link
Page HTML code
Share page
Share
_
Have a look at the manual LG F 1222ndr Russian Version Manual online for free. It's possible to download the document as PDF or print. UserManuals.tech offer 1069 LG manuals and user's guides for free. Share the user manual or guide on Facebook, Twitter or Google+.
1 2 3 4 5 6 7 8 9 10 11 12 13 14 15 16 17 18 19 20 21 22 23 24 25 26 27 28 29 30 31 32
View all the pages
Add page 1 to Favorites
image text
Enable zoom
Washing Machine Operating Manual Thank you for purchasing an LG automatic washing machine. Please read this user manual carefully as it contains instructions for the safe installation, operation and maintenance of your washing machine. Save it for future use. Write down the model and serial number of your washing machine. F1212SDR(5)F1012SDR(5)F1212NDR(5)F1012NDR(5)F1212TDR(5)F1012TDR(5) F1218SDR(5)F1018SDR(5)F1218NDR(5)F1018NDR(5)F1218TDR(5)F1018TDR(5) F121 9SDR( 5)F1019SDR(5)F1219NDR(5)F1019NDR(5)F1219TDR(5)F1019TDR(5) F1211SDR(5)F1011SDR(5)F1211NDR(5)F1011NDR(5)F1211TDR(5)F1011TDR(5) F1220SDR(5) F1020SDR(5)F1220NDR(5)F1020NDR(5)F1220TDR(5)F1020TDR(5) F1221SDR(5)F1021SDR(5)F1221NDR(5)F1021NDR(5)F1221TDR(5)F1021TDR(5) F1222SDR(5)F102 2SDR( 5)F1222NDR(5)F1022NDR(5)F1222TDR(5)F1022TDR(5) F1223SDR(5)F1023SDR(5)F1223NDR(5)F1023NDR(5)F1223TDR(5)F1023TDR(5)
Add page 2 to Favorites
image text
Enable zoom
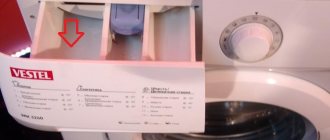
KEY FEATURES About 2 Contents The child lock function is designed to lock all buttons to prevent children from accidentally changing the wash program. The Smart Wash system automatically determines the optimal water level and wash time depending on the amount of clothes loaded and the incoming water temperature to minimize water and energy consumption. At the end of the wash, while the drum rotates, the laundry moves only up and down, so it practically does not wrinkle. The system automatically redistributes the laundry in the machine and sets the drum speed to reduce noise levels. Noise-reducing speed control system Child lock Economical smart wash system Anti-wrinkle system Direct drive system The AC motor rotates the drum directly without the use of a belt or pulley. Drum cleaning mode This mode uses a large amount of water and also sets a high rotation speed to clean the drum of the washing machine. Warnings…………………………………………………………………………………. Specification…………………………………………………………………………. Installation…………………………………………………………………………………. Functions………………………………………………………………………………… Using the washing machine……………………………………………………… … F1211(12)S/N/TDR(5) / F1011(12)S/N/TDR(5)………………………… F1218(19)S/N/TDR(5) / F1018 (19)S/N/TDR(5)………………………… F1220S/N/TDR(5) / F1020S/N/TDR(5)…………………………… …… F1221S/N/TDR(5) / F1021S/N/TDR(5)…………………………………… F1222S/N/TDR(5) / F1022S/N/TDR(5) ……………………………………………………… F1223S/N/TDR(5) / F1023S/N/TDR(5)…………………………………………………… Before washing……… …………………………………………………………………………………. Loading powder………………………………………………………………………………………. Maintenance………………………………………………………………………………… Troubleshooting…………………………………………………………………… …………. Warranty conditions……………………………………………………………………………………… 3 4 6 11 14 15 16 17 18 19 20 22 23 24 27 30
Add page 3 to Favorites
image text
Enable zoom
3 Warnings IMPORTANT SAFETY INFORMATION PLEASE READ THE ENTIRE INSTRUCTIONS BEFORE USING THE MACHINE WARNING: Observe the following precautions to reduce the risk of fire, electrical hazard, or personal injury: Do not apply excessive pressure to the machine door when it is open. This may cause it to tip over. Do not use an adapter or otherwise attempt to connect the plug to an ungrounded outlet. If there is no suitable outlet, call an electrician. SAVE THIS MANUAL GROUNDING INSTRUCTIONS Do not install or store the washing machine in areas exposed to adverse weather conditions. Do not damage the controls. Do not repair or replace parts of your washing machine yourself unless the process is described in the service manual or published do-it-yourself repair instructions that you fully understand and are skilled enough to perform. Make sure that there are no flammable objects under or around the machine, for example: paper, fluff, rags, chemicals, etc. If there are children near the machine, supervise them closely. Do not allow children to play on, in, or around the car. Do not leave the washing machine door open. If you leave the door open, children may try to hang on to it or climb inside the car. When washed at a high temperature (cotton 95°C), the glass becomes hot. Don't touch it! Never touch the inside of the machine during operation. Wait until the drum stops completely. Do not touch the drained water, it may be hot. Never insert/remove the plug with wet hands. Washing may reduce the fire resistance of clothing. Never wash or machine dry clothing that has previously been cleaned with flammable or explosive substances, or that has otherwise been exposed to substances such as wax, oil, paint, gasoline, degreasers, drying agents, kerosene, etc. This may result in a fire or explosion. Always follow the clothing manufacturer's recommendations when washing and drying. Do not slam the door too hard or try to force it open if the door lock system is activated (the door lock light is on). This may damage the washing machine. To avoid electrical hazards, before performing any repairs or maintenance on your washing machine, unplug the power cord from the electrical outlet, remove the fuse, or turn off the circuit breaker. Never operate the machine if it is damaged, defective, partially disassembled, or if any parts are missing or broken, including if the power cord or plug is damaged. The washing machine must be grounded. Grounding reduces the risk of electrical shock when a machine malfunctions or breaks down by ensuring that electricity is carried away through a conductor with less resistance. The power cord of this washing machine has a grounding conductor and a grounding plug. This plug must be connected to an electrical outlet that is installed and grounded in accordance with local codes and requirements. WARNING: Improper connection of the grounding conductor may result in electrical shock. If you are in any doubt about the proper grounding, contact a qualified electrician. Do not change the plug on the power cord. If it does not fit into the electrical outlet, have a qualified electrician replace the outlet. For your own safety, follow all instructions in this manual to reduce the risk of fire, explosion, electrical shock, property damage, personal injury, or death.
Add page 4 to Favorites
image text
Enable zoom
44 specificationC FRONT LOADING WASHING MACHINE 220 – 240 V ~, 50 Hz 48 l55 l 0.3 – 10 kgf/cm² (30-1000 kPa) Name Power supply Capacity Dimensions (W)x(D)x(H) Weight/Max .power Water consumption Spin speed Allowable water pressure 600mmx360mmx850mm600mmx440mmx850mm600mmx550mmx850mm 56 kg / 2000 W59 kg / 2000 W64 kg / 2100 W 6 kg (NDR)(5) 56 l 8 kg (TDR)(5) Drain pump filter D top on bottom panel Drain fitting If the power cord is damaged, contact an authorized center or invite a certified specialist to replace it. Plug Control panel Drum Drawer Door Bottom panel Adjustable foot Drain hose (For detergent and fabric softener) 4 kg (SDR)(5) No spin / No drain / 400 / 600 / 800 / 900 / 1000 / 1200 Inlet hose (1 pcs.) Wrench The appearance and characteristics of the machine are subject to change without notice in order to improve the quality of the machine. Spin speed may vary depending on model. Accessories
Add page 5 to Favorites
image text
Enable zoom
5 Specification C POWER CORD SAFE USE WARNING Electrical Connections Most products are recommended to be connected to a separate outlet, that is, the outlet should only supply electricity to one product and should not have additional outlets or branch outlets. Do not overload outlets. Overloaded, malfunctioning, or damaged wall outlets, extension cords, frayed electrical cords, or damaged or cracked cord insulation can be dangerous. These problems may cause electric shock or fire. Check the product cord periodically and, if you notice any damage, unplug it. After stopping the operation of the product, replace it with a similar cord from an Authorized manufacturer. Avoid physical or mechanical damage to the power cord, such as kinking, knotting, bending the cord, getting caught in a door, or over-pulling the cord. Pay special attention to plugs, wall outlets, and where the cord connects to the product. Do not plug the machine into an extension cord or tee. If the power cord is damaged, contact an LG Authorized Service Center or invite a certified technician to replace it. After washing, always turn off the washing machine and remove the plug from the socket. Connect the washing machine only to a grounded outlet. Install the machine so that the plug is easily accessible. Repairs to the washing machine must be carried out by qualified personnel. Repairs performed by untrained personnel may result in breakdown or serious malfunction of the machine. Contact your local service center. Do not install the machine in areas where the temperature may drop below 0°C. Frozen hoses can burst under pressure. The reliability of electronic control circuits may be compromised when temperatures drop below 0°C. If the device was delivered in winter and the temperature is below 0°C, keep the machine at room temperature for several hours before using it. 1. 2. 3. 4. 5. • • •
Add page 6 to Favorites
image text
Enable zoom
6 Installation Remove all packaging and check the product for external damage. If in doubt, do not use the washing machine and contact your dealer or supplier immediately. ATTENTION: before installing and starting to use the washing machine, carefully study our recommendations. Only correct installation will ensure reliable operation and safe operation of your device. when installing on carpet, etc. air must circulate freely between the bottom of the washing machine and the floor. When installing on tiles, place rubber pads under the legs. When installing on a wooden floor, we recommend placing rubber pads at least 15 mm thick under each leg, securing them with screws to at least two floorboards. If possible, choose a corner of the room where the floor is most secure. Make sure there is free space on the sides (20 mm each) and on the back of the washing machine (100 mm). The machine must not touch walls or furniture. Make sure that the installation location has a level, secure floor: Do not compensate for uneven floors by placing stands made of wood, cardboard or similar materials under the machine. If it is impossible to avoid installing the machine next to a gas or coal stove, an insulating partition (85 x 60 cm) should be laid between them with the side with aluminum foil facing the stove. Do not install the machine in areas where the temperature may drop below 0°C. The installation site must be clean and dry. Install the machine so that the technician can easily access the machine in case of repairs. In countries where premises may be infested with cockroaches and other vermin, take special care to keep the machine clean at all times. Any damage caused by cockroaches or other vermin is not eligible for warranty repair. Before unpacking the washing machine, you need to determine the installation location. ► ► – – – ► ► ► ► ► ► Rubber pads (item 4620ER3001B) can be purchased from LG Service Center.* Placement Unpacking
Add page 7 to Favorites
image text
Enable zoom
7 Installation Unpacking Removing the Shipping Bolts Failure to remove the shipping bolts may result in excessive vibration, excessive noise, and machine failure. WARNING: Packaging materials (e.g. plastic film, polystyrene foam) may be hazardous to children - they may pose a choking hazard! Keep packaging materials out of the reach of children. Plug When removing the packaging, be sure to remove the packaging insert in the center of the bottom of the machine. Washing machine Packaging base Packaging insert We recommend that you save all transport elements so that they can be used again if the machine is transported again. Using the wrench included with the washing machine, unscrew the 4 shipping bolts, then remove them along with the rubber plugs. Seal the holes with the supplied plugs. The transport bolts must be removed before using the washing machine. ►
Add page 8 to Favorites
image text
Enable zoom
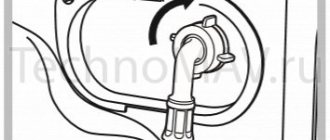
8 installation Connection to the water supply ► ► ► ► ► ► Make sure that the water pressure in the water supply network is within acceptable limits: The hydraulic pressure value must be between 1 and 10 bar (this means that from a fully open water tap in one minute At least 8 liters of water should flow out). To connect the washing machine to the water supply, use only the new hoses included in the delivery. Old hose sets cannot be reused. If the pressure is higher than specified, then a pressure reducer should be built into the pipeline. Connect one end of the water supply hose to the machine, turning it in the direction you need. In order to unfold the hose, simply loosen the coupling, adjust the hose and tighten the coupling again, making sure that there is no water leakage. Before connecting the machine to a new pipeline or to pipes that have not been used for a long time, drain sufficient water to remove any accumulated contaminants in the pipes. Check the tightness of the hose connections by opening the water supply valve all the way. Make sure the hose is not kinked or pinched. Connect the other end of the water supply hose to the water tap. To prevent leakage, two rubber gaskets are included with the water supply hose. Rubber gasket Hose coupling • • The water supply hose cannot be extended. If it is too short and you do not want to move the faucet, you should buy a new, longer hose specifically designed for this purpose.
Add page 9 to Favorites
image text
Enable zoom
9 Installation Leveling To prevent vibration and excessive noise, the washing machine must be placed in a strictly horizontal position. Make sure all four feet are firmly on the floor, then use a spirit level to check that the washing machine is level. Level the machine using the adjustable feet. If the machine is installed on a platform, it should be securely secured to prevent it from falling. Carefully level the washing machine by screwing in or out the adjustable feet. Never use cardboard, pieces of wood or similar materials to compensate for uneven floors. Secure the adjusted feet by tightening the locking nut counterclockwise. Make sure the machine is stable. When pressing on the corners of the top cover of the washing machine, the product should not tilt or swing up and down. If you can tilt the machine by pressing the corners of the top cover, adjust the feet again. With proper placement and alignment, your washing machine will operate for a long time, reliably and without failure! Fixing nut Adjustable foot Level ► ► ► ► ► ►
Add page 10 to Favorites
image text
Enable zoom
Hose clamp Bath Fastening belt min. 60 cmmax. 100 cmmin. 60 cmmax. 100 cm max. 100 cmmin. 60 cm length 105 cm length 145 cm length 100 cm max. 100 cmmin. 60 cm length 105 cm length 145 cm length 100 cm 10 Installation Connecting the drain hose • Do not install the drain hose at a height of more than 100 cm from the floor. • If the drain hose is longer than necessary, do not push the excess hose into the washing machine. This may result in increased noise levels. • Secure the drain hose tightly with a chain. • Securing the drain hose securely will prevent leaking water from damaging the floor. WARNING This product is not intended for use in marine or mobile applications such as mobile homes, aircraft, etc. Close the shut-off valve if you do not intend to use the machine for a while (for example, during the holidays), especially if there is no open water drain (gutter) nearby in the floor. When disposing of the device, cut the power cords and destroy the plug. Break the door lock to prevent children from accidentally locking themselves inside.
All LG manuals Comments (0)
Related Manuals for LG F 1222ndr English Version Manual
- LG F 1048td Dutch Version Manual
72 pages | LG Washing Machine - LG F 1022td Russian Version Manual
32 pages | LG Washing Machine - LG F 1022sdr Russian Version Manual
32 pages | LG Washing Machine - LG F 1021ndr Russian Version Manual
32 pages | LG Washing Machine - LG F 1020tdr Russian Version Manual
32 pages | LG Washing Machine - LG F 1020td Russian Version Manual
32 pages | LG Washing Machine - LG F 1020nd Russian Version Manual
32 pages | LG Washing Machine - LG F 1012ndr Russian Version Manual
32 pages | LG Washing Machine - LG E 8069sd Russian Version Manual
24 pages | LG Washing Machine - LG E 8069ld Russian Version Manual
24 pages | LG Washing Machine - LG E 1069sd Russian Version Manual
24 pages | LG Washing Machine
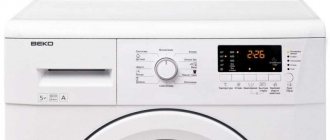
Specification
“Specification” is the first section, which may differ for each LG automatic washing machine. Using pictures and text, this section of the manual provides information about the design features of the device, the scope of delivery, and assembly methods before use.
Keep in mind that one manual may be issued by a manufacturer for several models, so the “Specifications” section may contain several characteristics at once, located in separate columns. For example, the F1222NDR5 is more powerful than its predecessor, supports larger loads (6kg vs. 4kg) and uses more wash water. In the factory description you can find out the exact overall dimensions. The depth of the device in the range of 550-600 mm immediately classifies the modification as a narrow model.