Atlant washing machines are loved by users for their good technical characteristics, modern design and affordable price range. Unfortunately, in many respects they cannot compete with their foreign counterparts, especially when it comes to durability.
It is often easier to entrust the repair of the washing machine to a good technician, but in some cases you can repair Atlant washing machines yourself.
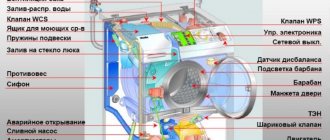
In this article you will learn about typical breakdowns, fault codes, and also how to disassemble an Atlant washing machine and carry out independent repairs.
Classification of typical breakdowns of Atlant machines
The user is notified of the occurrence of a particular malfunction by characteristic symptoms that can be noticed at one of the stages of the machine’s operation - during washing, drawing water, rinsing or spinning. Workshops often receive complaints about the following breakdowns of Atlant brand automatic washing machines:
- The Atlant washing machine does not turn on. This may be caused by a damaged socket or wiring. A non-functioning start button is another indicator of a failure. A failure of the electronic controller is also possible.
- The laundry is not wrung out. Taking very wet laundry out of the drum, you can judge that the motor has failed or the contacts on it have oxidized. A breakdown can be caused, as in the case above, by a broken board. If the spin does not start at all, then the laundry in the drum could be tangled into one lump, which caused an imbalance (try to load the drum with things of the same size, since a pile of things of different sizes are perfectly intertwined with each other, causing an imbalance in the drum).
- Water sits in the tank and does not drain. You need to look for the cause in the drain pump (pump) or drain hose, which could become clogged over the years of service.
- The machine rumbles during the spin cycle, vibrates and moves. This “inappropriate behavior” requires replacing the bearings.
- In all modes, washing is done in cold water. If the water does not heat up, this is most often caused by a burnt-out heating element, or less often by a failure of the temperature sensor or controller.
- The machine is leaking. It all depends on WHERE it is leaking: at the bottom of the car, from the hatch or in the powder cassette. Depending on the location, replacement of parts is required: waste water drain hose, pipes, seals or cuffs.
Most breakdowns are caused by elementary reasons:
- Foreign objects in the drum (filter, drain hose, pump).
- Excess of powder, rinse aid and other detergents.
- The water is too hard.
- Premature wear of parts.
- Violation of the operating rules specified in the instructions for the Atlant and others washing machine.
General information
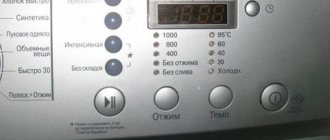
Indicator meanings for SoftControl and OptimaControl models
| No., p/p | Meaning | SoftControl | OptimaControl |
| 1 | 1 | Spin | Water stop |
| 2 | 2 | Water stop | Rinsing |
| 3 | 4 | Rinsing | Wash |
| 4 | 8 | Wash | Prewash |
How to recognize a breakdown: Atlant error codes
If error codes (Sel, None, F2, F3, F4, F5, F6, F7, F8, F9, F10, F12, F13, F14 or F15) are displayed on the control panel screen, then the machine is signaling you about a breakdown. We briefly reveal the reasons for these failures in the table:
| Code | Decoding |
| Sel | The interface module selector is broken. This item needs to be replaced. |
| None | Increased foaming. This can be caused by three reasons:
In this case, you need to reduce the amount of powder, change the product or wash in other modes. |
| F2 | Thermal sensor failure. The sensor itself could “fly”, or the contacts or wires could fail. May indicate a breakdown of the heating element. |
| F3 | Malfunction of the thermoelectric heater (heater). The heating element needs to be replaced. |
| F4 | Damage to the drain pump (drain pump). There are many reasons for this breakdown: clogged or incorrectly installed waste water drain hose, clogged coupling, pump failure, malfunction of the electronics. Repair depends on the diagnostic results. The drain pump may need to be replaced. |
| F5 | The fill valve is the cause of the breakdown. There could be a blockage or a broken hose. The error also occurs when the pressure in the water supply system is low or the control module is damaged. Self-repair or in a workshop - it depends on the nature of the identified breakdown. |
| F6 | Electric motor failure. The motor must be replaced with a new one. |
| F7 | Electrical breakdowns. In some cases, it is enough to replace the interference filter, test whether there is voltage in the power supply, or replace the electronic board. |
| F8 | Too much water in the tank. Culprits: water level sensor (pressure switch), fill valve, wiring that could have burned out or contacts that have oxidized due to high humidity. Depressurization of the cylinder or malfunction of the controller are also quite possible reasons. |
| F9 | Tachometer failure. If you started repairs at home, you will have to check the wiring and contacts with a tester, and maybe replace the engine. A controller failure can also mean error F9, but replacing the module yourself is a difficult task. |
| F10 | Locking failure, which is also associated with board failure. |
| F12 | Motor triath failure. Requires engine or controller replacement. |
| F13 | It means a whole range of breakdowns. First you need to check the contacts and wiring, and if the cause is determined to be a module failure, you should call a specialist. |
| F14 | Software glitch. It is recommended to restart the program. In severe cases, the board needs to be repaired or replaced. |
| F15 | The machine is leaking. This is caused by a violation of the drum seal, wear of the cuff, drain hose, pipes or coupling. It is easier to determine the malfunction by localizing the location of the leak. |
| door | The lock is broken. Maybe you didn't lock the hatch properly. An error also occurs if wires come loose or the board burns out. |
Important! Self-diagnosis of SM Atlant is possible not only in models with an electronic display. In electromechanical models, an error is indicated by indicators flashing in a certain sequence or combination.
What should you check first?
The search for any problem must begin according to the principle “from simple to complex.” First of all, the following systems and communications are checked:
Availability of electricity in the house . It is enough to press any switch to understand whether there is light in the room.- Checking the shield . You need to open it and make sure that the machines are located correctly. Sometimes when the device is put into operation, the circuit is overloaded and the power goes into emergency mode.
- Inspect the outlet . If the plastic is melted, has dark spots on it, or has a burning smell, you should not use this power source. If there are no visible defects, any device powered by electricity is connected to the outlet to which the machine is connected. If contact is normal, the search for the cause of the problem continues.
- Checking the integrity of the plug and cord . They must not be damaged, pinched or broken. This problem is especially relevant for people who keep animals in the house.
- Pay attention to the device display . Sometimes an error code is displayed on it, indicating exactly where the breakdown occurred and which components need repair.
All of the above reasons need to be checked independently. To identify them, you do not need the help of a specialist or special tools.
Atlant machine breakdowns: we repair them ourselves
Are Atlant washing machine malfunctions and their elimination your main problem today? Let's look at common failures one by one.
SMA Atlant does not start
If you were unable to turn on the washing machine, then start by checking the outlet, using any other working electrical appliance.
If the socket is working, then proceed to check the surge protector and controller. The entire electrical component of the machine is hidden under the top cover - removing it is easy: just unscrew 2 bolts.
Having found the electrician, check the wiring and terminals - you will notice oxidized or burnt-out components with the naked eye. Having carefully examined everything, arm yourself with a tester and test the network filter and cable. If the cable is faulty, replace it. Often stores offer the cable already complete with a surge protector - if you need to replace both parts, you will save a lot.
If you understand that the problem is not in the electrics, but in the electronics, which is also confirmed by the non-working start button of the washing machine, be prepared for the fact that repairing it yourself in this case is almost impossible. You need a good knowledge of not only the electrical circuit of the Atlant washing machine, but also electronics. It is better to trust a specialist - repairs can be much cheaper than eliminating the consequences after tampering with electronics yourself.
Heating element: self-check and replacement
The Atlant washing machine needs to be partially disassembled. To find the heating element, check it and replace it, follow this scenario:
- Remove the back panel.
- Find the heating element (usually it is located under the drum). First you need the water heater terminals.
- Remove all wires. Remove the terminals from the temperature sensor, if in your case it is built into the heating element itself. In certain models of washing machines, the temperature sensor is not built into the heating element and is installed near it.
- Taking the necessary tool, gradually unscrew the bolt in the center of the shank. Turn the nut just a couple of turns to the left. After that, try to direct it inside the body.
Important! In SMA Atlant it is not always easy to remove the heating element due to damage to the rubber seal. Be patient and proceed carefully.
- Take a slotted screwdriver (minus) and hook the heater by the base. Slowly loosen the part and remove it, pulling it towards you.
- The new heating element is installed in the same way as the old one is removed. Before performing this operation, clear the installation area of debris.
This video shows how to replace a heater using an Indesit machine as an example:
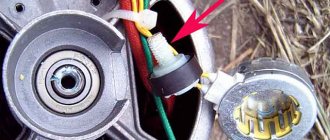
Temperature and level sensors in the Atlant machine: checking and replacement
A breakdown of the water level sensor (pressostat) most often occurs during the intake and drainage of water from the machine. The sensor must inform the controller about the level of water collected so that it stops the collection process and the tank is not overfilled. In the same way, the sensor informs the module that the water has not been drained, so the machine cannot spin the laundry. If the sensor fails, then no signals are sent - you need to check and change the sensor.
Speaking about the failure of the temperature sensor, the trouble is that if it breaks down, the washing machine heats the water too much or, on the contrary, does not heat it at all. You can determine if the sensor is working properly as follows:
- Remove the back panel and remove the sensor (from the heater or tank, depending on where it is located in your SMA Atlant model).
- Arm yourself with a tester and check the resistance. After this, immerse the sensor in water and warm it up slightly for a couple of minutes. After heating the temperature sensor, measure the resistance again. If the measurements differ significantly, then everything works as it should (and then the breakdown should be looked for in the heater or controller). If the data is the same, then the sensor needs to be replaced.
Important! When removing the sensor, mark the terminals. While you buy a new one, you can forget where and what it was.
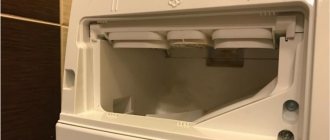
How to fix breakdowns in the drainage and water intake system yourself
If the washing machine has stopped draining waste water, then the first thing that needs to be inspected is the water drain hose, then the filter and drain pump . If small debris gets into the filter, which accumulates there over time, the machine cannot push water through. As a result, this can all end not only in the fact that the water does not drain, but also in the complete stop of the machine’s operation.
That is why it is recommended to check the pockets of clothes before washing.
Cleaning the drain filter should be tightly included in your household chores schedule - this will help protect the CM from breakdowns, blockages and unnecessary expenses for repairs. And cleaning the hose takes no more than two hours. The pump (drain pump) in all Atlant machines is located at the bottom of the body; to get it, you just need to lay the machine on its side and get to the pump from the bottom.
The filter, hose and pump must not only be cleaned of debris and dirt, but also rinsed under running water.
If you need to replace a drain hickey, this video will help you do it correctly:
The water intake system is the weak point in the Atlant machine
Speaking of too much water in the drum, the fill valve may be to blame. It is located on the rear panel - it is easy to find because the water intake hose is attached to it on the body.
Before checking the valve, turn off the power to the machine and disconnect it from the water supply, then remove the top panel of the housing. Then you need to remove all the wires and check the valve resistance level with a tester - the indicator should be in the region of 2-4 Ohms. If the values are different, the valve needs to be replaced according to the following scheme:
- Remove the hoses from the valve by loosening the clamps (memorize, photograph or sketch their location).
- Remove the bolts holding the valve. If the valve is held in place by the latches, release them.
- Turn the valve and pull it towards you to remove it.
- Take a new part, install and reassemble everything in reverse order. Remember, the valve cannot be repaired, so don't waste your time.
This useful video clearly shows how to replace the fill valve yourself:
Checking and replacing the interference filter
Atlant washing machines are equipped with a capacitor that protects equipment from power surges in the network. The noise filter copes only with small differences. Having felt a strong impulse, the capacitor will burn out, and in the worst case, the control module of the machine will also fail.
How to check the interference filter of an Atlant washing machine?
- Turn off the power to the machine.
- Unscrew the bolts securing the “top” of the washer and remove the cover.
- Find the capacitor, it is located on top.
- Inspect the power filter for swelling or carbon deposits.
- Remove the back panel of the case.
- Disconnect the wiring leading to the capacitor.
- Remove the surge protector from the machine.
- Place the multimeter probes on the element contacts.
- Measure the capacitor voltage at the input and output.
If there is no voltage at the output, the noise filter is no longer functioning. The device cannot be repaired; the capacitor will have to be replaced. If this is not the case, it is necessary to diagnose the control board.
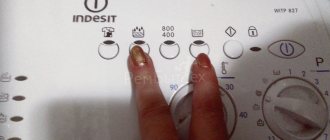
DIY repair
If the Atlant washing machine gives a Sel error, try rebooting the system. What does it mean?
Disconnect the Atlant SMA from the network for 15-20 minutes. If a system failure occurs, the error will be reset after a reboot. If you were unable to remove the Sel error from the screen, read on to find out what to do.
To know how to fix the situation, you need to find the cause of the breakdown. To do this you need to check:
- Wiring, contacts and connectors that run from the electronic module to the panel and buttons. To do this, you need to remove the top cover, carefully inspect the wiring harness, and tighten the connections. If there are damaged elements, they need to be replaced.
- Control board. The reason for the failure of the buttons and selector may be a faulty element on the board, so the module must be thoroughly diagnosed.
When you are convinced that the cause of the malfunction and the Sel CM Atlant error is in the control panel or selector, replace the broken element:
- Disconnect the Atlant machine from the network.
- Remove the detergent dispenser by pressing the lock in the middle.
- After unscrewing the screws, remove the top panel.
- Unscrew the bolts that are located behind the dispenser tray.
- Remove the front panel, take pictures of the connectors that are attached to it.
- Disconnect the wires.
- Release the latches and remove the control module from the panel.
- Remove the program selector knob by pressing its base.
- Install the new selector in reverse order.
At the same time, you can check and replace stuck buttons. This video will help you:
Each element is tested with a multimeter for the presence of resistance. In the event of a malfunction, the components of the board can be soldered.
Problems with the control unit in the Atlant washing machine can be resolved yourself if you understand electronics. Otherwise, you need to contact the service center. If replacing or repairing a module is justified, this approach will be cheaper than buying a new machine.
Now you know how to find a solution to the problem if Sel is displayed on the display.
Atlant washing machine repair: bearing replacement
A characteristic sign that the fault lies in the bearing is a crackling, humming or knocking noise made when the drum rotates. Its backlash should also alert you.
The process of replacing a bearing is quite labor-intensive, but this kind of work can be done on your own. To get to it, you need to remove the drum, which is easier to do through the top. The whole procedure looks like this:
- The screws on the back side that secure the cover are unscrewed, after which you just need to pull it back a little and lift it.
- The counterweight and transverse rod are removed.
- The springs that secure the drum are removed.
- The power unit is removed from the bottom side.
- The hoses are disconnected from the drum.
- Now, to make the process easier, you can remove the front panel, including the pump.
- The rubber casing is removed, which connects the machine body to the drum.
- The counterweight is removed, after which the drum can be removed out.
- The drum body is of a collapsible type and is secured with bolts; after unscrewing them, you need to remove the pulley.
- The working metal container itself is removed from the housing, and the bearings are removed.
At this point, the repair of the Atlant washing machine with your own hands is completed; in the future, all that remains is to carry out the assembly process in the reverse order and then check it.
If you are not confident in your abilities, it is better to entrust such work to professionals.
Recommendations for using the washing machine
To increase the service life of the machine, it is enough to follow several important rules:
- Do not overload the washing machine drum beyond the norm established by the manufacturer. The fact is that few people read the instructions included with the product in full. They describe how much and what kind of laundry can be washed at a time. And there is no need to strain the machine with full permissible loads; three quarters of the nominal weight will have a beneficial effect not only on the technical condition of your assistant, but will improve the quality of washing things. There is no need to be afraid of excessive consumption of electricity; for a long wash at 60 degrees, the device consumes from 0.5 to 1 kW of electricity;
- Use high-quality water and detergents when washing. This will improve washing results and limit the formation of scale deposits on the inside of the washing machine. If necessary, you need to install additional filters to soften the water. It is also necessary to carry out preventive measures against scale and other unwanted deposits at certain intervals. The formation of these deposits spoils machine parts and imbues washable items with unpleasant odors. The approximate level of contamination of the machine can be seen under the hatch cuff at the point where it connects to the device tank. To do this, you just need to open the hatch and lift the edge of the elastic band;
- After using the device, unplug it from the outlet and turn off the water supply tap to it. It is also necessary to correctly connect the washing machine when installing it for the first time. An important step is connecting the device to the sewer; it should not provoke spontaneous outflow of water during washing and its entry from the sewer system.