A washing machine, like any other household appliance, likes to break down at the most inopportune moment.
But don’t panic right away: if your unit is manufactured under the Veko brand, you can easily fix some problems yourself.
And our article will help you, in which we will discuss repairing the Veko automatic washing machine with our own hands.
Causes of breakdowns of Beko washing machines
To better understand which malfunctions the Beko washing machine is most susceptible to, you should take a closer look at the failure statistics collected by service center employees. According to their observations, the following breakdowns most often occur in these units:
- Accumulation of dirt in the drain line or failure of the drain pump - 30% of cases.
- Failures in the operation of the electronic module - 20% of failures. The statistics are spoiled by inexpensive machines of this brand, which have an Invensys board installed. The low-quality material from which it is made is brittle and can crack, causing the tracks to break. Most often, the semistors that control heating elements, filler valves, and electric motors suffer.
- The temperature sensor or heating element fails in 15% of cases.
- Leaks - in 10% of cases.
- Wear of the electric motor brushes or rupture of the drive belt – 10%.
- The appearance of extraneous noise during operation – 10%.
This phenomenon is most often caused by a foreign object getting inside, a broken shock absorber or a damaged bearing.
Not every breakdown of a washing machine can be fixed on your own, but cleaning the filter or replacing the heating element yourself is quite possible. Whirlpool washing machine: do-it-yourself repair of the main malfunctions of the machine.
We will consider repairing the mechanical components of Zanussi washing machines here.
Do you own an Indesit washing machine? Then the following article will be useful for you: https://aquacomm.ru/cancliz/mnogokvartirnyie-doma/santehnika/stiralnaya-mashina-indezit-neispravnosti-remont-svoimi-rukami.html. Algorithm for troubleshooting the unit and ways to eliminate them.
Cleaning the drain
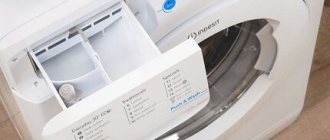
In the SMA, dirty fluid is passed through a drain filter, which prevents hair, threads and dirt particles from entering the pump. The user's task is to clean the filter. But first you have to find him. As a rule, it is located at the bottom of the device. Before removing the filter, place a basin nearby or place a rag so that water gushing out of the hole does not spread across the floor.
In some Beko models, the filter is supplemented with an emergency hose for convenient drainage of liquid. How to clean a drain:
- Turn the filter clockwise and remove it.
- Clean the removed element from dirt and then wash it under running water.
- Use a screwdriver to clean out the pipe—it can also accumulate debris.
DIY washing machine repair
In many cases, the user can revive the washing machine on his own, even without special skills. Let's consider several situations:
Problems with draining water
It is clear to everyone that waste water is not crystal clear - this is the specificity of the operation of a washing machine.
To prevent dirt from accumulating in the pump, a drain filter is installed in its path - this is what gets clogged most often.
This problem is dealt with as follows:
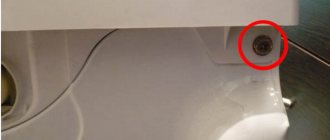
- First you need to find the drain filter, which is always located at the bottom of the machine behind a decorative hatch or panel.
- Now you need to place a sufficiently capacious container under the machine into which we will drain the waste water.
- Some models of Veko brand washing machines have an emergency water discharge hose next to the drain filter. If there is one, you should use it - it’s more convenient to drain water than through the filter hole.
- The filter should be removed by unscrewing counterclockwise, thoroughly cleaned and rinsed under running water.
- Using a screwdriver, you can also clean the pipe into which the filter was installed - usually it is also heavily clogged with dirt and silty deposits.
Since you had to take up the tools, at the same time, for the purpose of preventive maintenance, you can clean the filter on the water supply, which can be easily found at the place where the inlet hose is attached to the body of the machine. Particles of sand and rust that accumulate in it over time can interfere with the collection of water.
After cleaning the drain filter, do not rush to put it back in place, first you need to check the functionality of the drain pump. In fact, the Veko washing machine, thanks to the built-in self-diagnosis function, in many cases can itself detect a pump malfunction, displaying the error code “H5” on the display.
But there are breakdowns that the machine “does not see,” for example, jamming of a loose impeller (the appearance of strong play can be guessed by the characteristic hum).
To check the pump, you need to run the machine in drain mode, observing the impeller through the hole in the filter plug. It should rotate. If this does not happen, the pump must be cleaned or replaced.
The machine is unable to heat water
A very vulnerable element in a washing machine is the heating element, since due to the high temperature, the calcium and magnesium salts present in the water actively crystallize on it in the form of a solid coating.
This plaque (scale) retains heat like a fur coat, so the heating element overheats and burns out.
In the absence of scale, it can also burn out - from the exhaustion of its resource, just as a regular incandescent lamp burns out. The machine can signal problems with the heater with codes “H2” (heater is broken) and “H3” (heater is constantly on).
To accurately determine the condition of the heating element, you first need to get to it. In some models of Veko machines, this requires removing the back panel, in others, the front panel.
To remove the front panel, you have to remove the sealing collar of the loading hatch. It must be removed extremely carefully - the slightest damage will lead to leaks.
The heating element is detected by two contacts at the bottom of the tank with wires connected to them. Disconnect the wires and use a multimeter to measure the resistance between the heater contacts. Normally at room temperature it should be 25 - 35 Ohms.
Other readings (usually “infinity”) indicate a malfunction: the heating element must be removed by unscrewing the nut holding it (between the contacts) and replaced with a new one, thoroughly cleaning the mounting hole from the inside from scale.
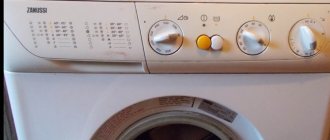
It happens that, contrary to expectations, the heating element turns out to be working properly. Then you need to check the functionality of the temperature sensor, which is located under the top cover (to remove it, after unscrewing the screws, you need to move it back a little). At room temperature, its resistance should be approximately 4.7 kOhm, and after heating with hot water it should decrease significantly.
If the thermostat is faulty, it needs to be replaced. To dismantle, you need to pull out and disconnect the powder dispenser hopper, then remove the control panel, having first disconnected the thermostat and control unit handles from it.
Symptoms of malfunctions of washing devices of this brand
People experienced in this area can even determine at first glance which of the components or elements will soon “die” and require urgent repairs.
It might seem that if there are certain problems with the machine, then you should immediately call a specialist to your home, and he will deal with the reasons for the breakdown and discomfort in working with the device. All this is easy, quick and without unnecessary hassle, so in most cases this course of action by the owner of a broken washing machine is quite appropriate and justified.
But nothing happens without a fly in the ointment: calling a specialist to your home costs a lot of money, which sometimes is simply not in stock or in large quantities.
It often happens that repairing a BEKO washing machine is more expensive than a brand new machine of the same model. It’s a shame to pay so much money to fix an old car, especially if you can’t yet afford to buy a new car.
The only sure and not so expensive way out is to fix the breakdown yourself. But for a quality repair, you must first make a correct “diagnosis”, i.e. find the true cause of the breakdown, and only then begin to “treat” something.
The following “symptoms” of malfunctioning VEKO machines will help you find a solution to the problem.
The water is not heated, and washing is done in cold water, or, on the contrary, washing takes place in very hot water, which does not correspond to the temperature at which it should have been heated.- It takes a very long time for water to fill the washing tank, or the water supply is completely blocked and does not work.
- The hatch cannot be closed all the way, which is why washing simply cannot start.
- At the end of the wash, the water simply does not drain, and this process may be accompanied by a fairly strong hum.
- When rotating, the drum of a VEKO washing device produces a loud grinding, clanging and other extraneous sounds.
It is not possible to start any washing program, because after turning on the machine immediately starts blinking all the indicator lights. It also happens that the program is installed, but simply does not start.- The machine does not respond when the button is turned on, although the plug is plugged into the socket and there are no problems with the power supply.
- VEKO machines with a display display an error code and simply “refuse” to work.
We advise you to pay attention! There can be many more symptoms of malfunctions, but the most common cases of breakdowns are described above.
Features of Beko washing machine repair
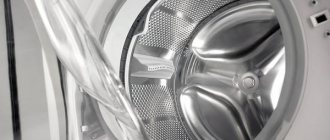
The design advantages of units of this brand become especially noticeable when it is necessary to replace a worn bearing.
Firstly, the machine is much easier to disassemble than many others, and secondly, it is most often not necessary to completely remove the tank.
Only the front part of the tank is removed, after which it becomes possible to pull the drum out of the rear part, which remains in the car.
The exception is when one of the bearings is completely destroyed and its parts have to be removed from the glass.
To access the front of the tank, you must first remove the front panel of the machine and unscrew the lower counterweight. Now you need to disconnect all the tubes and wires connected to it from the tank.
Before disconnecting the tank from the wires and tubes, take a photo of it with a camera with sufficient resolution, especially the wires. By looking at the photo, you can avoid errors during assembly.
The front of the tank is secured with 12 clips that must be removed. After this, it can be disconnected and pulled out. All that remains is to unscrew the back wall of the housing, remove the pulley from the drum axle shaft and pull out the drum itself. The bearings on the axle shaft are pressed, so it has to be knocked out with careful blows of a rubberized hammer.
It is prohibited to reuse the screw that held the pulley on the drum shaft.
You will learn what malfunctions of Samsung washing machines can be fixed without the help of a specialist in the following article: repairing a Samsung washing machine yourself and instructions for disassembling the unit.
You will find recommendations from professionals for repairing Ardo washing machines at this link.
Checking the temperature sensor
If after checking it turns out that the heater is working, proceed to check the thermistor. This sensor is located under the top panel. Take it out and check it:
- Remove the screws to remove the top panel.
- Remove the powder container and dismantle the control panel - these elements prevent you from getting to the temperature sensor. When the sensor is accessible, disconnect the wires from it.
- Measure the resistance using a tester. Under normal conditions - 4.7 kOhm.
- Warm up the sensor - lower it into warm water, the resistance should decrease. If the resistance remains unchanged, the sensor is broken and will have to be replaced.
- The thermistor is mounted in the same way as it is dismantled - the steps are performed in reverse order.
When to do repairs yourself?
Experts advise users to carry out on their own only the simplest repair work that does not require special knowledge, namely:
- Replacement of damaged parts or components.
- Removing blockages.
It is better to entrust all other cases to professionals, so as not to damage the washer even more. Typical cases that you can handle yourself:
- cleaning the drain filter;
- pump replacement;
- checking and replacing the intake valve;
- replacing the heating element.
Different models of SMA Veko have not only similar structures and characteristics, but also the same problems. In a Beko machine for 5 kg, the faults will be the same as in a device designed for 3 kg. Timely familiarization with the instructions and compliance with operating rules will help prevent problems.
Usually the user is not interested in the circuit diagram of an automatic washing machine. But if you suddenly plan to repair equipment, then you have to figure it out. You can carry out independent diagnostics or replace parts only by understanding how the SMA components work and where they are located.
Almost all front-loading washing machines are designed the same, with the exception of the location of some parts.
Electrical repair
Only users with electrical repair skills can cope with this task. If there is a break or oxidation of contacts somewhere, they will quickly fix the problem. All you need for Beko electrical repair work is a circuit diagram. Where can I get it? It is enough to know the exact name of the model to find it on the manufacturer’s website.
It is much more difficult with electronics - to repair or replace the control board, you need special knowledge and skills. The cost of the electronic module is high - reaching a third of the price of the entire SMA. Therefore, it is not recommended to touch it - it is better to trust a specialist. If the repair is minor, then repairing the module will not cost much. But independent experiments can lead to complete failure of the module - you will have to purchase a replacement for it, and a simple problem will transform into expensive repair work.