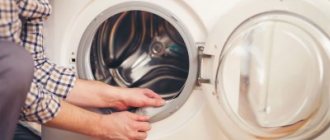
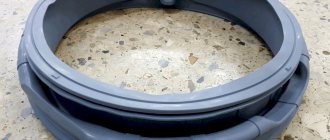
As a result of prolonged use of the Bosch washing machine, the use of aggressive household chemicals, and careless handling of the household appliance, the rubber seal around the hatch door (cuff) begins to deform and loses strength and elasticity.
As a result, water begins to leak through the damaged cuff. The problem cannot be ignored. Penetration of moisture inside the washing machine can result in a short circuit, which entails lengthy, expensive repairs of household appliances.
We will talk about replacing the cuff of a Bosch washing machine further.
Preparation
Provided proper preparation, replacing the rubber seal of the hatch door with your own hands will not be difficult.
The first thing you need to do is assemble the tool:
- keys,
- screwdrivers (two flat, one Phillips),
- marker.
It’s also worth taking care of a new cuff for your Bosch washing machine in advance.
After the necessary tools are collected:
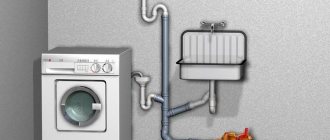
- the washing machine is disconnected from the sewer and water supply,
- unplug the power cord from the socket,
- Place the household appliance on a flat, stable surface, away from walls and furniture.
Removing the hatch cuff
It would seem that it would be easier now to remove the cuff from the drum, because we have removed everything that could interfere with us. Not so. On some Bosch washing machines, the front counterweights pinch the edges of the cuff so tightly that it is impossible to pull out the edges of the elastic from under them. If you have such a situation, you need to unscrew the counterweights, and only then remove the cuff.
Most often, the rubber gasket can be released without removing the counterweight. We pry up the second spring clamp, which is located at the base of the cuff, with a screwdriver, and remove the cuff along with the clamp. The old damaged cuff can be thrown away, but the clamps must be left, we reuse them.
How to change?
Replacing the rubber seal on the hatch door of a Bosch washing machine consists of three main stages: dismantling the old cuff, installing a new seal, and reassembling the washing machine.
How to remove?
To quickly get to the desired element - a worn cuff, you need to carry out a series of sequential actions:
- Using a Phillips screwdriver, unscrew the fasteners holding the top panel of the washing machine.
- Gently pushing forward, remove the cover from the washer body.
- Remove the detergent dispenser. To do this, you need to press a special latch inside the tray, after which the powder receptacle is very easily pulled out of the grooves.
- In the opened niche of the detergent dispenser, unscrew the fasteners holding the control panel. Carefully, trying not to damage the wiring contacts, remove the panel from the washing machine body.
- Using a flathead screwdriver, press out the latches holding the decorative panel located at the bottom of the washing machine.
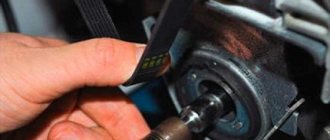
- Open the hatch door of the washing machine. Feeling the edge of the rubber seal with your fingers, find the retaining clamp (thin metal ring).
- Using a flat-head screwdriver, carefully pry the clamp off the cuff.
- Place the rubber seal into the washing machine drum.
- Unscrew the fasteners holding the hatch lock device (located on the right side of the loading hatch), disconnect the UBL wiring.
- Unscrew the fasteners around the perimeter of the front panel and remove it from the washing machine body.
- Using a flat screwdriver, carefully pry off the second clamp (metal ring) together with the rubber seal.
On the cuff, in the upper part, the manufacturer provides a special mark, which must coincide with the mark on the tank.
If there are no additional marks, before dismantling the old cuff, the point of contact of the tank with the rubber seal must be marked with a marker. This will help avoid mistakes when installing a new cuff.
Installation of a new part
Installing a new rubber hatch door seal yourself will not be difficult , provided you follow a clear sequence of actions:
carefully inspect the new part, turn the rubber with the drain holes down;- lubricate the grooves of the cuff and the seat with a soap solution (sliding simplifies the process of tightening the rubber seal);
- placing the cuff in a special recess located along the edge, evenly stretch the rubber seal to the right and left sides, pulling it onto the seat;
- secure the new cuff with a metal clamp.
It is necessary to ensure that the drain holes are located clearly in the center, otherwise problems with draining water may occur.
Reassembly
The process of reassembling a Bosch washing machine occurs in the following order:
- The UBL contacts are connected.
- The front panel is attached to its original place.
- The hatch locking device is secured with fasteners.
- The rubber cuff is fixed with a metal clamp.
- The lower decorative panel returns to its original place.
- The control panel is attached, the lid is mounted, and the detergent dispenser is inserted.
The reassembly process is completed, the washing machine is connected to the communications, after which a test wash is started.
How to change cuffs - in the video:
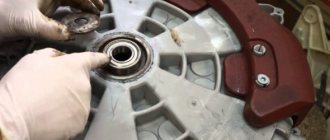
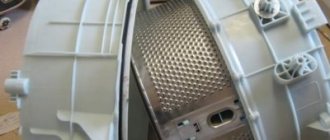
Bearing removal
They are located in the part of the tank that connects to the shaft.
Expert opinion
I work in the household appliance repair industry. Extensive experience in restoring washing machines and dishwashers.
Ask a Question
If no anti-scale additives were used during operation of the machine, then there will be quite a lot of dirt inside.
Dirt inside the tank
It must be cleaned using special products.
Then we treat the oil seal with WD-40 lubricant and pull it out using a screwdriver. Then we apply it to the bearings and wait at least 10 minutes.
Expert opinion
I work in the household appliance repair industry. Extensive experience in restoring washing machines and dishwashers.
Ask a Question
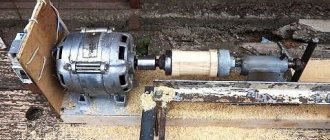
I would like to note that there are special pullers, but they are quite expensive - 5,000 rubles. Therefore, we use a metal drift with a wide and narrow end.
We start with the outer bearing. Raise the tank. You can use counterweights for the lining. Then we place the wide end as wide as possible against the bearing and strike with a hammer. Move the drift around in a circle.
Dismantled bearings and seal
In the same way we knock out the inner one. To do this, you can assemble a tank.
Price of a new part for a Bosch washing machine
Wear and mechanical damage to the rubber seal of the hatch door is a minor problem, which can be easily eliminated by replacing the worn element with a new cuff.
In order to choose the right version of the rubber seal, when going to the store to buy, it’s a good idea to take the old part with you. As a last resort, the information necessary to select a new part can be photographed on a plate attached to the back panel of the washing machine.
In a situation where the purchase of a new seal is made in an online store, before placing an order, the manager must inform the model, serial number and year of manufacture of the Bosch washing machine.
Before purchasing, it’s a good idea to check the seller’s reviews and ratings! Depending on the model of the washing machine, prices for cuffs vary from 1200 rubles. up to 6500 rub.
Replacing the seal in a bosch washing machine
The wear of the washing machine hatch cuff directly depends on how actively you use the equipment and how often you wash it. Each time during operation, the rubber gets wet and rubs against the glass of the hatch, which leads to its damage. It is very difficult to replace this part without special knowledge, so we have prepared detailed instructions for you on this topic.
First of all, you should consider wear options in which the gasket actually needs to be replaced.
- The hatch started leaking
- Creaking during rotation
- Visible damage, rubber torn or badly worn
Search for an original cuff specifically for your equipment model; another may differ in size by only a millimeter, but this is already critical for the operation of the device.
Call the master
When there is no time or desire to carry out routine repairs of the washing machine, service center specialists come to the rescue .
They will quickly diagnose the problem that has arisen and replace the worn cuff efficiently and with a guarantee.
Finding the necessary contacts is not difficult. As an option, you can use word of mouth (based on reviews from friends and neighbors, find the right specialist). The second way is to find out the contacts of the service center using search engines on the Internet.
The cost of replacing the cuff in a Bosch washing machine starts from 2,500 rubles. The cost of the service includes:
- diagnostics,
- dismantling a worn part,
- installation of a new cuff,
- Reassembly of the washing machine.
A new rubber seal is paid separately.
Unfortunately, no one is immune from fraudulent actions of unscrupulous craftsmen. One well-known rule will help you save money: “Payment is made only upon completion of the repair!”
Main signs when it is necessary to change brushes
The exact answer that it’s time to change the brushes is given by machine diagnostics. But calling a specialist for an inspection is not convenient for everyone. Based on repair experience, RemBytTech service engineers have prepared a list of signs that may indicate the need to replace electric brushes.
- Problems with drum rotation. The drum barely turns, and the machine cannot gain speed during the spin cycle. Or the washing machine does not rotate the drum at all, immediately draining the water after filling. Or, it happens that the drum spins a little at the beginning of the wash, after which the machine stops washing and gives an error.
- Unstable engine operation. When the machine is fully loaded while washing or spinning, it loses speed.
- Noise and sparking brushes. It is noticeable by the smell of metal or burning insulation; also in the dark you can see a glow at the bottom of the washer, like from sparklers.
The described symptoms may result in the program interrupting and displaying an error code. The code is displayed on the display (if there is one) or the indicators flash. Most often, brush wear is indicated by a motor, tachometer or spin error.
How to avoid problems in the future?
maintain the elasticity and integrity of the rubber seal of the hatch door :
- at the end of washing, the cuff must be wiped dry with a soft cloth, the hatch door is always left ajar (moisture promotes the development of mold and mildew, which destroy the rubber seal);
- When loading the washing machine, it is important to always follow the amount of washing powder indicated by the manufacturer on the packaging (excessive use of aggressive chemicals destroys rubber);
- When filling the drum, you should carefully monitor the amount of dirty laundry (constant overload destroys the bearing unit of the drum, which leads to rapid wear and deformation of the rubber cuff);
- Before washing, the pockets on the clothes are carefully inspected (even a very small but sharp object can cause the rubber seal to rupture).
High temperatures very quickly render the rubber seal of the hatch door unusable (cracks and tears appear). A gentle washing mode at a temperature of 40°C-50°C will protect not only the clothes from rapid wear, but also the rubber cuff from damage.
What can replace lubricant with?
Sometimes it is not possible to find a special lubricant for oil seals. In this case, craftsmen replace it with similar oil-based products, for example, grease or lithol. Experts warn against using these products, as they contribute to rapid wear of the seals. Such lubricants are used in the automotive industry, but they cause more harm than good to household appliances. Therefore, it is better to spend time and money purchasing specialized products that have a lasting effect and are completely safe for washing machines.
Lubricant for washing machine oil seals increases the service life of bearings Very often, the need to replace or lubricate the oil seal arises due to frequent washing at high temperatures. If greasy oil stains appear on freshly washed laundry, you need to think about lubricating the part for further operation of the unit. It is possible that you will need to install a new oil seal or bearing in the washing machine.
The oil seal is a small part in a washing machine that plays a very important role. It protects the moving parts of the washing machine from water that spins in the drum during washing. Thanks to the seal, water cannot enter the electronic parts from the tank. The oil seal is put on a special bushing and fits tightly to the outer part of the drum.
Oil seals are a sealing material, which is also called a rubber shaped seal.
Typically, the seal is made of durable rubber to perform the sealing function, and it also connects the fixed and moving parts of the automatic washing machine.
The oil seal, also known as the cuff, can be made of different rubber - silicone rubber, fluorine rubber or nitrile-butadiene material. This part is constantly subject to friction and very often its wear causes malfunction of the washing machine.
To extend the service life of the oil seal, you need to constantly lubricate it so that it does not dry out. When the rubber seal dries out, water can enter the bearing and cause serious damage.
It is quite difficult to understand that the oil seal is being rubbed. A washing machine sound specialist can determine this malfunction. It is better to replace the oil seal at a service center, but you can install it at the client’s home - in this case you will have to disassemble half of the unit.
The process of lubricating the bearings and oil seal of a washing machine pump is not difficult in itself. The difficulty is how to get to them. In order to replace or lubricate these parts, you need to see them.
The grease on the oil seal must not be washed away with water during operation.
Most often, before they fail, bearings begin to knock. In any case, a change in the sound of a running machine indicates that it would not hurt to check it, lubricate it, clean it, etc.
First you need to determine whether the oil seal and bearings need lubrication or whether they should be replaced. If bearings are replaced with original parts from the manufacturer's factory, for example, Indesit, this option is the most acceptable. But if the bearings are fake or not of very good quality, then it is better to lubricate them additionally, even if they are new. Cheap quality lubricant leads to rapid wear, so it is better not to skimp on it.
So, you've reached the right part. Lubricating the oil seal is as easy as shelling pears - you need to apply an even, thick layer of lubricant to the inner ring, where the oil seal comes into contact with the shaft. After lubrication, carefully put the oil seal back in place.
Please note that there is no need to push the lubricant anywhere else!
Before installing the bearing, it should be cleaned. To lubricate the bearing, you need to remove the protective cover from it with a scalpel or knife and fill the entire space with lubricant. If the bearing is non-separable, it is more difficult to lubricate it, but nevertheless possible. The goal is to create pressure and force the lubricant into narrow crevices.
After lubricating the bearing and oil seal, your task is to correctly reassemble the entire machine in reverse order.