Are you planning a kitchen renovation? Broken equipment needs repair? Then you need to know how to remove and remove a built-in dishwasher from furniture. When it comes to dismantling the dishwasher, many are confused: where to start, how to find hidden fasteners, what needs to be disconnected first. You will learn about this in our publication.
Preparation for subsequent disassembly
The principle of assembly and disassembly for built-in and free-standing dishwashers is the same. The only difference is that the built-in ones do not have a removable top cover and metal walls. By the way, free-standing models of dishwashers can be considered partially built-in. With the top cover removed, they fit perfectly under the tabletop, but at the same time they retain their own (and not furniture) façade.
Before starting to disassemble the dishwasher, be sure to disconnect it from the power supply. Then we turn off the water supply. Now you can work without expecting surprises.
A small addition - machines from different manufacturers may have different configurations of fasteners. For example, at Bosch and Siemens all fastening screws are made in the form of an asterisk of a certain size.
It is necessary to prepare the appropriate tool in advance. Screwdrivers, pliers and a set of keys will also come in handy.
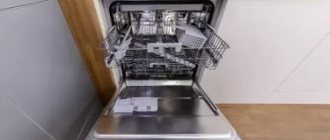
We remove everything that may interfere with disassembly. Disconnect the water fill and drain hoses. Open the door and take out the removable baskets for dishes and attachments. It’s clear that there shouldn’t be any dishes there. If you find any remaining water, remove it with a rag or sponge. During disassembly, water will still come out. Therefore, there is no need to remove funds to collect it far.
Now you need to move the machine to a place where there is enough space to disassemble and place the parts to be removed. Try to prepare boxes or bags for storing small parts and screws.
Otherwise, subsequent assembly may be delayed. It is advisable to have a camera or phone with a camera nearby. During the process of disassembling and disconnecting tubes or wires, it is better to capture how everything happened. Then the reverse assembly process will not be surprising.
Dishwasher installation. It is important to know!
Hello, dear reader! I’ll tell you about the nuances of installing a dishwasher under the countertop. There is a lot of information on the Internet about connecting the machine to communications, but the topic of integration into the kitchen set is not covered. Although the topic deserves a separate article.
Thank God, there is enough experience in installing a dishwasher in the kitchen to eliminate unnecessary movements and thoughts on your part. You will know exactly what to do. The result is a perfectly executed installation.
- Standard dishwasher dimensions
- Dimensions of the niche in the cabinet for the dishwasher
- Dishwasher Mount
- Correct placement of the dishwasher in the kitchen
- How to install a front on a dishwasher
- What to do with the plinth under the dishwasher
- Video on the topic
- Conclusion
Installation procedure for the built-in model
The dishwasher installation algorithm is described in the instructions provided by the manufacturer. Usually it consists of several stages, the first of which is preparatory.
In advance you need to purchase some parts for connecting to the pipes, take care of the socket arrangement, prepare a tool - a screwdriver, a screwdriver, a hammer, as well as flax or fume tape for plumbing connections, sealant, double tape.
Step 1 – checking the PMM equipment
In addition to the dishwasher, the kit usually contains templates for installing decorative trims, fastening tools, a protective rubber apron, gaskets, and hoses.
Disassembling the dishwasher
It would be nice to understand how this technique washes dishes.
Operating principle and device:
When the washing program is activated, the aquastop valve opens.
The stream of water begins to rotate the flow sensor, which registers the volume of incoming water.
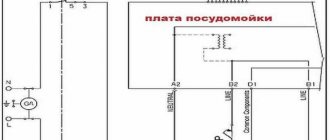
Consists of a housing, a fan impeller with a permanent magnet and a printed circuit board with a reed switch. Water sets the fan impeller in motion. A magnet attached to the fan impeller drives the reed switch 2 times to the (North/South/North) position. The generated pulses are counted by the electronics of the control module.
Water entering the machine through a special tube squeezes out air in the pressure valve (pressure gauge).
Two microphones - one aquastop, the second water level sensor. Water is collected, the second sensor is triggered, the water continues to accumulate, the red float 3 raises, it turns on microphone 1.
The pump circulates the water in a circle, and the heater warms it up. A compartment with a tablet opens. The dishes are washed. The temperature sensor checks the water temperature - in accordance with the selected program.
1 – water softening system. 2 – foam float of the aquastop system 3 – drain (sewer) pump 4 – circulation pump 5 – “brains”, also known as the control board in the casing 6 – water supply valve to the machine.
Protection device (emergency sensor):
At the end of washing, the drain valve opens and the water is drained using the drain pump. A new one is poured, warmed up and washed. Merges - similar to the first stage.
In the event of a leak, the machine is designed so that water always flows into the pan. There is a leakage sensor there - a foam float with contacts. If it floats up, the machine goes into emergency mode. Opens the drain valve and turns on the drain pump.
This is a hardware program - we stand and hum until it dries up. It may hum for two days, or until the pump dies from overheating.
Disassembling the dishwasher:
The article describes an approximate lg diagram for informational purposes. The principle of operation is similar in Indesit Bosch Electrolux and Ariston. Be careful not to get water on the electronic components.
Before you start:
1.Unplug the cord from the electrical outlet to avoid electric shock. 2.Close the water tap. 3.Remove all dishes. 4.Remove the bottom shelf and top shelf. 5.Disconnect the fill hose and drain hose. 6.You will need a rag to collect any remaining water.
1.To remove the bottom cover, it is usually enough to unscrew two screws.
2. Front panel - unscrew several screws from the back of the door.
3.4.Control panel assembly:
– Remove the screws. – Remove the connecting wires. – Remember or take a photo of the order in which the connectors are connected so that you do not mix up the connectors during assembly. – Remove the lock assembly, display – Unscrew the 8 screws securing the control module.
5.Ventilation and drying system assembly
- Open the door. – Unscrew the door from the bracket. – Disconnect the connectors and wires. – Remove the air duct. – Turn the inner cover counterclockwise. – Remove the detergent dispenser.
6. Door springs (right and left)
– Pull the spring up and remove it from the bracket loop. Be careful not to injure yourself on the sharp edges of the tank! – Remove the spring from the loop. – Lift the door and remove it from its hinges.
7.8. Turn over and remove the bottom housing cover.
9.10. Unscrew the screws and remove the base and water intake valve.
11,12.Remove the tray holder and push the tray down, pressing the hooks to the side. Be careful not to drop the tray assembly. – Loosen the nut of the heating element and pull it out of the pan. – Unscrew the fixing screws and remove the drain pump.
Disassembling a BOSCH dishwasher:
Basic Troubleshooting
Rating of Top 6 reliable budget dishwashers
Weissgauff DW 4012
capacity – 9 sets;
drying and washing class – A;
noise level – 49 dB;
water consumption – 9 l;
dimensions – 44.8x60x84.5 cm.
Gorenje GS62010W
capacity – 12 sets;
drying and washing class – A;
noise level – 49 dB;
water consumption – 11 l;
dimensions – 60x58x85 cm.
Weissgauff TDW 4017 DS
capacity – 6 sets;
drying and washing class – A;
noise level – 49 dB;
water consumption – 8 l;
dimensions – 55x50x43.8 cm.
Midea MCFD-55200W
capacity – 6 sets;
drying and washing class – A;
noise level – 49 dB;
water consumption – 6.5 l;
dimensions – 55x50x44 cm.
Indesit DSFE 1B10 A
capacity – 6 sets;
drying and washing class – A;
noise level – 51 dB;
water consumption – 11.5 l;
dimensions – 45x59x85 cm.
Recommendations
In the future, the dishwasher should be used taking into account all the rules in the instructions. They are not complicated, but critical for its long-lasting and uninterrupted operation. In general terms they can be described as follows:
- Before each new wash, add detergent and rinse aid in limited quantities as needed.
- Check the saline level.
- The order in which dishes are placed in baskets should not be neglected.
- Avoid overloading the wash compartment as this will reduce the wash quality.
- It is necessary to regularly check the serviceability of the sprayer and nozzles, and the cleanliness of the filters.
- The choice of operating modes must correspond to the degree of contamination of the devices.
Possible embedding options
A cabinet for embedding a PMM may look different. We suggest considering several popular options that are convenient for installation.
Each type of installation is associated with difficulties
To minimize them, it is important to comply with the above conditions and requirements specified by the manufacturer in the instructions. We offer several recommendations for installing a dishwasher in different places
Solution #1 – built into a closet
If there is a cupboard with a width of more than 45 cm next to the sink, then it can be used to install a dishwasher. The advantage of installation close to communications is the ability to integrate machine hoses into an already installed system under the sink.
You will have to remove the shelves and back wall from the cabinet, and, if necessary, the bottom panel. The built-in housing must be brought into a strictly vertical position; for this, adjustable legs are used.
Then you need to connect the machine one by one to the communications: sewerage, water supply and power supply. If necessary, an additional water seal with a drain pipe should be installed.
The decorative front panel, which is attached to the machine door, is usually assembled from removed cabinet doors or ordered additionally. Partially built-in models do not need to be decorated, so their installation is a little easier.
Solution #2 – installation in a separate module
If there are no free cabinets for new equipment, but there is enough space in the kitchen, you can order a separate module, but you need to install it near the communication nodes.
It is important to level and secure the unit so that it does not vibrate during operation or move the cabinet. Hoses and pipes are laid along the wall, but they are easier to access
To get to the communications, you don’t have to dismantle the car, but simply move the cabinet away from the wall.
If the dishwasher is installed under a common kitchen countertop, it must be removed for maintenance, since otherwise the hose connections cannot be reached.
Solution #3 – installation in a niche
If the kitchen has a niche for installing a microwave, oven or other small equipment, it can also be used to install a dishwasher. Dimensions of the compact model along with drawings can be found in the installation instructions.
Built-in compact models should not be confused with free-standing models. The latter do not have to be placed in a niche - any horizontal surface is suitable for their installation. So that the dishwasher is not conspicuous and is hidden like the rest of the equipment, the front part is covered with a decorative overlay in the style of a facade.
It’s easier to find a place for a compact model, but don’t forget that a mini-machine is not able to serve a large family.
Solution #4 – if embedding is not suitable
What to do if there is absolutely no space in the kitchen to install a built-in model? It remains to consider free-standing options, the design of which does not require special installation.
They can simply be installed on the floor, countertop or niche, leveled, and then connected.
There are still ways to fulfill your own dream of installing a built-in dishwasher - installing a facade on a free-standing model, completely renovating the kitchen unit, with possible repairs or relocation of communications. It is more expensive and requires not only financial investments, but also time.
Additional work
If necessary, holes are drilled in the cabinet walls for drain and water supply hoses and a power cord.
Installation of the “facade”
To match the design, interior and color of the kitchen, the front side of the doors of all built-in dishwashers is covered with a pre-ordered panel of the required size. To attach it to the car door, the delivery kit includes special fasteners and a template.
Making a custom front panel is not that difficult, but the interior of the room will look neat
The necessary drawings are drawn on a large sheet of paper and the points for attaching parts to the decorative panel are marked, the sheet is applied to it and, using a sharp awl, the points are transferred to the panel, after which the fasteners and door handle are screwed into the marked places with self-tapping screws. Then the panel is fixed to the car doors and screwed to it with self-tapping screws through the holes around the perimeter of the doors.
Tabletop protection
Before installing a dishwasher under the countertop, you need to pay attention to the following. All dishwashers have a not very good design feature - when the doors are opened, steam and moisture from the machine rise up and fall on the lower surface of the countertop, spoiling it.
Some manufacturers create protection against steam and moisture
If the kit does not provide special protection for the tabletop, you should take care of this yourself. You can use special tape, plastic, metal, etc. for protection.
In Bosch models, a special metal plate is attached under the tabletop before installing the machine; in Electrolux, a film made of a special material is glued.
Adjusting the required height
The final installation consists of adjusting the machine to the tabletop using the front and rear legs and leveling it. Then the necessary gaskets are inserted between the side walls of the cabinet and the machine and the walls are attached to each other. The dismantled lower decorative panel, if necessary, is cut off and put in place.
The rules for installing dishwashers require a gap between the rear wall of the machine and the kitchen wall to be at least 50 mm.
Any owner who wants to save money can install a dishwasher into a finished kitchen; it is not necessary to call highly qualified specialists. You can learn how to carry out the work correctly and avoid annoying mistakes from this article.
How to dismantle a built-in dishwasher with your own hands?
It is precisely for men who have “golden” hands and want to save their budget that we offer step-by-step instructions for removing this household appliance, which will help solve the problem without any effort and spending a lot of time.
But before you begin, you need to prepare the necessary tools, namely screwdrivers and wrenches of various diameters. You can select them by inspecting the mountings of the unit.
After this, the direct process of removing the dishwasher begins, which can be divided into stages.
At stage 1, the device is disconnected from the power supply by unplugging the power cord from the socket and shutting off the flow of water into it.
Stage 2 is characterized by performing operations to unscrew the front panel located under the machine door. It should be noted that some models (for example, Electrolux devices) do not have such strips.
At stage 3, the inlet hose is unscrewed. Don’t forget to place a container first to prevent any remaining water from draining onto the floor. Next, determine the location of the connection between the siphon fitting and the drain hose. This is necessary to unhook the latter, which is done by loosening or cutting off the clamp.
At stage 4, the washing chamber is opened to find the fastening elements located inside it. They are represented by screws that secure the machine to the countertop, and they will need to be unscrewed. After performing this operation, you need to lower the legs of the unit to the maximum level.
Next comes the 5th (final) stage, at which you need to grab the dishwasher body with your hands to further remove it
This must be done using rocking movements, and very carefully to avoid the device falling on the master’s feet.
This is an optional procedure, but it is used to maintain an aesthetic appearance, because it can be easily scratched during dismantling. For this:
- the dishwasher door opens;
- the screws located inside the sash are unscrewed;
- The facade is carefully removed.
Due to the fact that this part of the device is quite weighty, all actions are carried out carefully, as it can slip out of your hands. To facilitate the process, you need to lift it a little and then pull it towards you.
As you understand, dismantling a built-in dishwasher is quite easy, because it does not require complete disassembly. If you carry out this process yourself, then each man will be able to save a fairly significant amount for the family budget and his personal time. The main condition is to follow our instructions in your work, and success awaits you!
How to install a dishwasher: tools and parts
Prepare everything you need so that the tools are at hand. You will need:
- a set of slotted and Phillips screwdrivers;
- wrench;
- pliers;
- drill with a set of attachments;
- wire cutters;
- level;
- chisel;
- roulette.
- siphon;
- Euro socket;
- ball valve;
- brass tee;
Electrical connection
If you do not have a special outlet organized, we recommend calling a specialist for installation. He will cut a channel in the wall and lay a three-core copper wire, install a difavtomat and connect a moisture-resistant socket through it.
Now you are ready to proceed further.
Connection to water supply
Connect your dishwasher to a cold water source as it is of better quality. Moreover, the equipment is equipped with a heating element, which independently heats the water.
Read the instructions carefully. It is possible that only cold water is allowed to connect your model, and if you connect to hot water, you may lose your warranty.
We recommend additionally installing a coarse filter. It will provide protection from large debris, soften the water, so scale will not settle on the heater.
- Place a tee on the end of the cold water pipe;
- Connect the inlet hose to one outlet and the mixer to the other.
If your tee does not have a shut-off valve, install one immediately.
Wrap the joints with fum tape. It seals all connections.
Sewage work
First of all, a siphon with two drainage holes is installed. One will be used to connect a dishwasher, the other - a washing machine. You can also replace the sink with a more compact option.
- Place the drain hose 60 cm from the floor. Secure it with clamps to the furniture.
- Before connecting the end of the hose to the siphon, bend it so that the water from the machine goes into the siphon.
Is the hose not long enough? Don’t rush into extensions; it’s better to buy a new element of the required length. This way you will avoid the risk of a flood.
Now you know how to do all the work yourself. All that remains is to place the equipment in place. How to do it right:
- Move the PMM closer to the cabinet (you can immediately install it in the cabinet, if that’s more convenient).
- Connect the drain hose to the siphon.
- Reconnect the intake hose.
- Slide the dishwasher under the countertop.
- Use bolts to install the front part.
The work is completed. All that remains is to conduct a test run to check the correct connection. A video on the topic will help you:
How to dismantle
To remove the dishwasher from the built-in kitchen, you need to perform the following steps:
- prepare screwdrivers with different attachments;
- unplug the power cable from the socket and turn off the water supply tap;
- remove the narrow front panel, which is installed under the car door (if there is no decorative strip, this step is skipped);
- disconnect the inlet hose, first placing a container to collect the remaining water;
- disconnect the drain pipe from the siphon fitting by cutting or loosening the clamp in advance;
- open the car door, find the fasteners coming out and unscrew them (these bolts secure the device body in the niche);
- reduce the height of the legs to the limit;
- holding the body with 2 hands, move it forward with rocking movements (you must make sure that the machine does not fall).
This completes the dismantling. Some appliances have fronts that also need to be removed.
How to remove the PMM from the built-in kitchen?
To remove a dishwasher placed in a cabinet or under a countertop, you will need a screwdriver with attachments - usually this is enough for dismantling work. Procedure for removing built-in equipment:
- Unscrew the strip located under the device door. If there is no such bar, proceed to the next step.
- Unscrew the inlet hose. Place a container to drain any remaining water.
- Find the connection point of the drain hose to the siphon fitting and unscrew it.
- Open the wash bin door, locate the fasteners that secure the appliance to the countertop, and unscrew them.
- Unscrew the locking screw to lower the machine legs as much as possible.
- Grasp the body of the device. While performing rocking movements, move the device towards you. Be careful to prevent heavy equipment from falling on your feet.
Choosing a location depending on the type
To install the device, you need to correctly determine the location of the equipment: the section opening must correspond to the dimensions of the machine box, the communication means are located nearby. Experts offer several options:
| Type of equipment | Dishwasher space | Advantages | Flaws |
| Partially built-in and fully built-in | Under the sink in the sink | The depth and width of many models are the same; proximity to sewer water communications | The bottom of the sink may need to be reworked; buying a new siphon |
| Base cabinet | The instrument panel is hidden behind a decorative facade | The need to remodel a piece of furniture | |
| Dismantling a niche in a kitchen set | Selecting a panel to match the color of the furniture facade | Reducing kitchen utensil storage space | |
| Compact models | For a free-standing household appliance | Easy installation | The need to consider access to communications; technology reduces space in the room |
Thus, compact models are easiest to fit into a finished kitchen.
Where in the finished kitchen is the dishwasher installed?
There are several options where you can install the equipment. Each has its own characteristics. One of the options for installing a PMM in an already assembled kitchen is horizontal. In the case when the kitchen layout contains a lot of kitchen furniture and work surfaces, and most of them are not used when preparing food, you can choose a tabletop option. Place equipment under wall cabinets. There are other accommodation options, although not all of them are popular.
You can install the device under:
- Oven . In some kitchens, the oven is built into a separate cabinet at waist level. There are drawers underneath that can be removed and a dishwasher can be placed in this place.
- Table . Low models of machines are allowed to be built under a long kitchen table; the far end, where rarely anyone sits, is best suited.
- Electric stove . If there is no electric oven underneath, the place will be converted into a dishwasher.
Household appliances, including models Bosch (Bosch), Electrolux (Electrolux), Gorenje GV, Neff, Siemens (Siemens), Ariston, Hans, can be built in in other ways.
Cabinet installation
To install a dishwasher, you can use the cabinet cabinet of the kitchen unit, located next to the sink, if its width is more than 45 cm. In this case, it is possible to connect the hoses of the device to an existing system. The back wall and shelves are removed from the cabinet, and if necessary, the bottom panel. The built-in housing is brought to a vertical position using adjustable legs.
Recommendations
In the future, the dishwasher should be used taking into account all the rules in the instructions. They are not complicated, but critical for its long-lasting and uninterrupted operation. In general terms they can be described as follows:
- Before each new wash, add detergent and rinse aid in limited quantities as needed.
- Check the saline level.
- The order in which dishes are placed in baskets should not be neglected.
- Avoid overloading the wash compartment as this will reduce the wash quality.
- It is necessary to regularly check the serviceability of the sprayer and nozzles, and the cleanliness of the filters.
- The choice of operating modes must correspond to the degree of contamination of the devices.
Preparation and idle start
Usually the instructions describe in detail how to start the dishwasher for the first time. First you need to check the power supply and open the water supply tap. After this you need:
- make sure that the sprinkler impeller rotates normally;
- check the installation of filters;
- remove any remaining packaging material and other debris from the loading compartment;
- fill the ionizer with saline solution;
- place the starter kit tablets in the detergent compartment;
- indicate the tool used in the control program;
- select the longest operating mode with high temperature;
- turn on the washer.
Preparation
Manufacturers always recommend that the dishwasher be tested in a dry format before starting. To get started correctly, no dishes are loaded. The purpose of such a launch is to remove small debris and remaining lubricant. It will be possible to immediately assess whether the mechanics are operating correctly. For example, it will be precisely determined:
possible pinching of wires and hoses;
liquid leakage at connection points.
The test meets all the requirements of a conventional car wash. The mode is chosen at your discretion. When the rinsing is completed, wait for the device to cool down. Next, the first wash is carried out - always with a full load of dishes. Shipping wire or plastic twists and spacers will have to be removed immediately.
Before the first start, filters are washed under running water. Sometimes filters can only be removed by disassembling them into 2-3 parts. When the initial wash cycle with loading is completed, the machine should be allowed to cool for 10-12 minutes. Then the equipment must be removed and carefully inspected to check the quality of washing and correct operation.
The general scheme for the first start does not differ depending on the brand of dishwasher. Embedded versions can be placed in niches only after successfully passing the test. When starting up for the first time, be sure to check whether the connection to the power supply is correct. Identified leaks are repaired immediately.
It is very important to immediately determine the degree of water hardness in the water supply. To do this, testing strips are usually added to the delivery kit - and if they are not there, you can always buy additional ones
It is worth noting that for the first launch, special detergent compositions are usually intended, which provide an enhanced cleaning and disinfecting effect and cope with industrial blockages (but are not intended for everyday use). When the work is up to standard, you can place the dishwasher on a level (with the legs of the cabinet tightened). The rotation of the nozzles is checked by twisting by hand.
During the initial start-up, they use the type of detergent composition and the salt consumption that were already established by the engineers during design. The dosage of rinse aids should be minimal. Later you will need to select it specially. Effective cleaning of the chamber is ensured by selecting a particularly long program and setting the maximum temperature.
Installing correctly
You can install a built-in PMM instead of a cabinet, under a sink, or in a pencil case. The most convenient way is to install it in a cabinet that has previously been cleared of all drawers, panels and partitions.
Installing a dishwasher in a cabinet
Important: the width of the cabinet should be 5-10 cm larger than the dishwasher; there must be a gap between it and the wall for ventilation.
There should be an outlet for the unit near this place. The initial installation stage includes preparing the cabinet for the built-in dishwasher. You need to remove all panels and doors from it, leaving only the side panels to which the machine is attached. You need to make holes in them for the pipes (it is most convenient to install the PMM next to the sink).
Important: the socket should not be located immediately behind the cabinet on the wall, otherwise the PMM simply will not fit; better in the next closet. The system must be grounded.
Cabinet in the kitchen set
Tip: to prevent the wooden panels of the cabinet from deteriorating from moisture, line them from the middle with special sheets. In built-in appliances from Bosch, Electrolux and some others they are included.
Next we move on to installation. Pass the hoses through the holes, connect the power cord to the machine, then slide the dishwasher into the niche, gradually tightening the hoses and cord. After this, level its position using the aligned legs.
Next, you need to secure the dishwasher using fasteners to the walls and countertop to immobilize it during operation. All that remains is to connect the drain and intake hoses, plug them into a power outlet and conduct a test run.
The last stage will be the installation of the facade.
Dishwasher in the cabinet
Dimensions for built-in dishwasher
You can select the dimensions before purchasing on the website of the store or manufacturer. They must be a multiple of the height and width of the tabletop, as well as all the parameters of a niche or cabinet if the equipment needs to be hidden behind the door. Instead of a regular door, a decorative damper is often used, designed in the same way as the entire facade.
There are several standard solutions. The standard depth is 0.55 m. This leaves enough space of just under 50 cm for water supply and air cooling. For kitchen sets designed for standard apartments, narrow models with a width of 0.45 m are produced. It can vary up to 0.65 m. Most often it is 0.6 m. The height ranges from 0.815 to 0.875 m. It is a multiple of the height of ordinary countertops
There are dishwashers with minimal dimensions for installation. They are installed not only under the countertop. They are even located in the upper modules. The upper cabinets are narrower, and their depth is on average 15 cm less. In this case, problems with drainage should not arise even at a considerable distance from the siphon. You will only need to hide the drain pipe, connect the device to the water supply and resolve the electrical issue. Such devices have low productivity, but they are compact and consume less water and electricity.
Kitchen furniture manufacturers make a small margin by adding 2 mm on each side inside the modules. On the contrary, the built-in equipment is slightly smaller than the declared dimensions. This is necessary so that it fits into the niche prepared for it, even taking into account small irregularities.
The dimensions of the built-in dishwasher are one of the most important selection criteria. If it does not fit in size, it is better to refrain from purchasing and continue searching.
Questions and doubts
If everything is clear with desktop devices, then what about those that are intended for installation in a special furniture section? Judging by the questions on various forums, owners of built-in dishwashers encounter a similar situation quite often.
On the one hand, the equipment is in good working order and ready for work. Why not find a temporary place for it, connect it and use it?
Important! Installation specialists advise performing a test run before installing it in the headset. This will allow you to check the reliability of the connection and, if necessary, eliminate minor faults.
On the other hand, an embedded device requires special operating conditions. And this raises certain questions and doubts.
- Where can equipment be installed for temporary use?
- The machine vibrates a little when working. Fastening to furniture holds equipment in place. How will a loose dishwasher behave?
- Will there be any problems opening the door if the handle is installed on the front of the furniture?
- Will the car fall forward?
Or maybe other problems will arise that the owners are not even aware of? And therefore it is better not to even experiment with the technique, but to wait for it to be assigned to its intended place?
Let's try to find answers to these questions.
First dishwashing
Once the dishwasher has cooled and dried, you can begin loading the dishes. But before you load the machine for the first time, you should familiarize yourself with a number of rules:
- all dishes must be cleaned of large food residues;
- frying pans and other large items should be placed in the lower basket;
- The plates cannot be placed close to each other, because this way they will not be washed.
Different machines, for example Siemens or Samsung, have different washing modes, so you need to study the instructions for your specific model. Most often, “Quick wash”, “Intensive” or “Delicate” is selected, it all depends on the degree of contamination and whether there are greasy pans in the chamber.
After the detergent has been added and the desired mode has been selected, all that remains is to press start and wait for the process to complete. When the machine does its job, it will let you know with a characteristic sound.
Should I call the master or not?
The answer depends on the consumer: if it is possible to pay for the services of a specialist and there is no desire to bother with dismantling the equipment, the problem can be solved with one call. If the user is confident that he can dismantle the built-in dishwasher himself, it makes sense to prepare for the process by first studying its nuances.
It doesn’t matter what kind of PMM you have - a prestigious Bosch (“Bosch”) or a budget model made in China, the technician will have to pay separately for dismantling. If you cannot remove the built-in equipment yourself, you will have to pay about 40 USD. e. Disadvantages of this solution:
- you lose money;
- you are wasting time - sometimes you have to wait a long time for the repairman.
To get the dishwasher yourself, you will need:
- read our article;
- watch the corresponding video;
- prepare the necessary tools;
- spend half an hour.
Why remove the machine?
Indeed, why take the machine out of the built-in kitchen, for what purpose? It stood there for many years and may it continue to stand.
- The first and most obvious goal is to repair the machine. Many breakdowns can be eliminated by gaining access to the parts of the machine tray, and such access can only be obtained by dismantling the built-in dishwasher. There are no other options.
- The second goal is related to replacing the dishwasher unit. You can sell your old equipment to someone else, and use the proceeds to buy a new “home assistant.” But in order to sell an old machine, it must be removed correctly so as not to damage anything or completely ruin the presentation of the equipment.
- The third goal is more global - renovation of the entire kitchen with replacement of furniture. When disassembling a kitchen set, it is impossible to leave the machine in it. She needs to be pulled out, and this needs to be done carefully, since further use of the “home assistant” is planned in the future.
As you can see, there are more than enough reasons. If one of them affected you, read our post to the end and understand how to properly remove your dishwasher.
Why not invite a master?
The reasons are purely economic. If you have money and don’t mind sponsoring the master a little, then you don’t need to read this article to the end. Call a specialist, he will quickly arrive and do everything. If you don’t want to pay extra money, take note of our arguments.
Firstly, the technician almost always charges a separate fee for dismantling Bosch and other brands of dishwashers. The cost of the service can reach up to $40. And if diagnostics and repairs are required in the future, you will pay separate money for this. Secondly, by calling a specialist, you will waste time, because due to busy schedules, specialists rarely arrive very quickly. Thirdly, men and even some women want to show independence, if not in all, then in many matters. Everyone wants to feel like a jack of all trades. It’s not always right to stroke your pride this way, but in our case it’s acceptable.
The process of removing the machine
Well, you’ve decided to pull out the machine yourself from under the tabletop or from the cabinet, let’s get to work, but first, let’s prepare the tools. Inspect the machine mounts and select suitable screwdrivers and wrenches. For the most part, you can get by with a screwdriver and a set of bits. We take it and go to the typewriter.
- First, unplug the power cord from the socket and also shut off the flow of water into the machine.
- Next, unscrew the strip of the narrow front panel, which is located under the machine door. Not all dishwasher models have such a bar. Take, for example, the Electrolux line of dishwashers. If you have such a machine, skip this step.
- Unscrew the inlet hose and place a bucket so that the remaining water drains into it.
- We find the place where the drain hose connects to the siphon fitting and unhook the hose.
- Open the door of the washing chamber, find the fasteners coming out and unscrew them. These screws secure the appliance to the countertop.
- We unscrew the fixing screw and lower the legs of the machine to the limit.
- We grab the body of the machine and push it towards us with rocking movements. You need to act carefully so as not to drop the machine on your feet.
Why is it better to get a built-in dishwasher yourself?
Many users of Bosch, Siemens, Electrolux and other brands of dishwashers are thinking about how to remove the machine from the built-in kitchen. If everything is done correctly, the work will not take more than 10 minutes.
Why is it better to do the work yourself rather than contact a service center? You can save on the work of a master, who will definitely count the dismantling of the PMM as a separate service.
For example, equipment needs diagnostics to find out the cause of the breakdown. What you pay for:
- for a specialist visiting your home (depending on the company);
- for diagnostic services;
- It will be on the spot: in order to carry out the inspection, you need to remove the PMM from the furniture - you will also pay for this.
Whether to contact the service center or not is up to you. After reading our article, you will learn how easy it is to do the work yourself.
After purchasing a dishwasher, many turn to furniture makers who install and connect the appliances. There are cases when self-tapping screws are used to drill through furniture panels or the body for better fastening.
As a result, the plastic water tank located at the side wall of the PMM is damaged. There may not be any immediate leakage because the self-tapping screw is inserted tightly. But when you decide to pull the car out, the tank will no longer be restored.
How to install and connect a dishwasher, read the previous article.