May 6, 2020
Buying a new washing machine greatly simplifies your everyday life. But choosing the right device is just the tip of the iceberg. The rest, the “invisible” part, is related to the commissioning of equipment. True professionals can competently fit the machine into the interior and carry out a set of necessary installation procedures. Fortunately, with the right approach, installing the device yourself will not be difficult. The result of your own efforts is often no different from the “golden hands” of a master, and sometimes surpasses the handwriting of a specialist. How to properly connect a washing machine at home? It is enough to read this material to the end.
SEARCHING FOR A LOCATION FOR INSTALLATION
First of all, you need to choose a suitable place for the machine in the house. It is advisable to find the installation point before going to the hardware store. Otherwise, finding free space will turn into a headache, and installation work will be delayed indefinitely. Most people do not focus on finding a place, but the procedure is of paramount importance.
BATHROOM
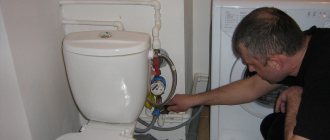
Traditionally, the bathroom is used as a permanent home for the washing machine. Connecting a washing machine in the bathroom is quite logical: there are already the necessary communication elements to include the device in the overall system.
This method has two significant drawbacks. Firstly, high humidity levels in the bathroom negatively affect the electronics inside the machine. Accumulation of condensation on microcircuits leads to rapid equipment breakdown. Secondly, the features of the home’s layout. Often the area of the room is not enough to accommodate washing equipment.
KITCHEN
Often, when installing a machine, preference is given to the eating area. If free space allows, why not. A factor in the implementation of a unit in the kitchen is usually the lack of square meters in the bathroom. Place the “washing machine” next to the sink or directly under the sink. The presence of communications facilitates easy installation of equipment, and the close arrangement of elements reduces the work period and saves consumables. Both built-in and standard models of machines are suitable for installation.
But the method also has disadvantages. One is associated with changes in humidity and temperature changes during the cooking process. The other relates to the kitchen area. In a small space, where even cooking is inconvenient, fussing with the laundry will become a burden.
UTILITY OR HALLWAY
A hallway or utility room will serve as a permanent shelter for an automatic machine, if the size of the room allows you to install the device.
The only obstacle on the way is the issue of communication. To power the unit with electricity and connect it to the water supply system, you will have to draw additional networks to the installation site of the machine.
Determining a suitable location depends entirely on the layout of the room and the personal preferences of the owner. Just one parting word: when deciding a question, you should thoroughly weigh all the arguments and make an informed choice.
Types and design of locking devices
Taps are now presented in a huge variety in the assortment of special plumbing stores. Let's take a closer look at the most commonly used options.
These are multi-turn mechanisms, they block the water flow due to the movement of the plate, and ball valves, which are turned on and off by changing the positions of a small ball located in the structure.
Connecting the SMA to the water supply
The choice of ball types provides certain advantages:
- reliable tightness;
- response speed, which allows you to quickly stop the water flow;
- a simple design that extends the service life of the crane.
In addition, this model of cutting device has a compact size, which allows it to be used under any conditions.
Ball valves are available in several varieties. Below are the main ones that are used in work related to connecting a washing unit at home.
Passage
Equipped with double-sided outlets, this makes it possible to block the watercourse by dividing the branch in two. These devices can be installed on a separate pipe, which is diverted from the common riser to any plumbing fixture, or they can be used for tapping.
Angle ball valve
Tee
Already from the name it is clear that such a mechanism has three holes. The first one is used to block the watercourse itself, the other two combine all the drainage outlets into one whole.
These components differ in appearance and design; they are usually used when cutting into water pipes. They are almost always connected with other parts, for example, with a mixer. This is impossible when using a conventional flow-through faucet, because this is how its design is designed.
three-way valve
NECESSARY TOOLS FOR INSTALLATION WORK
How to quickly and efficiently connect an automatic washing machine? Before starting installation work, you should ensure that you have an arsenal of tools. For a quality installation you will need:
- set of wrenches;
- several slotted and Phillips screwdrivers of different diameters;
- pliers;
- hacksaw for metal;
- construction tool – level;
- knife;
- pipe cutter;
- roulette.
In addition to tools, you need to prepare consumables:
- rubber linings or a special carpet with an anti-vibration effect (for wooden floors);
- check valve;
- sealant;
- sealant (fum tape or plumbing thread);
- spare flexible high pressure hose (for supplying clean water);
- additional hose for draining waste fluid;
- tee (for inserting a metal-plastic pipe with a tap);
- three-core cable designed to power household appliances. Here it is important to choose the optimal wire cross-section, since insufficient thickness will lead to an overload of the electrical network and even a fire. Therefore, the recommended wire cross-section is at least 2.5 mm2;
- 16 A circuit breaker. The device successfully suppresses power outages. The device will protect family members from accidental electric shocks and extend the life of the machine.
After collecting all the necessary tools and materials, you can move on to the next stage - preparing the machine for connection.
First start of the machine.
- After all the steps have been completed, you need to check the installation is correct.
- It is necessary to turn on the washing machine in each of its modes.
- After testing operation without laundry, you need to familiarize yourself with the following:
- Tank filling time
- No leaks
- Correct drain operation
- Correct drum function
- Spin
- Good heating of water in a short period of time. About six minutes after the drum is filled with water.
- No excessive rumble or other excessively loud sounds.
PRE-SETTING THE WASHING MACHINE
A purchase that has just been delivered to your home requires preliminary preparation. Correct connection of the washing machine begins with removing the “non-working” shipping shell. The latches are designed to reduce the risk of deformation of the machine during transportation, but in stationary conditions they should be discarded.
- On the back side, you need to remove the clamps that secure the outlet hose and the network cable.
- There are also bolts for securing the drum on the rear panel. They must be unscrewed, and plastic plugs are placed in place of the holes (included in the basic configuration of the machine).
- At the base of the machine there are clamping bars that separate the tank of the machine and the walls of the body. Wooden pads are needed for transportation, and must be disposed of before use.
You should not throw away the shipping items right away. You may have to return them to their place when contacting the service center. Therefore, it is better to leave the fasteners in storage. You should remove the operating instructions and spare parts from the drum of the machine.
Now that the washing machine is completely ready for connection, you can begin installation work.
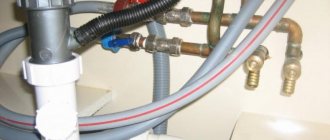
WATER CONNECTION OPTIONS
How to connect an automatic washing machine to water? Various options are suitable for tapping into the water supply system. Let's look at the most common ones.
PREPARED BAND
Connecting a washing machine to water through a ready-made outlet is the most basic and rational solution. At the time of laying communications, a separate line is allocated specifically for connecting the “washing machine”. The isolated pipe at the end is closed with a tap or plug until connected to the device.
In this scenario, the owner will simply connect the unit to the system. One end of the braided hose is screwed onto the threaded connection of the faucet, and the other end is attached to the corresponding branch pipe of the “washer”. Then open the tap valve and check the connection for defects. To avoid leaks, each connection is additionally reinforced with a special sealant or sealing tape.
TEE
An alternative solution when there is no ready-made outlet or there is no desire to tie into the system yourself. The essence of the circuit is to power the “machine” from a functioning highway. A cold water supply hose to a sink, toilet or sink is suitable for connection. A tee is introduced into the system, which has an additional function - filling the washing tank. The “washing machine” hose is connected through the splitter to collect water.
To install you will need:
- wrench of the required size;
- sealing tape;
- tee with tap;
- additional extension hose (if necessary).
Installation involves inserting a tee in place of the old connection of the cold water pipe. You need to unscrew the hose nut with a wrench and screw in the tee. All joint elements should be pre-sealed, the nuts should be securely tightened with a wrench, and then checked for leaks.
This method has a significant drawback - a drop in water pressure when the machine and sink mixer operate simultaneously. At the moment the automatic device is filled, the water pressure in the mixer drops to almost zero.
BATHROOM MIXER
The third solution is applicable if the water supply system is located in a hard-to-reach area. How to connect a washing machine in the bathroom without any hassle?
First of all, you will need a special three-way faucet and an extension cord to connect the washing machine. You will also need a set of matching wrenches and a few extra spacers.
Independent work begins with shutting off the water in the outlets. Then you need to unscrew the mixer using wrenches. A tap with an additional free outlet is screwed onto the cold water outlet. An extension cord is attached to the hot water supply line. A previously removed bathroom faucet is installed on top of the structure. Now a washing machine is connected to the free outlet of the tap.
After the completed manipulations, you will get an independently operating mixer with an additional dedicated line for the machine, which can be shut off at any time. When connecting for the first time, it is important to make sure that the structure is tight and there are no leaks.
INSERT IN AN ARBITRARY PLACE
The most difficult connection method of those listed is tapping at an arbitrary point in the water supply system. A certain level of training will be required from the master. But independent work will not be difficult if you have the appropriate tools and materials. How to connect a washing machine to water in the required place?
The technological process largely depends on the material of the pipe that the master will have to deal with.
Steel pipe
Steel pipes have almost completely become obsolete, but are still found in old buildings. The purpose of the work is to punch a hole in the metal pipe and secure the drain valve for the “washing machine”.
We stock up on the following tools:
- electric drill;
- set of wrenches;
- saddle coupling;
- tap;
- sealant (fum tape).
First you need to turn off the main tap and get rid of the remaining water through the mixer. Then you should find a suitable point to create the hole. The designated area must be cleaned of rust and paint. Next, a preliminary “fitting” of the tap on the pipe is carried out. Place a rag under the pipe to absorb spilled water when using a drill and drill a hole of the required diameter. The joint elements are cleaned of chips, treated with sealant and joined together.
Metal-plastic pipe
A cross section of a metal-plastic pipe clearly demonstrates the features of its design. It resembles a “sandwich”, where the metal base is enclosed in a plastic shell on both sides. Working with a metal-plastic pipe consists of introducing a tee into the system. In the right place, the pipe is cut and the adapter is screwed in. The machine is connected through the free outlet.
For installation work you will need:
- tee with tap;
- metal hacksaw or pipe cutter;
- set of wrenches;
- sealant;
- calibrator
How to connect a washing machine to a metal-plastic pipe? The first step is to turn off the main water tap and drain the remaining water through the nearest faucet. Then, in the designated area near the washing machine, cut the pipe with a pipe cutter. The separated ends need to be bent in different directions for the convenience of further work. Bevels are made on each edge using a calibrator. Remove the nuts with ferrules from the tee and attach them to each edge of the pipe. Elements with notches are additionally treated with fum tape in the direction of the thread. Then a tee is attached to the empty space, and the free outlet is connected to the washing machine.
Polypropylene pipe
Plastic pipes are gaining more and more popularity. Most often, when laying the main line, the connection of the “washing machine” is taken into account and an adapter is initially introduced. If a mistake was made in the work, you will have to install it yourself.
The installation technology largely corresponds to working with metal-plastic. Only here the tee is not pressed with nuts, but is soldered under the influence of high temperature.
Before making repairs yourself, you should prepare:
- pipe cutter;
- tee with tap;
- soldering iron;
- sealant.
The instructions for work are as follows: traditionally, the action begins with shutting off the water supply through the emergency tap. The remaining water must be drained through the mixer. The marked area for insertion should be located in an accessible place near the “washing machine”. Using a pipe cutter, cut out a piece of pipe, with a margin of 1.5 cm on each side. The final length of the removed section should be 3 cm shorter than the length of the adapter.
One end of the pipe must be thoroughly dried and heated with a soldering iron to the required temperature for 5 seconds. Then quickly connect to the tee and press the parts tightly for 10 seconds. A similar procedure must be carried out with the other edge of the pipe.
Fum tape is wound onto the free outlet and the tap is screwed on. The hose from the washing machine is connected to the tap and the water supply is turned on.
Stage 7. Test activation
After completing all installation work, you need to check that the device is connected correctly by performing a test run. In this case, you do not need to load things into the drum, but carry out “sea trials” empty.
During the test run, you need to pay special attention to the following nuances:
- The speed at which water enters the tank. If it is too long, then perhaps the pressure in the supply hose is insufficient.
- There should be no leaks at the joints of hoses, pipes, fittings. If any are found, you need to tighten the nuts more tightly, or it is better to seal the joints with winding and seals.
- Water circulation during washing, rinsing and spinning should occur without problems or delays.
- During operation of the equipment, various extraneous sounds should not be heard. Vibrations and mechanical knocks may indicate an uneven base on which the machine is installed, or that all transport fixing elements have not been removed.
If any problems are found during the test run, they should be corrected promptly.
INSTALLATION OF DRAIN SYSTEM
Everything is clear with the supply of clean water to the unit, but how to connect the washing machine to the sewer? An insertion into the sewer system solves the problem of discharging dirty, waste liquid. The drainage organization scheme can be divided into 2 categories:
- permanent - stationary drain in a certain place;
- temporary – a forced measure for a short-term period (until the creation of a permanent flow).
Next, the most common options for organizing wastewater discharge will be discussed in detail.
READY STOCK
Connecting a washing machine through a ready-made system is the most correct and logical solution. To connect to the sewer system, the automatic device has a special drainage hose, which is located on the back of the device. If the hose is short, its length can be increased if necessary. However, the maximum length of the drain hose should not exceed 4 meters. This is necessary for the pump to successfully cope with pumping out the waste.
Connecting to the finished outlet consists of fixing the drainage hose of the machine in the corresponding sewer outlet.
DRAIN THROUGH A BATH, TOILET OR SINK
This drainage arrangement is considered a temporary option, since it entails household inconveniences. Making an indirect drain is not difficult, but after washing, dirt from the sewage will remain in the sink or toilet. And if the drain is clogged, there is a risk of flooding the apartment.
It is very easy to connect the washing machine yourself using the drain hose holder. Simply install the holder on the edge of the drainage pipe and secure it to the edge of the sink, toilet or bathtub.
INTEGRATION INTO THE SEWER THROUGH A SIPHON
The siphon option also allows you to fight back with small forces. Compared to the previous method, this scheme serves on an ongoing basis. The essence of the method is to secure the drainage hose through an additional outlet of the siphon. As a result, the washing machine and sink (or sink) will use a common sewer outlet.
To do this you will need a screwdriver and a clamp. The first step is to remove the plug from the siphon outlet, connect the hose and secure it with a clamp. If the siphon does not have an additional outlet, you should replace the part with a suitable one and follow a similar procedure.
INSERT IN AN ARBITRARY PLACE
Independently inserting into the sewer is the most technically difficult operation. But the reward for your efforts will be a tap that will last for many years. The algorithm of actions largely repeats working with a water line, but with some nuances.
Cast iron pipe
Cast iron lines have long outlived their usefulness. But in old buildings there are still metal pipes. In the case of cast iron sewers, it is better to choose the insertion area near the drain of the sink or sink. There, the pipe diameter is optimal for connection, and the location is ideal for installation manipulations.
To work, you will need a sewer tee, a set of rubber adapters to secure the joints and a sealing agent.
First you need to unscrew the siphon from the sewer drain. Then install a rubber adapter to which the tee is connected. The siphon is attached below using a rubber adapter, and the drain hose of the machine is connected to the free outlet of the tee.
Plastic pipe
Plastic sewerage is a modern solution to the problem. The sequence of actions during installation is completely identical to the previous method. The only difference is the material - cast iron is replaced by plastic.
Examination
All adjustment steps have been completed, which means it’s time for the first launch. You need to run the machine without laundry at the highest possible temperature. This will allow you not only to check the correct installation, but also to clean the inside of the device from any dirt and oil from the factory.
During the debut cycle, check all the joints: is there any dripping at the joints of the pipes, are there any leaks in the sewer hose, is the housing electrocuted, how loud is the unit, is it jumping around the room?
If any of the above deficiencies are detected, it is better to interrupt the work and immediately begin to eliminate it.
If you don’t know how to get rid of shortcomings, then stop being a hero and call a specialist. The quality of washing, service life and, of course, safety depend on the correct connection.
ALIGNMENT
After introducing the “washer” into the water supply system, it is necessary to ensure maximum stability for the unit. A special mat with an anti-vibration effect is placed under the base of the machine, which dampens vibrations from the operation of the device.
Next, the machine needs to be placed in a perfectly level position. The building level will help with this. A level is placed on top of the unit and by changing the length of the threaded legs, the desired condition is achieved. The deflection angle should not exceed 2 degrees.
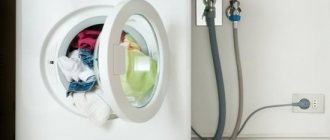
CONNECTION TO THE ELECTRICAL NETWORK
To connect the washing machine to the electrical network, you need to plug the machine's wire into an outlet. This is the final stage of setting up the washing machine. If the house is old, then the electrical wiring is in a sad state. Therefore, it is first recommended to replace the wires with new ones and connect the grounding contact.
For new buildings, the best solution would be a separate three-wire wire from the meter with automatic 16 A network overload protection. If you have to use an extension cord, you need to make sure there is a grounding contact.
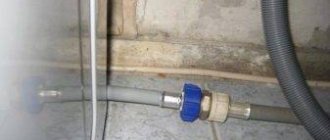
Purpose of the crane
The function of the tap, which is attached to the washing machine to connect to the pipes, is very important. Using it, it is easy to shut off the water flow if unforeseen circumstances suddenly occur, for example, a breakdown of the SMA, which leads to leakage.
Expert opinion
I work in the household appliance repair industry. Extensive experience in restoring washing machines and dishwashers.
Ask a Question
The consequences of water hammer in water pipes are much more dangerous. This trouble is fraught with a violation of the integrity of the elastic hose of the machine, and then with a very significant flood, which will create inconvenience not only for the owners, but also for the neighbors.
To prevent this cataclysm, you need to connect the washing machine using a tap. This part should be in an easily accessible place, since it always needs to be reached quickly. In an extreme case, this will provide the opportunity to gain a few moments, and they can ultimately prevent flooding.
TYPICAL MISTAKES WHEN CONDUCTING INSTALLATION WORK
Often during repairs, beginners make a number of serious mistakes:
- Poor fixation of connections. Under high loads, unreliable fasteners may become detached, and the entire contents will spill out under pressure. All joints should be tightly secured to avoid such problems.
- Small siphon diameter. If the size of the part is incorrectly calculated, the line may burst under high pressure.
- Excessively long drain hose. The standard pump of the machine will not cope with the pumping function if the length of the hose exceeds 4 meters. It is better to limit yourself to a short tube or think about a different location for the “washer”.
- Small sink size when organizing a drain. With large drain volumes, the small sink will fill up in a short time, and then dirty water will rush over the edge. It is advisable to think over this point and choose a different option for connecting to the sewer.
CONCLUSION
Connecting a washing machine to the sewer and water supply network on your own will be an insurmountable challenge for an unprepared person. But if you approach the issue with full responsibility, then the work will be within the capabilities of everyone, and not just a professional with extensive experience. Let the prepared material become the main weapon in the golden hands of a home craftsman who wants to set up a washing machine!
Tags:
- Apartment renovation
Rate the material:
Expert recommendations
More details:
- An important point is the choice of location. It is best to install SMA in the bathtub, since a kitchen or other place will create certain difficulties. The machine is afraid of sudden changes in air temperature, and in the kitchen, with the stove on, it can be hot.
- If you need to buy a hose, it is better to do it in a special store rather than in a regular one, which guarantees the quality of the product.
- A faucet made from brass costs more than one made from other materials, but it is much more durable. When purchasing a faucet yourself, you should pay attention to this fact.
- In order to protect the MCA from leaks, attention must be paid to sealing.
Connecting a faucet to a washing machine is usually a task for craftsmen, but it is quite easy to do it yourself.
Connecting the MAS requires a serious selection of the valve and other parts, as well as actions in accordance with the instructions, with strict adherence to the prescribed stages of work.
If done carefully, it is possible to obtain excellent results, and this guarantees long and comfortable use of the washing unit.