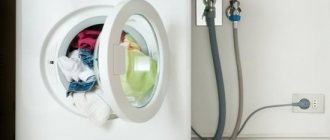
Purchasing an automatic washing machine involves performing the necessary installation work to connect it to communications: water supply, sewerage and the electrical network. The installation and connection of the unit can be entrusted to a specialist or done independently. How to install a faucet for a washing machine and connect the unit, ensuring its uninterrupted operation, we suggest you learn from this article.
The main task of a faucet for a washing machine is to shut off the water supply in case of repair of the hydraulic unit, its rearrangement or removal from its previous premises. At the same time, it will not affect the passage of water to the mixer, ensuring an uninterrupted water supply.
On sale there are faucets for washing machines made of silumin and brass. It is preferable to choose brass taps. Although they are an order of magnitude more expensive than their silumin counterparts, they are able to withstand constant loads and serve regularly for decades.
When purchasing a tee, you should also pay attention to the type of thread (internal or external), as well as the diameter of the pipes involved in installation.
The outlet on the tee must have an external thread D = 1/2 inch.
But in any case, after installation, the tap must be kept closed during breaks between operation of the unit. Because the water pressure can tear off the hose in a matter of seconds. The consequences of this can be very dire: in 10-15 minutes, water will flood the apartment and rush to the neighbors below. Washing machines are equipped with hoses for supplying and draining water, as well as an electrical cord. In addition to purchasing a three-way faucet for your washing machine, you will also need:
- additional hoses (if the hose included with the unit is not long enough for installation);
- additional coarse filter;
- siphon with outlet for drainage;
- moisture-proof socket;
- FUM tape;
- adjustable wrench.
Connecting a washing machine
When choosing an installation location, you should be guided by the ability to connect the unit to communications without much hassle and enough space for its comfortable operation.
Unpacking the unit
When removing the packaging from the machine, you should check for scratches and dents, and also make sure that the drain hose and power cord are intact.
Using a wrench, unscrew the transport bolts, first lifting one and then the other edge of the machine.
Unscrew the adjusting feet as far as possible. Then the transport screws with spacers are unscrewed on the rear panel, and the remaining holes are covered with plugs. Only after this the unit is installed, maintaining a distance of 5 cm between the back wall and the wall of the room. Having installed the hydraulic unit, use a level to level its position in order to reduce vibration during the spin process.
Connection to water supply
First of all, use the inlet valve to turn off the water in the apartment, and drain the remainder by opening the taps.
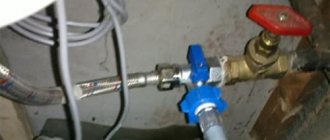
It is good if a circuit with a ball valve is provided. In this case, the connection is reduced only to installing the hose. If this is not equipped, it is necessary to make an insertion into the pipe and install a tee to connect to the flexible connection of the sink.
To supply water you need to use a pipe through which cold water passes.
Using an adjustable wrench, screw a tee onto the pipe, sealing it with FUM tape or flax. After this, install the flexible line and secure the hose from the washing machine, the straight end of which is equipped with a plastic nut. A coarse filter is installed on the bent end of the same hose and connected to the machine.
Tip: the nuts on the hose itself should be tightened by hand without applying additional force: the tightness of the connection is ensured by a rubber gasket.
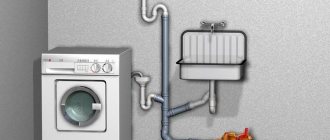
Connection to sewerage
The machines come with plastic hooks for securing the drain hose and draining into the sink or bathtub. If this method does not suit you, the drain can be connected to the sewer system. To do this, the hose is led directly to the pipe through a siphon - a plastic elbow with a special outlet to which the hose tip is attached. The drain hose at the outlet is raised to a height of about 60 cm and fixed using special fasteners.
Important: The outlet is placed above the curved section of the elbow to ensure communication with the atmosphere and prevent the occurrence of a “siphon effect”, in which the unit simultaneously begins to fill and drain water.
Connection to the electrical network
Since in most cases washing machines are installed in rooms with high humidity, it is better to use waterproof sockets to connect them. It would also be useful to have a grounding conductor in the outlet.
To do this, cut the pipe at the required level and make a thread, or disassemble the connection made from the pipe and flexible wiring, installing connecting fittings into the gap.
It is better to conduct electrical wiring for connecting a washing machine through an RCD with a leakage current within 30mA.
Having connected all communications, all that remains is to carry out a test wash. During the first wash, it is important to monitor the connection point of the hose for supplying water from the water supply to the machine, as well as the drain hose. The water supply tap to the washing machine should not vibrate or make any extraneous sounds. If a leak is detected, after completing the washing process, you should once again check the connection points and the tightness of the gaskets.
Tee tap for connecting a washing machine
Having bought a new washing machine or moved to another apartment, you will have to connect it to communications. Even if there are no conclusions, it is quite possible to install them yourself, without the help of a plumber. After arranging the terminals, additional parts will be needed. So, in order to “power” the device to the water supply, you will definitely have to buy a special tee tap. Let's look at the types of devices and their features.
Causes of leaks
During operation, various breakdowns and leaks may occur, which can cause flooding of several nearby apartments.
The financial costs of restoring residential premises must be reimbursed by the owners of household appliances. Timely repairs, preventive measures and an additional protection system will help avoid unpleasant situations. Causes of breakdowns and ways to eliminate them:
- weak fixation of the nut with the fitting - additional connection of all elements;
- deformation of rubber gaskets - installation of a new part;
- mechanical deformation of the hose - restoration of integrity using special hermetic compounds or installation of a new hose;
- destruction of the structure by aggressive chemicals - application of special silicone compounds to the damaged surface;
- long period of operation - purchase of a new part
The cause of a breakdown can be not only a violation of the rules for installing and operating the equipment, but also the low quality of the purchased product:
- mechanical damage to the reinforced protective layer;
- low quality polyvinyl chloride;
- low level of hose sleeve compression.
Types of taps for washing machines
Equipment can be connected to the water supply in two ways: with a separate branch pipe or through a tie-in into a pipe (for example, going to a water heating tank or sink). The faucet for connecting a washing machine can be of two main types:
- tees or bushings (if you have to cut directly into the pipeline);
- corner ones, when there is a separate branch for connecting a washing machine.
Note. Instead of angle valves, you can use a regular water ball valve or fitting - it all depends on the situation.
Regardless of the type, all taps are divided into:
Their difference is only in the method of shutting off the water; they have no other design features.
Which faucet is better to install?
The installation method and the choice of parts depend more on financial capabilities and skills than on the location of the machine. Using a valve, straight-through or ball valve is a matter of budget. Let's look at how the parts work in practice.
Using a Globe Valve
This method is the most acceptable, since it is simple and economical and does not require special devices for connecting pipes or cutting threads. The straight-through valve can be installed on the water supply hose, for example, connect it to:
- washbasin;
- faucet in the kitchen;
- tank drain hose;
- water heating tank.
When choosing a straight-through valve, it is important to choose the correct direction of the lever (valve) itself. If it rests against a wall or is in a hard-to-reach place, turning off the water will be problematic.
To connect a tee, it is enough to have a set of keys, a gas wrench and FUM tape in stock. Also remember a few useful installation rules:
- The tee can be installed both before and after the hose on the drain tank.
- When connecting to a mixer, do not install a tee to old pipes.
- Use the “supply” (supplies water to the tank) pipe on the water heating tank to install the faucet, otherwise the machine will draw hot water from the tank.
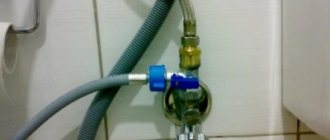
The tee installation process is quite simple:
- first unscrew the locknut and coupling on the hose (this can be done with either a regular wrench or a gas wrench);
- remove all old FUM tape from the thread and wipe it;
- if the pipe is old and metal, then thoroughly clean its end with a file so that the surface is smooth (this is not necessary for plastic pipes);
- screw the FUM tape onto the pipe and install the tee;
- Screw the FUM tape onto the external thread of the tee and screw the hose from the drain tank/mixer/water heating tank, and the hose from the washing machine into the remaining hole.
- tighten the connections with a gas wrench.
Please note that most cheap hoses cannot be used a second time, as the sealing rubber becomes dull and does not return to its original position. Consequently, it begins to let water through. Better stock up on new hoses.
Applications of corner valves
Unlike tees, this type of valve has only two outlets. Taps are used to connect the washing machine hose to a pipeline, where a separate pipe is allocated for the washing machine. The connection method with an angle tap is easier and more reliable than a tee, but is more expensive - you will have to buy a special tee and an additional pipe. make an insert into the pipeline, install a tee there, then solder it and only then install the valve.
The process of installing a corner device is not much different from installing a tee:
- prepare a FUM tape, a gas key and a set of regular keys;
- wrap the tape around the threads of the faucet (on all threaded ends), then screw the valve first into the pipe, then screw the hose from the device to it;
- check the connection for leaks.
There are many models of this type of crane. The choice depends on cost and design. It is better to take brass options.
Alternative
A tee fitting can also be used as a tee. To install it, you need to cut the pipeline, then install the fitting, after which you need to install the pipe going to the washing machine in the remaining hole. This method is very cheap and easy to implement, but not very reliable, since over time the rubber seals on the fitting deteriorate and water begins to seep out. Instead of a washing machine faucet, you can use a regular ball valve. In terms of reliability, it is not inferior to a specialized one, but costs much less.
Important! To connect to the pipeline, all taps use an internal thread with a diameter of half an inch; for a washing machine, an external thread of 3/4 inch; for plumbing fixtures, an external half-inch. But in angle taps both threads are external.
Table of the main causes of inlet hose leaks
All inlet hose leaks can be divided into two main categories - on the flexible tube itself and at the joints. Their causes are different in nature, and the ways to eliminate them are also different.
| Cause of leakage | Remedy |
| The integrity of the hose is compromised due to natural wear or kinks or kinks. | Even if the crack is not visible to the eye, it will grow over time. Strong pressure inside the tube makes any repair impractical and impossible. The entire hose needs to be replaced. |
| The nut connection has become loose due to vibrations | Tighten the nut, check the tightness of the connection |
| The rubber gasket inside the connecting nut is worn out | Replace the gasket, tighten the nut |
Examples of using
In theory, everything sounds simple, let’s look at successful and “working” examples in practice.
Three-way valve from Fornara
This faucet is made in Italy. It belongs to the category of tees, so it has three threads: for a washing machine, water supply and plumbing. The product is made of quite high quality and lasts a long time.
Croatian tees
Such three-way ball valves are made of brass and coated with chrome plating. They have standard thread sizes and three outlets. The product works for at least 20 years.
Decorative corner tap Rubinetta
This mini-model, designed specifically for washing machines, will look good as a corner valve. The tap is miniature, straight through, with high-quality chrome plated.
Angle tap ITAP
This ball angle valve has the same thread on both sides - an external half-inch thread. Used to connect any plumbing fixtures. not just washing machines. Made of brass, nickel plated.
Verdict
You can connect the washing machine in different ways. Which one to choose is up to you. The most reliable, but more expensive - through a separate pipe and corner valve, a simplified version - using tees. It is very undesirable to connect the device directly, since to disconnect the machine from the communication line you will have to completely turn off the water.
https://2stiralki.ru
Choosing a faucet for a washing machine is a responsible step that must be taken very seriously. This link will provide a reliable connection to water, which is a very important condition. Choosing the wrong parts, careless installation and inattentive reading of the instructions will lead to unpleasant consequences in the future. A bad faucet can not only damage the internal parts of the machine and lead to, but also cause a real flood not only in your home, but also in your neighbors. We will look at the design of water taps and tell you how to choose them correctly and then connect them to the machine.
Taps for connecting a washing machine and other household appliances to the plumbing system are divided into several types.
Ordinary flow
Its outlets are located on both sides. This type of device is mounted on a special branch
, which connects the water supply communications with the washing machine. This type of faucet simply shuts off the flow of water to the device, dividing the branch into two parts.
Flow tap
Triple
It has several outlets for connecting devices to the water supply. One of them is responsible for directly blocking the flow. Others serve as ordinary flow-through devices to combine all branches of the water supply system into one system. These taps can have different shapes and configurations. several devices through one connection in the water supply system
. A standard flow system faucet will not be able to do this due to its design features.
For example, this is how a washing machine usually works.
This is a system with two branches of modernized contraction. This allows you to divide the outlet pipe into 2 compartments, while placing it at an angle of 90 degrees. This faucet is best suited for situations where the machine is connected to a water pipe located in the wall
, which makes it quite difficult to connect a direct tap to it.
In addition, it is used in the installation of toilets and other plumbing fixtures.
Angle tap
Accommodation options
There are several places where you can put a washing machine:
- toilet;
- bathroom or combined bathroom;
- kitchen;
- corridor.
The most problematic option is the corridor. Usually there are no required communications in the corridor - no sewerage, no water. You will have to “pull” them to the installation site, which is not at all easy. But sometimes this is the only option. In the photo below there are several interesting solutions for how you can place the typewriter in the hallway.
The photo shows an option for installing a washing machine in a narrow corridor
Making something similar to a portal is also a way out. Hide it in the nightstand.
Integrate into hallway furniture
The toilet has all communications, but in typical high-rise buildings the size of this room is such that it is sometimes difficult to turn around there - there is no space at all. In this case, washing machines are placed above the toilet. To do this, make a shelf so that when sitting on the toilet you do not touch it with your head. It is clear that it must be very durable and reliable, and the machine must have very good shock absorbers. In addition, they must be set perfectly, otherwise they may “jump away” during the spin cycle. In general, with this method of installing a washing machine, it doesn’t hurt to make several strips that will prevent it from falling off the shelf.
The shelf is solid and reliable, but slippery - a rubber mat is needed under the legs for shock absorption. Powerful corners are built into the wall, with a washing machine installed on them. The plastic stops were removed from the legs, and holes were drilled in the corners for the remaining screws. The installation is reliable, it is only important that the vibration does not tear the corners out of the wall
Can be closed with vertical blinds
This is already a whole cabinet. The only thing missing is the doors
In the bathroom and combined toilet there is usually not very much space either, but still more than in the toilet. There is a choice here. If you have space, you can place the washing machine next to the sink. You can install a table top on top, which will be a logical conclusion and will also solve the problem of water getting on the body. To make everything look organic, you need to choose a machine of such a height that it fits into the size, and the sink itself is better square - then they will be wall to wall. If there is not enough space, you can slide at least part of the body under the sink.
Place the washing machine next to the sink
Now fashionable countertops in the bathroom can be finished with mosaics
If space allows, just place the machine next to the sink.
There is a more compact way - to place the washing machine under the sink. Only the sink needs a special shape so that the siphon is installed at the back.
To place the washing machine under the sink you need a special sink
One of the sinks under which you can put a washing machine
The next option for installing a washing machine in the bathroom is on the side of the bath - between its side and the wall. Today, case sizes can be narrow, so this option is a reality.
Narrow cases are no longer uncommon
Between the bathtub and toilet The sink should not be smaller than the body
Nobody bothers you to install a sink on top
Just keep in mind that installing such equipment in bathrooms or a combined bathroom is not the best idea. Due to increased humidity, the case begins to rust quickly (tested from my own experience). However, there is usually not a lot of space, although in principle, you can put the car under the washbasin or hang shelves above it. In general, it's up to you.
Another popular place to install a washing machine is in the kitchen. It is built into the kitchen set. Sometimes they close doors, sometimes they don’t. This is at the discretion of the owners. Several interesting photos are in the gallery.
Doors with a cutout for a “porthole”
Place it in the kitchen cabinet. The washing machine looks quite organic in the kitchen unit.
Installation required
Most consumers, when purchasing parts for installing a washing machine, often ask themselves why not just connect the hose directly to the water supply. What is the purpose of the crane? Of course, there is always the option to refuse to use this part, but then be mentally prepared to compensate your neighbors for losses.
For people who have already encountered such an unpleasant phenomenon as water hammer
in water supply pipes, it makes no sense to describe its consequences. This is a fairly common problem, when it occurs, the seams of metal and metal-plastic communications are completely torn. Now think about what will happen in the same situation with a soft one, which is directly connected to the water supply pipes. In a couple of seconds it will not be able to hold back the water and will rupture completely, and after a few minutes several floors of the apartment building will be flooded.
That is why it is impossible to do without a special overlapping device. An installed tap will make using the washing machine safe and convenient: plumbers recommend turning off the water after completing each wash.
Selection options
When choosing a model, pay special attention to the following aspects:
- The material
from which the faucet was made. The modern market is able to offer models made of brass or silumin. Experts do not recommend giving preference to a brass product, since silumin taps wear out quickly. - Diagram of the
water shut-off mechanism. In faucets, the most common are ball and multi-turn systems. In terms of efficiency and durability, the ball type is best. - External characteristics
of the valve. This part is designed to control the water pressure and completely shut it off. It is very important to choose a valve that is convenient for you. They may differ in size, shape and the force required to close the tap. In the event of an accident, every second will count, which is why it is so important that the surface of the valve is not slippery and fits comfortably in the hand.
Connecting the washing machine to the water supply
Having decided on the right valve, you can start working on the water supply system. When preparing for the procedure, you need to provide yourself with the appropriate tools and necessary parts. During work you may need:
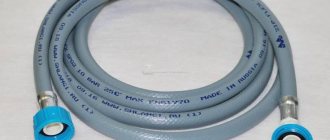
- Double hose
. As a rule, it is included with the washing machine, but if for some reason the developer did not include it in the kit, you will have to purchase the hose separately. Be sure to check the required length; it is better to take it with a small margin so that you don’t have to lengthen the hose later. Choose a two-layer hose with wire reinforcement; it will easily withstand high pressure and ensure an uninterrupted flow of water during washing. - flow system
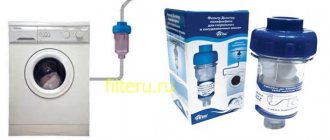
for water purification. This part is mounted directly onto the thread of the faucet and connected to the branch of the water supply pipe. The filter is used to improve the quality of running water and reduce the risk of the formation of various deposits. Depending on the quality of the liquid, different numbers of filters can be used. - Seal rings
, spare nuts, winding. This is a standard plumbing installation kit. These materials are used to ensure tight connections and securely fasten all components. - Key
with adjustable mechanism. Used for tightening nuts, connecting pipes, pipes and hoses. - calibrator
. Used for fitting and installing taps into pipes.
Having prepared the necessary materials and tools, you can safely begin connecting the washing machine to the water supply system. Think in advance about how it will be connected to the main water pipes. There are several of them.
Connection via a tee valve with integration into the pipe
While doing this, turn off the cold water riser. Remove the portion of pipe required to install the faucet diameter. Remove from the faucet and install special mounting nuts on the pipe. Using a calibrator, expand the outlet diameters of the pipes and install a tee valve on them. Do not forget to properly secure the joints using tightening rings
. Connect the shut-off section of the faucet to the inlet hose of the machine.
Installation of a two-way valve
Such a valve is best used when a separate pipe branch is specially provided for a household device. As a rule, such a branch is already equipped with a special threaded bushing
. The owner just has to screw a tap with a two-outlet system to it and connect it to a flow filter. After this, the inlet hose is connected to the filter. It will take no more than five minutes to do everything!
Angle tap installation
This procedure is very similar to that already described above. The only difference here is the need to screw not a flow-through valve to the outlet, but an angle one.
As a result, we can say: purchasing and connecting a faucet for a washing machine is a fairly simple process. If you carefully follow the instructions, you can even install everything yourself, without turning to professionals. Follow the tips described above and you will quickly understand the nuances of this process.
There are at least five ways to connect a washing machine to the water supply. The exact choice depends on local conditions. Below we will look at the connection options in more detail.
There are several ways to connect a washing machine to a water supply
From a designer's point of view
One of the disadvantages that can cancel out all the advantages at once is the unaestheticness of a washing machine in a kitchen set. But there are several ways to successfully fit the unit into the kitchen design, and you can choose the one that suits you best in terms of labor costs, money and results.
Hidden behind the façade
Like most modern technology, washing machines can be built-in models.
This means that the machine has a flat front panel, close to which you can attach the front and make the unit indistinguishable from other cabinets in the kitchen.
This option allows you not to think about the appearance of the machine, but you will have to overpay a little: built-in appliances are usually more expensive. The second point is design: this installation option needs to be planned at the kitchen design stage. It will be very difficult and expensive to remake a ready-made set.
Switch in the closet
A slightly less convenient, but also aesthetically pleasing solution is to place the machine in one of the cabinets on the lower base, converted or specially ordered for the machine.
It could even be a free-standing box (for example, in a niche), made in the style of the rest of the kitchen.
This option differs from a built-in washing machine for the kitchen in terms of inconvenience of access: while a built-in machine has a flat front panel, a regular one has a more streamlined one, and it will have to be placed deeper in the cabinet. But this method is more economical (can be used for any machine, even a budget one) and can be used for a ready-made kitchen.
Taste and color
The third option is not to close the washing machine at all, but choose it to best suit the style of the kitchen.
For example, a machine in a Metallic case will suit a high-tech design using a silver color.
And in combination with the same refrigerator and stove, it will create a harmonious ensemble.
For a kitchen in a modern style and in light colors, white appliances are suitable.
When planning a place for a washing machine, it is better to install it away from the stove: proximity to a hot oven is undesirable for any equipment.
When choosing a washing machine model for your kitchen, consider the width of the countertop and the dimensions of the model. The standard tabletop width is 600 mm, but there must be space behind the unit for hoses - that is, the machine should be no more than 550 mm. in depth. When installing “in a closet” you need to choose an even narrower model (450-500 mm).
Connection to a metal pipe
To make the connection you will need a mortise clamp. There is a threaded hole at the top of the clamp. This part is a tee for drainage. Along with the clamp there should be a rectangular rubber gasket, as well as a guide bushing for drilling the pipe.
Sequencing:
- We clean the area where the gasket will be located from paint and dirt. To do this, you can use a file or knife.
- We install the long end of the guide bushing into the clamp. The bushing must be tightly secured so that the gasket remains motionless when installing the part.
- We apply both halves of the clamp to the pipe and lightly tighten the 4 coupling bolts. Then we slowly twist them one by one, using a “crosswise” pattern. The bolts must be tightened so that the halves of the clamp are in a parallel position, and the gap between them is equal everywhere.
The more the bolts are tightened, the more the pipe pushes the guide sleeve outward. The gasket can be considered to be sufficiently pressed when the bushing comes completely to the surface. Sometimes the bushing does not come out completely, as it is held back by the gasket. Then you need to push the bushing through with a screwdriver or file. It is optimal if the gasket has a round hole, located inside the clamp hole and equidistant from the center.
Sometimes the gasket hole moves to the side. In this case, it is necessary to straighten it by tightening the bolts on the side where it comes off. If the hole is not completely visible, it means there is a misalignment somewhere that will lead to a leak.
- Before proceeding to the next stage, you need to close the riser. We insert the guide sleeve into the clamp. It should be positioned with the cap facing inward.
Take a drill 6-7 millimeters in diameter and drill a hole. Next, we place a bucket under the clamp and slowly open the water that was previously in the vertical pipeline.
We remove the shavings that are not washed off with water. A piece of bandage or toilet paper works best for this.
- We test the system for leaks from under the clamp.
Note! If in the future you have to remove the clamp, the procedure for returning it to its place is the same as when installing it.
When choosing a location for the clamp, you should keep some points in mind:
- It must be installed after the coupling, when viewed from the riser.
- The section of pipe located between the coupling and the tap is called the “squeeze”. If the faucet needs to be replaced, this part of the pipe will have to be removed to dismantle the faucet. If the new tap is of a different size, it is necessary to replace the drive with another one of the same length. So, when replacing the drive, you will also need to change the clamp.
- Most often, an angle tap is installed on the clamp. You should not save on this device; it is best to purchase a product from a reputable manufacturer, for example, ARCO.
How to extend the drain hose?
The factory length of this SMA element is 1.5-2 m. If you buy a replacement with a longer length, you will have to disassemble the device. Not everyone is suitable for this. It’s easier to do extensions, for this you will need:
- Similar element;
- Clamps;
- Connecting element.
If the connection is tight, clamps will not be needed - you can save on them. However, these are inexpensive parts. In order not to run after them in case of poor sealing of the connection, it is better to stock up on them in advance. You will also have to use clamps if you cannot find the right connector. Let's consider two connection options:
- With connector:
- We fix the elements in the connector;
- Secure with clamps - if necessary;
- We connect with SMA and sewerage;
- Let's run a test wash.
- If there is no connector.
- You need a tube of the appropriate size made of rubber or plastic;
- We string the tube onto two connecting elements so that they are joined in its center;
- The tube should fit as tightly as possible - we strengthen the fit using clamps.
There are other options:
- Move the device closer to the sewer pipe;
- Make the drain closer.
You've learned how to extend your drain, but that's only half the battle. Now let's look at the element through which water enters the SM.
Connection to a metal-plastic pipe
To install a tee on a metal-plastic pipe, you will need to make a cut in the desired area. The piece of cut pipe should be equal to the size of the tee. In this case, you need to cut in a place where there are no bends.
Note! The installation length of the tee is calculated not by its ends, but by the location of the fittings.
Next, attach a nut to the pipe. We take the calibrator and slightly widen the end of the pipe to make it easier to fit it onto the tee fitting. The calibrator must be inserted using a rotational motion to prevent transverse vibrations, which could unnecessarily stretch or deform the pipe.
Tee for a metal-plastic pipe
We mount the tightening ring and direct the tee fitting into the pipe, pressing it to the very end. If you feel that the ring is completely pressed against the tee end, tighten the nut, supporting the tee, preventing it from rotating with the nut as it is tightened. We repeat the same with the other end of the pipe. It is better to mount the tap on the tee before installing it on the pipe.
Note! The white ring at the end of the fitting is a dielectric that serves as protection against electricity (for example, if one of the neighbors suddenly grounded the water supply system).
You may also need a calibrator in the shape of the letter T. The fact is that for some pipes made of metal-plastic, a standard calibrator may not be suitable. In this case, you will need to sharpen the pipes inside. To avoid excessive thinning of the walls, you need to use calibrators in turn: first with a reamer, and then with a standard device.
Varieties
Regular
The most common inlet hoses, without a leakage protection system, which are sold in any hardware store:
- rubber water pipe - standard for connecting equipment to the water supply network, usually included in the kit, service life 3-10 years;
- reinforced (available in corrugated metal braid), which is a standard rubber tube protected by an additional layer, which gives additional strength. Metal and nylon are used for reinforcement.
With mechanical valve
The rubber hose for water supply with the Aquastop system is one of the first with protection against leaks.
Aquastop is a valve with a special spring that is instantly activated when the pressure changes. If the Aqua-Stop system detects an unexpected leak in the washing machine, then the water that at that moment enters the unit is immediately shut off.
A special feature of this system is a thick water supply tube that can withstand up to 70 bar, when a standard water supply can only withstand 10 bar. This mechanism contains a solenoid valve (safety valve). Its normal position is normally closed.
Water Block # Blocking valve
The principle of operation of the Water Block water shut-off valve is to determine the volume of water that has passed through the sensor. "Water Block" is installed at the water inlet. The valve does not allow more water to pass through than specified in the program; it blocks the access of liquid. This system reacts even to small leaks, since the pressure inside the water supply does not matter to the device. After an alarm is triggered, the system starts a new operating cycle only after it is reset by pressing the “Reset” button.
The user of the system can adjust the permissible water level independently - the delivery set includes a key for setting the required parameters. For correct settings, you need to know information about the water consumption of the washing machine for one operating cycle.
With powder adsorbent
Some modern manufacturers equip washing machines with inlet hoses containing absorbent powder. This system is equipped with an internal channel through which water flows, and an external tube hermetically seals the internal flow. If the internal channel is damaged for some reason, water will begin to flow into the outer shell and rise to the automatic blocker. The mechanism is located at the point where the hose connects to the water supply pipeline. There are two types of protective devices in such systems:
- a plunger that performs the function of a shut-off valve. The absorbent component is connected to the plunger using a spring. When the absorbent powder comes into contact with water, it expands and begins to press on the spring and the plunger closes the entire system;
- magnets ensuring a stable position of the plungers. Dry absorbent powder keeps the system in balance. When wet, it expands in volume and separates the two magnets. As a result, the field between the magnets weakens, and the flow is cut off by the plunger.
Such a system gives results only if there is a leak in the hose. If the depressurization occurs on the threads or inside the washing machine, the mechanism simply will not work, as with small leaks.
Another disadvantage of the system is its disposability, i.e. After an emergency, the system requires complete replacement.
With float sensor
Another leakage protection system built into washing machines by manufacturers is a float sensor with a switch (much like dishwashers). In this case, the lower part of the household appliances is covered with a decorative plastic tray. If a leak occurs at the junction of the pipes or a leak occurs inside the unit, the liquid begins to collect in a special container. The float sensor, protection system, rises as the liquid level in the container rises. After some time, the mechanical leak valve will activate the switch, stopping the flow of water into the tank.
The disadvantage of such a system is that the protection mechanism only works when water collects in a special container. If water accumulates on the floor, the switch will not work. In addition, the mechanism does not respond to small leaks.
Walk-through taps for washing machines
This method of connecting to the water supply system is the most accessible and economical of all possible. The tap is placed on the hose-pipe connection. It is used in the place where water is supplied to the hose for the drain tank, water heater, or in the bathroom.
Walk-through valves come in different directions. You need to choose one so that its lever is not facing the wall, but to the right or left.
When there is already a tap in front of the hose (for example, for draining to a tank), then we install (before or after - it doesn’t matter) a through tee to connect the washing machine. However, if the hose is directed to the water heater, and you also plan to connect an additional washing machine, then the tap must be placed between the pipe and the tap on the water heater. This measure will allow you to wash at any time, and not just when the hot water is turned off.
If the washing machine will be located in the kitchen, and the mixer is of an outdated design (i.e., not on hoses, but on pipes), then rather than buying a mortise clamp, it is better to buy a new mixer. In this case, you will need one pass-through valve.
You will need a gas wrench to unscrew the locknut. If the nut becomes loose with force, you need to tighten it in the opposite direction from time to time. Next, remove the coupling - after the nut it should go easily, but it can be hampered by the flax acting as a seal. Here the principle is the same - we go in the opposite direction, get rid of the flax, then continue to remove the coupling.
The edges of the pipes pulled out from the coupling most often have torn edges due to corrosion processes. We correct the situation with the help of a file, since the hose must fit neatly to the pipe.
You can also install an extension cord. If you do this, you don't have to worry about torn edges. The pass-through tap will act as an extension cord for flexible wiring.
Instructions for replacing aquastop
Find out your device type
If it is mechanical, then it is enough to simply “snap” it back. The spring will return to its original position. If it is absorbent, then the absorbent material will soon return to its original position, you need to wait. The electromechanical one needs to be replaced, so read the material further.
This will not give you the opportunity to receive a current discharge, and will also give you access to the electromechanical aquastop.
This must be done, because without aquastop, a leak is likely!
It just rolls up, nothing complicated.
Do it carefully, don't break it! In the photo it is the blue wire.
Reassemble the new device by following the steps in reverse order.
Be sure to repeat the sequence exactly. This will protect the new device from damage.
You have replaced the aquastop on your dishwasher!
Connecting to a bathroom faucet
This method involves connecting the washing machine to the water supply using a tee tap, which is installed between the mixer and the eccentric. An extension cord for hot water supply is supplied with the faucet. In contrast to the valves described above, all ends of this straight-through valve have the same thread - ¾ inch.
This method is optimal only when there is a valve with a nut on the mixer, but not on the eccentric. Such taps, despite their external similarity, have different threads. And since the pass-through valve in question is produced in a single modification (¾), it is only compatible with a similar thread design. When installing the crane, there is no need to dismantle the eccentrics, since the crane is installed directly on them.
If we are talking about a Russian-made mixer, you will need to remove it, then dismantle the eccentrics, and also install a walk-through valve with an extension. It is convenient to wrap the extension cord into a corner on the wall, behind a plug with an external thread inserted into it using a sealant. While working, you need to support the corner with an adjustable wrench.
In general, the option with a walk-through tap is difficult to install. At the same time, this is also a rather expensive option when compared with installing a branded faucet and a mortise clamp. In addition, the design on the faucet from which the hose comes off is not very aesthetically pleasing. Therefore, it is recommended to use this option only if other options are unavailable or inappropriate. The above especially applies to situations when we are talking about Russian-made mixers.
Also, do not unnecessarily touch old communications, as they are susceptible to unexpected failure. The exception is when old connections are connected to plumbing using nickel-plated threads. There is a considerable probability of damage to the eccentrics with an adjustable wrench. Therefore, it is better to have them in reserve.
General information about the inlet hose
It can be installed with your own hands; the main thing here is the correct choice of device.
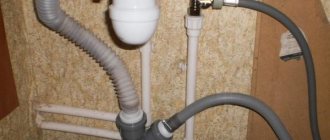
Hose design
If the household appliance is located at a considerable distance from the water supply, and a standard hose is not enough, then it is possible to connect several hoses into one. In this case, plastic fasteners are used and sealed using plumber's tape.
A good quality filler product is equipped with a pressed metal sleeve at the junction of the pipe and fitting. All products are marked with technical characteristics.
Please note: Typical products can withstand voltages of up to four bar.
To prevent the hose from expanding under water pressure, it is wrapped with reinforced thread.
Dimensions
Filled products are available in the following sizes:
• Installed, up to five hundred centimeters in size. One hundred and fifty centimeter hoses are included with the washing machine. • In a bay, the length of which is up to ten meters. If desired, upon purchase, they can cut the hose to the length you need. • Telescopic. The design is in the form of a corrugated wave, i.e. the length of the hose can be increased to the desired size.
Types of inlet hoses
The following types are distinguished:
• rubber water hoses; • reinforced rubber hoses; • rubber hoses with Aqua Stop protection.
Filler hoses may vary in lifespan and price. The most short-lived and cheapest ordinary rubber hose. But the most expensive are products with protection against leaks.
Aqua Stop protection
Products with the Aqua Stop system represent a separate type of inlet hoses. A regular tube may leak during operation. If this is not corrected in a timely manner, serious problems may arise, ranging from damaged flooring to flooding of the lower apartment. When liquid is poured into the device, a lot of pressure is applied to the hose, which the hose may not withstand and may burst.
Aqua Stop with solenoid valve
When there is a leak, the valve is activated and the water is automatically shut off. A special sensor that controls the action of the valve is located in the outer shell of the hose. The entire length of the product is enveloped in a flexible shell.
If the product breaks right at the outlet of the device, the liquid will not flow out, since the water is collected in a specially installed tray located under the washing machine.
A sensitive float is installed in the pan, which begins its action when liquid appears, rises and closes the switch contacts. Also, the valve may operate if the working container is overfilled or if the device is damaged.
Also, if there is an overdose of detergent, foam appears on top of the working container.
Pumping device
More expensive machines have a pumping device. If for some reason the emergency valve does not work, then the leaked liquid is pumped out into the sewer system by the pump that comes into action and its leakage is prevented. It should be noted that the Aqua Stop protection in the event of an accident is activated 1 time. This hose is not reused. You can buy a hose with Aquastop protection at any hardware store. Almost every well-known brand produces flooded products with leakage protection. Having such a hose available, you won’t be afraid of flooding.
• CODO; • Aquastop; • UDI-Black; • Aqualine.