To install an automatic washing machine, it is not at all necessary to call a specialist. After all, his services will not be cheap. Detailed instructions explaining how to connect a washing machine yourself will help you correctly carry out all the necessary manipulations with minimal financial costs.
We will tell you how to install and connect household washing equipment with your own hands. The article we presented describes in detail the process of unpacking, leveling and connecting the unit to communications. Taking into account our advice, you can carry out all the work flawlessly.
The procedure for connecting an automatic machine
To start the operation of the washing device, you need to choose the optimal location for its placement. Then prepare the washing machine for connection work.
After this, all that remains is to correctly perform the following steps:
- align the device, giving it the optimal position;
- connect to the water supply to collect water needed for washing;
- connect to the sewer to drain water when implementing a given program (washing, soaking, rinsing, spinning);
- connect to the electrical network to ensure the supply of electric current that drives the unit’s motor.
Next, we will consider in detail all the above stages.
Planning and marking
Before you get down to business, you need to choose the optimal location to install the outlet. It should be located in close proximity to the machine, but the distance to the shield must also be taken into account. Do not forget that the further the shield is, the more wire will be required, in addition, the more work on gating and subsequent sealing of the channel will have to be done.
The installation location of the socket, as well as the wire route, is marked with a marker directly on the wall. When planning a route, you must remember that the wire must run either strictly vertically or strictly horizontally. Violation of this rule can cause an accident; not knowing where the wiring is laid, you can drive a nail or tighten a screw extremely unsuccessfully.
Having finished marking, it is worth checking everything again, and at the same time making sure that there is a sufficient amount of wire and its cross-section is correctly selected. It is important to understand here that high-quality wiring for a washing machine is continuous wiring. There should be no connections or twists in the channel - these are potential fire points.
Stage #2 - preparation for installation
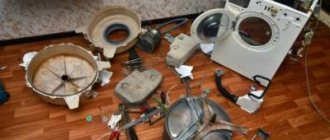
The purchased machine is delivered to the apartment in packaged form. All rotating parts are fixed with fasteners (bolts, bars, brackets), which protect the device from accidental damage during transportation.
Before starting installation, it is important to remove all fasteners (bolts, brackets, clamps) that protect the machine parts during transportation
The delivered washing machine should be freed from the box, and then begin removing the fixing parts:
- From the rear wall of the unit you need to remove the brackets , which are installed for the rigidity necessary for transporting household appliances. Such elements also hold flexible parts of the structure, namely the hose and electrical cord.
- Following this, it is necessary to remove the bars placed between the tank and the body of the device. To do this, just tilt the washer slightly forward.
- You should also remove the bolts that are installed on the front of the machine to secure the drum. It is better to immediately insert plastic plugs into the holes from the removed elements (they are usually included with the model).
Released fasteners must be carefully packed and stored: they may be needed when calling for service.
Image gallery
Photo from
Installation points for fastening blots
Loosening the bolts with the supplied wrench
Removing the bolt along with the plastic insert
Collecting shipping bolts for storage
Wire laying work
They start pulling the wiring from the panel. At the same time, it is important not to forget that an additional machine will be installed in it. Before starting installation, you need to mark the connection points of the conductors (phase, neutral, grounding), but you do not need to connect the terminals yet.
The wire is temporarily fixed inside the shield, placed in the prepared channel, and, if necessary, secured with plastic fasteners.
Stage #3 – leveling the washing machine
In order for the automatic machine to serve with maximum efficiency, the installation and connection of the washing machine should be approached with the utmost care.
The floor base requires special attention, which must meet a number of criteria:
- strictly horizontal surface;
- durable structure;
- sustainability;
- protection from vibration and other influences inevitable during operation of the unit.
If the foundation does not meet these criteria, it is better to take measures to meet them.
In addition to levelness and reliability, the base for installing the washing machine must also have anti-vibration properties. If you are going to install it on a tiled or wooden floor, then it is better to carry out the whole process using devices that dampen vibration:
Image gallery
Photo from
Felt pieces against vibration
Anti-vibration stand for washing machine
Round anti-vibration device
Invisible anti-vibration pads
On fragile surfaces, it is advisable to make a cement-sand screed or strengthen the existing floors in the place where the washing device is supposed to be installed.
Adjustment of the position of the washing unit is achieved by changing the height of the support legs: to increase the distance from the floor they can be unscrewed, and to decrease they can be screwed in
After making sure that the base meets all the previously mentioned requirements, you can begin installation. The fully unpacked machine with the fasteners removed is placed in the selected location.
The horizontal installation is determined by the top panel, while the angle of deviation, which is checked by the top cover, should not exceed two degrees. Exceeding this indicator leads to a sharp increase in vibration, which has a very negative effect on the condition of the components and significantly reduces the service life of the machine.
Image gallery
Photo from
Step 1: Screwing all legs to minimum height
Step 2: Adjust the rear support to the required level
Step 3: Checking the horizontal alignment of the legs
Step 4: Fine Adjustment of Support Heights
Placing improvised materials under them that could slip out from under the supports during work is strictly prohibited. This may lead to an emergency situation. At the same time, it is allowed (and even recommended) to place a thin rubber mat on the sliding tiled surface.
As soon as the body of the machine is in a perfectly horizontal position, you should tighten the locknuts counterclockwise, fixing the optimal height of the support legs.
When leveling the machine, it is recommended to consider the following factors:
- The greatest degree of stability of the unit is achieved with the adjusting supports screwed in as much as possible, but this option is only permissible on a perfectly flat surface.
- When installing the machine on an inclined floor, it is advisable to use fixing parts to secure the supporting structures.
- To check whether the unit is installed correctly, you need to try to swing it diagonally. If the process is done correctly, there is no free play or its amplitude is the same for different diagonals.
Once you are sure that the unit is in the correct position, you can proceed to the next steps.
Mounting space for socket and groove
It is better to start chiseling from the recess for the socket. The optimal tool for this seems to be an electric drill with an attachment for drilling cylindrical holes. It is only important to choose a crown of a suitable diameter, focusing on the parameters of the socket box. If there is no such attachment, you can drill holes over the entire area of the future recess and carefully knock down the jumpers with a chisel. The recess will not be as neat, but the method is quite effective.
Next they move on to gating. Ideally, you can use a special tool for this – a wall chaser. It leaves behind a perfectly even groove; working with it does not require excessive physical effort. In the absence of one, you can get by with the same drill. Holes are drilled along the cable laying line with the minimum possible pitch, and the final formation of the groove is done using a grinder.
Sometimes you can do without dusty work at all; a cable laying channel will help out. It is enough to fix the box on the wall and lay the wire of the required cross-section inside it. It's quick and easy, but not always aesthetically acceptable.
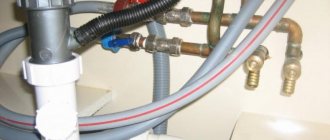
Stage #5 - connection to the sewer
Connecting the washing machine to the sewerage system allows you to solve the problem of draining dirty water that remains after washing.
This can be done using different schemes:
- Temporary , by using a special hose directed into the toilet or bathtub.
- Permanent , providing for a stationary drainage device.
The first method is very simple: the water is drained through a hose attached to the edge of the bathtub, toilet or sink, which can be done using special fixing elements.
In the second case, two options are possible. Drainage is carried out using a siphon of a special design, which has a separate outlet for connecting automatic washing machines, located under the siphon elbow.
You should not replace such a device with a conventional analogue, since waste water will linger in it, spreading an unpleasant odor.
This diagram shows an option for connecting the “machine” to the sewer system using a siphon of a special design, which provides a special outlet for the hose
The washing machine can be connected without a siphon. With a sewer pipe diameter of 4-5 cm, the outlet for the machine can be connected directly to this element.
The S-curved drain hose is inserted into the pipe so that it does not touch the waste water, and then carefully surrounded by a sealant and sealed. The distance from the inflection point to the floor must exceed 0.5 m.
The maximum hose length is usually indicated in the instructions supplied with the model. If you select a large part, the load on the pump will increase sharply, which can lead to unexpected failure.
Image gallery
Photo from
Washing machine drain hose
Exit to the bath using a retainer
Discharge into sewer pipe
Siphon with a pipe for connecting equipment
If the design of the washing unit does not provide for a check valve, then when installing the model, there is a restriction on the height at which the drain hose is located. The manufacturer usually provides specific information in the instruction manual.
Tools and consumables
The list of tools that will be required to lay the wire to the washing machine is individual and directly depends on the material of the walls. In limestone or a thick layer of plaster, you can chisel a channel with a “classic” hammer and chisel; in the case of monolithic reinforced concrete, you cannot do without a grinder. In general, you should prepare the following for work:
- electric drill and concrete drills;
- grinder with a disc for stone;
- sharp mounting knife;
- wire cutters and pliers;
- several screwdrivers;
- indicator screwdriver.
Consumables, namely a copper wire of the required cross-section and a socket, have already been purchased, as well as everything that is needed for installation, but it’s worth stocking up on electrical tape just in case. Even if twisting is not planned, but with its help you can quickly fix the wire in the right place. A tube of regular silicone sealant wouldn't hurt either.
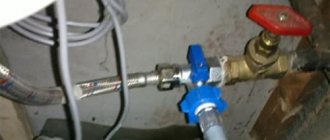
Stage #6 - connecting to the electrical network
Specific information on how to properly connect a newly purchased washing machine to the power supply can be found in the instructions. Particular attention must be paid to safety rules, since the device has a high level of power consumption (1.5 - 2.5 kW) and also comes into contact with water.
To connect the unit to the electrical network, it is important to carefully select the outlet. The device must be grounded; in addition, it is advisable to choose a model with a cover
As a rule, to connect a washing machine yourself, you need a three-wire socket, which has a phase, a neutral, and a carefully insulated ground wire. The distribution board is grounded by using a special bus with a cross-section of at least 0.3 cm.
When connecting, it is advisable to follow several recommendations:
- The best option is an individual power supply . In this case, the washing machine is powered from the distribution panel via a separate input, and electricity is supplied through additionally laid power cables. To prevent wires from spoiling the interior, they can be placed in neat plastic boxes.
- Use of specialized electrical protection devices . In addition to the mandatory circuit breakers, it is recommended to additionally install a residual current device (RCD) into the power supply line of the automatic machine.
- Strict compliance of all components of electrical circuits with requirements /technical/operational characteristics. For wiring, it is important to use three-core cables, and the cross-sectional area must exceed 1.5 sq.cm.
- Connect the socket according to the diagram specified in the instructions. It is important to comply with a mandatory condition - the presence of protective grounding. The wire must be connected to the grounding bus of the distribution panel.
- Connecting a conductor to heating or water supply lines is strictly prohibited , since this can lead not only to failure of the machine, but also to the creation of emergency situations.
- It is better to give preference to sockets with IP44-IP65 when choosing models that have a high degree of safety; It is desirable that they have a lid that protects from moisture and a ceramic base.
- Extensions, tees and adapters should be avoided when connecting a washing machine: the additional connections inevitable in this case can provoke an increase in temperature in the contacts, which leads to breakdown of the unit.
It is undesirable for the socket for an automatic machine to be located in rooms with constant high humidity. If the electrical cord is long enough, it is better to place the power supply in an adjacent space, for example, a corridor.
Image gallery
Photo from
Minimum distance between the socket and the washing machine
Grounding power cord plug
Socket with grounding for washing machine
Violation of the washing machine operating rules
Common installation errors
It happens that when you try to start the washing machine, the electricity in the apartment is completely turned off due to the protection being triggered. This happens if the terminal for the neutral wire is confused with the junction point of the ground wire. Other mistakes made by craftsmen:
- Connection to the network through a socket with a lower permissible current than the rated load. The result will appear as carbon deposits on the housing or melting of the contacts.
- Connecting to power without grounding the washing machine. After some time, the electronic control board becomes unusable; touching the body of the device is accompanied by a tingling sensation.
- Ignoring RCD. An accident on the water supply or on the hoses of the machine will cause a short circuit, but the circuit breaker will not work: it only protects against exceeding the total network load.
- Incorrect installation of the washing machine, when the sensor does not see the water remaining in the tank, which can accumulate electrostatic potential. When removing laundry from the drum, a current discharge occurs even when the machine is turned off.
You need to remove the plug from the socket after each wash - this is stated in the instructions for using the device. If a separate cable is connected to the SMA, it can be disconnected from the panel.
differential machine
Stage #7 - test activation
Having completed all the work described above, you need to check the correct installation by starting the washing machine one by one to operate in all modes.
The final stage of work is to check all systems of the washing machine. It must be carried out strictly according to the instructions and affect all sides of the connection.
To do this, you need to inspect all the assembled components, and then conduct a test run of the machine without laundry, during which you need to pay attention to the following options:
- the period of time (it should be short) during which the tank is filled;
- no leaks;
- correct functioning of the drain;
- uniform rotation of the drum;
- good spin;
- full heating of water, which occurs 5-7 minutes after the completion of water collection.
At all stages of operation of the unit there should be no extraneous sounds.
You can install and connect to communications yourself not only a washing machine. We suggest that you read the installation instructions for the dishwasher. The step-by-step guide we offer will provide effective assistance in carrying out the work yourself.
Selecting a residual current device (RCD)
Before deciding which wire for the washing machine (see photo below) to connect to, a number of issues must be resolved. And first of all, install an automatic packet switch (most often it is C16) and an RCD, placing it in front of the socket of the connected device.
For groups of devices operating in conditions of high humidity with separate access, the setting for the RCD is set to 10 mA. With this value for the differential disconnecting current, automatic shutdown devices are produced for an operating current value of no more than 16 A, which corresponds to the rating of the package switch. For single-phase electrical wiring, we select a two-pole electromechanical RCD type A (permanent leakage type), with a short circuit current of 6000 A.
We provide protection against failures
High-quality grounding is the first step towards forgetting about most problems. But only recently have people begun to think about proper grounding for sockets that are supplied with devices.
The actions are described as follows:
- We bring out a wire that is intended for grounding to the desired wall of the house. The end of the wire should reach the foundation.
- A piece of reinforcement is driven into the ground to a depth of approximately 2 meters. The tip should stick out on the surface, about 30 centimeters.
- The ends of the wire must be completely free of insulation. Protruding ends need to be removed from dirt and rust. The exposed part of the wire must be tightly wrapped around the fittings. The connection can be secured with a small amount of cold welding to make everything more secure.
- The connection between the fittings and the wires is carefully wrapped with electrical tape. A piece of rubber hose of the appropriate diameter is placed on top of the fittings.
- Preparation of proper grounding ends here. Now the wire and socket connect without problems.
Checking the quality of work
You can verify that the installation has been completed correctly using a test screwdriver; it can be successfully replaced by any household appliance powered by the mains, for example, a table lamp. If everything is fine, you can seal the channel and move on to finishing the walls.
Good wiring is a guarantee of safe operation of any household appliances: refrigerator, water heater, dishwasher and washing machine. Although laying wires and installing sockets is a rather complicated process, if you wish, you can do everything yourself. Of course, we must not forget that electricity is dangerous; if you have doubts about your own abilities, you should entrust the work to a master.