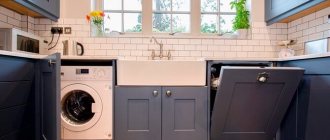
Installing a washing machine on a wooden floor
- How to choose the right place to install household appliances
- How to install a washing machine on a wooden floor
- Installation methods
If the room in which it was decided to install the washing machine has a smooth concrete floor, then the owner will not have any problems. However, it often happens that the flooring in a certain part of the room is not up to standard. In this case, some decide to place pads under the legs of the washer or slightly adjust the legs, however, this is the wrong decision. Experts say that before installing a washing machine on a wooden floor, it is necessary to evaluate the evenness of the coating, because the service life of the device directly depends on it. Wood is the most common flooring material, but if installed incorrectly or during operation, its level may change slightly, which will negatively affect the quality of the device.
Cleaning after repair
The question is often asked: how to clean linoleum after renovation without streaks.
The simplest thing is to prevent contamination altogether, of course: before starting work, always cover the floor with plastic film, preferably in several layers. Or get the invited team to do this. But if this preparation was not done, or at some point the film moved away, the problem can still be solved.
Even a very dirty floor can be cleaned like this:
- use a spatula to remove all large remnants of finishing materials and sweep away dust and small particles;
- to finally deal with dust and white deposits, wash the floor in several waters, each time with a new rag;
- remove stains with a solution of potassium permanganate or table vinegar;
- Treat very difficult and stubborn stains with white spirit (strictly according to the instructions, working with rubber gloves).
Traces of varnish and paint need to be cleaned as soon as possible. Water-based compounds (fresh) are removed with wet wipes or unnecessary damp rags. Oil paints are blotted with dry cloths and removed with sunflower oil, and what remains after this treatment is removed with soapy water or cleaning agents.
The polyurethane foam is carefully cut off with a knife, and the frozen crust is soaked and then carefully scraped off the surface
How to level a washing machine using a level
This process consists of several stages. First, you need to make sure that the floor surface is level. This is determined using a special tool. The ideal coating is made of tiles, concrete or marble. If the site is uneven, in the slope area it is “built up” with substrates.
For mounting on a wooden floor, place a small piece of plywood under the structure, which will help balance the load on a shaky floor. If the boards are too old, it is recommended to disassemble them down to the concrete base. Then a “podium” of concrete mixture is poured, on which the unit will stand during use.
Before placing it on the selected area, a connection is made to communications: a water hose, an electrical outlet and a sewer drain. After installation, connecting will be problematic.
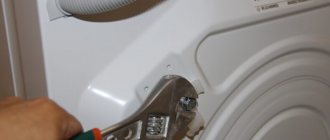
Next, twist the legs a little. After alignment with the level gauge, the racks are screwed in completely.
Then the device is placed on the prepared area. If checking with a tool reveals a tilt, the horizontal position of the washing machine is achieved by adjusting the corresponding support points. By turning the leg with the key included in the kit, you reduce the space between the floor and the structure at this point. And vice versa, by wrapping the stand, they raise the bottom of the washer.
Tools for repairing linoleum
If you need to fix something, you always need to first prepare the necessary tools so that the process is not interrupted. An important element for this work is a sharp knife; in construction stores you can find special tools for PVC materials; it will be much easier to repair the product with it. You will need:
- Universal knife. It will help you cut the material straight, remove frayed edges, and prepare the desired patch. The blades are replaceable and durable, they easily cut material such as linoleum;
- Retractable reinforced knife. Equipped with a durable anatomical handle and a strong, rigid blade. Can cut the product at an angle, used when working with hard-to-reach areas;
- Circular cutter. Made in a round shape, it is used when creating patches of complex shapes; it is also convenient for cutting linoleum next to communications and protrusions;
- A knife in the shape of a month, suitable for cleaning the surface of glue, trimming cuts, and removing burrs on the edge of the material.
In addition to these tools, you should prepare a marker with a ruler for marking; in order to apply glue for repairing linoleum, you will need a spatula and a roller.
A reinforced knife can cut the product at an angle and is used when working with hard-to-reach areas.
Step-by-step installation instructions
Installation of an automatic washing machine should begin with preparing the place where it will be installed. Models with horizontal loading require more space, while models with vertical loading require less.
The first mistake when creating an installation site is installing the device in a niche, which practically squeezes the machine on the sides. Such a solution can almost immediately lead to vibration problems, since the device still creates vibrations and this requires space - about 3-4 cm on each side, otherwise you can observe the problem of the device hitting the walls of the furniture.
Many craftsmen say that the minimum gap between furniture and appliances should be 1 cm, but this is not enough for most models.
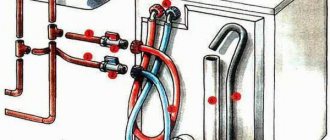
Installation diagram: 1 - machine, 2 - connection to the electrical network, 3 - water supply pipe, 4 - sewer adapter
When choosing a place, you should pay attention to:
- convenient location of communications;
- presence of unevenness on the walls;
- the presence of objects on top at a height of less than 2-3 cm from the machine.
The basic installation diagram consists of the following steps:
- removal of all transport devices;
- connection to the sewerage system and water supply system - the main difficulty here is the selection of adapters for pipes; they should be selected according to the diameter of the machine pipe and pipes;
- connecting the adapter to the water supply system - it is better to install it at the junction of the tap with the water supply;
- installation of a sewer adapter;
- connection to sewerage and water supply systems;
- Level adjustment of the legs using a building level with pinpoint precision.
The biggest difficulty during installation is the type of floor covering, on which the “activity” of the machine depends. When installing on a tiled (tiled) or wooden floor, there should be no problems with installation, since such surfaces are smooth and hard, which is what is needed.
Important! Laminate and linoleum are softer coatings, so it is recommended to lay an additional hard layer on them in the form of chipboard.
Causes of strong vibration
The washing machine only jumps in the spin mode, whereas this does not happen during washing due to the peculiarities of this process. When spinning, the device creates oscillatory movements, which, turning into vibration, spread to the entire body.
Important! When installed correctly, the legs of the device absorb about 90% of vibrations and, by placing your hand, you can only feel small vibrations.
The main causes of strong vibration are:
- transport bolts that have not been removed, which transmit vibration, loosening the device;
- failure to remove the transported foam pallet;
- the device is not level;
- overweight when loading things - if the weight is too heavy, the drum bounces more, creating much stronger loads on the hinges, which leads to increased vibration;
- problem with drum bearings or shock absorbers.
New washing machines have problems with shipping accessories and improper installation. If a problem with vibration appears in an already installed device, there is a reason to send it for diagnostics or invite a technician.
Installation at the level of the washing machine if the floors are wooden
Thank you, this is already the answer in essence. What size is your car in terms of plan? It is clear that 60x60 in itself is more stable than 60x40 cm.
- The car was exactly 60x45, “top loading” - at that time the children were small.
Did you place something under the car on the “Brezhnev” floor?
- put a sheet of metal on top of the linoleum - otherwise the legs of the car would “sink” in the linoleum; wooden blinds reviews. The machine had to be pulled out periodically, the sheet of metal lifted and washed underneath: the water actually leaked a little. But it's useful to do it. it doesn't matter what gender.
Please clarify, is the new machine installed in the same place, but on a concrete floor? If so, how did you make the base? Did you cut the boards and concrete them? How did you seal the joint between boards and tiles?
— The renovation was radical. The floor has been completely replaced with expanded clay concrete and tiled. The thickness of the screed at the installation site of the machine is about 10 cm.
There are no joints, and no problems either. The machine is now 60x60 and can hold 7 kg of laundry, front-loading. and works quite quietly.
Good luck to you - if in doubt, well - you will have to move around, but then you will sleep peacefully.
Washing machines Candy Aqua
Comments:
sirejka
writes: will there be a review of dryers?
Tim Mironoff
writes: Very good, informative and competent review, thank you!
sirejka
writes: will there be a review of dryers?
Tim Mironoff
writes: Very good, informative and competent review, thank you!
https://saw-wood.com/articles/ustanovka-po-urovnju-stiralnoj-mashiny-esli-poly/ Installation at the level of the washing machine if the floors are wooden 2014-12-29T18:39:25+03:00 admin Articles if floors, washing machine, washing machine, washing machine level, washing machine level, install washing machine
Related Tagged Posts
Top loading washing machine bearing replacement Contents Replacing bearings in washing machines Top loading washing machine All about replacing bearings in washing machines. Replacing a bearing in a washing machine / Substitution bearing washer Replacing bearings.
Other repair options
When linoleum burns through, the question arises of how to fix it. In fact, you can not only repair, but also decorate the resulting defect. Subsequently, it will become a beautiful decoration of the room. There are several options to solve the problem.
Special stickers
Decorative floor decals can be found at a hardware store. They may have different patterns. You can even choose a model that will match the stylistic design of the room. The kit includes glue and a special tool for proper installation.
Application
Instead of stickers, appliqués are often preferred. This approach is ideal for eliminating defects in a children's room. Such decor can look like a child’s drawing or a cartoon character. Typically, a play area is set up with this design.
Decoupage on linoleum
This idea only applies if the owner prefers a similar style. At the same time, the room must correspond to the interior direction, which is characterized by the use of decoupage techniques.
In case of major damage, it is easier not to put a patch, but to completely re-lay the linoleumSource remontnik.ru
Can you tell me the easiest way to level the floor?
Girls, maybe someone can tell you if you have encountered this. We have a washing machine in the kitchen (it doesn’t fit in the bathroom). Previously there was linoleum. The floor is uneven. My father and husband tried to level this floor. My father even used a level for this. Useless. The machine kept jumping during the spin cycle. They even started blaming the machine that I supposedly chose for everything. But my friend has exactly the same one! And everything is fine. One fine day, my husband left the machine to wash, and he went to smoke on the landing and chatted with a neighbor. I returned and the car jumped off as usual. But the most offensive thing is that we flooded our neighbors. The machine is broken, and now I have to pay for my neighbors’ kitchen repairs. Of course, I was still to blame! I have a question. How can you level the floor so that a similar situation does not happen again? The car will still be different now. My husband thinks that nothing will have to be leveled. It is clear that this is complete nonsense. I would like to somehow at the same time insulate the floor, soundproof it, and, if something happens, to avoid further flooding of the neighbors.
Self-leveling floor will help you. If I remember correctly, the mixture was called “Tieroth”, but there are others, such as “Prospectors” and so on. Bags of 25 kg. You need 2 large basins, a puncher with an attachment like a mixer, and a leveling needle roller. The mixture will spread evenly, and it’s hard to think of anything smoother. And on top you can lay linoleum or lay tiles. You can make an electric heated floor under the tiles. Some people use water-heated floors, but I wouldn’t recommend it.
You can make a level pedestal for the machine. You will be tempted to level the entire floor - this will have to be done in the entire apartment at once if you do not want to have thresholds between the rooms.
It seems to me that you are confusing the reason. If the machine shakes during the spin cycle, it is due to an imbalance, not an uneven floor.
I remember when I was a child I had an old Soviet machine, so when starting and stopping the spin centrifuge I had to hold it with my hands with all my strength so that it wouldn’t go somewhere...
that is, if the machine stands rigidly on the floor with all 4 legs, and does not swing on three, then it moves away during the spin cycle not because of the uneven floor.
Sergey, do you think that my husband was right after all, and it’s my fault for choosing a low-quality washing machine?
Not that they are guilty. The manufacturer does not guarantee that the drum will be balanced during spinning. Before purchasing, it doesn’t hurt to surf around the relevant forums and read reviews. There people report problems such as strong vibration during spin cycles.
For example, my machine stops the drum, if a strong vibration appears when accelerating for spinning, the laundry flutters there for uniform distribution and again tries to spin the drum for spinning. And so on until an even distribution of laundry in the drum is achieved. As a result, there is little vibration during spinning.
So approach the purchase of a new car with the appropriate criteria, and not just choose by appearance and number of programs.
there are special linings for the legs of the car, sold there, in Eldorad and M-video
bought pads, no use! Strange. Why doesn’t my friend’s car run like this?
Apparently, the workmanship is not stable, and my friend was luckier.
Damn, the legs of the machine are adjustable, you need to use a key to level it so that it stands rigidly and loads less laundry. We found a problem - pouring the floors.
She says that before the kitchen renovation (they poured a concrete screed), the machine also jumped. Fill it somehow. in general, I don’t want to.
Confused about my relationship with my husband
Repair
How to leave a tyrant husband!? How to live alone with two children?
Tell me what to do next?
An economical way to level the walls and ceiling
Buying a normal car and installing it rigidly will cost you much less than a screed.
Where did it come from, from your nightstand?
I encountered a similar problem myself. The only thing that helped was leveling the floors in the bathroom. The floor was poured with concrete.
Did you remember to remove the retaining bolts?)))
I encountered a similar problem myself. The only thing that helped was leveling the floors in the bathroom. The floor was poured with concrete.
Did the machine stop vibrating after placing it on a flat floor? This is already interesting.
The masters were called. That's when he told us about gender. She also jumped out, but towards the sink
How to clean linoleum after renovation work
Sometimes there is no need to change the flooring, but housewives may find it difficult to remove traces of repairs. To simplify the task, before starting work, the floor can be covered with film and secured with tape to the baseboard. They should be removed only after all dusty work has been completed, otherwise a large amount of dirt will stick to the glue, which will be difficult to remove.
From cement, whitewash and putty
After renovation, white marks from construction materials often remain on the floor. You can solve the problem as follows:
- First, sweep the floor to remove any abrasive particles that could damage the finish.
- Carefully scrape off the frozen putty with a spatula.
- Add a couple of tablespoons of salt and a little grated laundry soap to warm water. Wash the linoleum with the prepared solution.
- Change the water and add a little potassium permanganate to it to get a light pink solution. Wipe again.
- Wipe the flooring dry.
- To make linoleum shine, rub it with a woolen cloth dipped in linseed oil or drying oil.
It is better to wipe the primer immediately with a damp cloth, otherwise you may need to use special products. For example, you can remove traces of primer with a solvent, but first check its safety on the remaining material or in an invisible place.
From paint
You can remove paint from linoleum if it is not ingrained with vegetable oil. Follow these simple steps:
- Add a few drops of vegetable oil to the paint.
- Wait a couple of minutes for it to soften.
- Then wipe with a cloth or the hard part of a washcloth.
- Wash the floor with warm soapy water.
Dried paint is more difficult to remove
White spirit can cope with it, but it must be used carefully, as it can damage the coating. Soak a cotton pad in the solvent and wipe the stain. When finished, oil the floor.
When finished, oil the floor.
From polyurethane foam
Due to its excellent adhesion to any surface, polyurethane foam is difficult to remove. It is advisable to remove traces immediately, before the material has time to harden. If the moment is missed, carefully cut off the top of the material with a sharp knife. Then use a special solution for removing polyurethane foam. You can find it in a hardware store or market. Use the product strictly according to the instructions, do not increase the holding time.
Connection to sewerage
The next step according to the instructions when installing the washing machine is connecting to the sewer. This is necessary in order to drain water from it.
Depending on the design, drainage can be carried out in different ways. The easiest option is to pour water directly into the bathtub or kitchen sink. For this purpose, washing machines are equipped with a special hook on the hose, which is attached to the side of the bathtub or sink.
A more convenient way is to connect the drain to the siphon of a bathtub or sink. To do this, you will need to install a siphon with a special outlet. Or you can organize the drain from the washing machine directly into the sewer.
If the washing machine is drained into the sewer, it is necessary to create a bend for the water seal (like a siphon is bent), otherwise unpleasant odors will enter the tank. The bend should be lower than the tank of the machine. Therefore, sometimes you have to put it on stands or shelves.
Connecting the washing machine to the drain via a siphon
What to consider when cleaning linoleum
When starting to put linoleum in order, you should consider several recommendations that will help keep the surface of the coating intact:
When cleaning stains on linoleum, you should always exercise a certain amount of caution and diligence so as not to completely ruin the material.
- If aggressive compounds are used for cleaning, then aqueous solutions should be prepared from them in a 1:1 ratio.
- Do not use sandpaper to clean the coating - it can damage it irreparably.
- A knife and spatula are used to remove stains only as a last resort, if the frozen stain is localized and has a decent thickness. These tools must be used extremely carefully. And under no circumstances should it be used to scrape off thin layers of dirt.
- If a brush is used for cleaning, its bristles should not be too hard. It is better to use a dish sponge that has a special, more rigid layer on one side.
- If chemical solvents are used, they should not be rubbed into the surface of the linoleum. Such compositions are usually applied to a napkin and applied to the stain for a short period of time. The process must be kept under control.
- Rinsing off the applied substances is mandatory, as some of them may continue to cause reactions that will damage the coating. For example, baking soda or another alkaline mixture left for a long time can make the top layer of the coating brittle and brittle, and chlorine-containing compounds reduce the brightness of the paints of the material.
- Do not use hot water. To wash this coating, only cold or warm water with the addition of a small amount of detergent is suitable.
- If the stain cannot be cleaned, and this also happens, you should not persistently rub the linoleum “to the hole.” In this case, it is better to resort to a radical method, carefully cutting out the damaged area and gluing in a patch selected according to the drawing. Gluing works well using “liquid nails” or two-component “cold welding”.
Why it jumps and solutions
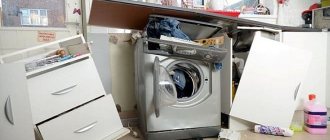
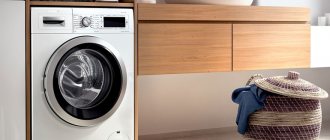
To prevent the washing machine from jumping, it must be placed where it will be on a flat surface. To do this, it is very important to read the instructions, information from which will allow you to correctly place the device, finding out where, how and where it is best to place it.
After all, it is especially important if the washing machine will be installed under the countertop in the kitchen or bathroom. Its jumps can destroy furniture if the device is installed close to furniture elements.
So, before deciding where to put the washing machine, it is worth removing the shipping bolts. Very often home craftsmen forget about this nuance, which results in subsequent unwanted vibration processes. Shipping anchors are needed to secure the tank during transportation, preventing it from being damaged. After removing the bolts, the tank “hangs” on shock absorbers, thanks to which vibration is softened. Therefore, further operating conditions depend on how to install the washing machine drum.
When installing equipment, you need to pay attention to the legs. In all modern models they are adjustable, so the washing machine can be leveled in any situation. To do this, you need to arm yourself with a building level (placed on top of the device) and patience. Even if the floor has obvious unevenness, this adjustment format most often allows you to achieve the required level.
It is highly undesirable to use any pads, stands or other third-party devices that are not able to withstand the load during spinning. Therefore, you need to decide where to put the washing machine, and then place it and check the legs. The device can be slightly shaken in different directions to determine its level of stability.
It must be remembered that the level should be placed not only along the width of the device, but also along its depth. If the indicators are normal, the shaking of the equipment with your hands does not allow you to move it from its place, there is every chance to believe that the efforts have been successful.
However, it is too early to rejoice. If the machine is stable at rest, then during its active operation everything can change. Therefore, the device needs to be turned on and checked in operation, especially in spin mode.
If such advice on how to install a washing machine correctly did not allow you to achieve success, most likely the reason lies in a very uneven floor. It needs to be checked with a level - in the photo. If there is a significant distortion, it will have to be eliminated.
How? It all depends on the floor covering, operating conditions, purpose of the room, etc. The easiest way is to use a rubber mat. It will not slip and will provide a slight lift to the required angle.
Methods suitable for minor damage
Vegetable oil
This is one of the simplest methods that will allow you to easily and without additional expense hide all small scratches. Just wash the floor in the right place, dry it with a dry cloth, and then rub a little vegetable oil applied to a sponge or cotton pad into the scratches that have been cleared of debris and dirt. Olive oil is most often used for these purposes. The effect of this treatment will become apparent within 20 minutes.
Polish
If you don't want to use regular oil, buy a special laminate polish. It is sold in the hardware departments of stores and comes in the form of a liquid or aerosol, sometimes a mastic. Liquid options are diluted in water and used for cleaning floors. They not only remove existing minor defects, but also create a protective layer that prevents the appearance of new ones.
More dense compounds need to be rubbed into the laminate; they are quite thick. But the effect from them will last for at least a year, and the effect is noticeable instantly and very obvious. They need to be rubbed into the surface in a circular motion, after which, after waiting a while, rub the floors with a dry cloth.
WD-40
For minor scratches, you can also use WD-40 lubricant - every motorist definitely has it. You need to apply it like a polish: spray it on the desired area of the floor, wait a while, and then rub it in. The composition helps to easily cope with very minor defects.
Furniture marker
You can disguise scratches using a special furniture marker. You can match it to the desired tone and simply paint over the scratches. It does not fill cavities, so it is used only for minor damage. You can buy such a marker in a special store.
2. Concrete slab.
This method involves taking into account certain aspects that subsequently affect the operation of the washing machine.
- We concrete the steel pipes under the floor so that they can be seen from the holes made in the wooden floor. Accurate vertical position is important. A concrete slab weighing at least one hundred kilograms is laid on top.
- The slab is attached to the pipes as needed. The main thing is that the pipes are firmly concreted. This design is a reliable option for high-quality washing without harm to the unit.
Article on the topic: How long does frozen meat last in the refrigerator?
3.The top floor is made of wood.
This option is applicable when the floor cannot be dismantled.
- Before installation, we check the floor for strength, strengthen the boards that are loose. We test the floor for durability so that vibration does not occur during washing. Otherwise, the wooden floor will break and the machine will be damaged.
- We mark the dimensions of a household device.
- We drill holes along the perimeter of the marking and place small sections of steel pipes. It is important that the pipes must be located at the same level.
- We install the machine.
Location of counterweights
Finding counterweights in an automatic machine is very easy. The easiest place to get to is the top weight. However, there are always more problems with dismantling this block. To “climb” to it, you need to:
- de-energize the automatic machine;
- close the shut-off valve responsible for the water supply;
- move the washing machine away from the wall to have free access to all sides of the body;
- Use a screwdriver to unscrew the two screws holding the top panel of the machine;
- Remove the housing cover by moving it slightly back and lifting it up.
The upper counterweight will be immediately in front of your eyes. The unit must be inspected for defects. Next, you need to evaluate the condition of the front weights; to do this, you will have to remove the front wall of the case. The further algorithm of actions will be as follows:
- pull out the powder receptacle;
- Unscrew the bolts located around the perimeter of the control panel;
- unhook the “tidy” from the body and carefully place it on the machine so as not to damage the wiring;
- remove the lower false panel, behind which the garbage filter is hidden, by picking it up with a screwdriver;
- open the hatch door wide;
- use a screwdriver to hook the outer clamp holding the drum cuff and remove the ring;
- tuck the rubber seal inside the drum;
- slightly tilt the body of the machine back, insert your hand between the tank and the front wall, feel for the UBL and disconnect the chip with the blocker contacts;
- Unscrew the screws holding the front wall;
- remove the front panel.
Now you can inspect the front counterweights. If there are many cracks on them, the elements will have to be replaced. We'll show you how to remove damaged concrete weights to make room for new blocks.
Plywood podium
Such a base is easier and cheaper to make. It does not require much time, but is inferior to concrete in strength. This means that this option temporarily solves the problem of stability and requires periodic monitoring and updating of the design .
As a set of materials you will need:
- a sheet of plywood at least two centimeters thick;
- a steel pipe with a cross-section of four centimeters or corners of the same material;
- rubber mat.
The tools you need to work with these materials are:
- drill with appropriate attachments for drilling holes in plywood;
- hacksaws for wood and metal;
- level for leveling the structure.
Making a podium
In this case, there is no need to dismantle the laminate or boards, which simplifies and speeds up the work. If necessary, you will need to strengthen the floor by eliminating unwanted movement of the boards. After this you need:
- Mark the perimeter according to the dimensions of the device.
- Drill holes according to the established marks.
- Cut the pipe into four parts and install them in the holes with horizontal alignment.
- Make a plywood stand slightly larger than the perimeter of the car.
- Place the sheet on supports with fastenings at the corners.
- Strengthen the support with mortar.
- Lay down a mat that will prevent slipping.
All that remains is to install the washing machine on the finished base and level it by adjusting the legs. Then you can proceed to connecting communications.
Repairing minor damage
How to repair a small hole in linoleum?
- a frequently asked question. The modern market offers a wide range of repair compounds:
- Mastic. Sold as a pencil or paste. A wide range of colors allows you to choose the right option.
- PVC glue for linoleum (cold welding). Allows you to eliminate holes with a diameter of up to 2 mm.
- Wood sealant. Such compositions are available in various colors, so they are often used to repair minor defects in floor coverings.
- Homemade composition. Made from various components. For example, colorless nail polish and shavings from the top layer of linoleum are used.
Before repairs, the surface is prepared: it is cleaned of debris and degreased. After this, the holes are filled with the selected product.
How to remove scuffs?
Minor scratches and surface damage to linoleum can be eliminated using the following means:
Wax for linoleum. This coating renewal is carried out if the damage is shallow. They are rubbed with the edge of a coin, eliminating uneven edges. Treated with wax to obtain a uniform glossy surface
But this procedure will have to be repeated periodically. Mastic
It is important to choose the required color. You can cover shallow damage with mastic
Polish. This product is used to restore the protective layer of the floor covering.
How to seal linoleum is chosen in a specific case. It largely depends on the type, scale of damage, and financial capabilities. Any chosen method requires a patient and careful attitude. Then the repair site will not have to be additionally masked with carpets and furniture.
Useful video: Restoring old linoleum
Although the specified floor covering has a fairly high strength and reliability, if it is installed and used incorrectly or is not selected, damage may appear on the linoleum in the form of tears, cuts, delamination of seams, stains, dented areas, and others. Most of these problems are not difficult to fix on your own and do not require any repairs.
Communications
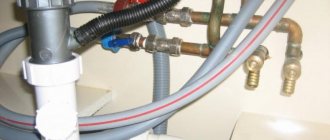
After preparing the foundation, you can begin to connect communications. For this you will need:
- ball valve with pipe;
- siphon;
- fum tape;
- adjustable wrench.
The sequence of actions involves:
- Turn off cold water.
- Installation of a shut-off valve with a pipe.
- Connecting a water supply hose to it.
- Installation of a siphon with a drain pipe.
- Attaching a drain hose to it.
After all stages of installing the washing machine, you can turn it on to the network to run a test wash to check for the absence of vibrations and the functionality of the main functions.
Source: https://tehnopomosh.com/dlya-chistoty-i-uyuta/stiralnye-mashiny/ustanovka-na-derevyannyj-pol.html