The height of the drain for the washing machine is determined taking into account the operating instructions. Any manufacturer of household appliances, as a rule, indicates various nuances inherent in a particular model. After reading the installation instructions, select the appropriate height of the washing machine drain hose, and connect the washing machine in any convenient and accessible way.
Connection to the sewer in the wall
Location of the water supply under the washing machine
A washing machine requires three connections:
Regarding electricity:
For cold water, the line should be 3/4 inch male threaded. For convenience, you can install a separate tap on the washing machine.
The diameter of the sewerage hose is 25mm. It is inserted into the sewer pipe through a rubber adapter - a “cuff”.
All these three eyeliner points can be hidden behind the machine. There are a couple of tricks here to minimize the gap between the machine and the wall.
First trick:
It is better to make the sewer line with a diameter 32 mm pipe, and take the outlet out of the wall not at an angle of 90º, but at two angles of 45º.
The hose inserted in this way will not rest against the machine.
We also press the water supply against the wall.
Second trick:
We position the liner so that the fittings do not fall on the protrusions of the machine, and the hoses do not cross each other.
In this case, for the LG washing machine the socket has coordinates: 700mm from the floor and 450mm from the right corner.
Water supply: 740mm from the floor and 90mm from the corner.
Sewer line: 500 mm from the floor and 115 from the corner.
As for the outlet, according to the rules, the distance between the electrical point and the water pipes must be at least 50cm.
In this case - 35cm - we have a slight violation. Although, if any organs find fault, you can simply cut off the power.
Some people try to put a “splash-proof” outlet in the bathtub with a cover. This will not work here - when the plug is inserted, the lid will rest against it and stick out towards the machine. Which is undesirable.
Just in case, let me remind you that when installing the washing machine, you need to remove the shipping screws from it; set according to level.
Stanislav Plitochkin was with you. Let me help you save SVDN!
Source
Rules for independently connecting a washing machine to water supply and sewerage
To avoid flooding, short circuit, or breakdown of the washing machine, when connecting it yourself, you need to adhere to a number of rules, choose the optimal installation location and method of connecting to communications
Modern washing machines perform many operations, and human participation in the washing process is minimized: load sorted laundry, add powder, press the necessary buttons, and after a few hours pick up clean, wrung out items. There is only one difficulty: for the machine to work, it must be connected to the water supply, sewerage and electrical networks . Errors at the stage of installation and connection to communications are fraught with serious problems.
How to connect it to ensure its uninterrupted operation? Of course, you can use the services of specialists in this area, or you can try to connect it yourself, which will allow you to save money on installing the machine.
Requirements
To ensure that your SMA lasts 10 years or more without breakdowns, follow the mandatory requirements for its connection.
Selecting a location
Before connecting the washing machine to the water supply, sewerage and electrical networks with your own hands, you need to decide on the location for its installation. In private houses, a washing machine can be installed in a special laundry room, and in apartments this equipment is sometimes installed in kitchens, and most often in bathrooms .
When choosing a specific area in the bathroom, you need to take into account the availability of free space and the location of communications. You need to plan where the washing machine will be located even before purchasing it , in order to choose a model that will “fit” into the available space.
When choosing a location for installing a washing machine, you need to consider the following factors:
Some useful tips when choosing a location:
Hoses can be extended, but this increases the load on the machine pump , and any additional connection is an additional risk of leaks.
Classification of sockets by design features
The answer to the question of how to choose a water socket for a washing machine has long been found. It is necessary to take into account all their technical characteristics: shape, type, material, but first of all, the method of connection to the highway. Here you need to focus on the configuration of your water supply system, the material of the pipes and the availability of special tools.
Threaded models
As the name suggests, a thread is used to connect these products. This is a time-tested method. Made from high-quality material, this socket is guaranteed to last for many years. A threaded water socket is:
- long service life;
- excellent tightness performance;
- strength and reliability;
- ease of installation.
Installing a threaded water socket does not require any special tools; even a novice craftsman can handle it. An additional plus is that the connection is removable. The socket is easy to disconnect from the pipeline, dismantle, and replace if necessary.
Crimp water sockets
The water supply connection is carried out using the crimping method. The basic part of the product is a collet, a special bushing that ensures the reliability and tightness of the joint. Such models have been used relatively recently, however, they have a number of significant advantages:
- low cost;
- long service life;
- ease of installation;
- wide range of models;
- Possibility of dismantling and reinstallation.
Installing such a water socket is somewhat more complicated than working with its threaded counterpart, but it also does not require special tools.
Self-locking
This type of sockets is characterized by ease of connection. For fixation, various locks are used, which are easy to close, securely hold the pipe, and can be easily separated if necessary. Advantages of such products:
- completely collapsible design;
- possibility of reconnection;
- ease of installation;
- versatility.
After connecting these parts, you must check the reliability of the joint. Carefully inspect for leaks, use a napkin if necessary.
Solder sockets
These water sockets are attached to a plastic pipe using a special soldering iron. The joint is even, smooth and reliable. Advantages of this method:
- minimum of used parts;
- compactness;
- long service life;
- tightness;
- low cost;
- versatility.
This is one of the simplest methods of fastening, but it also has disadvantages. First of all, the connection is permanent; if replacement is necessary, the pipe will have to be cut. In addition, installation will require special equipment.
Step by step guide
Before you begin installing and connecting the washing machine to the water supply and sewer system with your own hands, carefully study the installation instructions , as well as this article, which will help you easily and effortlessly connect the washing machine to ensure its smooth operation.
Preparation
After delivery of the equipment, it must be unpacked, freed from polystyrene foam and adhesive tape and carefully examined, checked for completeness and made sure there are no defects . Then you need:
Minimum set of required tools:
a branch with a shut-off valve for connecting a washing machine is already cut into the water supply system . If it is not there, the set of tools and components depends on the material of the pipes; tees are best equipped with an angle valve to cut off the water supply:
To connect to the sewer, depending on the chosen method, you need:
To connect to power you will need:
Do you want to always have hot water in your house? Find out everything about installing a gas water heater in an apartment with your own hands.[/blockquote_gray]
Drain installation
There are three options for draining water from the washing machine:
The first option is very unreliable ; vibration can cause the hose to become disconnected from the bathtub (washbasin), fall to the floor and flood the room.
In the second case, the hose should not pass along the floor ; it must be fixed in a stationary mount on the rear panel and run over the top.
When leading directly into the sewer, the drain hose of the washing machine must enter it at least half a meter from the floor, and the socket is often located lower. Therefore, the socket of the additional elbow must be raised to the appropriate height.
Reliable fixation of the hose pipe in it is ensured by a rubber cuff.
Below is the simplest diagram for connecting a washing machine to a sewer without a siphon - the drain is connected directly with a hose:
Connection to the water supply system
The machine comes with a water supply hose, one end of which is connected to the corresponding hole on the rear panel, and the other to the water pipe. It is preferable to connect the machine to a cold water supply system , since it has a water heater in its design, but it is impossible to cool hot water.
All work on inserting taps and tees must be carried out with the water in the riser shut off!
Depending on the specific conditions, there are many options for connecting the washing machine to the water supply. The simplest case is the presence in the system of an outlet with a tap for an automatic washing machine ; a flexible hose is simply connected to this outlet; if the thread diameter does not match, an adapter is used.
A diagram of a simple connection of a washing machine to a water supply looks like this:
If the machine is located near a washbasin or bathtub, it is possible to connect the hose to the pipe using a walk-through tee tap. The faucet can cut between the hose and pipe in the following places:
Sometimes, if a mixer with a tap and shower is installed above the bathtub , and a separate mixer is installed on the washbasin, the tap (spout) above the bathtub is unscrewed, and a washing machine hose is connected in its place, if its length allows.
If the machine is located far from the bathtub, washbasin, toilet, the outlet cuts into the pipe closer to the installation site of the equipment. The procedure depends on the material of the pipes.
Iron pipes
Metal-plastic pipes
It will also be useful to read the instructions for installing a faucet in the bathroom with your own hands.
Did you know that you can buy a small and very convenient water heater that can even be installed on a faucet? Find out everything about how to install an instantaneous electric water heater on your shower.[/blockquote_gray]
Plastic pipes
Leveling with a level
A strictly horizontal position of the machine is the key to its long service life ; even a slight misalignment can lead to serious damage.
You can also place a level on the top plane of the machine and attach it to the side wall . If there is a skew of water in the window, you need to adjust the height of the machine legs to compensate for the slope or unevenness of the floor. To do this, the fixing nut is loosened, the leg is rotated in the direction of lengthening or shortening, and after reaching a stable position, the nut is tightened until it stops.
Connection to the power grid
If the house has a grounded (three-wire) outlet located near the bathroom, everything is quite simple; the washing machine's power cord is connected to it.
If such an outlet is not available, you need to take care of its installation; it is better to entrust this to a professional electrician . To connect it, the distribution panel must have a neutral or grounding bus; a three-wire cable runs from the panel to the socket.
If you have an unused electric stove socket in your home, you can install an socket with a grounding contact in its place, with a grounding wire already connected to it. In this case you will have to use an extension cord ; it must also have a grounding contact, and if it is used directly in the bathroom, it must also be waterproof.
It is recommended to install powerful energy-intensive devices , which include a washing machine and automatic switch, on the cable that supplies power from the panel.
Over time the insulation of the wiring may become damaged ; if such damage is not identified and repaired in a timely manner, equipment may break down and people may be electrocuted.
For protection in such situations, it is good to use an easy- to-install portable residual current device . It will also minimize the risk of electric shock if the washing machine is connected to a regular two-wire network without grounding.
How to secure a water socket?
Before purchasing and direct installation, you need to decide on the method of attaching the water outlet to the wall. There are several options that depend on the strength, thickness and material of the existing wall. So, a new branch is attached.
- In the pocket. If the partition is made of concrete or brick, then the optimal solution would be to make a recess in the wall to form a pocket of suitable size. A hole of 4-5 cm will be required, but it is not necessary to completely recess the fitting. Often it is left protruding and masked with improvised means.
- In a recess with a gasket. For thin gypsum walls with a thickness of up to 4-6 cm, another option is suitable. Make the largest possible hole and install a half-centimeter sawn wood lining into it. The water socket is attached to a piece of wood, which should be carefully treated with anti-corrosion impregnation to avoid rapid rotting.
- Lined. If the walls in the bathroom are plasterboard, then you will need to act completely differently. First, the drywall is placed on a frame made of metal or wood, then a 3-4 cm spacer is fixed on top, and then the socket itself.
The entire structure is hidden behind another sheet of drywall so that the fitting is flush with it.
Here it is important to soberly assess the strength and thickness of the existing partitions, since unreliable fixation will quickly lead to failure and leaks. It is important to accurately measure the dimensions of the outlet in order to eliminate unsightly voids and subsequent repairs . Afterwards we proceed to the actual installation.
This is interesting: How to attach a stainless steel sink to a countertop, how to install an overhead sink to a cabinet, how to attach it in the kitchen - installation and installation
Checking work
After all connections have been made, you need to test run the washing machine . All operations are performed, but without loading laundry.
First,
the washing mode , you need to make sure that the tank is filled with water, the heating elements are working, and there are no leaks anywhere in the places where there are taps into the water supply, connecting the hose to the water supply and to the machine.
Then the spin cycle starts and the presence or absence of leaks in places where water is discharged into the sewer system is monitored. If leaks are detected, the connections need to be sealed and sealed as much as possible. If everything is fine, you can start washing according to the instructions.
It is quite possible to install and connect a washing machine yourself; sometimes the communications system already provides everything necessary for such a connection; if the water supply and sewage systems are old, the task becomes more complicated and requires additional tools and consumables.
Connecting to the electrical network is the easiest step if you have a grounded outlet and the most difficult step if you don’t have one. In this case, if you do not have sufficient qualifications, it is better to invite an electrician. It is important to remove shipping parts, position the machine strictly horizontally, and carry out tests before operating it.
For a complete understanding of the topic, watch a video about correctly connecting the taps of a washing machine to the sewer drain and water supply , as well as connecting this equipment to the home electrical network:
Taking into account the tips outlined in this article, we are confident that installing and connecting the washing machine yourself will not be difficult for you.
Source
Plumbing work. Slopes and heights of terminals.
During the renovation process, a lot of questions arise. I will highlight the most common ones that arise when renovating bathrooms.
What is the slope of the sewer pipe? – for a pipe with a diameter of 100 mm – at least 2 cm/meter – for a pipe with a diameter of 50 mm – at least 3 cm/meter
At what height is the sewage system installed... - for a wall-mounted toilet 160-190 mm (depending on the manufacturer and model), local fitting will give the most correct answer - for a wall-hung toilet 220-240 mm from the floor - for a shower cabin with a tray 60 mm - for a washbasin 500-550 mm – for a bathtub 100-150 mm – for a kitchen sink 300-400 mm – for a washing machine and dishwasher 500-650 mm
If, for technical reasons, the sewer outlets for the bathroom (shower stall, toilet) are made higher, then under the bathtub (shower stall, toilet) you can make a podium to the required height. Perhaps this situation will upset someone, but on the other hand, this podium can play a decorative character.
At what height is cold and hot water discharged... - for a side-mounted toilet 400-600 mm (depending on the water supply to the tank - bottom, side or rear), local fitting will give the most correct answer - for a shower cabin with a tray 1200 mm from the bottom of the tray , and shower heads – 2100-2250 mm (from the bottom of the head to the bottom of the tray) – for a bathtub 750-800 mm from the floor – for a washbasin 550-650 mm – for a kitchen sink 500-600 mm – for a washing machine and dishwasher 500-750 mm
The distance between the water outlets... - for the shower cabin and for the bathtub is 150 mm from the central axes - for the washbasin and for the kitchen sink 100 mm (not so rigidly tied, as they are connected by flexible hoses)
The bathtub is mounted at a height of 600 mm, the washbasin is 850-900 mm. These sizes can be changed and depend on the height of family members. And they drag along with them the adjustment of other sizes (output of water outlets)
And do not forget that the floor level in toilets and bathrooms should be 15 - 20 mm below the floor level in adjacent rooms, or the rooms should be separated by a threshold. And also do not forget about waterproofing in the bathroom and toilet.
It is advisable to purchase all the plumbing before the installation of plumbing begins. communications. This will simplify the plumber’s task and reduce the risk of mistakes.
Plastering and painting works
How to glue wallpaper - online wallpaper calculator
Tile work
Choosing an installation location
Just as a theater begins with a hanger, so the installation of a washing machine begins with the choice of location for the unit. There are not many options; it could be a bathroom, a kitchen or a special laundry room, which is often installed in private homes. In any case, it will not be difficult to organize a water supply to the machine and drainage into the sewer in these rooms, since they are already there from the start. It is more difficult when an empty closet or other room is determined as the location for installing the washing machine. In this case, it will be necessary to lay utilities in them as well.
The key factor in choosing an installation location is the convenience of further use of the washing machine. The main thing is that there is easy access to the washer hatch.
The ideal place for installation is a free area with a convenient location, which has all the necessary communications connections in close proximity to the washing machine:
If the premises are planned from scratch, then engineering communications need to be installed at the renovation stage. Otherwise, you need to place the washing machine as close to them as possible.
There are no special requirements for the installation location, the main thing is that the base under the washing machine is level and strong, and that there is a small gap (5–10 mm) between the walls or furniture and the body of the unit.
The gap is necessary to minimize the risk of the machine body hitting walls or furniture in the event of vibrations during operation.
Before installation, it is necessary to remove the shipping bolts from the washing machine and close the spaces under them with the plugs included in the kit.
It is extremely important to install the washing machine level. This eliminates the possibility of increased vibration and movement of the device from its installation location while operating in spin mode. To level “horizontally” you will need a regular bubble level. The adjustment itself should be carried out in two planes, along the width and depth of the washing machine. Manufacturers allow a deviation from the “zero” value of no more than ± 2 °.
You can do without a level at all. Many modern smartphone models have a standard application for calling quick tools (Compass, Ruler, Flashlight, etc.). You need to select the “Surface Level” tool and place the mobile phone on the washer. Based on the readings of the level gauge, align the surface to the horizon.
In fact, the installation plane can be adjusted “by eye”, focusing on the natural “beacons” of the room (horizontal tile seams, furniture countertops, etc.). The main thing is that after adjustment you need to make sure that there are no distortions by pressing the diagonal corners of the upper surface of the washing machine. It shouldn't wobble.
The plane is adjusted by twisting or unscrewing the front legs. To do this, you need an open-end wrench of the required size. Rotation counterclockwise increases the height of the leg, clockwise rotates it decreases the height.
After setting the desired height of the legs, if provided for by the design, their position is fixed by tightening the locknuts.
Methods for attaching a water socket
There are several common ways to secure a socket. The choice of one or the other is determined by the material of the walls, the features of the water supply in a particular apartment and the installation height of the outlet. In any case, before starting work, it is necessary to carefully inspect the surface of the wall at the site of intended installation. There should be no voids or cracks that could lead to failure of the fitting with subsequent leakage.
Pocket installation
This method is applicable when installing a water socket on a solid brick or concrete wall. A recess is made according to the size of the socket. It is not necessary to completely hide the fitting; it can peek out, which will later be “played out” during the finishing work.
The socket is fixed using the supplied parts, after which they move on to finishing the walls.
On a wooden spacer
In the case of thin walls (4-6 cm), when it is not possible to make a full-fledged “pocket” and securely secure the socket, another method is used. A small recess is made, the fitting itself is attached to a board about 0.5 cm thick. The wood must be pre-treated with an antiseptic. The gasket is fixed in the recess.
Installation on a pad
This method is used in the case of a plasterboard wall. It is definitely not possible to attach the socket directly to the sheet; you must first make a support for it. As such, a frame made of wood or a metal profile is used. Its shape and configuration is determined individually.
A wooden gasket is installed on the finished frame, which, in turn, will be the basis for the water outlet.
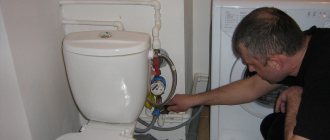
Connection to water supply
The procedure for connecting to the water supply network should not cause any difficulties. The connection is made using the special inlet hose included with the washing machine. One end is screwed to the water pipe,
the second - to the filler fitting of the washing machine.
Installation of a shut-off valve on the water pipe is mandatory. It is needed to shut off the water supply when the machine is not in use. To connect, you need a valve with an external thread diameter of ¾ inches.
No tools are required to connect the inlet hose. For a reliable connection, the hands of a master are enough. The fittings are initially equipped with rubber gaskets to ensure a reliable connection.
If the water collection point is located at a considerable distance, you will need to purchase an inlet hose of the required length.
When laying the hose, avoid twisting and excessive bending.
What is a water socket and what are its advantages?
Previously, washing machines were connected mainly using tee taps. This is convenient, but only in the case of open pipelines. If the pipes are hidden under panels, placed in a box, or simply run inside the walls, this solution is not suitable. A water socket is needed here.
In essence, this is one of the types of fittings used in plumbing. There are different options, but the simplest design looks like this: an elbow with threaded parts for connecting to the main line and connecting the consumer, which has lugs for fixing on the wall. At the location chosen for installation, this angle is secured with dowels, and a water supply pipe is connected to it. After sealing, only the threaded part peeks out from the wall, intended for connecting a washing machine and other household appliances.
Installing water supply outlets to your washing machine is a smart approach that offers a number of significant benefits, including:
- ease of installation;
- household appliances are connected after the repair is completed, which guarantees their safety;
- The process of replacing or transferring equipment is as simple as possible.
This is really convenient, because you only need to make repairs once, install several sockets, and you can change washing machines as often as your family budget allows.
Drainage connection
The main rule when connecting a drain hose to a drainage system is that the end of the hose must be connected to the sewer at a certain height specified in the operating instructions.
It is the end of the hose, and not some other part of the drain line!
Only in this case will the possibility of water leaking out of the washing machine tank by gravity be eliminated during the washing cycle.
There are several options for organizing the drainage of dirty water. The easiest way is to use the bracket that comes with the washing machine. The end of the drain hose is tucked into the bracket, and the device itself is attached to the edge of the bathtub, washstand or toilet.
Due to the inconvenience of this method, it should be considered solely as a temporary option.
Another connection method is to organize a drain through a sink siphon. To do this, you need to purchase a siphon with a side outlet to connect the drain hose of the washing machine.
For greater structural reliability, it is advisable to strengthen the junction of the drain hose with the siphon with a clamp of a suitable diameter.
Of the stationary solutions, this is the simplest implementation of draining dirty water into the sewer. The only thing you will have to constantly monitor closely is the cleanliness of the internal cavity of the siphon. If it becomes clogged or “overgrown” with dirt, there is a possibility that tap water from the sink will enter the washing machine tank, even with a check valve installed in it.
If the washing machine is significantly removed from the point of entry into the sewer system, drain hose extensions are available for sale, through which the required length is obtained. It should be borne in mind that to avoid heavy loads on the washing machine pump, many manufacturers do not recommend using extension cords longer than 1.5–2 meters.
Organizing a stationary drain point is the most labor-intensive, but at the same time, the most thorough option for draining dirty water from the washing machine.
The appearance and approximate dimensions of the structure are shown in the diagram.
Important points to know before purchasing
To organize an effective washing process, you can use any type of siphon. The main thing is to take into account ease of installation, use and aesthetic qualities. Therefore, if the washing machine is located far from the siphon, and saving space is not an issue, then you can buy any type of siphon.
It is ideal when the drain fittings are hidden from view by something - a bathtub, sink, door, furniture, or any other object. If the shape of the siphon “hurts the eye”, does not add aesthetics to the room, and there is no way to hide it, then you need to purchase a built-in product.
This solution will allow you to place the washing machine close to any wall the owner needs and hide the drain fittings. This option will significantly improve the appearance of the room.
We suggest you read How to remove stains on wool
A combined siphon is the most universal solution, as it allows you to connect any number of drain hoses to the sewer pipe
If a potential buyer plans to drain contaminated water from 2-3 types of equipment simultaneously, then the optimal solution would be to purchase a combined siphon that has the required number of fittings for connecting drain hoses.
If there is no check valve in the design of the washing machine, you should not save money on its purchase. The owner will not regularly benefit from it, but in a critical situation this product will save you from significant troubles and losses.
In addition, there is no need to skimp on the quality of the siphon itself or its components. Since their service life is always relatively short, and budget options remain operational for an even shorter period of time.
Be sure to initially decide how the urinal will be installed, which mounting method is preferable for you, how waste water will be discharged and what additional options you need. You may prefer a model that has an automatic drain or a device with increased capacity.
It is worth adding that on sale today you can also find devices that do not have a drain. A special absorbent or built-in membrane is used here to prevent the occurrence of unpleasant odors in the room, which also prevents unpleasant odors from penetrating into the room from the sewer.
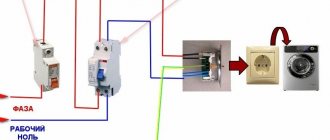
Electrical connection
The washing machine operates from a regular electrical outlet. The socket must be located in close proximity to the washing machine. The use of extension cords is not recommended. The instruction manual states that the washing machine, for safety reasons, must be connected to a grounded electrical outlet.
Most housing construction is equipped with a two-wire electrical network and does not physically meet these requirements. There is a way out of the situation! To connect the washing machine, you must use a separate line, protected by a circuit breaker and a residual current device (RCD), or a differential circuit breaker that combines both devices.
If the maximum power of the washing machine is up to 2 kW, 10 A of the machine is sufficient to protect the line, otherwise a protective device designed for a rated load current of 16 A will be required.
Leak-proof hose
Aquastop UDI is a protection system designed specifically to shut off the water supply in the event of water leaks associated with damage to the inlet hose of the washing machine. This type of protection cannot one hundred percent guarantee that water will stop in the event of a leak; be careful.
A modified version is a hose, the valve of the protective block of which is actuated by permanent magnets facing each other with like poles. When water gets in, the magnets rotate and activate a mechanism that shuts off the water. Unfortunately, this device can only be used once.
The third type of flooded products with leakage protection has a protective device with a solenoid valve. If the machine is turned off, the valve (plunger) is closed. When the unit is turned on, voltage is applied to the electrical winding and the valve opens, providing water supply. The electrical control wires in such devices are reliably protected by a waterproof sheath.