When a bearing in a washing machine malfunctions, action should be taken immediately. Continued use of a unit with such a breakdown invariably results in fatal damage to it.
Timely detection of a malfunction and manual replacement of a bearing in a washing machine will cost incomparably less than paying for the services of a specialist or purchasing new equipment. In our article we will analyze this process in detail, starting with step-by-step instructions for disassembling the washing machine, removing worn bearings and ending with the installation of new ones.
Signs of bearing failure
Breakdowns depend on various factors, including the build quality of the equipment and its age.
Trouble can happen for the following reasons:
- due to a worn oil seal, the bearing assembly is destroyed by moisture;
- the rules for installing the washing machine were violated (instructions for proper installation are given here);
- regular tank overload.
Another possible problem is the initially poor quality of the bearings themselves.
It is often possible to find out about a breakdown even by hearing.
The signs that a bearing unit is malfunctioning are eloquently signaled by the following signs:
- the drum does not spin after turning on the washing program, although the motor is running (other reasons for such a breakdown are discussed in this article);
- the drum rotates, but makes an atypical grinding noise, and sometimes a rumble, the washing machine vibrates significantly;
- washed clothes are not spun (we talked more about noise and lack of spin in another article).
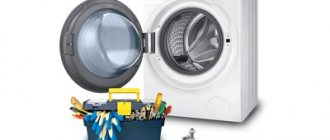
Having decided to deal with such an obstacle on your own, you need to clearly understand that this is a very labor-intensive process related to a major overhaul, in which virtually the entire washing machine must be disassembled.
You can make sure that there is a problem in the bearing by turning off the power to the washing machine and trying to rotate the drum in different directions by hand. The knocking and grinding sounds that appear in response will confirm suspicions
When the final decision is made to fix the breakdown yourself, in order not to aggravate the situation, you need to stop using the faulty mechanism and start preparing for repairs.
When does a washing machine drum bearing need to be replaced?
Before starting repairs, make sure that the cause of the problem is a worn bearing. To do this, spin the washing machine drum. Grinding, squeaking, and other noises indicate a problem.
Another way to identify a defect is to press on the top of the drum and evaluate the degree of shift. Large play between the driving element and the rubber cuff is a sure sign of bearing wear. The problem is also indicated by leaks of rusty water under the rear panel of the unit.
Before starting repairs, make sure that the cause of the problem is worn bearings. To do this, inspect the washing machine drum
What tools are needed?
First of all, before serious work, you need to take care in advance of the spare parts and tools that will be required during the repair.
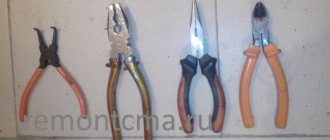
Set of tools:
- pliers;
- open-end wrenches of various diameters;
- hammer;
- a metal rod with the diameter of a pencil or a blunt chisel;
- Phillips and slotted screwdrivers.
You will need a silicone sealant and a lubricant designed for bearings placed specifically in washing machines, which is not afraid of water.
You won't need many tools, but they should all be on hand. You also need a fairly spacious space - cramped spaces interfere with productive work
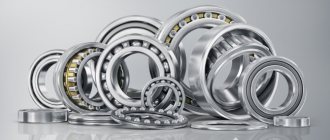
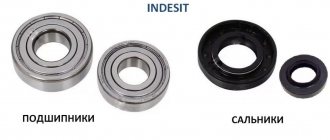
As spare parts, you need to purchase an oil seal and 2 bearings. The parts are not standardized, but in stores by brand of equipment they will select what you need.
You can also disassemble the car and remove the old parts, find them by numbers and write out the necessary parts on the Internet.
There is no point in saving: the service life of a washing machine is directly dependent on the quality of the parts. Ultimately, cheap analogues will cost more than branded spare parts.
Preparation for repair
Replacing the drum bearing requires disassembling the washing machine. Therefore, the SM needs to be prepared. For this:
- Unplug the machine.
- Disconnect all communications. Before unscrewing the inlet hose, prepare a container as water will flow out of it.
- Drain the water from the drain filter. To do this, open the hatch at the bottom of the front panel. It is secured with latches; you will need to loosen them with a screwdriver.
- Unscrew the filter by replacing the container.
Move the washer away from the wall so that you can move around comfortably. If you're short on space, it may be better to move to the garage.
What tools will you need?
- Set of slotted and Phillips screwdrivers.
- Open-end and socket wrenches.
- Hammer.
- Bolt.
- Bit.
- Sealant or glue (if the tank is not removable).
- Drill.
- WD-40 product.
- Lubrication.
How to choose spare parts
To replace you need to buy the following parts:
- two bearings (front and rear);
- stuffing box.
All parts must be original, only for your SMA model. Unsuitable bearings will wear out quickly, leading to repeated replacements.
Stages of disassembling a washing machine
First of all, the washing machine must be disconnected from the communications that supply it with water and electricity, and provide drainage. To get to the broken bearing, you will have to remove the tank, and to do this, virtually disassemble the entire car.
It would be a good idea to have a camera or cell phone with a similar function to record all stages of disassembly.
When assembling, such forethought can be of invaluable help, because relying 100% on memory is more than risky. As a last resort, the entire process needs to be recorded, especially the order in which the wires are connected.
Step #1 - remove the cover and dashboard
First the cover is removed. To do this, unscrew 2 screws on the back wall and lift it, moving it slightly back.
The next task is to remove the washing powder tray. It will leave the grooves quite freely if you pull it towards you by extending and pressing a special latch.
In models not equipped with such a button, the powder receptacle can be pulled out by slightly pressing it down.
Before removing the upper instrument panel, you need to determine where the bolts securing it are located. Their location and number may vary depending on the model, but in the place where the powder tray was removed, some of the screws are located exactly.
Another one is always placed on the right side of the washing device. If after unscrewing them the panel does not want to be removed, you need to continue searching for the missing fasteners.
In principle, the panel can be left hanging, but it will not be very convenient to work, and besides, the wires can be accidentally damaged
Before disconnecting a whole bunch of wires going to the control board, be sure to photograph them - this will be very helpful when reconnecting.
Next you need to remove the bottom panel: after pressing with a flat screwdriver on the latches holding it, it is easily released.
Step #2 - release the hatch, remove the front wall
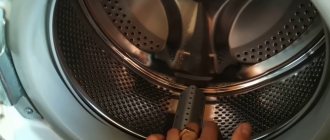
The next step is to release the cuff, that is, the rubber gasket, one side placed on the tank and the other on the front panel of the washing machine. It is fixed with a spring and a clamp. We discussed the removal process in more detail in this instruction for replacing the cuff.
By running your hand along the perimeter of the cuff, you can find a spring holding the ends of the clamp together. The spring together with the clamp is taken out into the light by prying it off with a flat screwdriver. The cuff is carefully disconnected from the hatch hole and tucked into the tank
It was time to dismantle the front wall. To do this, with the hatch latched, remove the bolts holding the panel and carefully remove it from the hook, remembering the wire connecting the panel and the hatch lock.
As soon as possible, the wire should be disconnected. There are no obstacles left to remove the wall.
Step #3 - remove the heating element, wiring and tank
First of all, the internal top panel is removed, for which the screws securing the water supply valve are found in the back of the device and removed. After this, the bolts on the panel begin to twist.
But you shouldn’t rush to remove it right away - before this action you should disconnect it, not forgetting to take pictures of the wires and pipes with the camera.
Next comes the dismantling of the drain pipe, connected to the tank using a clamp. The clamp is unscrewed and the pipe is removed. It’s a good idea to have a rag on hand, as remaining water may leak out of the nozzle.
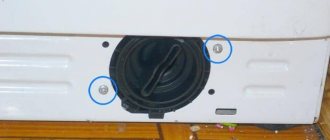
The heating element must also be removed. To do this, disconnect the wires leading to the heater.
In different models, the location of the heating element is possible both in the front and in the rear of the automatic washing machine, so you need to be prepared to dismantle the back wall.
After disconnecting the wires leading to the heating element and unscrewing the nut, the electric heater is pryed up with a screwdriver and carefully removed from the tank
At this stage, the wiring is completely dismantled. It must be borne in mind that sometimes it is attached to different parts of the unit using different types of fasteners. For example, it can be attached to the tank with ties or wire.
Next, the wires from the engine are removed. You can also disconnect the wiring from the pump and put it outside so that it does not create unnecessary interference when it comes time to remove the tank.
To make it easier to remove the tank, you should remove the counterweights - lower and upper. Depending on the model, they can be found both in the front part of the case and in the back.
Using a wrench, remove the bolts that secure the shock absorbers and water level sensor in the desired position.
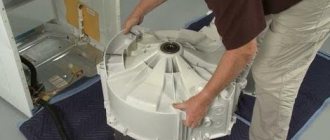
After removing the belt and disconnecting the engine and shock absorbers, the work of removing the tank from the bowels of the car is nearing completion. The tank was left hanging only on the springs; it weighs little, so it doesn’t require much effort.
You need to lift the tank with one hand, and with the other unhook it from the retaining springs and remove it from the car. The tank has been removed, the next task is to remove from it everything that will interfere with further work or is accidentally damaged
For convenience during future disassembly, the released tank is usually placed on a durable table with the pulley facing up.
Step #4 - disassemble the dismantled structure
To avoid accidentally damaging the rubber cuff during work, it is preferable to remove it, remembering to mark the correct location with a marker.
The tank is usually made of 2 parts fastened together. Fastenings, depending on the brand of the machine, can be special latches or bolts. These halves need to be separated. There are, however, solid tanks that need to be cut.
In traditional cases, after the front part of the tank is removed, you can see a drum on its rear half, which can now be easily removed.
Often, after opening the tank, debris, dirt and other long-term accumulations are found in it - you need to get rid of them
Step #5 - open the solid tank
In some models, especially the Ariston and Indesit brands, there are not collapsible, but solid polycarbonate tanks.
In such cases, in order to get to the faulty bearings, the container will have to be cut with a regular hacksaw.
To keep the thickness of the cut as small as possible, the saw blade is tapped with a hammer to minimize the setting of the teeth.
In models where the seam along which the cut is made passes through the pressure switch chamber, the situation becomes more complicated. A hacksaw is too cumbersome for such an operation, so you have to make do with one blade
The cut halves are coated with sealant and twisted using self-tapping screws according to pre-applied marks.
Different brands have their own nuances in disassembling the washing machine. On our website we have detailed disassembly instructions using the example of models from popular brands - LG, Electrolux, Samsung, Ariston and Atlant.
Disassembling the tank
If the SMA tank is collapsible, then it is enough to unscrew the bolts around the perimeter, release the latches and remove one half.
If the tank is non-separable, the drum will be more difficult to get. You'll have to do some sawing. You will need a hacksaw and a metal blade - be sure to use one for metal, as they are thinner, so you will do the job accurately.
- Place the tank on its edge.
- Start cutting from a comfortable place.
- Having cut into two halves, proceed to dismantle the drum.
To make it easier to remove the drum, hit the bushing several times with a hammer and it will fall out.
Step-by-step replacement of worn bearings
The matter is gradually moving towards completion, and soon it will be possible to get rid of the faulty bearings, but there are still a few preliminary steps ahead.
Stage #1 - preparatory work
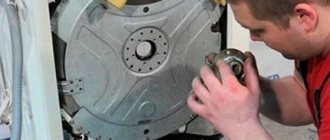
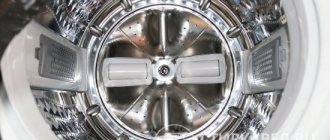
Now you need to carefully disconnect the drum from the back of the tank - a responsible operation that requires special attention.
First you need to free yourself from the fasteners holding the pulley. The tank is turned over with the pulley up, and the bolt securing it to the shaft is disconnected. When the pulley is removed from the axle, the unscrewed bolt is returned to its place to avoid damage to the shaft when the drum is knocked out.
The shaft is removed gradually, by carefully tapping with a hammer. Some experts advise inexperienced craftsmen to use a rubber mallet in this case, so as not to inadvertently flare the bearing seat.
If the shaft moves little by little, the work continues patiently. If the result is negative, before increasing the effort, the standard bolt should be replaced with one that you don’t mind throwing away if it becomes deformed.
When the position of the shaft is equal to the head of the bolt, the latter is unscrewed and the drum is removed out.
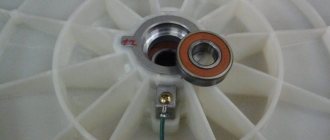
It is necessary to carefully inspect the shaft and bushing for their integrity. To check, you can put a new bearing on the shaft to make sure there is no or no play. If flaws are found, the shaft with the cross will have to be replaced.
Such a drum shaft must be cleaned until it shines and only then returned to its original place. You can additionally treat the surface with anti-corrosion paint
The bushing located on the shaft should also be free of wear and tear defects and mechanical damage.
Pronounced transverse grooves eloquently indicate that the oil seal on such a bushing will not be able to protect the bearing from moisture, and, therefore, repeated repairs are inevitable.
Before removing the bearings, the seal must be removed. The operation is simple: pick it up with a flat screwdriver and remove it. If it doesn’t work right away, you’ll have to soak it with a penetrating lubricant.
It won't be a problem if the seal breaks, it still needs to be replaced.
Stage #2 - removing the damaged part
The tank is placed on wooden blocks, and it’s time to work with a metal rod or a blunt chisel. Place the pin on the worn bearing and hit the part with a hammer.
Subsequent blows are applied in a circle until the part is knocked out. During operation, care must be taken to ensure that the bearing does not become distorted. The outer bearing is removed first.
The tank is a rather fragile part, so many craftsmen, in order to avoid breakage, knock out the bearing by placing the container on their knees or a soft base
The second bearing is also removed using the same method. The blows should be careful and not strong. And yet, this procedure is quite noisy, so the neighbors will be grateful to the home craftsman if he finds the opportunity to do it outside the walls of the house.
The landing sites must be thoroughly cleaned of dirt using an anti-scale agent and a soft cloth, until they shine, to prevent clogging of new parts.
Stage #3 - installation of new bearings
Now nothing prevents you from installing serviceable bearings. Initially, this is done with the smaller one.
A metal rod will help here too: it is alternately applied to the bearing from opposite sides and, with careful blows of a hammer, is directed to the right place.
The sound will indicate that the part is placed correctly: it will become much louder. The larger bearing is changed in the same way.
When installing new bearings, craftsmen use the same tools: a hammer and a metal rod. You can use other convenient installation devices
All that remains is to install a new oil seal. First of all, it must be treated with a lubricant created specifically for washing machines. Only after this can it be placed in its proper place.
When this is not available, some recommend Litol-24, which can be purchased at any auto store. But responsible craftsmen categorically do not advise doing this. It does not have great water resistance, and everyone understands what moisture brings to the bearings.
Stage #4 - reassembling the structure in reverse order
The lubricated tank shaft is installed at the same location - in the back cover. Before connecting the tank halves, it is recommended to replace the sealing rubber with a new one. As a last resort, fill the groove along with the gasket in a circle with a layer of sealant.
It’s a good idea to first make sure the tank is tight by pouring water into it above the gasket. If it does not leak, then everything has been done correctly, the work of replacing faulty bearings has been successfully completed
All that remains is to assemble the car. This is done in the reverse order of disassembly. And here the photographs he took while disassembling the unit will provide an invaluable service to the home handyman.
The more there are, the less likely it is that “extra” parts will remain near the assembled washing machine.
How to replace a bearing
- Remove the oil seal by prying it with a screwdriver.
- Place a chisel on the outer race of the bearing. Gently tap it with a hammer, moving in a circle.
- After knocking the bearing out of the cage, do the same with the second part. If you have a special puller, then the task becomes easier.
Clean the seat. Lubricate the bearings and install them in the socket. To ensure they sit evenly, use a bolt. Tap the bolt with a hammer, moving it along the outer edge of the part.
Place the oil seal on top and lubricate its inner groove.
Replacement completed. All that remains is to reassemble the car in reverse order.
Features of repairs with vertical loading
Here the drum is supported by 2 axle shafts and 2 bearings. With such a reliable design, they fail infrequently, usually when there is some other failure.
They are often damaged by water penetrating through a faulty seal. Rusting and steadily becoming clogged with dirt, the bearing eventually fails.
Repairing such machines is much more convenient. When communications are disconnected, 2 side covers of the housing are removed, and access to the work area is provided.
The bearing on the side where there is no drive pulley is replaced first. To do this, the caliper is removed - a ready-made set of bearings and oil seal enclosed in a housing.
The calipers of the same machine have different thread directions. On the side where the pulley is missing, it is right-handed and unscrews counterclockwise. On the reverse side, such a part has a left-hand thread and is unscrewed clockwise
The seat of the oil seal, as well as the shaft itself, is freed from contamination. When installing a new bearing, it is necessary to avoid distortion of the sealing ring.
Otherwise, it will not be able to prevent fluid leakage, which will cause new bearing failure.
Changing the caliper on the motor side begins with removing the belt and drum pulley. Then comes the turn of the grounding block. Next the caliper is unscrewed. The shaft and seat, as in the first case, are thoroughly cleaned.
A serviceable oil seal is installed in its proper place, and the caliper is tightened. There is no need to put in much effort, because the carving is made on plastic. Assembly, as usual, is carried out in reverse order.
We also have a separate article on our website that discusses in detail the process of replacing bearings in an Indesit washing machine.
What causes bearing wear?
The bearing ensures uniform rotation of the tank and drum during washing. Following a worn bearing, the crosspiece and the SMA tank may be damaged, which will lead to a complete stop of work. You will have to change the tank that came with the drum. Sometimes such a replacement is equal to the cost of a new washing machine.
For what reasons does a breakdown occur?
- Natural wear and tear. The manufacturer claims that the bearing life is from 5 to 7 years. With rare use it can last up to 10 years.
- Water leak. This can happen due to a damaged seal, which protects the bearing from moisture. Water washes away the lubricant, which leads to corrosion and gradual wear.
Remember! All parts must be replaced at once: 2 bearings and an oil seal, otherwise the repair will not be of high quality.
How to recognize a malfunction
In addition to loud noise, you may notice an error code on the display. You can also shake the drum with your hand. If there is play - the drum moves far away from the tank, then the reason is wear. The same result will occur if the rotation of the drum is non-uniform.