/Household appliances/Built-in/
If there is no place in the bathroom for a washing machine (hereinafter referred to as WM), the easiest way is to place it in the kitchen. After all, all communications are already there - a pipe supplying cold water and a sewer drain. All you have to do is find a suitable place, select a model of the right size and, if desired, build it into a set or install it under a tabletop. In this article we will tell you how to do it correctly - without compromising the interior and ease of use of the SM.
The sequence of connecting a machine - an automatic machine with your own hands.
Before connecting the unit, you need to choose the most convenient and suitable location for its placement.
After this, the following steps should be followed:
- The washing machine must be installed very levelly, without slopes.
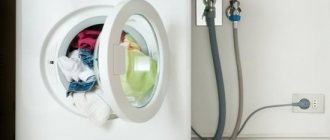
- Connect the flexible water supply hose
- Connect a flexible drain hose to drain water
- Connect to power supply
Choosing a suitable location.
You need to approach this point very carefully. Since subsequently transferring to another place will be difficult. The main factors to consider are:
- Availability of nearby water supply and drainage systems
- Presence near sockets
- Smooth surface
- The overall interior and the washing machine must match each other
- Accessibility to the washing machine from each side. Free opening of doors.
When choosing a location for installation, several of the most acceptable options are usually selected. This is the kitchen, hallway or bathroom.
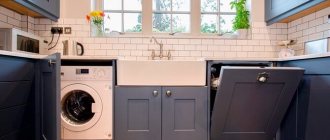
Washing machine under the countertop
Even the smallest kitchen has space for a countertop. You need to use the space underneath it rationally. To do this, you need to replace the usual kitchen cabinet for storing things with household appliances. Pots and plates fit well on hanging shelves. A washing machine in the kitchen under the countertop is the fastest and easiest way to install. This solution saves space and does not require large expenses. In a small apartment, the countertop is often combined with a window sill.
The location of the washing machine under the countertop saves space and looks harmonious against the background of white tiles in the work area Source archidea.com.ua
The machine always remains in sight; the absence of a door provides free access when loading things before washing and constant monitoring of the process. If the design of the equipment does not fit well into the overall scheme of the room, it is advisable to decorate the front part with decorative stickers or artistic painting.
A white washing machine and a white stove look great in an interior with a wood-effect kitchen unit Source archidea.com.ua
When choosing a model, special attention should be paid to colors. It is ideal if the shade is similar to the color scheme of the kitchen set or countertop. If the store only offers traditional white cars, don’t be upset. This color is universal and will fit into almost any style and design.
Placing the washing machine and dryer next to the sink will ensure easy and simple installation of equipment Source remontbp.com
Stages of installing a washing machine.
- Remove all staples. They are located on the back wall of the machine. They serve for rigid fastening of all elements of the washing machine.
- Remove all special bars located between the body and the tank of the machine.
- Remove all bolts installed at the front of the washing machine. They serve to completely immobilize the drum of the machine. In the resulting holes you need to insert special plugs, which should be included in the kit.
All removed parts should be removed and not thrown away. If you call for service, these details may come in handy.
An important stage in installing the automatic machine is its alignment in the horizontal plane.
Before you begin installing your washing machine, it is important to familiarize yourself with some flooring parameters.
- If possible, the floor covering should be absolutely horizontal.
- Be very durable.
- Protected from various vibrations that always occur during operation of the machine.
If these parameters are clearly not observed, they must be eliminated as much as possible. The floor can be reinforced with cement screed.
Now we proceed to install the washing machine in this place. The main thing is to ensure that the machine is installed horizontally. The horizontal position is set along the top cover. This is possible using a regular building level. After this, the legs are tightened using special fixing nuts, achieving the desired height.
It is strictly not recommended to place various materials under the legs. During operation they may slip out and as a result the machine may break. But at the same time, it is recommended to place thin rubber material under the legs.
When installing a washing machine, you should consider some features:
- The best installation is achieved with the legs fully screwed in. (only suitable for perfectly horizontal floors)
- When installing on an inclined surface, it is better to use special fixing parts.
- You also need to rock the machine. It should not fluctuate at all or its fluctuations should be minimal.
From a designer's point of view
One of the disadvantages that can cancel out all the advantages at once is the unaestheticness of a washing machine in a kitchen set. But there are several ways to successfully fit the unit into the kitchen design, and you can choose the one that suits you best in terms of labor costs, money and results.
Hidden behind the façade
Like most modern technology, washing machines can be built-in models.
This means that the machine has a flat front panel, close to which you can attach the front and make the unit indistinguishable from other cabinets in the kitchen.
This option allows you not to think about the appearance of the machine, but you will have to overpay a little: built-in appliances are usually more expensive. The second point is design: this installation option needs to be planned at the kitchen design stage. It will be very difficult and expensive to remake a ready-made set.
Switch in the closet
A slightly less convenient, but also aesthetically pleasing solution is to place the machine in one of the cabinets on the lower base, converted or specially ordered for the machine.
It could even be a free-standing box (for example, in a niche), made in the style of the rest of the kitchen.
This option differs from a built-in washing machine for the kitchen in terms of inconvenience of access: while a built-in machine has a flat front panel, a regular one has a more streamlined one, and it will have to be placed deeper in the cabinet. But this method is more economical (can be used for any machine, even a budget one) and can be used for a ready-made kitchen.
Taste and color
The third option is not to close the washing machine at all, but choose it to best suit the style of the kitchen.
For example, a machine in a Metallic case will suit a high-tech design using a silver color.
And in combination with the same refrigerator and stove, it will create a harmonious ensemble.
For a kitchen in a modern style and in light colors, white appliances are suitable.
When planning a place for a washing machine, it is better to install it away from the stove: proximity to a hot oven is undesirable for any equipment.
When choosing a washing machine model for the kitchen, consider the width of the countertop and the dimensions of the model . The standard tabletop width is 600 mm, but there must be space behind the unit for hoses - that is, the machine should be no more than 550 mm. in depth. When installing “in a closet” you need to choose an even narrower model (450-500 mm).
Connecting an automatic washing machine to the water supply with your own hands
This stage is the most important and difficult. Therefore, you need to look at a few important points.
- Assess the place where the machine will stand. The connection method and the selection of the necessary parts will depend on this.
- It must be remembered that water hoses should be located behind furniture or interior parts. Their length will depend on this.
- It is necessary to estimate in advance the approximate length of the water hose. Very often the kit comes with very short ones.
- To connect to the water supply system you will need: pipes, a valve or a regular tap.
Faucet for connecting an automatic washing machine
The most common connection method is to connect it to a flat section of the water supply. To do this you will need a tee. Or this can be done on a special branch of the pipe. The connection to the tee or branch is made through the toilet cistern.
Interior organization
The equipment in the kitchen should be installed so as not to spoil the interior of the room and at the same time not to take up space. It is more convenient to do this by choosing a special frame that is no different from other cabinets, into which the machine will be installed during assembly. The distance to pipes, outlets, and other equipment is taken into account. Since everything you need to connect a dishwasher is also suitable for a washing machine.
If the interior is already ready, and the machine is purchased later, the task becomes more complicated. But it can also be solved quickly - either by building it into a cabinet (then the appearance of the equipment is unimportant) or by decorating it in the style prevailing in the kitchen (pasting or painting). An experienced craftsman is invited to remodel the style of the device so as not to spoil the expensive equipment.
Types of connections of a washing machine to a water supply source.
Connection to the toilet cistern.
Connecting a washing machine to the toilet cistern
This method is most suitable for beginners. It does not require specialized operations.
- Requires a tee
- The tee is attached to the branch of the pipe
- Connect hoses to the tee to supply water to the toilet and washing machine. The water supply will be carried out through a valve or shut-off valve for connecting the washing machine.
The main disadvantage of this method is the lack of connectivity in a separate bathroom or kitchen.
Connection to the mixer.
This is also a fairly popular connection method.
It is reliable and simple. The main feature is the use of a special tee, the design of which includes a ball valve. This tee is installed between the outlet and inlet of cold water into the mixer.
The main disadvantage is the lack of external aesthetic appearance. The hose will always be visible and can only be hidden behind specially made interior parts.
Connection with tapping into a pipe.
This method is also quite simple. A special metal tee must be installed at the place where the polymer pipe is cut.
In details:
- Cut the pipe that supplies water
- Measure the tee
- Cut out part of the pipeline according to the measurements taken
- Attach the ring with the nut
- Flare the pipe cuts. This is done using a calibrator
- Place the pipe onto the fitting fitting
- Tighten the nuts firmly, first pushing the rings tightly together.
The faucet for connecting the washing machine to the tee must be screwed in in advance. In order not to damage the polymer pipe.
If you have plastic pipes installed, you will need a special one. tool and special fittings for soldering fasteners with tees.
Connection in some other place.
For this method you need to have a special adapter - a coupling saddle and a straight pipe. A coupling saddle is a clamp made from a cage with a threaded outlet. A ball valve is screwed into the upper outlet to connect the washing machine. A pipe is connected to it that delivers water to the washing machine.
The last stage is setting the level
Connecting the washing machine to the water supply and sewerage system is not all. We need to provide her with normal working conditions. To prevent the washing machine from jumping during the spin cycle, it must be positioned strictly vertically. The position of the body is adjusted using adjustable legs. Take a building level, place it on the lid, change the height of the legs, ensuring that the bubble in the level is strictly in the center.
Check by placing the level parallel to the front part, then move it to the rear wall. Then the procedure is repeated, but the level is applied to the side walls of the case - on one side, then on the other. Once the bubble is strictly in the center in all positions, we can assume that the washing machine is level.
Checking the correct alignment of the washing machine
If there is no level, you can try to level the machine by placing a glass with a rim filled with water on it. The water level is up to the rim. Change the position until the water is exactly along the rim. This method is less accurate, but better than nothing.
There is one more point. Most often, washing machines are placed on a tiled floor, which is slippery and hard. That’s why even a perfectly aligned machine sometimes “jumps”—it’s impossible to dampen the vibration when spinning on a hard floor. To cope with the situation, you can place a rubber mat under the machine. It serves as an excellent shock absorber.
Connecting an automatic washing machine to the sewer with your own hands.
This can be done in one of 2 ways. Temporary and permanent.
- The first method involves the absence of a permanent connection to the sewer. The drain hose is simply directed into the bathroom or toilet.
- The second method is divided into two options. For the first option, a siphon is required. Moreover, it must be of a special design. It contains a separate input for washing machines. The second option involves the absence of a siphon. The pipe is connected directly to the sewer pipe. The main thing is that the water drainage hose does not come into contact with the waste water in the pipe. Then the hose must be carefully sealed. The height between the floor and the bend should be no more than 50 cm.
Washing machine in the kitchen with different layouts
Sometimes the appliances are too noisy, in which case you need tight kitchen doors made of durable material that can be closed, and the problem will go away on its own. If there is an arch instead of doors in the kitchen or the machine is installed in a studio apartment, when purchasing equipment, pay attention to its technical characteristics. Keeping the kitchen unit door closed will also help reduce noise levels. You can place the machine on a porcelain stoneware or ceramic tile floor. The equipment becomes more stable and vibrations are reduced.
Household appliances under the countertop save room space and do not interfere with the interior at all Source remontbp.com
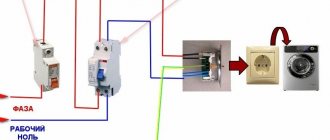
Connecting the washing machine to the electrical network.
The main thing that needs to be followed is the safety requirements specified in each operating manual. One of the features worth noting is the presence of an outlet with a grounded wire. There are also some recommendations:
- Using a separate input in the panel via specially laid wires. Additional cables can be given a neat aesthetic appearance using interior elements sold everywhere.
- Using a residual current device (RCD).
- Use cables with three cores. The cross-sectional area should not be more than 1.5 sq.cm.
- Be sure to use a grounded outlet.
- Connection to water supply and heating systems is prohibited.
- It is advisable to use a socket with a cover to protect it from moisture.
- If possible, do not use extension cords and tees to avoid mechanical and other damage to the machine.
Review of the best models
When purchasing a washing machine to be built under a countertop, it is important not only to choose the right size, but also to take into account the technical characteristics of the unit. Using the example of several models, we will find out what parameters you should pay attention to:
- Siemens WK 14D540 . Built-in model with dimensions 60 x 60 x 82 cm and loading capacity up to 5 kg. The unit is equipped with a stainless steel tank and 22 washing programs. Fits standard headsets and does not vibrate even at the highest spin speeds. Has leakage protection and imbalance control;
- Zanussi FCS 1020C. A free-standing machine with dimensions 50 x 52 x 67 cm and a loading capacity of up to 3 kg. Easily hides under the countertop, has energy consumption class A and low water consumption (39 l);
- Miele W 2859 iR WPM ED Supertronic. Built-in model with dimensions 60 x 58 x 82 cm and loading capacity up to 5.5 kg. Equipped with 16 washing programs. It is characterized by silent operation, low water consumption (42 l), the presence of a honeycomb drum with illumination and an electricity consumption meter; has energy consumption class A+;
- Bosch WFC 2067 OE . Free-standing equipment with dimensions 60 x 40 x 85 cm and loading capacity up to 4.5 kg. Equipped with 12 washing programs, protection against leaks and a delayed start function; Easily installed under the countertop. It features economical energy consumption;
- LG F-10B8MD . A model with the possibility of embedding, dimensions 60 x 44 x 85 cm and the ability to load up to 5.5 kg of laundry. It has 13 programs, including the “Volume Items” mode, which not all compact models are equipped with;
- Candy Aquamatic 2D1140-07 . Free-standing machine with dimensions 51 x 46 x 70 cm and the ability to load up to 4 kg of laundry. Equipped with a child protection function and 16 washing programs. Ideal for placement not only under the countertop, but also under the sink;
- Bosch WIW 24340 . Built-in model with dimensions 60 x 57 x 82 cm and loading capacity up to 7 kg. Has the highest energy efficiency class - A+++. Equipped with leak protection and 14 washing programs.
First start of the machine.
- After all the steps have been completed, you need to check the installation is correct.
- It is necessary to turn on the washing machine in each of its modes.
- After testing operation without laundry, you need to familiarize yourself with the following:
- Tank filling time
- No leaks
- Correct drain operation
- Correct drum function
- Spin
- Good heating of water in a short period of time. About six minutes after the drum is filled with water.
- No excessive rumble or other excessively loud sounds.