As most owners note, malfunctions of the LG washing machine occur very rarely. And thanks to the informative self-diagnosis system, many damages can be eliminated independently.
But there are a number of breakdowns that, due to their complexity, require certain skills and special devices.
One of these is the replacement of the drum bearing block. After all, in order to “get” to the bearings, you will have to completely disassemble the washing machine and “halve” the tank. As with all models, replacing the bearing in an LG washing machine has its own characteristics, some of which will be discussed in this short article.
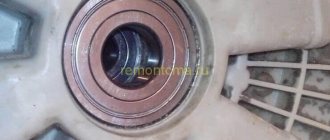
Usually, it is not difficult to determine that the bearing assembly needs to be replaced: the washer begins to make strange sounds, a grinding or rumble is heard, and small “rusty” puddles can be found near the washer.
In addition, the machine refuses to wring things out, although it performs all other stages flawlessly. But this is only at the initial stage of bearing destruction.
In the future, the washing machine may not start at all, and drum loosening can be diagnosed by raising and lowering it by hand. In such cases, immediate replacement of the bearing in the LG washing machine is required.
After all, you can expect that a falling off drum will damage not only the tank, but also other elements of the washer and the cost of repairs will increase significantly.
Tool
To disassemble the housing and install bearings on an LG washing machine, you will need the following tools and accessories:
- small light hammer. Preferably with a bronze or copper striker;
- lubricant WD-40 or similar, as well as automotive or universal sealant;
- pliers;
- screwdrivers of various configurations (with straight and Phillips heads);
- wrenches (open-end and socket) of various sizes and a small adjustable wrench.
You will also need a small pin with a diameter of 4 mm to knock out the drum axis.
Preparing for work
Before you begin replacing the drum bearings, it is worth carrying out a number of preparatory steps. Good preparation contributes to faster, and most importantly high-quality, completion of work.
First, you need to take care of the necessary equipment. What you will need:
- a hammer, the striking part of which is covered with bronze;
- lubricating fluid, such as WD-40;
- pliers;
- two screwdrivers (phillips, flat);
- medium-sized adjustable wrench;
- set of sockets and open-end wrenches;
- automotive sealant;
- metal rod 30-40 cm long.
Secondly, you should take care of purchasing new parts: the damaged component and the oil seal. This can be done via the Internet in an online store or specialized center. To buy the necessary components, you need to know the series of the existing lg direct drive machine. As a rule, such data can be found in the technical data sheet of the device. When purchasing in a specialized store, you can use the help of a consultant. He will not only help you select the necessary components, but will also offer assistance with repairs. But you can also choose it yourself.
It is not recommended to take risks by purchasing components that are not intended for this category of equipment. In the best case, after a short period of time the entire algorithm will have to be repeated again. And this is not 10-15 minutes of time. If you have no experience with such an event, there is a risk of carrying around all day.
Original parts cost about 250-350 rubles, an oil seal costs about 300 rubles.
It should not be forgotten that different machine models may have different components installed. Therefore, you need to know what model of machine is available and what components are there.
Thirdly, you need to prepare your workspace. Of course, it is better to move the repair work to an equipped workshop or garage. If this is not possible, replacing the drum bearings can be done in an ordinary apartment. One condition is to free up more space in order to comfortably perform all the necessary manipulations.
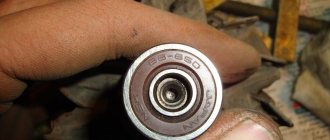
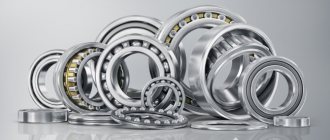
Buying bearings
Even from the same manufacturer, different models have bearings of different sizes. This is due to the different characteristics of washing machines (capacity and size of the drum, maximum spin speed, etc.).
To buy a bearing for an LG washing machine, you need to know the model of your washing machine or the markings of the bearings. Typically, sellers offer several versions of bearings of similar sizes, differing only in price. Considering that it is difficult to get to the bearing block of the washing machine drum, you should not buy the cheapest parts. It is better to choose an original bearing for an LG washing machine - this is a guarantee that it will last a long time.
Sometimes in a store, based on the name of the washing machine model, it is difficult to determine the dimensions of the bearings of LG washing machines. To make it easier to select the required part, we have prepared a table that includes bearing numbers for the LG washing machine, seal brand and drive belt type.
Solving common problems
For device repair to be successful, it is necessary to correctly identify the causes of the breakdown. To do this, it is worth analyzing the signs of malfunctions:
- If the heating element breaks down, an error code appears on the monitor. If there is no such signal, the operation of the heating element can be assessed by other criteria - the quality of the wash, the dissolution of the washing powder. To accurately determine the operation of the element, it is worth measuring the voltage. This is done on contacts.
- When the pressure switch breaks down, the water often drains itself. She is recruited and immediately released. The indicator does not indicate that the tank is full. Therefore, water is continuously poured in and drained from the device. Dealing with a violation is not difficult. To do this, replace the pressure switch.
- If the bearings fail, unusual noises appear during operation of the device. Sometimes the unit rumbles so loudly that the sounds of breakdown can be heard even in neighboring apartments. To identify a violation, you should rotate the drum in different directions. If squeaking and knocking noises occur, bearing failure may be suspected.
- An abrupt shutdown of the device indicates that the fault is localized in the terminals. It may also indicate damage to the wires. The control module itself breaks down quite rarely. Much more often, the wires directed to the sensors burn out and short out.
- The drain pumps of this manufacturer's equipment often break down. This is due to a not very successful design. The drain often gets clogged. As a result, the blockage prevents the water from draining completely. In this situation, the “OE” code appears on the monitor.
- Sometimes the filler valve cuff breaks. If it is broken, water enters the tank even when the unit is turned off. If water gurgles after turning off the device, you may suspect a breakdown of the fill valve.
In LG equipment, bearings break quite often. To cope with such a defect, it is necessary to properly disassemble the device. This must be done carefully, strictly following the instructions. It is advisable to take photographs of this process. Thanks to this, it will be possible to assemble the unit correctly.
Share link:
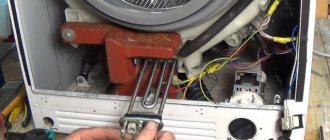
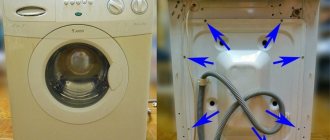
Stage 6. Freeing the tank from fasteners
After removing the front wall, access to all elements of the washing machine opens. Disconnect from the tank;
- pipelines to the filling valve;
- pipe to the drain pump;
- rotor and wires to the stator (in direct drive models);
- wires going to the heating element, temperature sensor and electric motor;
- drainage pump wiring;
- pressure sensor pipe.
We also dismantle both counterweights (larger in the upper part of the washer and smaller in the lower) and shock absorber mounts. After this, unhook the springs and pull the tank out of the washing machine body.
How to replace LG washing machine with direct and belt drive?
Replacing bearings on a direct-drive and belt-drive washing machine is practically the same. The only difference is whether you have to remove the belt or not. In machines with direct drive, the engine is located on the tank, and with a belt drive, it is located under it.
Preparation
Before you begin disassembling your LG washing machine, you need to prepare your tools. To work you will need the following equipment:
- pliers;
- screwdrivers;
- adjustable wrench;
- lubricating fluid (you can use VD-40);
- hammer;
- a set of keys;
- pliers.
In addition to tools, you need to take care of the workplace. There should be enough space so that you can not only disassemble the machine, but also remove the drum from it.
Disassembling a household appliance
It’s good if you can disassemble the washing machine with a partner. It will be more difficult to cope with the task alone.
The procedure is as follows:
Disconnect the device from the network.- Unscrew the two bolts located at the top of the rear wall. They are responsible for securing the lid. Move it to the side and then remove it.
- Remove the powder tray. To do this, pull it out and gently press on a special tongue. Hold it and remove the part. Taking this opportunity, you can wash the powder container.
- Remove the two bolts that hold the control panel in place. In some models of LG washing machines, they are secured with an additional screw located at the end, on the right side of the device.
- Pry the panel with a screwdriver and pull it out. You need to work carefully, as the fasteners are plastic and can break.
- Unfasten the chips from the body, disconnect the connector with the wire. In order not to confuse the connection points of the wires during the reassembly process, you need to fix them on the camera. All removed parts are put aside so as not to accidentally damage them.
- Disconnect the wires and tube leading to the pressure switch. The sensor is fixed with one self-tapping screw, which needs to be twisted.
- Using a socket wrench, unscrew the bolts holding the counterweight located at the top of the washing machine. They take it out carefully, as its weight is impressive.
- Disconnect the intake valve tubes and remove the chips.
- If your washing machine is equipped with a steam wash function, then the next step is to remove the steam wash unit. It is located next to the intake valves.
- Remove the surge protector.
- Take out the clamp that presses the hatch cuff.
- Remove the rubber band.
- Unscrew the screws that are responsible for fastening the lock.
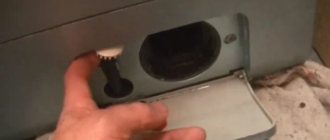
- Remove the bottom cover under which the drain pump filter is located, tighten the bolt securing it and remove the part.
- Proceed to remove the front panel. It is attached to two screws, which are located at the top of the device.
- Pull off the clamp and take out the dispenser tank.
- If the washing machine has a pump for recirculating liquid during washing, it is twisted. A hose will be connected from it to the cuff, which is unfastened.
- Dismantle the transverse metal strip.
- Loosen the clamp and pull out the pipe leading to the tank.
- Remove the front counterweight.
- Unscrew the back cover.
- Find the heating element under the tank and disconnect all the wires that are found.
- Tighten the screw holding the motor, remove the belt and take out the part.
- Remove the tachometer.
- Remove the strips that are attached to the tank.
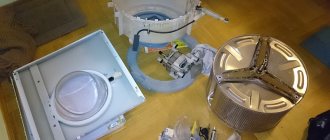
- Remove the shock absorbers and take out the tank.
- Unscrew the screws that are responsible for connecting the two halves of the tank. Pull out the drum.
- If the drum is stuck to the bearings, use a lubricant that will eat away the rust. Knock out the tank with a hammer.
- Clean the drum from scale and dirt.
How to remove parts?
Once the drum is outside, you can begin to remove the bearings. What bearings are in an LG washing machine? There are two of them - external and root.
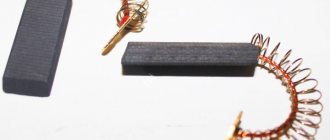
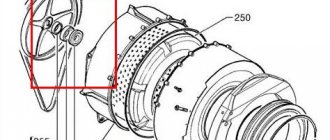
Stages of replacing the oil seal and bearings
Typically, replacing bearings on an LG washing machine is performed in the following sequence:
- We remove the “old” oil seal from the rear “half” of the tank. You can use a small screwdriver for this;
- uses the same pin as in the previous section, carefully knock the bearings out of their seats;
- we clean the holes where the worn bearings stood from rust, grease residues and dirt;
- carefully hammer the bearings into place, evenly tapping them with a hammer through the nozzle;
- generously lubricate and install the oil seal;
- we assemble the tank (before connecting the two halves, coat the seam with sealant).
In reverse order, we assemble the washing machine and test its operation.
Reassembly
After installing the new parts, you can assemble the washing machine. It is important to replace the seals and treat the shaft with lubricant. Reassemble the device in the reverse order. During the process, it is recommended to compare photos of the stages that were taken. This will ensure excellent operation of the unit after repair.
After assembling the device, it is not recommended to immediately start washing clothes. It is much better to run a full cycle with water. This will help clean the drum from grease and check the operation of the device. It should not make any extraneous sounds.
Common mistakes
Quite often, replacing bearings on your own in an LG washing machine ends in failure. And then, in addition to the usual cost of replacement, you have to pay for restoring the functionality of other components of the washing machine. Among the most common errors leading to additional repairs are:
- broken wiring to the drum door lock module;
- damage to the surface of the cuff seal (when trying to remove it without dismantling the clamp);
- deformation of the pulley when removing it from the axle;
- violation of the integrity of threads on bolted connections;
- broken wiring to the heating element or temperature sensor;
- violation of the tightness of the water inlet pipelines (when removed without loosening the clamps);
- damage to the tank and drum due to careless removal or installation of bearings.
Considering that few washing machine owners have sufficient experience in performing repair work, it is more profitable to immediately contact a service center - it will not only be faster, but will also be cheaper.
When does it need to be changed?
The following signs will indicate that it is time to replace the bearing in your washing machine
Extraneous noise that occurs during washing or while rinsing clothes. This may include metallic clanging, knocking and grinding sounds.- Poor quality spinning. Due to the destruction of the bearings, the drum does not pick up speed, so the laundry remains wet.
- Washing machine imbalance. When the drum rotates, it will sway violently from side to side.
- Damage to the edges of the cuff. This may serve as an indirect sign of bearing wear.
You can determine that it’s time to change a part even without disassembling the washing machine. To do this, just unplug it, place your hand on the top of the drum and swing it. It should move with the tank on the springs, but there should be no play between them. If there is free play, it means the bearing has begun to deteriorate.
Contacting a service center is practical! Need proof?
- The washing machine was restored on the day of the call.
- You can call a technician to repair your washing machine until 23:00 on any day, weekends and holidays.
- You will receive a complete diagnosis completely free of charge.
- You will be offered original spare parts that are beyond doubt.
- Doing work from home will not take much time.
- You have in your hands a guarantee in accordance with GOST for everything that has been done and installed.
- You save money with a flexible pricing policy that provides benefits and discounts.
You should not take on painstaking, troublesome work if you are not sure of success. Trust the experience of the master, and you will not have to regret your decision. Call!
Parsing the machine
To disassemble the device, you must first disconnect it from the power source and turn off the hoses. It is recommended to place the unit in such a way that you can access each of its parts. All car disassembly procedures should be photographed. This will help you reassemble the device correctly after the repair is completed.
Removing the top cover
First you need to unscrew the lower fixing screws that are located on the back wall. They should be moved slightly back - 3-4 centimeters. Then remove it from the stops, fold it back and set the lid aside.
Detergent tray
To remove this part of the device, you need to press it with your finger onto the latch located in the center. After which the tray can be pulled out. After this you can see the side bolts. They should be unscrewed with a Phillips screwdriver.
Disconnecting wires
To disconnect the wires, you need to unscrew the plastic holders. Then you can pull out and disconnect the wires. To do this, you need to find and squeeze the latches. Then unplug the connectors one by one.
How to remove the clamp
The next step is to open the door. The clamp spring should be pryed off. This is done with a screwdriver. It is located under the drum rubber. You should take out the clamp and insert the cuff under the drum.
Service panel cover
To remove the service panel, press out the latches that go on top. Then lift and slightly tilt the panel towards you. It is recommended to unfasten the wiring and pull it out through a special hole. Then remove the control panel from the device.
Cuff
The hoses connected to the cuff can be disconnected using a flat-head screwdriver. The cuff is fixed on the tank with the same clamp as on the hatch. Therefore, the spring should be pryed. This is done with a flat screwdriver. As a result, you will be able to get the fixing clamp. The cuff can then be removed from the drum and set aside.
Disconnecting tank hoses
To make the tank lighter, it is worth disconnecting the heavy counterweights. Then you need to unscrew the screw fastenings of the counterweight located on top and remove it. Similar steps can be performed for the lower counterweight.
heating element
To remove the heating element, it is recommended to unfasten the batteries and cut the tie with wire cutters. Then you can unscrew the grounding contacts.
Disconnecting all elements connected to the tank
Be sure to remove all parts attached to the tank. The clamps of the pipes can be loosened using a Phillips screwdriver. You should also remove the screws securing the pressure take-off chamber.
Stator
This part should also be removed after unscrewing the screws. It is recommended to tilt the element down. This will help remove the wires from it.
Shock absorbers
These fragments are fixed on pins. To pull them out, you need to put on the key and squeeze the locking tabs. Then pull the part towards you with pliers. It is recommended to disconnect it and lower it down. Then remove the front shock absorber. This is done using a spanner wrench. Using pliers you can remove the pin.
Tank
To remove the tank, it is recommended to remove the side springs that secure this structural element. Use a flat-head screwdriver to unscrew the plug, lift and pull out the spring from the hole located on the frame. Carefully lower the drum down and remove the spring. Do similar steps on the second side.
Choosing a lubricant for a washing machine
It can be different and has distinctive characteristics. But each of them must be :
- heat-resistant , since the bearing and oil seal heat up during operation of the machine when washing at high temperatures;
- moisture resistant . If water gets on the bearing, it will have to be replaced, because this is unacceptable. To prevent this situation from happening, you need a seal. It is this that prevents moisture from entering the part. If the lubricant is washed out during operation of the machine, the bearing will break;
- thick _ This quality allows it to not leak when washed.
- not aggressive . The lubricant must be suitable for rubber. If it does not have the necessary properties or is a low-quality product, the oil seal may become stiff or, on the contrary, become wet when used. This will again lead to depressurization.
You should not use automotive lubricants (Litol-24, Azmol, etc.) due to their ineffectiveness.