In this article we will talk specifically about disassembling a personal computer that has a system unit. If you own a laptop and are interested in interacting with this type of device, check out another general article on our website, which describes all the features of performing the task.
Read more: Disassembling a laptop at home
Some tips
When disconnecting the power supply to the control panel or motor of older Bosch, LG, Samsung or Indesit models, do not pull the wires. Fingers must be placed on the connector body. If it does not give in, you can lightly shake it in different directions. When tugging on the wire or using force, the core may be torn off from the crimp.
To remove the front upper and lower covers, you will need screwdrivers: flat-slotted, Phillips, or asterisk. It is better to prepare everything that is available at once and not be distracted.
Depending on the year of manufacture, manufacturer and model, the panels on washing machines are connected to the frame using additional plastic latches. To avoid damaging them when separating the surfaces, you must carefully press the teeth not with a screwdriver, but with the handle of a tool, finger or nail, since the metal can damage the surface of the part. For the same purpose, you cannot use force: if the component does not give in, it means that not all fastening elements have been separated yet.
Installation location
If the machine will be installed in the kitchen or in a room (not in the bathroom), then there must be a reinforced concrete floor under it. It is not recommended to install the washing machine on a wooden floor, linoleum or laminate - the machine will constantly vibrate both during washing and during spinning.
In any case, you have reinforced concrete floor slabs under the wooden flooring, so you need to remove the wooden floor and fill the area under the machine with concrete mortar to the level of the old floor.
Subsequently, you can adjust the tightness of the legs of the machine to all four points on the floor - for this, the legs are equipped with threads.
If the floor under the machine is perfectly level (check with a level), then screw the legs in all the way - the shorter the height of the legs, the less conditions for vibration.
If the machine is installed in the bathroom, then the floor there is already concrete, and you don’t need to do anything. The only obstacle is the tiles on the floor. The machine can slide on it when working, so you just need to place a rubber mat under it.
If this is not done, then after a while you will see that the tiles under the machine will begin to crack and break into small pieces.
Is it necessary to remove the panel?
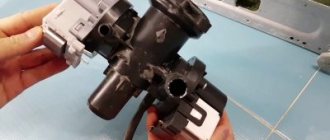
Replacing the control board is easy. The difficulty lies in another point - sometimes the problem lies in a completely different place in the washing machine. So, another element of the system, a UBL or a pump, may break, creating the appearance of damage to the electronics. As a result, the new module does not fix the problem, money is wasted, and the machine will still need repairs.
In order not to blame the board in vain, it is necessary to diagnose the defect that has appeared. Ideally, in case of any malfunction, the machine should be thoroughly checked, leaving the control module until the last moment. Only if other components and mechanisms prove to be operational, can you remove the dashboard and inspect the electronics.
The second option is to suspect problems with the board based on characteristic “symptoms”. A washing machine with a broken control board radically changes its “behavior,” revealing the electronic nature of the cause of the failure. You just need to recognize the signals and identify them.
- The washing machine does not spin, and after the rinse is completed, the dashboard freezes - it does not respond to user commands and does not display an error code on the display.
- The LEDs on the dashboard flash randomly. Despite the current supplied to the board, the program cannot be started - the machine does not respond to button presses.
- After starting the cycle, the machine does not fill with water or immediately starts draining. As a result, the equipment freezes “tightly”: all that remains is to reboot the system. In this case, after rebooting, the machine washes normally.
- Regardless of the type of program, the machine washes for 3-4 hours without stopping, without switching to rinsing and spinning. The drain pump does not start, and the system simply freezes over time.
- After connecting the machine to the network, it is not possible to set the washing mode: the system freezes and immediately turns off.
- The program starts, information about the mode is displayed on the screen, the timer starts counting, but the washer is silent. Water does not pour, the drum does not rotate - nothing happens.
- The engine operates strangely: it suddenly changes speed when it is not required by the program. The opposite option is also possible, in which the drum rotates for a long time in one direction.
- Problems arise with heating: the heating element either overheats the water or leaves it cold. Thermistor readings and program settings do not play a role in this case - everything happens in a chaotic manner.
Before replacing the control board, you need to make sure that it is faulty - conduct a comprehensive diagnostic of the washing machine.
It is worth understanding that the listed signs only hint at a possible module malfunction. However, similar failures can also be caused by malfunctions of other elements and mechanisms of the washing machine. To make sure that the control board is broken, it is recommended to first run an autotest of the system, and then do manual diagnostics of the machine.
Launching an autotest occurs in different ways - it all depends on the brand and model of the washing machine. It is enough to carefully study the relevant section of the instructions and follow the algorithm given in it. For example, on an Ardo washing machine, autotesting is activated as follows:
- connect the washing machine to the network;
- scroll the programmer to a strictly vertical position so that the arrow points down;
- set the temperature to zero;
- make sure that the drum is empty (there is no water or things in it);
- close the hatch door;
- Simultaneously press all the buttons on the washing machine’s dashboard (this activates the autotest);
- wait for the system mode to complete;
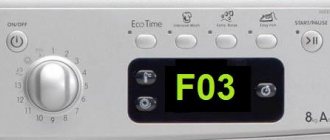
- look at the display - an error code will appear on it (the explanation of the combinations is given in the factory instructions).
Modern washing machines have a self-diagnosis system, which is launched automatically or manually through a special button on the dashboard.
Not all washing machines have an autotest mode. Modern machines instead provide a built-in diagnostic system that operates constantly. If a problem occurs, self-diagnosis automatically records the failure and displays the corresponding error code on the display. It's another matter if the machine is equipped with an asynchronous motor. Self-testing is impossible with such equipment - only a “manual” check performed by the user.
It is recommended to check the autotest result during manual diagnostics. It is advisable to sequentially run multimeters on all suspicious components and elements of the system, and last but not least, on the board itself. It will take a lot of time to check one by one, but you can be 100% sure of the cause of the malfunction.
Interesting:
- Miele dishwasher errors
- Is it possible to repair the control board yourself?
- The drum does not spin in a Siemens washing machine
- How to change the control module of a washing machine
- Whirlpool washing machine errors without display
- How to connect a Bosch dishwasher yourself
Reader comments
- Share your opinion - leave a comment
Replacing light bulbs
To change the lights on the tidy, you first need to remove it.
How to do this is indicated above. After dismantling it will need to be disassembled. This is done by snapping out the terminals. The result should look like this.
The photo above shows the location of the light bulbs mounted in the car's dashboard. After disassembly, you need to unscrew the illuminator along with the socket and install a new element in its place.
There are only two types of light bulbs used on the car panel.
- Direct lighting – AMN 12-3-1. Modern standard T3W.
- Indicators A12-1.2 or, in a new way, W1.2.
Wood floor refinishing options
There are two ways to properly remodel a floor to accommodate a washing machine.
— Concrete screed.
You will need to make a concrete screed under the wooden floor. This design will create a reliable foundation for the smooth operation of any washing machine. What is the manufacturing process:
- We decide on the final location, mark places on the floor and wall. The markings are made with an increase in the original dimensions by a dozen centimeters.
- We remove the boards.
- We make formwork.
- It would be good to weld a mesh of reinforcement, which will allow it to last for a long time.
- Pour the concrete solution and make it even.
- We are waiting for it to harden.
- Restoring a wooden floor.
- Installs a household device.
— Concrete slab.
This method involves taking into account certain aspects that subsequently affect the operation of the washing machine.
- We concrete the steel pipes under the floor so that they can be seen from the holes made in the wooden floor. Accurate vertical position is important. A concrete slab weighing at least one hundred kilograms is laid on top.
- Fastening the slab to the pipes is at your discretion. The main thing is that they sit deep in the ground and are concreted. This design is a reliable option for high-quality washing without harm to the unit.
— On top of the floor is made of wood.
This option is applicable when the floor cannot be dismantled.
- Before installation, we check the floor for strength, strengthen the boards that are loose. We test the floor for durability so that vibration does not occur during washing. Otherwise, the wooden floor will break and the machine will be damaged.
- We mark the dimensions of a household device.
- We drill holes along the marking perimeter and place small sections of steel pipes. It is important that the pipes must be located at the same level.
- We install the machine.
Bottom of front panel
Please note that at the bottom of the front panel there is a metal cover, on the right side of which there is a hatch, which provides access to the filter and pump of the device. The front panel fasteners are located under this cover, so it will have to be removed.
Under the hatch you will find a few screws that need to be removed, after which the cover can be removed with a little force and perhaps the help of a flathead screwdriver. Pry the bottom part with a screwdriver, this will release it from the fasteners, after which you can easily remove it.
How does rust appear?
The main reason for rust is the destruction of the protective layer of the housing, drum or tank. Destruction of the layer can occur due to physical or chemical effects on the surface of the parts. In addition to corrosion, on the surface of the drum, tank, and powder compartments, rust may appear in the form of a coating consisting of calcium and iron salts. But the main thing is that, no matter what the reason for the rust, it will not be possible to wash the clothes in such a washing machine until it is removed.
Helpful information
Tips that will be useful when removing the front panel of an LG washing machine:
You cannot begin to disassemble household appliances if they are plugged into the network. This may result in electric shock.- If a screwdriver is used to pry up individual elements, you must act carefully so as not to scratch elements located in a visible place.
- When disassembling the machine, you need to pay attention to the bolts that are twisted from different elements. In order not to confuse the screws and the parts that they fix, they need to be placed in matchboxes, making appropriate notes on them.
- If traces of rust, dust or other contaminants are found on the removed parts, they must be removed before reassembling. Very often, corrosion can be found on the top cover of a top-loading machine.
Signs of rust inside the machine
In addition to the appearance of characteristic brown spots on washed items, there are other signs by which you can determine that the washing machine, albeit slowly, is rusting from the inside.
- The appearance of rusty smudges on the plastic panel of the washing machine, the compartment for powders and gels, and the tray.
- The appearance of rusty stripes and stains on the cuff.
- Red stripes and spots on the drum.
One of the first signs of destruction of the machine from the inside is the appearance of an unpleasant odor. This occurs because debris accumulates inside the washing machine, which prevents excess moisture and detergents from being removed from it. As a result, an aggressive environment is formed inside the device, which leads to the oxidation of internal iron elements. If the drum is not made from a solid sheet of stainless steel, but only has a stainless coating, then if it is damaged, traces of corrosion may appear.
Lid
To release the top cover of the machine from the grooves, first unscrew the two screws that secure it to the back wall. Depending on the model, the screws may have a Phillips head or an asterisk, so to unscrew them you will need a different tool, a Phillips screwdriver or an asterisk wrench. After the fasteners are removed, you need to pull the cover towards you and lift it up, then simply move it to the side.
Preparation
Before you begin your main activity, you need to prepare your tools. To complete the work you will need:
- pliers;
- crosshead screwdriver;
- star screwdriver.
Steps to take before you begin removing the front panel of your LG washing machine:
- Disconnect the device from the network.
- Shut off the water supply hose.
- Remove the drain hose from the sewer and drain any remaining water, if any.
- Move the washing machine away from the wall and other interior items that may interfere with operation.
You should make sure that you always have a rag at hand, since leaks are possible when disassembling the equipment.
Why remove the top part of the front wall?
By removing the cover and the upper part of the wall, the repairman gains access to the control module, pipes and wires for:
- diagnosing and solving problems with starting the device;
- eliminating leaks and short circuits when pipes break;
- dismantling the lower part of the front panel when replacing the drum bearings, the container itself, and fasteners;
- complete disposal of the device.
The techniques used to remove the panel of an LG direct drive washing machine are not fundamentally different from the disassembly of representatives of other companies: Samsung, Indesit, Bosch and even Atlant.
The similarity of the layout of all these devices:
- The top cover on almost all washing machines is attached to the body with two screws from the back.
- Most of the fasteners are hidden under the front of the powder container.
- The plane with the program module is fixed with self-tapping screws on the upper mounting corners, one on the left and one on the right.
- The wires leading to the block are disconnected at the connectors.
Removing the cover
How is withdrawal made?
The disassembly rules are as follows:
- Before removing the top front panel from a washing machine, for example, Indesit with front loading, you need to remove the top cover and pull out the powder tray.
- To completely remove it from the grooves, you should press the “tongue” of the central latch between the detergent grooves (or simply move it down) and pull it towards you.
- Next, unscrew and remove the screws hidden under the top cover on the right and left.
- Remove the fasteners holding the container cavity and the front wall with buttons and indication: slightly lift this plane and pull it towards you.
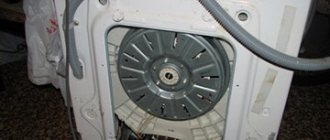
Washing machine without top panel
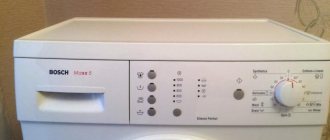
When removing the control unit from the body of the Bosch device, you need to follow the same sequence. On the Bosch model of the “Classic 5” series, the cover is additionally fixed on its right side with an asterisk screw.
There are many wires leading to the control module, which should be disconnected only after fixing their accessories on a paper diagram or photographing them using a phone.
Star screwdriver
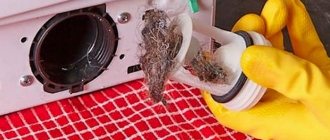
Complex types of pollution
It is not always possible to get rid of rust stains on clothes using the above method. If the washing machine has been used for a long time, but is rarely cleaned, and the operating instructions are not followed, then over time a lot of debris can accumulate inside it. Debris clogs the filter and outlet valve. As a result, the water slowly seeps out, and debris, including rust flakes, remains inside. You will have to clean the filter, tank, valve and cuff from dirt and debris. They can only be removed by disassembling the washing machine.